制作環境
Windows 10
Laravel : 6.18.35
Laravel/ui : 1.0
Laravel-mix : 5.0.1
Bootstrap : 4.0.0
axios : 0.19
Vue : 2.5.17
XAMPP
PHP : 7.4.3
Visual Studio Code
はじめに
この記事はプログラミングをはじめたばかりの素人が、できたことをメモするのに利用しています。
内容には誤りがあるかもしれません。
関連記事
Laravel 6.x 非同期通信(Ajax) 【JavaScript】 【jQuery】 【axios】 【Vue.js】 各記述方法 ~JavaScript編~
Laravel 6.x 非同期通信(Ajax) 【JavaScript】 【jQuery】 【axios】 【Vue.js】 各記述方法 ~jQuery編~
Laravel 6.x 非同期通信(Ajax) 【JavaScript】 【jQuery】 【axios】 【Vue.js】 各記述方法 ~JavaScript × axios編~
Laravel 6.x 非同期通信(Ajax) 【JavaScript】 【jQuery】 【axios】 【Vue.js】 各記述方法 ~jQuery × axios編~
Laravel 6.x 非同期通信(Ajax) 【JavaScript】 【jQuery】 【axios】 【Vue.js】 各記述方法 ~Vue.js × axios編~
Laravel 6.x 非同期通信(Ajax) 【JavaScript】 【jQuery】 【axios】 【Vue.js】 各記述方法 ~JavaScript × FetchAPI編~
Laravel 6.x 非同期通信(Ajax) 【JavaScript】 【jQuery】 【axios】 【Vue.js】 各記述方法 ~jQuery × FetchAPI編~
作成するもの
商品の登録ができるだけの簡単なページを作成します。
その際業者コードを入力すると、非同期通信(Ajax)で仕入れ先の名前が自動で入力できるようにします。
ただし商品の登録時に業者コードが入力されていなくても、仕入れ先が手動で入力されていれば問題なく登録できるものとします。
非同期通信の記述を学ぶのが主な目的の為、最低限必要だと思う記述しかしていません。
完成イメージ
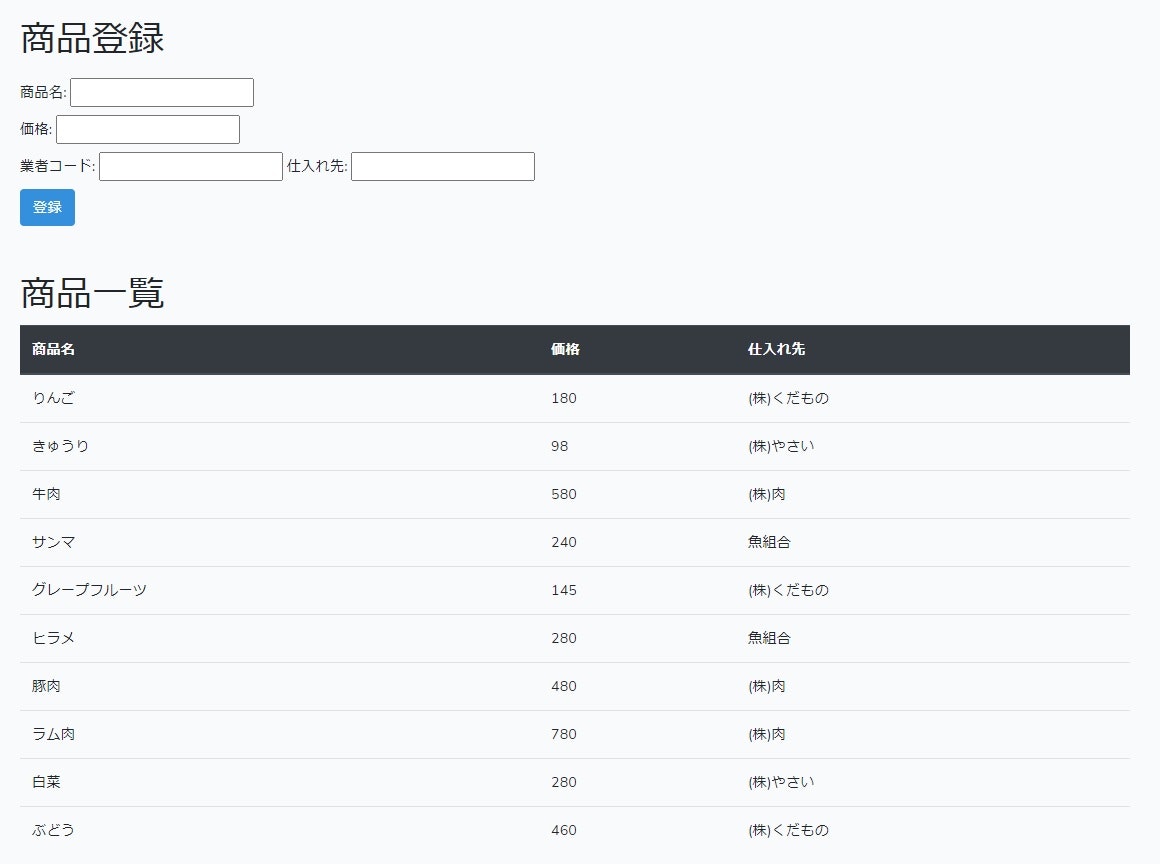
登録した商品は下に一覧で表示される。
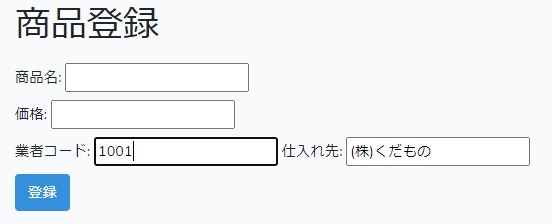
やりたい事は、業者コード(4桁)を入力すると仕入れ先が自動で反映されるようにする。
はじめる前に
当方の環境ではBootstrapとVue.jsを事前にlaravel/uiでインストールし、Laravel-mixで読み込むようにしてあります。
インストールは事前に行っておいて下さい。
CDNを利用される場合は、<script src="{{ mix('js/app.js') }}"></script>の部分をCDNで置き換えてください。
事前準備
非同期通信の処理の前に、必要なデータベースのテーブルやフォームを作成します。
※仕入れ先を新規登録するフォームの作成はしません。
また、事前準備の内容についてはあまり詳しく触れません。
データベース
データベースには以下の3つのテーブルを作成します。
items テーブル
商品用のテーブルです。
| id | name | supplier | created_at | updated_at |
|---|---|---|---|---|
| 1 | りんご | (株)くだもの | 2020-11-06 18:21:21 | 2020-11-06 18:21:21 |
| 2 | きゅうり | (株)やさい | 2020-11-06 18:21:21 | 2020-11-06 18:21:21 |
| 3 | 牛肉 | (株)肉 | 2020-11-06 18:21:21 | 2020-11-06 18:21:21 |
| 4 | サンマ | 魚組合 | 2020-11-06 18:21:21 | 2020-11-06 18:21:21 |
| 5 | グレープフルーツ | (株)くだもの | 2020-11-06 18:21:21 | 2020-11-06 18:21:21 |
| 6 | ヒラメ | 魚組合 | 2020-11-06 18:21:21 | 2020-11-06 18:21:21 |
| 7 | 豚肉 | (株)肉 | 2020-11-06 18:21:21 | 2020-11-06 18:21:21 |
| 8 | ラム肉 | (株)肉 | 2020-11-06 18:21:21 | 2020-11-06 18:21:21 |
| 9 | 白菜 | (株)やさい | 2020-11-06 18:21:21 | 2020-11-06 18:21:21 |
prices テーブル
価格のテーブル
| id | item_id | price | created_at | updated_at |
|---|---|---|---|---|
| 1 | 1 | 180 | 2020-11-06 18:21:21 | 2020-11-06 18:21:21 |
| 2 | 2 | 98 | 2020-11-06 18:21:21 | 2020-11-06 18:21:21 |
| 3 | 3 | 580 | 2020-11-06 18:21:21 | 2020-11-06 18:21:21 |
| 4 | 4 | 240 | 2020-11-06 18:21:21 | 2020-11-06 18:21:21 |
| 5 | 5 | 145 | 2020-11-06 18:21:21 | 2020-11-06 18:21:21 |
| 6 | 6 | 280 | 2020-11-06 18:21:21 | 2020-11-06 18:21:21 |
| 7 | 7 | 480 | 2020-11-06 18:21:21 | 2020-11-06 18:21:21 |
| 8 | 8 | 780 | 2020-11-06 18:21:21 | 2020-11-06 18:21:21 |
| 9 | 9 | 280 | 2020-11-06 18:21:21 | 2020-11-06 18:21:21 |
traders テーブル
仕入れ先業者のテーブルです。
| id | trader_code | trader_name | created_at | updated_at |
|---|---|---|---|---|
| 1 | 1001 | (株)くだもの | 2020-11-06 18:21:21 | 2020-11-06 18:21:21 |
| 2 | 1002 | (株)やさい | 2020-11-06 18:21:21 | 2020-11-06 18:21:21 |
| 3 | 1003 | (株)肉 | 2020-11-06 18:21:21 | 2020-11-06 18:21:21 |
| 4 | 1004 | 魚組合 | 2020-11-06 18:21:21 | 2020-11-06 18:21:21 |
itemsとpricesは1対1の関係なので、本来1つにまとめればいいと思いますが、練習の為に1対1のままにしてあります。
マイグレーションファイルの作成
プロジェクトのディレクトリでターミナルを起動し、以下を実行してください。
php artisan make:migration create_items_table
続けて、
php artisan make:migration create_prices_table
続けて、
php artisan make:migration create_traders_table
完了後、database>migrations内のxxxx_xx_xxx_xxxxxx_create_items_table.phpを開き、以下のように編集します。
    public function up()
    {
        Schema::create('items', function (Blueprint $table) {
            $table->bigIncrements('id');
            $table->string('name')->comment('商品名');
            $table->string('supplier')->comment('仕入れ先');
            $table->timestamps();
        });
    }
次に同じディレクトリ内のxxxx_xx_xxx_xxxxxx_create_prices_table.phpを開き、以下のように編集します。
    public function up()
    {
        Schema::create('prices', function (Blueprint $table) {
            $table->bigIncrements('id');
            $table->unsignedBigInteger('item_id')->comment('商品ID');
            $table->foreign('item_id')->references('id')->on('items')->onDelete('cascade');
            $table->unsignedBigInteger('price')->comment('価格');
            $table->timestamps();
        });
    }
次に同じディレクトリ内のxxxx_xx_xxx_xxxxxx_create_traders_table.phpを開き、以下のように編集します。
    public function up()
    {
        Schema::create('traders', function (Blueprint $table) {
            $table->bigIncrements('id');
            $table->unsignedBigInteger('trader_code')->unique()->index()->comment('業者コード');
            $table->string('trader_name')->comment('業者名');
            $table->timestamps();
        });
    }
モデルの作成
ターミナルを起動し、以下を実行してください。
php artisan make:model Models/Item
※モデルはModelsフォルダの中に作成するようにしています。
続けて、
php artisan make:model Models/Price
続けて、
php artisan make:model Models/Trader
完了後、app>Models内のItem.phpを開き以下のように編集します。
use Illuminate\Database\Eloquent\Relations\HasOne;

class Item extends Model
{
    protected $fillable = ['name', 'supplier'];

    public function price(): HasOne
    {
        return $this->hasOne('App\Models\price');
    }
}
次にPrice.phpを開き以下のように編集します。
use Illuminate\Database\Eloquent\Relations\BelongsTo;

class Price extends Model
{
    protected $fillable = ['price'];


    public function item(): BelongsTo
    {
        return $this->belongsTo('App\Models\item')->withTimestamps();
    }
}
次にTrader.phpを開き以下のように編集します。
class Trader extends Model
{
    protected $fillable = ['trader_name', 'trader_code'];
}
ビューの作成
resources>views内に新しくindex.blade.phpを作成し、内容を以下のように編集します。
<!DOCTYPE html>
<html lang="ja">
<head>
    <meta charset="UTF-8">
    <meta name="viewport" content="width=device-width, initial-scale=1.0">
    <meta http-equiv="X-UA-Compatible" content="ie=edge">
    <meta name="csrf-token" content="{{ csrf_token() }}">
    <link rel="stylesheet" href="{{ mix('css/app.css') }}">
    <title>テスト</title>
</head>
<body>

    <div id="app">
        <div class="container">

            <h1 class="mt-5 mb-3">商品登録</h1>

            @if (session('success'))
                <p class="text-primary">{{ session('success') }}</p>
            @endif

            @if (count($errors) > 0)
                <div>
                    <ul>
                        @foreach ($errors->all() as $error)
                            <li class="text-danger">{{ $error }}</li>
                        @endforeach
                    </ul>
                </div>
            @endif

            <form action="/form" method="post">
                @csrf
                <div>
                    <label>商品名: <input type="text" name="name"></label>
                </div>

                <div>
                    <label>価格: <input type="text" name="price"></label>
                </div>

                <div>
                    <label>業者コード: <input type="text" id="code"></label>
                    <label>仕入れ先: <input type="text" id="supplier" name="supplier"></label>
                </div>

                <button class="btn btn-primary" type="submit">登録</button>

            </form>

            <h1 class="mt-5">商品一覧</h1>

            <table class="table">

                <thead class="thead-dark">
                    <tr>
                        <th scope="col">商品名</th>
                        <th scope="col">価格</th>
                        <th scope="col">仕入れ先</th>
                    </tr>
                </thead>

                <tbody>
                    @foreach ($itemTable as $item)
                    <tr>
                        <td>{{ $item->name }}</td>
                        <td>{{ $item->price->price }}</td>
                        <td>{{ $item->supplier }}</td>
                    </tr>
                    @endforeach
                </tbody>

            </table>

        </div>
    </div>
    <script src="{{ mix('js/app.js') }}"></script>

</body>
</html>
コントローラの作成
ターミナルで以下を実行してください。
php artisan make:cotroller FormController
完了後、app>Http>Controllers内のFormController.phpを開き、以下のように編集します。
use App\Models\Item;
use App\Models\Trader;
use App\Http\Requests\TestFormRequest;
use DB;

class FormController extends Controller
{
    public function index()
    {
        $itemTable = Item::with('price')->get();
        return view('index', compact('itemTable'));
    }

    public function post(TestFormRequest $request)
    {
        DB::transaction(function () use ($request) {

            $form = $request->all();
            unset($form['_token']);

            $itemTable = new Item;
            $itemTable->fill($form)->save();

            $priceData = ['price' => $form['price']];

            $itemTable->price()->create($priceData);
        });

        return redirect('/form')->with('success', '★★商品を登録しました★★');
    }
}
コントローラの記述について(2020/12/05追記)
コントローラの以下の記述ですが、
$itemTable = Item::with('price')->get();
->get()を->first()とした方が、スクリプトの記述を少しだけシンプルに書くことができます。
変更後
$itemTable = Item::with('price')->first();
記述を上記に変更することで、スクリプトの指定の記述を以下のように変更することができます。
変更部分
data[0].trader_name
変更後
data.trader_name
[0]がいらなくなります。
->get()と->first()の違い
->get()だと複数の値を取得することを想定しているため、たとえ1つのレコードのデータを取得したい場合でも、複数のデータ取得と同じ形でデータが取得されます。
イメージ
取得されるデータが複数(かなり簡易的に記述してます)
[0] => {取得されたデータ}
[1] => {取得されたデータ}
[2] => {取得されたデータ}
[3] => {取得されたデータ}
取得されるデータが1つ
[0] => {取得されたデータ}
この様に[0]番目(1番目)に取得されたデータ、[1]番目(2番目)に取得されたデータと個別に分かれる形になり、1レコードのデータを取得する際は何番目([])のデータなのかを指定するか、foreach等で1レコード単位で抜き出す必要があります。
これは例え1レコード分のデータでも同じです。
その為valueに値を代入する際に、[0]番目の値を代入するように指定してます。
->first()だと抜き出した最初の値だけを取得するので、1レコードのデータを取得したらそこで終了、つまり最初から1つしか取得しないので、[]番目に取得されたデータという指定が必要ありません。
イメージ
取得されるデータは最初から1つ(かなり簡易的に記述してます)
{取得されたデータ}
1レコードのデータを取得する際は->first()で取得する方がいいです。
フォームリクエストの作成
バリデーションの為にフォームリクエストを作成します。
ターミナルで以下を実行してください。
php artisan make:request TestFormRequest
完了後、app>Http>Requests内のTestFormRequest.phpを開き、以下のように記述します。
class TestFormRequest extends FormRequest
{
    /**
     * Determine if the user is authorized to make this request.
     *
     * @return bool
     */
    public function authorize()
    {
        return true;
    }

    /**
     * Get the validation rules that apply to the request.
     *
     * @return array
     */
    public function rules()
    {
        return [
            'name'     => 'required',
            'price'    => 'required|integer|regex:/^[\d]+$/',
            'supplier' => 'required',
        ];
    }

    public function messages()
    {
        return [
            'name.required'  => ':attributeは必ず入力してください。',
            'price.required' => ':attributeは必ず入力してください。',
            'price.integer'  => ':attributeは整数を入力してください。',
            'price.regex'    => ':attributeは整数を入力してください。',
            'supplier'       => ':attributeは必ず入力してください。',
        ];
    }

    public function attributes()
    {
        return [
            'name'     => '商品名',
            'price'    => '価格',
            'supplier' => '仕入れ先',
        ];
    }
}
ルーティングの作成
routes内のweb.phpを開き、以下のように記述します。
Route::get('/form', 'FormController@index')->name('index');
Route::post('/form', 'FormController@post')->name('post');
確認
/formにアクセスし、商品が登録できるかやってみてください。
商品が登録され、下の一覧に表示されればOKです。
まだ仕入れ先の自動入力は実装していないので、仕入れ先は手動で入力してください。
また、仕入れ先を4桁(1001)で直接登録しておいてください。
次回につづく・・・