実務1年目駆け出しエンジニアがLaravel&ReactでWebアプリケーション開発に挑戦してみた!(その26)
0. 初めに
本シリーズでは、見習いエンジニアの僕が一からWebアプリケーションを開発する過程をお届けしています!
前回からいよいよ各ページを作り始めました。
前回は、ホームページを作成しましたね!
今回は、ホームページで検索した結果のページを作りたいと思います!
1. ブランチ運用
いつも通り、developブランチを最新化して、新規ブランチを切って作業しましょう。
ブランチ名は、feature/frontend/search-result-pageとかにしますかね!
2. 画面デザイン
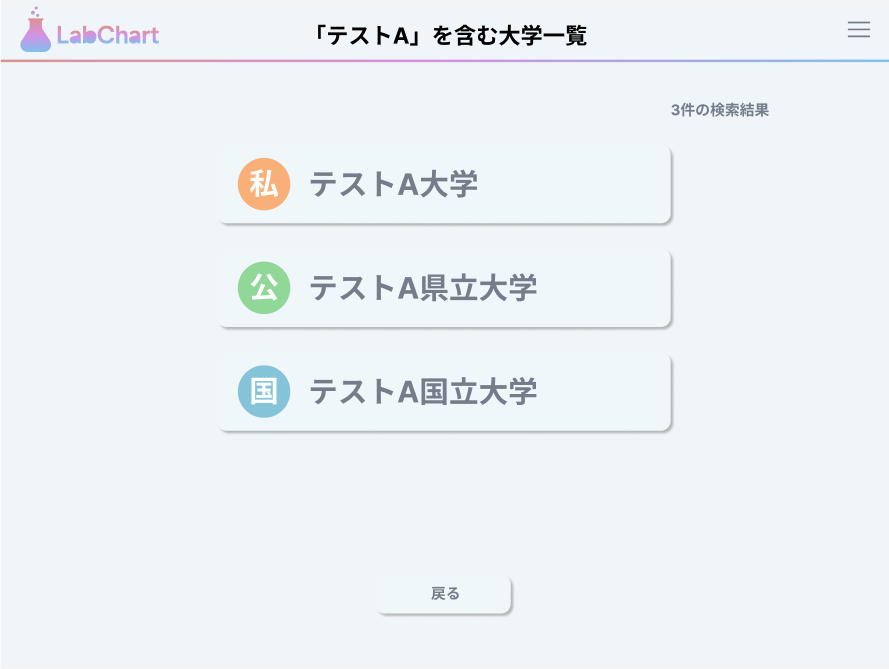
毎度おなじみの完成のイメージ図の共有です!
前回作ったホームページの検索バーに検索したい大学名を入力して、検索ボタンを押すと、以下のような感じで検索結果の一覧と戻るボタンを表示するようにしたいと思います!
ちなみに、検索結果が一つもヒットしない場合は、以下のようにメッセージと戻るボタンを表示するようにしたいです。

今日これから作る画面をイメージはできましたか?
3. 修正: テーブル定義
フロントエンド編で、まさかのテーブル定義修正!!
ま、まぁ、ア、アジャイル開発ならよくあることっすよ...!!('◇')ゞ
何を修正するのかは、画面デザインを見たら察した方もいらっしゃるかと思います。
大学名の横に「国」とか「私」とかの区分が用意されています。
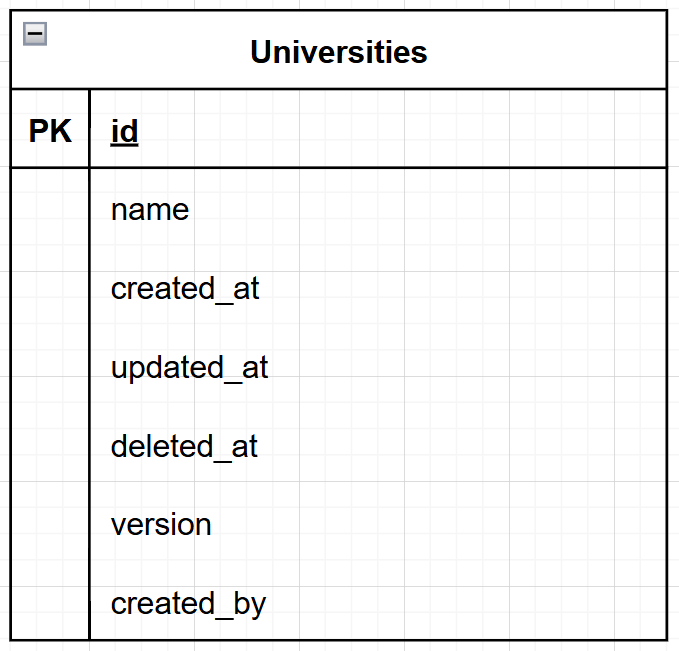
現在のテーブル定義ですと、主キーの他には大学名しかないため、このような表示はできません。
現在のUniversitiesテーブル定義
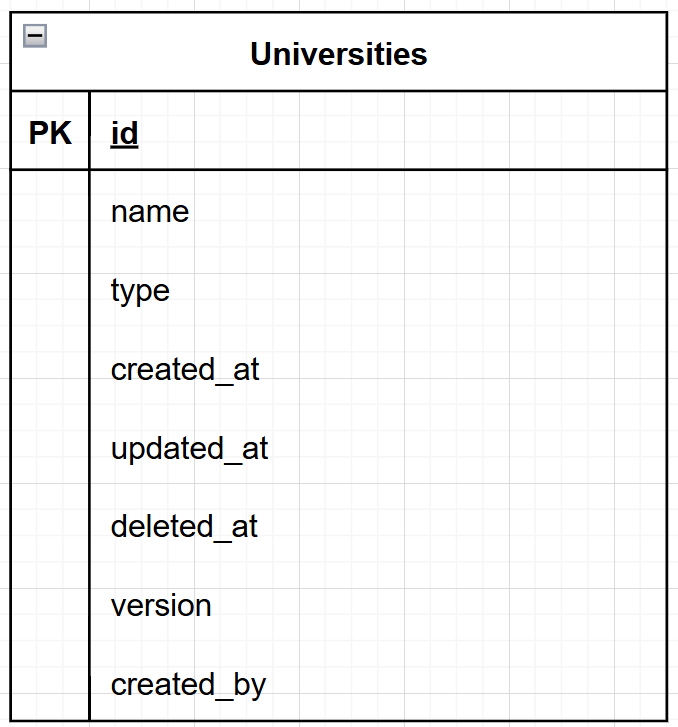
そのため、以下のようにその大学の区分を表すtypeカラムを追加します。
修正後のUniversitiesテーブル定義
4. マイグレーション修正
テーブル定義の修正によって、マイグレーションファイルを修正する必要があります。
<?php

use Illuminate\Database\Migrations\Migration;
use Illuminate\Database\Schema\Blueprint;
use Illuminate\Support\Facades\Schema;

return new class extends Migration
{
    /**
     * Run the migrations.
     */
    public function up(): void
    {
        Schema::create('universities', function (Blueprint $table) {
            $table->id();
            $table->string('name')->unique();
            $table->enum('type', ['national', 'public', 'private']); // 追加
            $table->timestamps();
            $table->softDeletes();
            $table->unsignedBigInteger('version')->default(1);
        });
    }

    /**
     * Reverse the migrations.
     */
    public function down(): void
    {
        Schema::dropIfExists('universities');
    }
};
いや~、このファイル作ったの5月か~。懐かしいっすね。(*´ω`)
5. モデル修正
モデルにも影響が出ますので、修正しましょう。
<?php

namespace App\Models;

use Illuminate\Database\Eloquent\Model;
use Illuminate\Database\Eloquent\SoftDeletes;

class University extends Model
{
    use SoftDeletes; // 論理削除

    protected $fillable = [
        'name',
        'type', // 追加
    ];

    protected static function boot()
    {
        parent::boot();

        static::deleting(function ($university) {
            // 論理削除時に関連する学部も論理削除
            $university->faculties()->get()->each->delete();
        });
    }

    // リレーションの定義
    // ユーザーとのリレーション(多対多)
    // 中間テーブル名を明示的に指定
    public function users()
    {
        return $this->belongsToMany(User::class, 'university_edit_histories')->withTimestamps();
    }

    // 学部とのリレーション(一対多)
    public function faculties()
    {
        return $this->hasMany(Faculty::class);
    }

    // 削除依頼とのポリモーフィックリレーション(一対多)
    public function deletionRequests()
    {
        return $this->morphMany(DeletionRequest::class, 'target');
    }

    // 作成者とのリレーション(多対一)
    public function creator()
    {
        return $this->belongsTo(User::class, 'created_by');
    }
}
こちらももはや懐かしのファイルです。
業務では最近フロントエンドを担当させていただくことがほとんどなので、PHPのファイルを見ること自体が懐かしいですw
6. シーディング修正
当然、影響はシーディングにも及びますね。
ついでに、テストデータを増やしておきました。
<?php

namespace Database\Seeders;

use App\Models\University;
use App\Models\User;
use Illuminate\Database\Console\Seeds\WithoutModelEvents;
use Illuminate\Database\Seeder;

class UniversitySeeder extends Seeder
{
    /**
     * Run the database seeds.
     */
    public function run(): void
    {
        //  作成者を管理者に設定
        $adminId = User::where('email', 'admin@example.com')->value('id')
            ?? User::first()->id; // 念のため、管理者がいなければ最初のユーザーを使用
        // テストデータを修正
        University::create([
            'name' => 'テストA国立大学',
            'type' => 'national',
            'created_by' => $adminId,
        ]);

        University::create([
            'name' => 'テストB国立大学',
            'type' => 'national',
            'created_by' => $adminId,
        ]);

        University::create([
            'name' => 'テストC国立大学',
            'type' => 'national',
            'created_by' => $adminId,
        ]);

        University::create([
            'name' => 'テストD国立大学',
            'type' => 'national',
            'created_by' => $adminId,
        ]);

        University::create([
            'name' => 'テストE県立大学',
            'type' => 'public',
            'created_by' => $adminId,
        ]);

        University::create([
            'name' => 'テストF県立大学',
            'type' => 'public',
            'created_by' => $adminId,
        ]);

        University::create([
            'name' => 'テストG市立大学',
            'type' => 'public',
            'created_by' => $adminId,
        ]);

        University::create([
            'name' => 'テストH市立大学',
            'type' => 'public',
            'created_by' => $adminId,
        ]);

        University::create([
            'name' => 'テストI私立大学',
            'type' => 'private',
            'created_by' => $adminId,
        ]);

        University::create([
            'name' => 'テストJ私立大学',
            'type' => 'private',
            'created_by' => $adminId,
        ]);

        University::create([
            'name' => 'テストK私立大学',
            'type' => 'private',
            'created_by' => $adminId,
        ]);

        University::create([
            'name' => 'テストL私立大学',
            'type' => 'private',
            'created_by' => $adminId,
        ]);
    }
}
修正出来たら、以下をDockerコンテナ内で実行してください。
実行コマンド
$ php artisan migrate:fresh --seed
7. コントローラー修正
    public function index(Request $request)
    {
        $query = $request->input('query', '');

        $universities = University::query()
            ->when($query, function ($queryBuilder) use ($query) {
                $queryBuilder->where('name', 'like', '%' . $query . '%');
            })
            ->orderBy('name')
            ->paginate(10) // 10件ずつ表示に変更
            ->withQueryString();

        return Inertia::render('University/Index', [
            'universities' => $universities,
            'query' => $query,
        ]);
    }
バックエンド編の時に、ページネーションうまくいっているかを確認するために、1ページ当たりの表示数を少なくしていました。
何件にするのがベストなのかが正直良くわからないのですが、とりあえず10件にしておきます。
動作が分かりにくい時は、適宜変えてみてください。
8. Reactコンポーネント作成
一応フロントエンド編なので、ここからが今日のメインです!
University/Indexを作成する
まずは、ページを表示する担当のコンポーネントを作成します。
既に、University/Index.jsxというファイルがありますが、こちらは一旦すべて消して、一から作り直したいと思います!!
// 最初から書き直すぜベイベー♪
まずは、必要そうなモジュールのインポートからです!
import { Head } from "@inertiajs/react";
import AppLayout from '@/Layouts/AppLayout';
import UniversityCard from '../../Components/University/UniversityCard';
import BackButton from '../../Components/Common/BackButton';
import Pagination from "../../Components/Common/Pagination";
コンポーネントたちは、この後作成していきます!
propsには、コントローラーから受け取るデータを指定します。
大学の情報が格納されているuniversities、ユーザーの検索文字列であるqueryの二つですね。
また、大学が1件以上あるかどうかで表示内容を少し変化させたいので、hasResultsという真偽値型の変数を用意しておきます。
import { Head } from "@inertiajs/react";
import AppLayout from '@/Layouts/AppLayout';
import UniversityCard from '../../Components/University/UniversityCard';
import BackButton from '../../Components/Common/BackButton';
import Pagination from "../../Components/Common/Pagination";

const Index = ({ universities, query}) => {
  const hasResults = universities.data.length > 0;
}

export default Index;
jsxの部分には、このhasResultsを三項演算子を用いて利用します。
三項演算子は、このシリーズでも何度も登場してきています。
ここまで読んでくださっているあなたなら、もうバッチのはずです!(^^♪
import { Head } from "@inertiajs/react";
import AppLayout from '@/Layouts/AppLayout';
import UniversityCard from '../../Components/University/UniversityCard';
import BackButton from '../../Components/Common/BackButton';
import Pagination from "../../Components/Common/Pagination";

const Index = ({ universities, query}) => {
  const hasResults = universities.data.length > 0;

  return (
    <AppLayout title={`「${query}」を含む大学一覧`}>
      <Head title={`「${query}」を含む大学一覧`} />

      {hasResults ? (
        // 1件以上の場合:コンテンツが少なければ戻るボタンは画面下部、多ければスクロール後に表示
        <div className="flex flex-col items-center min-h-full">
          <div className="w-full flex justify-end">
            <p className="text-[#747D8C]">{universities.total}件の検索結果</p>
          </div>
          <div className="w-full max-w-xl space-y-6 mt-8">
            {universities.data.map(university => (
              <UniversityCard key={university.id} university={university} />
            ))}
          </div>

          {/* ページネーション */}
          <Pagination paginator={universities} />

          <div className="mt-auto pt-8 pb-12">
            <BackButton routerName="home" />
          </div>
        </div>
      ) : (
        // 0件の場合:メッセージを画面中央に、戻るボタンは下部に固定
        <div className="flex flex-col items-center min-h-full">
          <div className="flex-1 flex items-center justify-center">
            <p className="text-[#747D8C]">0件の検索結果</p>
          </div>
          <div className="pt-8 pb-12">
            <BackButton routerName="home" />
          </div>
        </div>
      )}
    </AppLayout>
  )
}

export default Index;
例によって、共通レイアウトAppLayout.jsxを適用しています。
また、各コンポーネントに渡すpropsの定義は、この後しますので、今はすべて理解できなくても大丈夫ですヨ!
UniversityCardを作成する
ここからは、University/Index.jsxでインポートする各コンポーネントについて実装していきたいと思います。
まずは、検索結果の大学一つ一つを表すUniversityCardです!
import { router } from "@inertiajs/react";
import TypeBadge from "./TypeBadge";

const UniversityCard = ({ university }) => {
  return (
    <div
      className="bg-[#EEF7FB] rounded-lg shadow-md px-4 py-3 hover:shadow-lg transition-shadow cursor-pointer flex items-center gap-4"
      onClick={() => router.get(`/universities/${university.id}/faculties`)}
    >
      <TypeBadge type={university.type} className="flex-shrink-0 text-3xl" />
      <span className="text-2xl font-bold text-[#747D8C]">
        {university.name}
      </span>
    </div>
  );
}

export default UniversityCard;
例によって、Inertiaのrouterを使って、カードが検索されたときにその詳細ページに遷移できるようにしています。
また、TypeBadgeは大学の区分を表すもので、この後すぐ作成します。
TypeBadgeを作成する
次に、TypeBadgeです。
import NationalBadge from '../../Assets/icons/university/national.svg';
import PublicBadge from '../../Assets/icons/university/public.svg';
import PrivateBadge from '../../Assets/icons/university/private.svg';

const BADGE_MAP = {
  national: NationalBadge,
  public: PublicBadge,
  private: PrivateBadge,
};

const TypeBadge = ({ type }) => {
  const Icon = BADGE_MAP[type];
  return (
    <img
      src={Icon}
      alt={type}
      className='w-12 h-12 object-contain'
    />
  );
}

export default TypeBadge;
アイコンたちの画像ファイルは、以下に共有していますので、例によってダウンロードして指定のフォルダに格納してください。
BackButtonを作成する
続いて、一番下に表示する「戻るボタン」を構成するコンポーネントを作りましょう。
import { router } from "@inertiajs/react";

const BackButton = ({ routerName, params = {}}) => {
  return (
    <button
        className="px-16 py-2 bg-[#EEF7FB] text-[#747D8C] shadow-md font-bold rounded-md hover:shadow-lg transition-shadow cursor-pointer"
        onClick={() => router.get(route(routerName, params))}
      >
        戻る
    </button>
  );
}

export default BackButton;
こちらも、routerを使って、propsで受け取った遷移先にクリック時に移動できるようにしています。
このようにpropsで遷移先を渡せるようにしておくことで、他のページでもこの戻るボタンを使いまわすことができます!
Paginationを作成する
最後は、ページネーションです。
こちら、画面デザインを作っているときに、バックエンド編でページネーションを作ったことをすっかり忘れておりました。💦
以下のようにしてみましょう。
import { Link } from '@inertiajs/react';

const Pagination = ({ paginator }) => {
  const canGoPrev = paginator.current_page > 1;
  const canGoNext = paginator.current_page < paginator.last_page;

  // 1ページしかないときはそもそも出さない
  if (paginator.last_page <= 1) return null;

  return (
    <div className="mt-8 flex items-center justify-center text-sm">
      <div className="w-8 flex justify-end">
        {canGoPrev && (
          <Link
            href={paginator.prev_page_url}
            preserveScroll
            className="text-2xl text-[#747D8C] hover:text-gray-600"
          >
            ≪
          </Link>
        )}
      </div>

      <span className="mx-4 text-[#747D8C]">
        {paginator.current_page} / {paginator.last_page}
      </span>

      <div className="w-8 flex justify-start">
        {canGoNext && (
          <Link
            href={paginator.next_page_url}
            preserveScroll
            className="text-2xl text-[#747D8C] hover:text-gray-600"
          >
            ≫
          </Link>
        )}
      </div>
    </div>
  );
}

export default Pagination;
University/Index.jsxでpropsとして、paginatorにuniversitesを渡します。
これはコントローラーで加工されたページネーションオブジェクトになっています。
Laravelのページネーションについて、軽く見てみましょう。
ペジネーターからのJSONは、total、current_page、last_pageなどのメタ情報を持っています。結果レコードは、JSON配列のdataキーを介して利用できます。ルートからペジネーションインスタンスを返すことによって作成されたJSONの例を以下で紹介します。
{
   "total": 50,
   "per_page": 15,
   "current_page": 1,
   "last_page": 4,
   "first_page_url": "http://laravel.app?page=1",
   "last_page_url": "http://laravel.app?page=4",
   "next_page_url": "http://laravel.app?page=2",
   "prev_page_url": null,
   "path": "http://laravel.app",
   "from": 1,
   "to": 15,
   "data":[
        {
            // レコード…
        },
        {
            // レコード…
        }
   ]
}
current_pageは現在のページ、last_pageは最後のページですね。
JSON形式なので、JavaScriptで簡単に取得することができます。
(まあ、このシリーズではあんまりJSONとか意識していなかったので、よくわからない方はスルーで大丈夫ですw)
これらを使って、ページの移動ができるかどうかを表す変数canGoPrev, canGoNextを用意しました。
これらを三項演算子に用いることで、ページを開けるかどうかに応じて表示内容をけることができるようにしています。
preserveScrollは、InertiaのLinkに付けることで、ページを移動してもスクロールの位置を保存することができます。
これにより、ページネーションで次のページに行ったときでも(特に戻ってきたときに効果を発しますが)上からスクロールしなおさずに済みます。
詳しくは、以下をご覧ください。
動作確認をする
これにて、必要なコンポーネントがすべてそろったはずなので、動作確認をしましょう!
適当な文字列で検索をしてみましょう。
表示件数によって、レイアウトが若干変化する様子をお楽しみください。
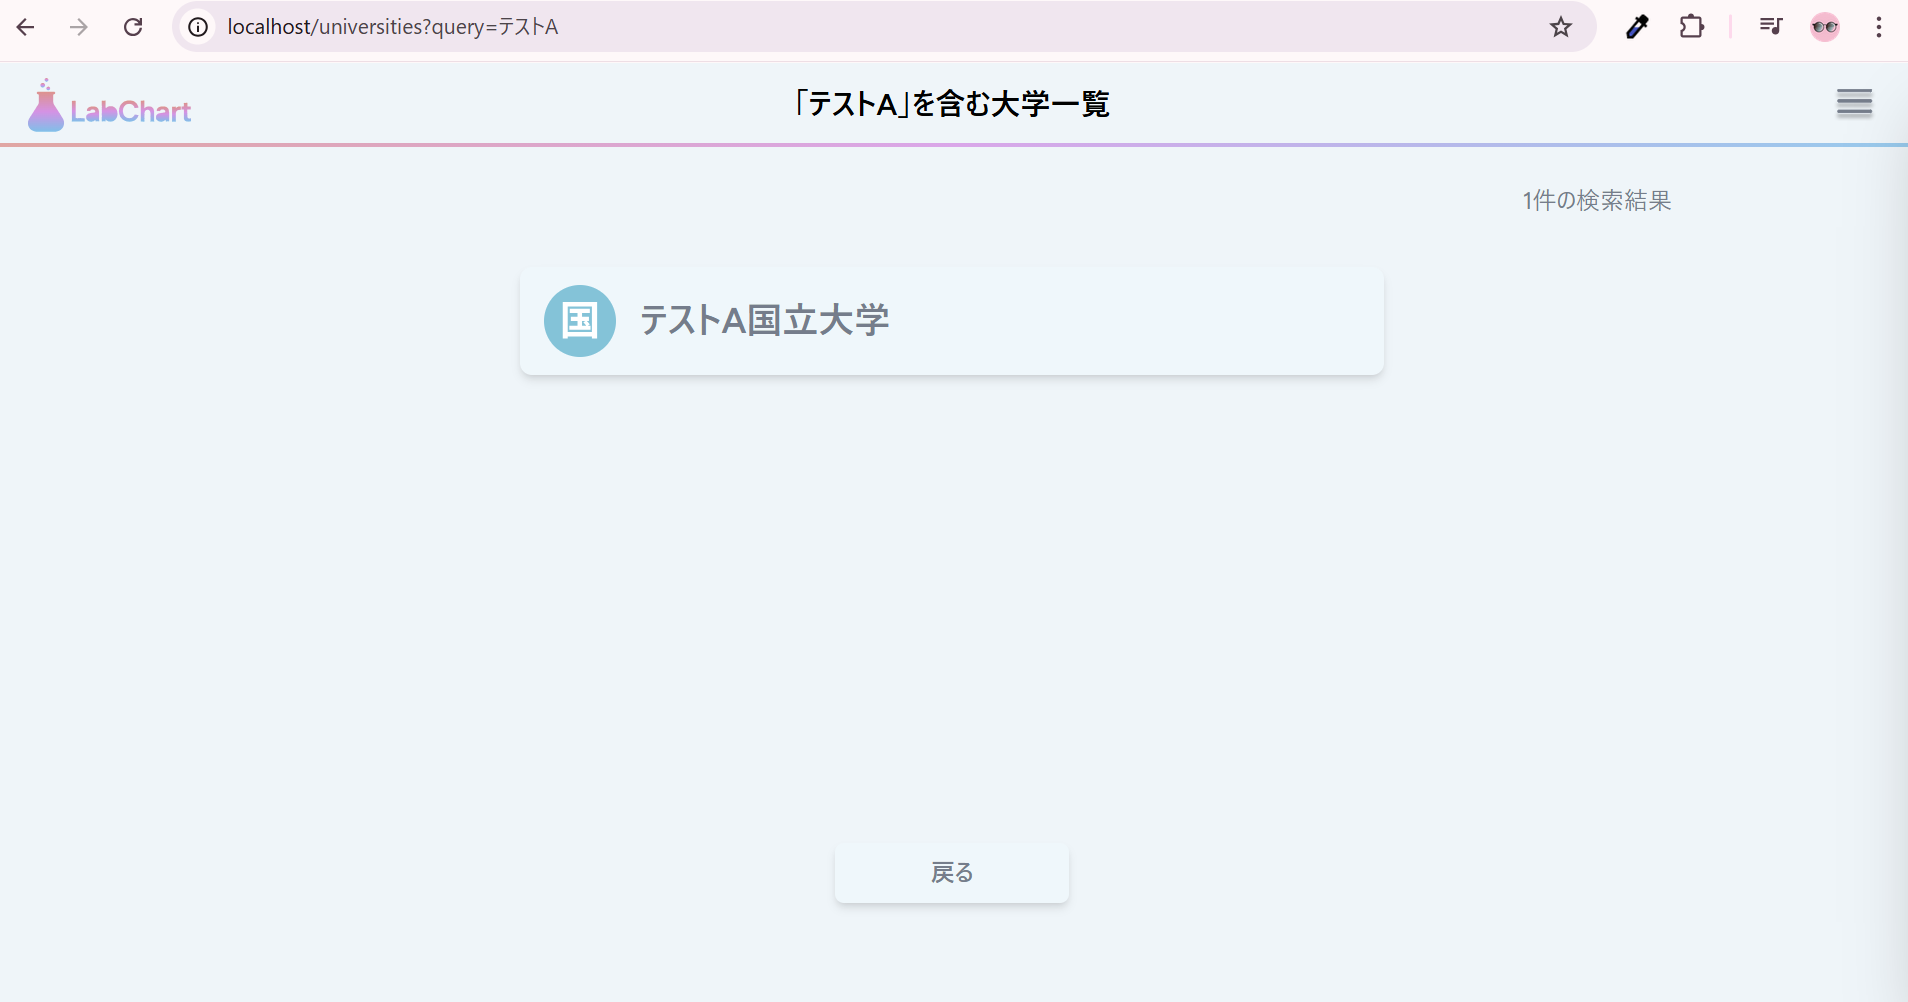
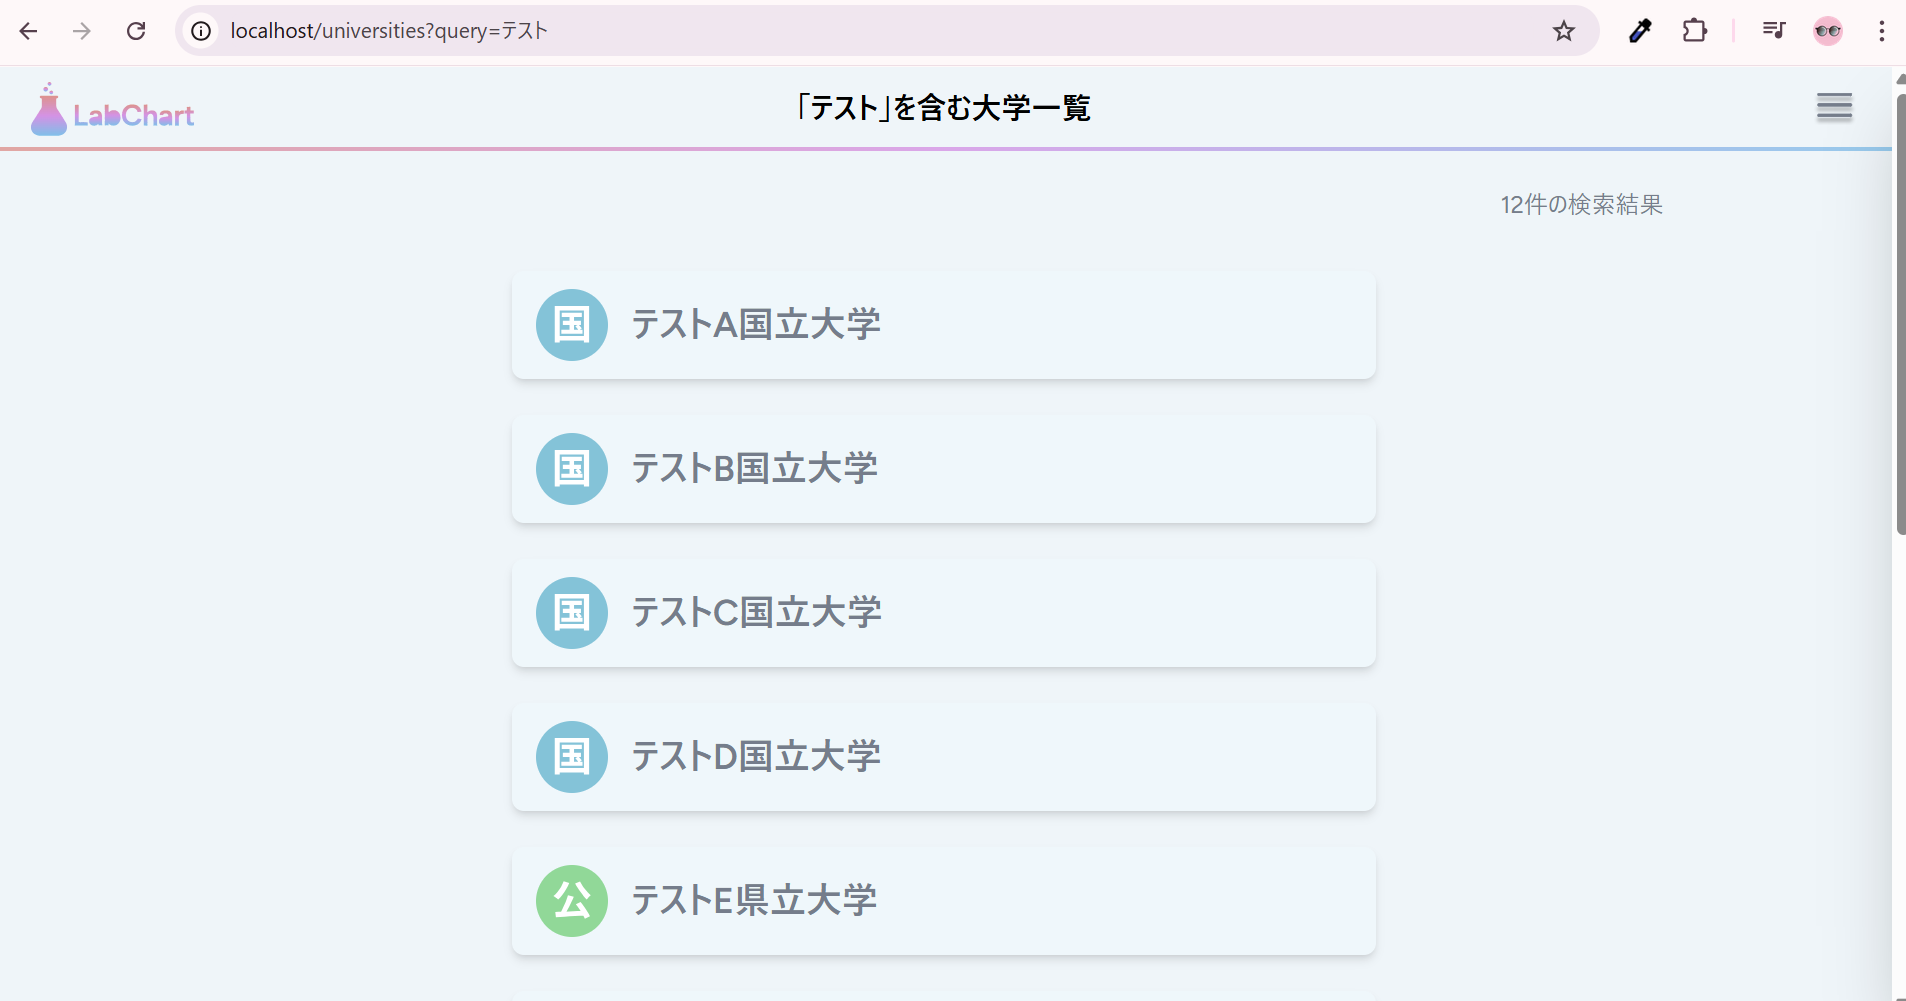
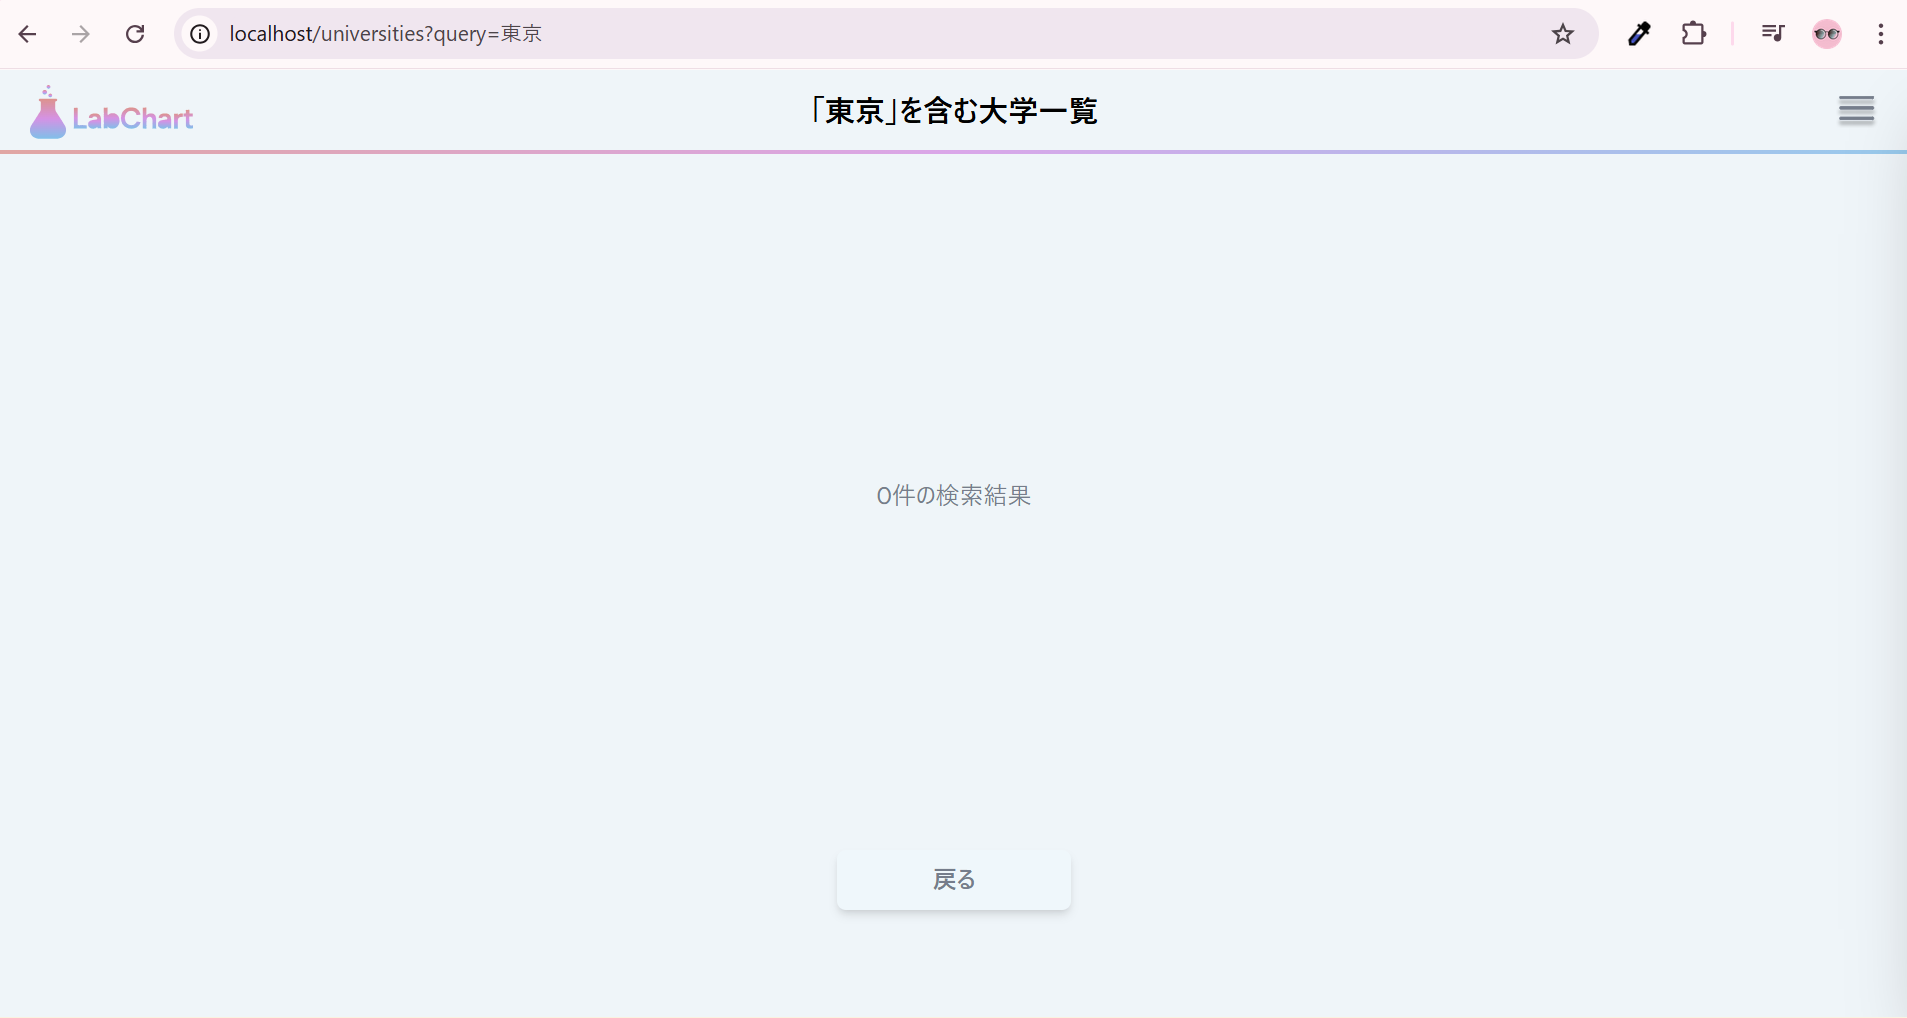
「カードをクリックして詳細ページに移動できるか」と「戻るボタンで正しく戻れるか」、「ページネーションをクリックしてページ遷移が正しくできるか」などを適宜ご確認ください。
9. (おまけその1)修正: 関数定義の書き方統一
今日の実装は完了なのですが、これまでのフロントエンド編で書き方が微妙だった箇所がいくつか見つかったので、「おまけ」ということで修正してみたいと思います。
それが、関数の定義の書き方の統一感がなかったことです。
以下の二つのファイルを比べて見てください。
どちらもこれまで作成してきたファイルです。
import { Head, usePage } from '@inertiajs/react';
import { useState, useCallback, useEffect } from 'react';
import Header from "../Components/Header";
import Sidebar from "../Components/Sidebar";
import HamburgerMenu from '@/Components/HamburgerMenu';

export default function AppLayout({ children, title, mode='default' }) {
  // ユーザーの認証状態を管理
  const { props } = usePage();
  const isLoggedIn = !!props?.auth?.user;

  // サイドバーの開閉状態を管理
  const [isSidebarOpen, setIsSidebarOpen] = useState(false);
  const setSidebarOpen = useCallback((open) => setIsSidebarOpen(Boolean(open)), []);

  // ホームページかどうか
  const isHome = mode === 'home';

  // サイドバーが開いている間は、背景のスクロールを防止
  useEffect(() => {
    if (isSidebarOpen) document.body.classList.add('overflow-hidden');
    else document.body.classList.remove('overflow-hidden');
    return () => document.body.classList.remove('overflow-hidden');
  }, [isSidebarOpen]);

  // Escキーでサイドバーを閉じる
  useEffect(() => {
    const onKey = (e) => e.key === 'Escape' && setIsSidebarOpen(false);
    window.addEventListener('keydown', onKey);
    return () => window.removeEventListener('keydown', onKey);
  }, []);

  return (
    <div className="min-h-dvh flex flex-col bg-[#EEF5F9]">
      <Head title={title} />

      {/* ホームモード: ハンバーガーアイコンのみを固定表示(サイドバー非表示時のみ) */}
      {isHome ? (
        !isSidebarOpen && (
          <div className="fixed top-4 right-6 z-50">
            <HamburgerMenu onOpenSidebar={() => setSidebarOpen(true)} />
          </div>
        )
      ) : (
        /* デフォルト: フルヘッダー表示 */
        <Header title={title} onOpenSidebar={() => setIsSidebarOpen(true)} />
      )}

      {/* メインコンテンツ領域 */}
      <main className="flex-1 bg-transparent flex">
        <div
          className="
            mx-auto
            w-full
            max-w-container
            px-[clamp(16px,4vw,32px)]
            py-6
            bg-[#EEF5F9]
            flex-1
          "
        >
          {children || <p className="text-gray-400 text-center">メインコンテンツ領域</p>}
        </div>
      </main>
      {/* サイドバー */}
      <Sidebar isOpen={isSidebarOpen} onClose={() => setSidebarOpen(false)} isLoggedIn={isLoggedIn} />
    </div>
  );
}
import { Link } from '@inertiajs/react';

const Pagination = ({ paginator }) => {
  const canGoPrev = paginator.current_page > 1;
  const canGoNext = paginator.current_page < paginator.last_page;

  // 1ページしかないときはそもそも出さない
  if (paginator.last_page <= 1) return null;

  return (
    <div className="mt-8 flex items-center justify-center text-sm">
      <div className="w-8 flex justify-end">
        {canGoPrev && (
          <Link
            href={paginator.prev_page_url}
            preserveScroll
            className="text-2xl text-[#747D8C] hover:text-gray-600"
          >
            ≪
          </Link>
        )}
      </div>

      <span className="mx-4 text-[#747D8C]">
        {paginator.current_page} / {paginator.last_page}
      </span>

      <div className="w-8 flex justify-start">
        {canGoNext && (
          <Link
            href={paginator.next_page_url}
            preserveScroll
            className="text-2xl text-[#747D8C] hover:text-gray-600"
          >
            ≫
          </Link>
        )}
      </div>
    </div>
  );
}

export default Pagination;
AppLayout.jsxは、フロントエンド編の最初で作りましたね。
こっちは、関数の定義をfunctionキーワードで書いています。
一方で、今日作ったPagination.jsxは、アロー関数で書いています。
...どっちかにそろえたほうが気分が良い気がするので、統一します。
皆さんは、どちらがおすきですか?
僕は、アロー関数に統一したいなと思った(特に深い理由はありません)ので、AppLayout.jsxの方を修正したいと思います。
修正
import { Head, usePage } from '@inertiajs/react';
import { useState, useCallback, useEffect } from 'react';
import Header from "../Components/Header";
import Sidebar from "../Components/Sidebar";
import HamburgerMenu from '@/Components/HamburgerMenu';

const AppLayout = ({ children, title, mode='default' }) => {
  // ユーザーの認証状態を管理
  const { props } = usePage();
  const isLoggedIn = !!props?.auth?.user;

  // サイドバーの開閉状態を管理
  const [isSidebarOpen, setIsSidebarOpen] = useState(false);
  const setSidebarOpen = useCallback((open) => setIsSidebarOpen(Boolean(open)), []);

  // ホームページかどうか
  const isHome = mode === 'home';

  //  サイドバーが開いている間は、背景のスクロールを防止
  useEffect(() => {
    if (isSidebarOpen) document.body.classList.add('overflow-hidden');
    else document.body.classList.remove('overflow-hidden');
    return () => document.body.classList.remove('overflow-hidden');
  }, [isSidebarOpen]);

  //  Escキーでサイドバーを閉じる
  useEffect(() => {
    const onKey = (e) => e.key === 'Escape' && setIsSidebarOpen(false);
    window.addEventListener('keydown', onKey);
    return () => window.removeEventListener('keydown', onKey);
  }, []);

  return (
    <div className="min-h-dvh flex flex-col bg-[#EEF5F9]">
      <Head title={title} />

      {/* 修正: ホームモード: ハンバーガーアイコンのみを固定表示(サイドバー非表示時のみ) */}
      {isHome ? (
        !isSidebarOpen && (
          <div className="fixed top-4 right-6 z-50">
            <HamburgerMenu onOpenSidebar={() => setSidebarOpen(true)} />
          </div>
        )
      ) : (
        /* デフォルト: フルヘッダー表示 */
        <Header title={title} onOpenSidebar={() => setIsSidebarOpen(true)} />
      )}

      {/* メインコンテンツ領域 */}
      <main className="flex-1 bg-transparent flex">
        <div
          className="
            mx-auto
            w-full
            max-w-container
            px-[clamp(16px,4vw,32px)]
            py-6
            bg-[#EEF5F9]
            flex-1
          "
        >
          {children || <p className="text-gray-400 text-center">メインコンテンツ領域</p>}
        </div>
      </main>
      {/* サイドバー */}
      <Sidebar isOpen={isSidebarOpen} onClose={() => setSidebarOpen(false)} isLoggedIn={isLoggedIn} />
    </div>
  );
}

export default AppLayout;
これに伴って、他のファイルも修正します!
import { Link } from '@inertiajs/react';
import close from '../Assets/icons/sidebar/close.svg';
import home from '../Assets/icons/sidebar/home.svg';
import mypage from '../Assets/icons/sidebar/mypage.svg';
import bookmark from '../Assets/icons/sidebar/bookmark.svg';
import ranking from '../Assets/icons/sidebar/ranking.svg';
import logout from '../Assets/icons/sidebar/logout.svg';
import login from '../Assets/icons/sidebar/login.svg';
import register from '../Assets/icons/sidebar/register.svg';

const Sidebar = ({ isOpen, onClose, isLoggedIn }) => {
  // メニュー定義
  const items = isLoggedIn
    ? [
        { label: 'ホーム', href: route('home'), icon: home },
        { label: 'マイページ', href: route('mypage.index'), icon: mypage },
        { label: 'ブックマーク', href: route('mypage.bookmarks'), icon: bookmark },
        { label: 'ランキング', href: null, icon: ranking },
        { label: 'ログアウト', href: route('logout'), method: 'post', icon: logout },
      ]
    : [
        { label: 'ホーム', href: route('home'), icon: home },
        { label: '新規登録', href: route('register'), icon: register },
        { label: 'ログイン', href: route('login'), icon: login },
        { label: 'ランキング', href: null, icon: ranking },
      ];

  return (
    <>
      <style>{`
        @keyframes text-expand {
          0% {
            letter-spacing: 0;
          }
          100% {
            letter-spacing: 0.05em;
          }
        }
        .text-expand:hover {
          animation: text-expand 0.3s ease-out forwards;
        }
      `}</style>
      {/* オーバーレイ */}
      <div
        onClick={onClose}
        className={`
          fixed inset-0 bg-black/40 transition-opacity duration-300
          ${isOpen ? 'opacity-100 pointer-events-auto' : 'opacity-0 pointer-events-none'}
        `}
        aria-hidden="true"
      />

      {/* 本体 */}
      <aside
        role="dialog"
        aria-modal="true"
        className={`
          fixed right-0 top-0 h-dvh w-[270px] max-w-[90vw] bg-[#EEF5F9] shadow-2xl
          transform transition-transform duration-300
          ${isOpen ? 'translate-x-0' : 'translate-x-full'}
          flex flex-col
        `}
      >
        {/* ヘッダー(バツ印) */}
        <div className="flex items-center justify-end px-4 h-14">
          <button
            type="button"
            onClick={onClose}
            className="p-2"
            aria-label="メニューを閉じる"
            autoFocus
          >
            <img src={close} alt="" className="h-7 w-7 hover:opacity-80 transition" />
          </button>
        </div>

        {/* リスト */}
        <nav className="p-2">
          <ul className="space-y-1">
            {items.map(it => (
              <li key={it.label}>
                {it.href ? (
                  <Link
                    href={it.href}
                    method={it.method}
                    as={it.method ? 'button' : 'a'}
                    className="
                      text-expand text-lg w-full text-left flex items-center gap-3 px-4 py-3 rounded-lg
                      hover: transition
                      text-[#747D8C] font-medium
                    "
                    onClick={onClose}
                  >
                    <img src={it.icon} alt="" className="h-8 w-8" />
                    {it.label}
                  </Link>
                ) : (
                  <span
                    className="
                      w-full text-left flex items-center gap-3 px-4 py-3 rounded-lg
                      text-gray-400 font-medium cursor-not-allowed
                    "
                  >
                    <img
                      src={it.icon}
                      alt=""
                      className={`${it.label === 'ランキング' ? 'h-8 w-8' : 'h-5 w-5'} opacity-40`}
                    />
                    {it.label}
                  </span>
                )}
              </li>
            ))}
          </ul>
        </nav>
      </aside>
    </>
  );
}

export default Sidebar;
import hamburgerIcon from '../Assets/icons/hamburger.svg';

const HamburgerMenu = ({ onOpenSidebar }) => {
  return (
    <button
      onClick={onOpenSidebar}
      className="ml-auto flex items-center"
      aria-label="メニューを開く"
    >
      <img
        src={hamburgerIcon}
        alt="メニュー"
        className="h-7 w-7 hover:opacity-80 transition"
      />
    </button>
  );
}

export default HamburgerMenu;
import searchInputIcon from '../Assets/icons/search/icon-search-input.svg';
import searchButtonIcon from '../Assets/icons/search/icon-search-button.svg';

const SearchBar = ({
  value,
  onChange,
  onSubmit,
  placeholder = '大学名を入力...',
}) => {
  const isDisabled = !value || !value.trim();

  const handleSubmit = (e) => {
    e.preventDefault();
    if (isDisabled) return;
    onSubmit?.(e);
  };

  return (
    <form
      onSubmit={handleSubmit}
      className='w-full max-w-xl mx-auto'
    >
      <div className='
        flex items-center
        rounded-lg
        bg-[#E2EDF6]
        border border-[#E2EDF6]
        shadow-[inset_0_2px_4px_rgba(0,0,0,0.15)]
        px-4 py-0
      '>
        {/* 左虫眼鏡アイコン */}
        <div className='mr-0.5 flex-shrink-0'>
          <img src={searchInputIcon} alt="" className='w-5 h-5' />
        </div>
        {/* 入力フィールド */}
        <input
          type="text"
          value={value}
          onChange={onChange}
          placeholder={placeholder}
          className="flex-grow bg-transparent border-none focus:outline-none focus:ring-0 text-black placeholder-[#747D8C]"
        />
        {/* 区切り線 + 右側の検索ボタン */}
        <div className='flex items-center'>
          <div className='
            h-6
            border-l border-[#747D8C]
            mx-3
          '></div>
          <button
            type="submit"
            disabled={isDisabled}
            className={`
              flex items-center justify-center
              w-6 h-6
              rounded-md
              focus:outline-none focus:ring-2 focus:ring-blue-500
              ${isDisabled ? 'opacity-50 cursor-not-allowed' : ''}
            `}
          >
            <img src={searchButtonIcon} alt="検索" className='w-6 h-6' />
          </button>
        </div>
      </div>
    </form>
  )
}

export default SearchBar;
import { useState } from "react";
import { router, Head } from "@inertiajs/react";
import AppLayout from "@/Layouts/AppLayout";
import logo from "../Assets/logo/Home.svg";
import SearchBar from "../Components/SearchBar";

const Home = ({ query=''}) => {
  const [search, setSearch] = useState(query || '');

  // 検索フォームを送信する関数
  const handleSubmit = e => {
    e.preventDefault();
    router.get('/universities', { query: search });
  }

  return (
    <AppLayout mode="home"> {/* ホームモードをpropsで渡す */}
      <div className="flex flex-col items-center gap-8 pt-24">

        {/* ロゴ */}
        <img src={logo} alt="App Logo" className="h-32 w-auto" />

        {/* 検索フォーム */}
        <SearchBar
          value={search}
          onChange={e => setSearch(e.target.value)}
          onSubmit={handleSubmit}
        />

        {/* 検索メッセージ */}
        <p className="text-[#747D8C]">まずは大学を検索してみましょう。</p>
      </div>
    </AppLayout>
  )
};

export default Home;
使い分けをする方もいるそうです。
以下の動画であれこれ議論されていますのでよかったらどうぞ。(笑)
https://youtu.be/yu5cGmYM0dM?si=LkkLSinwZkTyC-jG&t=47
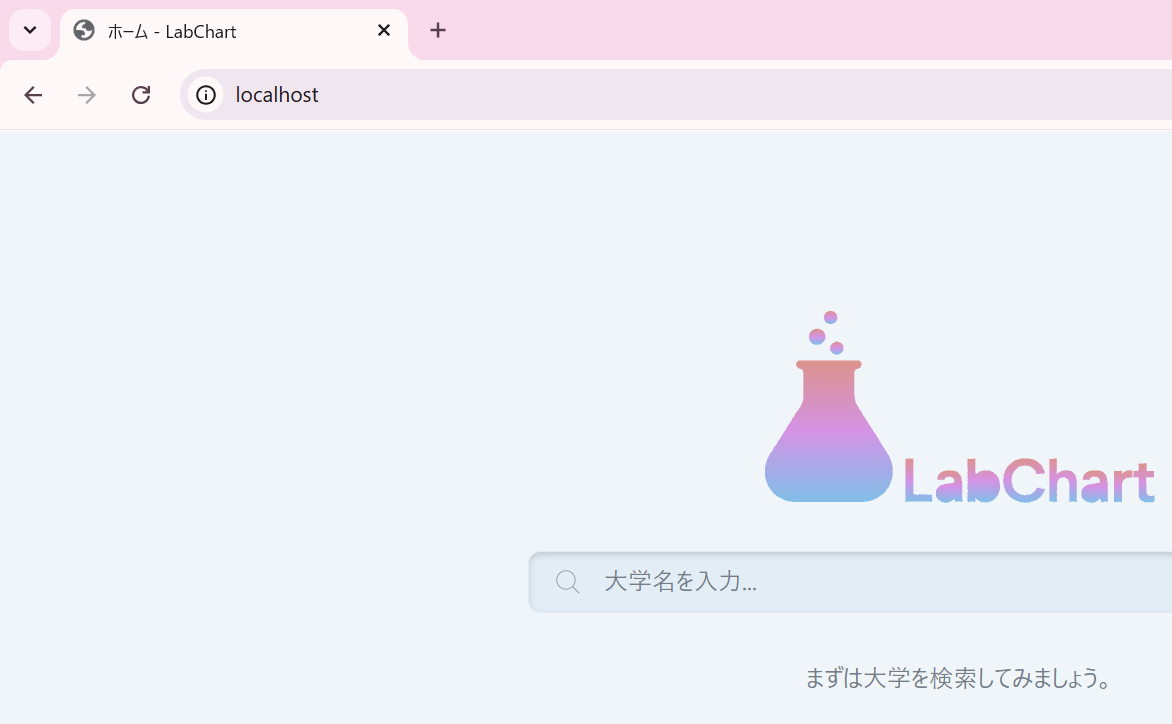
10. (おまけその2)修正: ページタイトルについて
今まで、テキトーに流していましたが、ページタイトルもちゃんとしておきましょう。
前回は、ホームページを作ったので、Home.jsxにHeadタグを用意して、titleを設定しておきましょう。
import { useState } from "react";
import { router, Head } from "@inertiajs/react";
import AppLayout from "@/Layouts/AppLayout";
import logo from "../Assets/logo/Home.svg";
import SearchBar from "../Components/SearchBar";

const Home = ({ query=''}) => {
  const [search, setSearch] = useState(query || '');

  // 検索フォームを送信する関数
  const handleSubmit = e => {
    e.preventDefault();
    router.get('/universities', { query: search });
  }

  return (
    <AppLayout mode="home"> {/* ホームモードをpropsで渡す */}
      <Head title="ホーム" /> {/* 追加! */}
      <div className="flex flex-col items-center gap-8 pt-24">

        {/* ロゴ */}
        <img src={logo} alt="App Logo" className="h-32 w-auto" />

        {/* 検索フォーム */}
        <SearchBar
          value={search}
          onChange={e => setSearch(e.target.value)}
          onSubmit={handleSubmit}
        />

        {/* 検索メッセージ */}
        <p className="text-[#747D8C]">まずは大学を検索してみましょう。</p>
      </div>
    </AppLayout>
  )
};

export default Home;
さらに、.envファイルを修正します。
APP_NAME=LabChart
これで、ブラウザのタブの部分に表示される文字列が変わりましたね!
本当はあと一つ直したいことがあるのですが、直す箇所がたくさんあるので、次回!!
11. まとめ・次回予告
お疲れ様でした!!
今日は、検索結果画面を作りましたね。
テーブル定義の修正から始まり、使用するコンポーネントもたくさんあった疲れたと思います。
ゆっくり休んで、また明日から頑張って行きましょうね!(≧◇≦)
次回は、大学詳細・学部一覧画面を作っていきたいと思います!
今日よりは軽めに終われたらいいな...
ありがとうございました。
これまでの記事一覧
☆要件定義・設計編
☆環境構築編
- その2: 環境構築編① ~WSL, Ubuntuインストール~
- その3: 環境構築編② ~Docker Desktopインストール~
- その4: 環境構築編③ ~Dockerコンテナ立ち上げ~
- その5: 環境構築編④ ~Laravelインストール~
- その6: 環境構築編⑤ ~Gitリポジトリ接続~
☆バックエンド実装編
- その7: バックエンド実装編① ~認証機能作成~
- その8: バックエンド実装編②前編 ~レビュー投稿機能作成~
- その8.5: バックエンド実装編②後編 ~レビュー投稿機能作成~
- その9: バックエンド実装編③ ~レビューCRUD機能作成~
- その10: バックエンド実装編④ ~レビューCRUD機能作成その2~
- その11: バックエンド実装編⑤ ~新規大学・学部・研究室作成機能作成~
- その12: バックエンド実装編⑥ ~大学検索機能作成~
- その13: バックエンド実装編⑦ ~大学・学部・研究室編集機能作成~
- その14: バックエンド実装編⑧ ~コメント投稿機能~
- その15: バックエンド実装編⑨ ~コメント編集・削除機能~
- その16: バックエンド実装編⑩ ~ブックマーク機能~
- その17: バックエンド実装編⑪ ~排他制御・トランザクション処理~
- その18: バックエンド実装編⑫ ~マイページ機能作成~
- その19: バックエンド実装編⑬ ~管理者アカウント機能作成~
- その20: バックエンド実装編⑭ ~通知機能作成~
- その21: バックエンド実装編⑮ ~ソーシャルログイン機能作成~
☆フロントエンド実装編
- その22: フロントエンド実装編① ~メインコンテンツ領域作成~
- その23: フロントエンド実装編② ~ヘッダー作成~
- その24: フロントエンド実装編③ ~サイドバー作成~
- その25: フロントエンド実装編④ ~ホームページ作成~
参考
軽く宣伝
YouTubeを始めました(というか始めてました)。
内容としては、Webエンジニアの生活や稼げるようになるまでの成長記録などを発信していく予定です。
現在、まったく再生されておらず、落ち込みそうなので、見てくださる方はぜひ高評価を教えもらえると励みになると思います。"(-""-)"