MacでTensorFlow Liteを動かすまでの流れを解説していきます。
環境
動作確認済の環境は以下の通りです。
・macOS Catalina バージョン10.15
・Python 3.7.4
・conda 4.7.12
・TensorFlow 1.15.0
・keras 2.2.4
環境構築
以下のURLよりAnacondaをインストール
https://www.anaconda.com/distribution/

ダウンロードしたインストーラパッケージをダブルクリックして起動します。 利用規約に同意し、保存先を決めてインストールします。
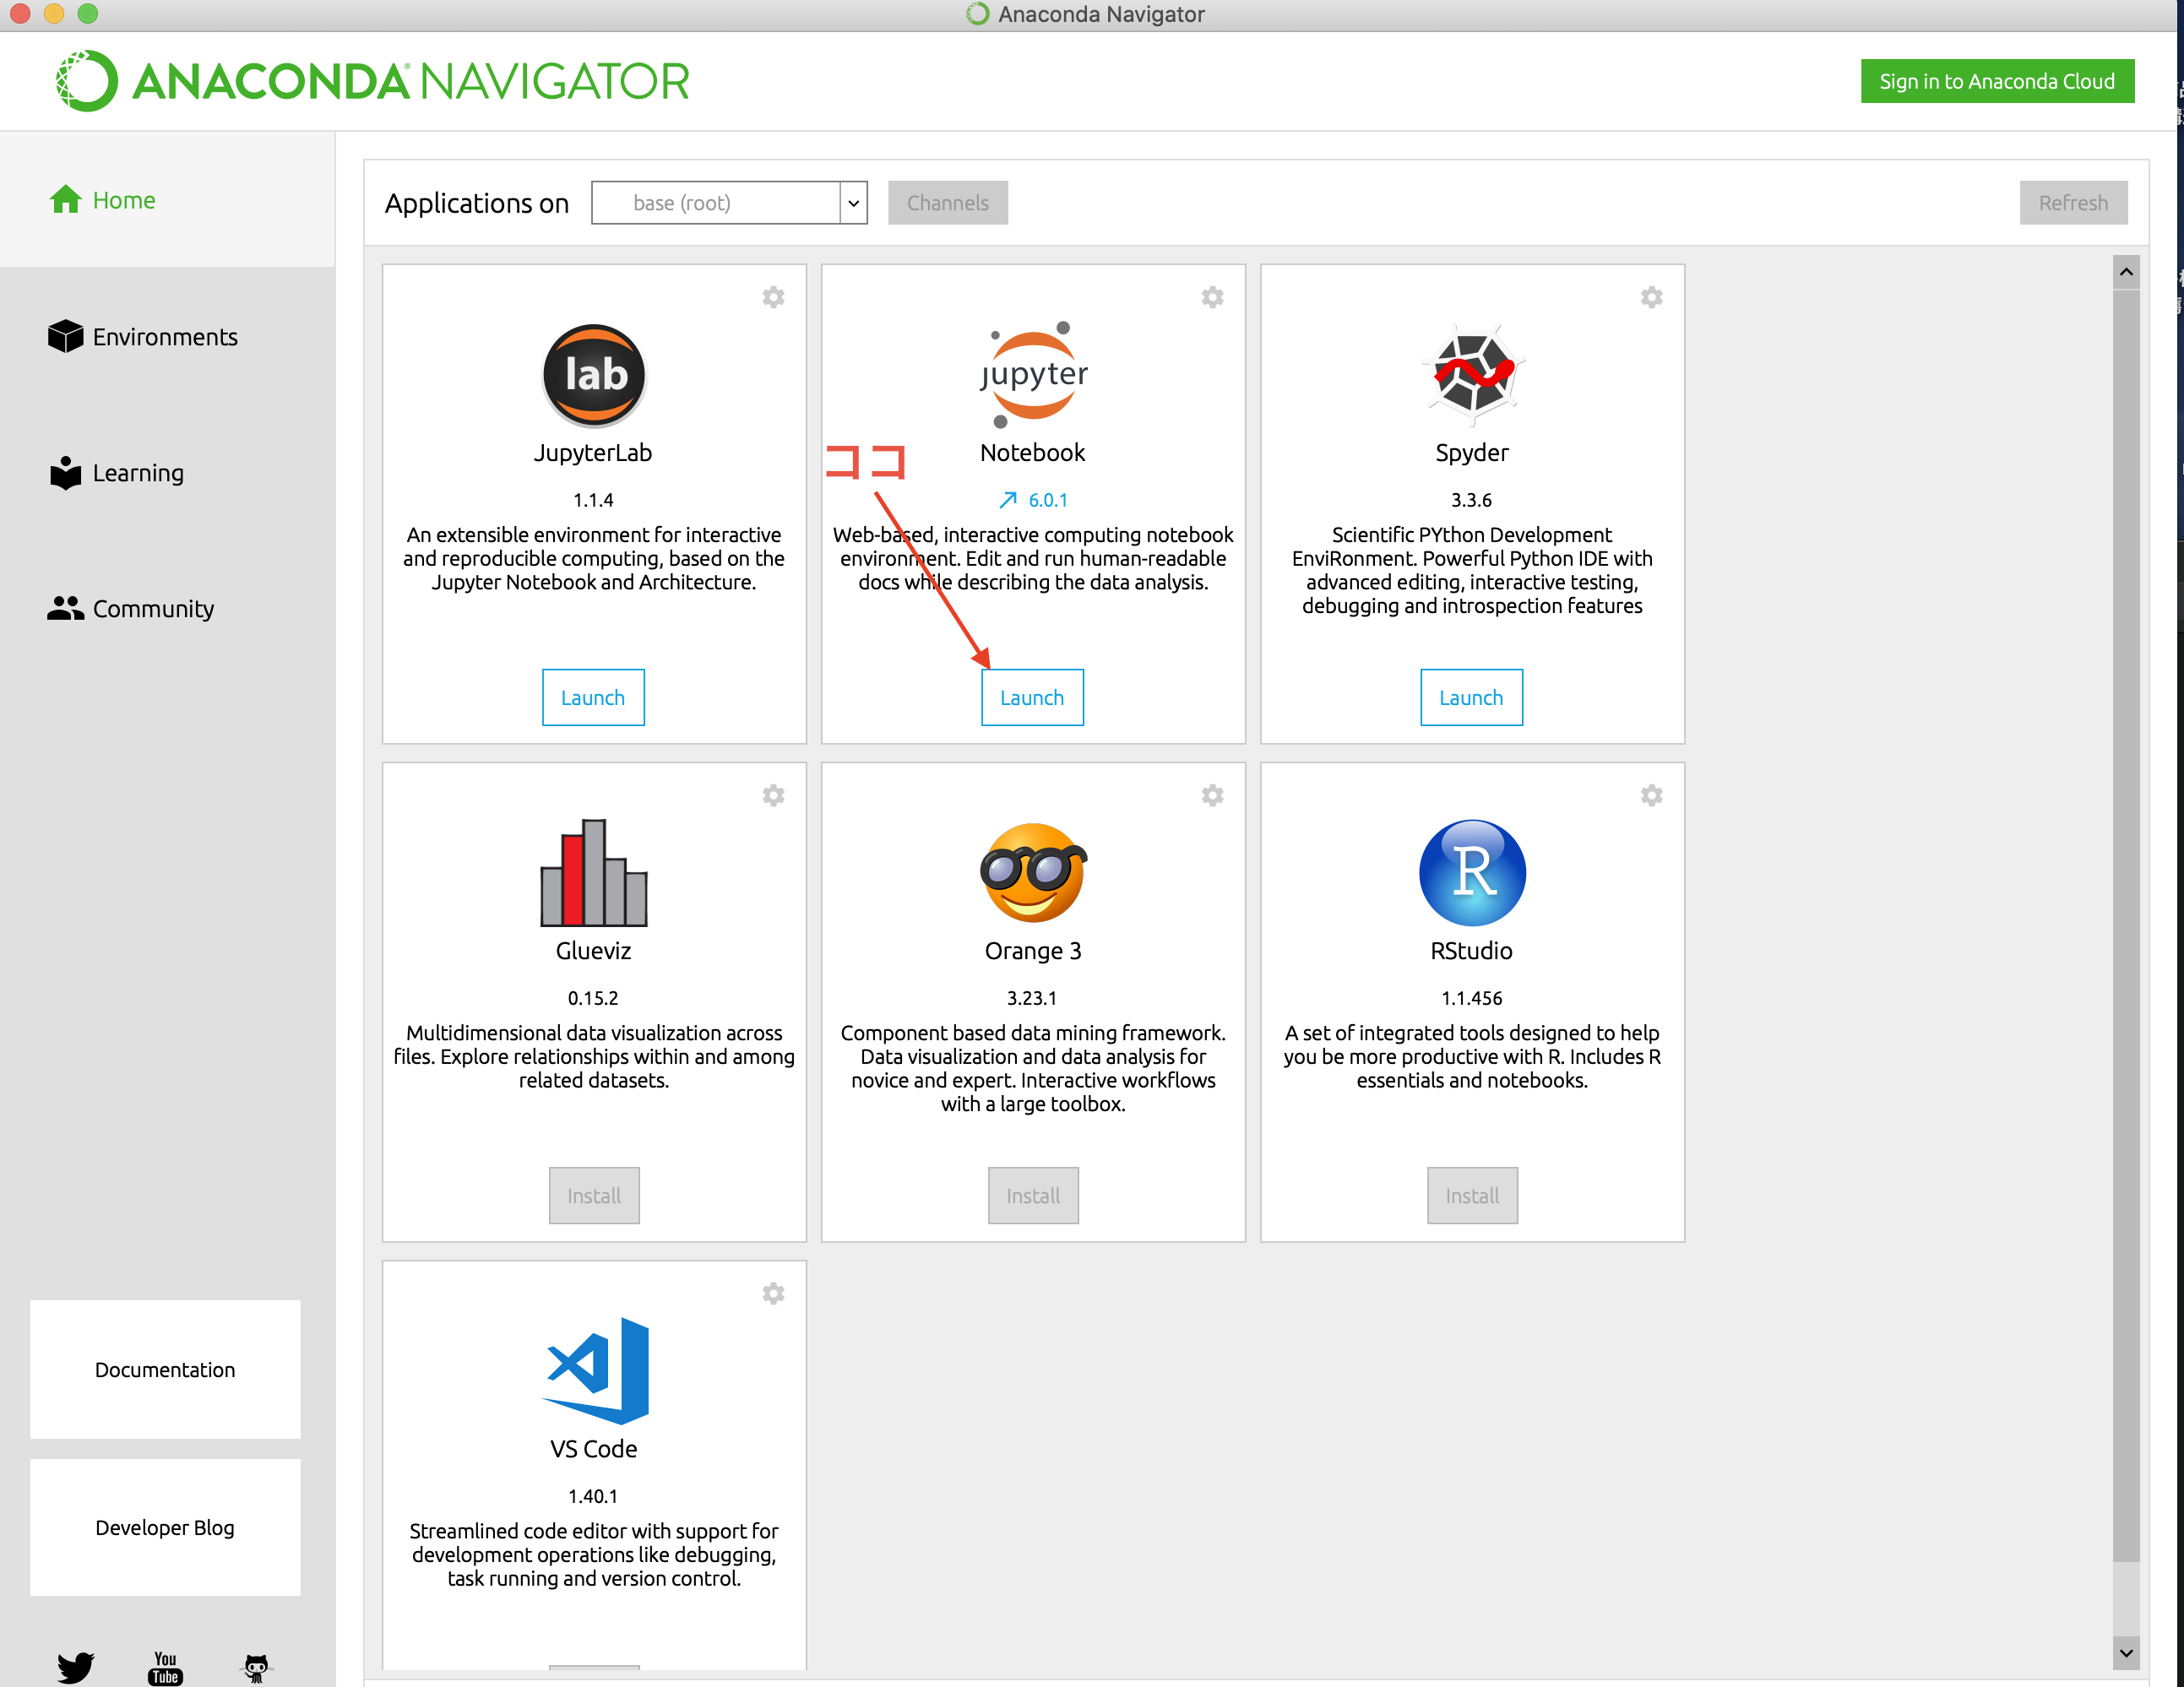
HomeからJupyter Notebookを起動します。
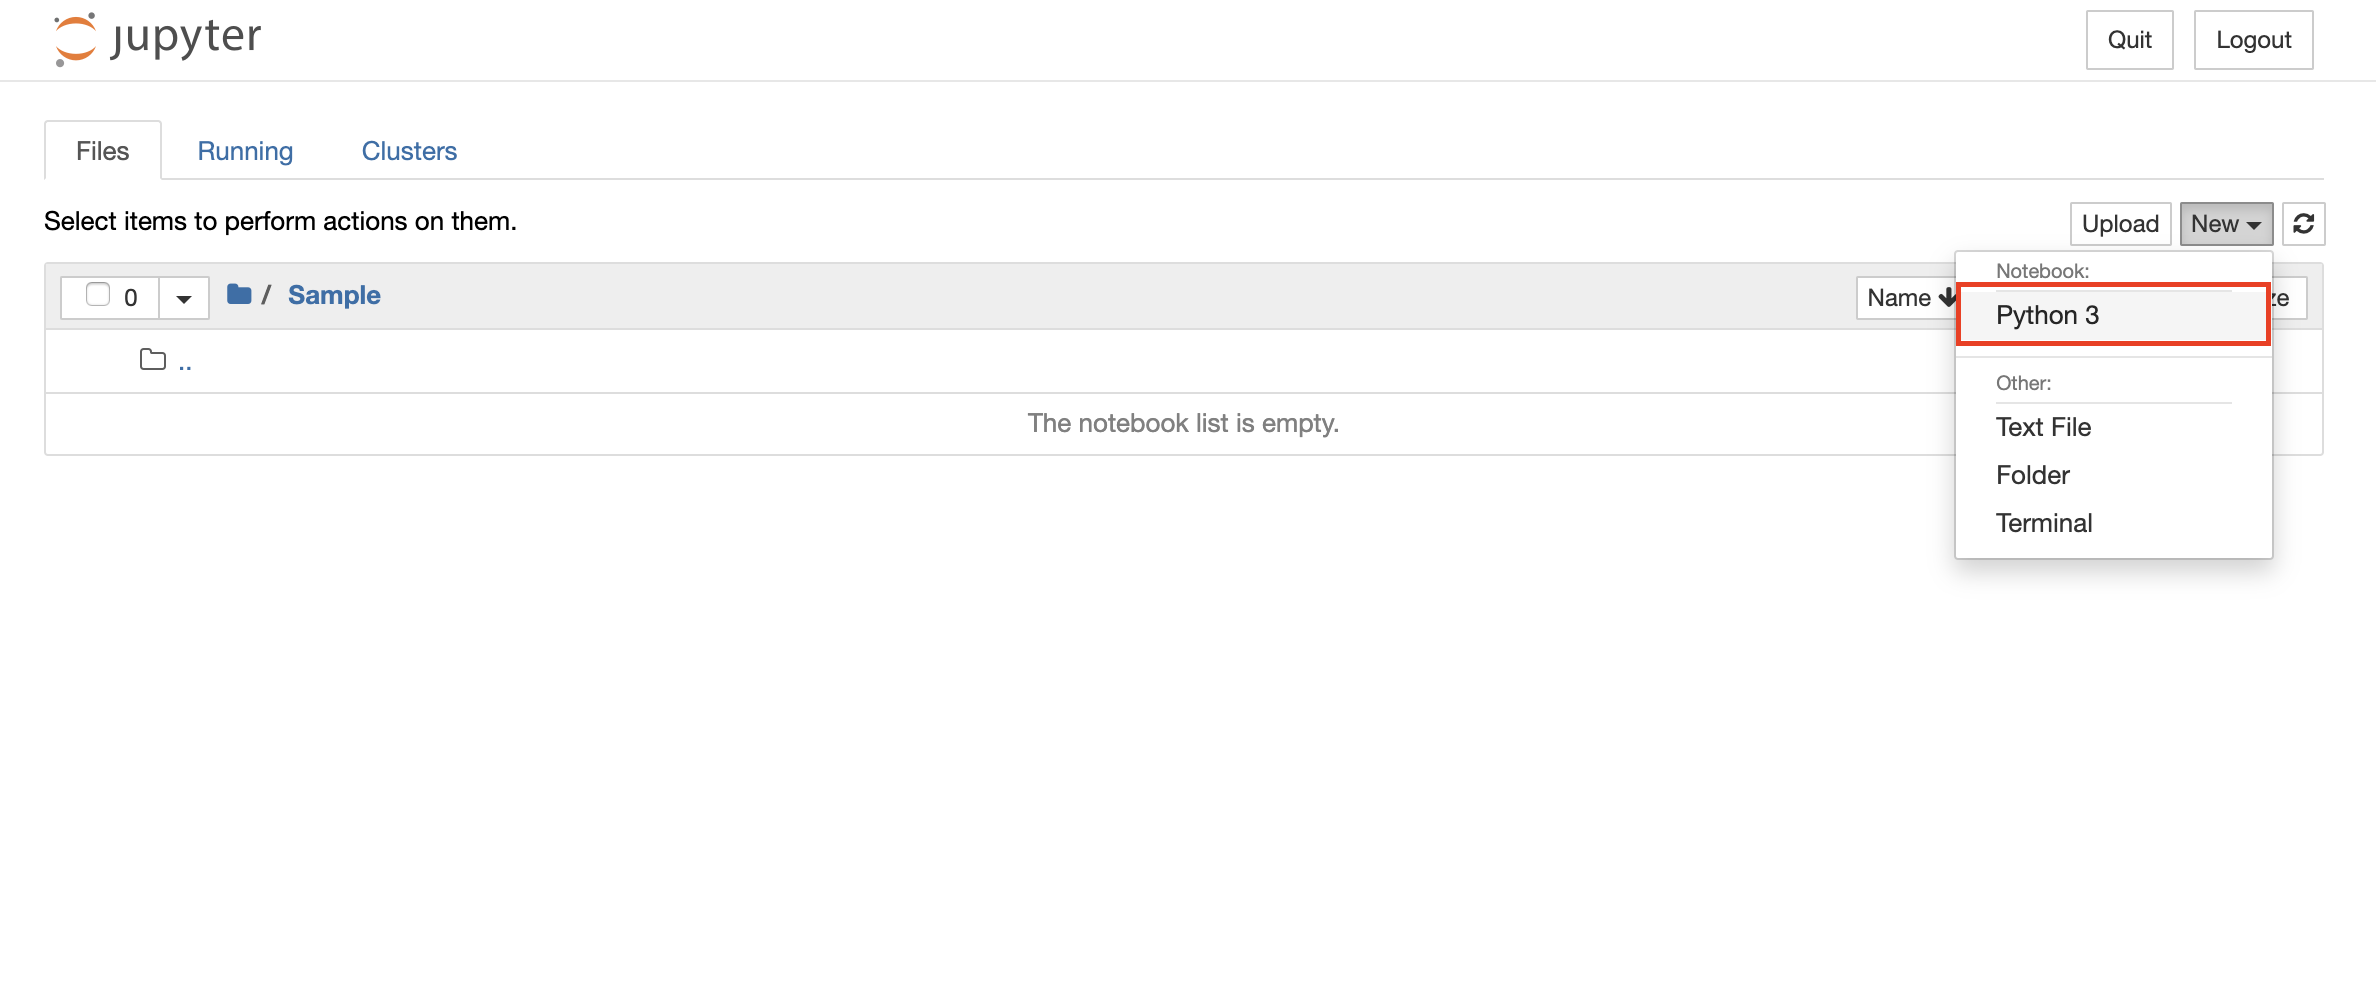
作業場所を決めて、NEW→Python3でipynbファイルを作成します。
ファイルを開くとこのようにプログラムを書ける画面に移ります。ここにプログラムを書いていきます。

次にTensorFlowを動作させるためのパッケージをインストールします。
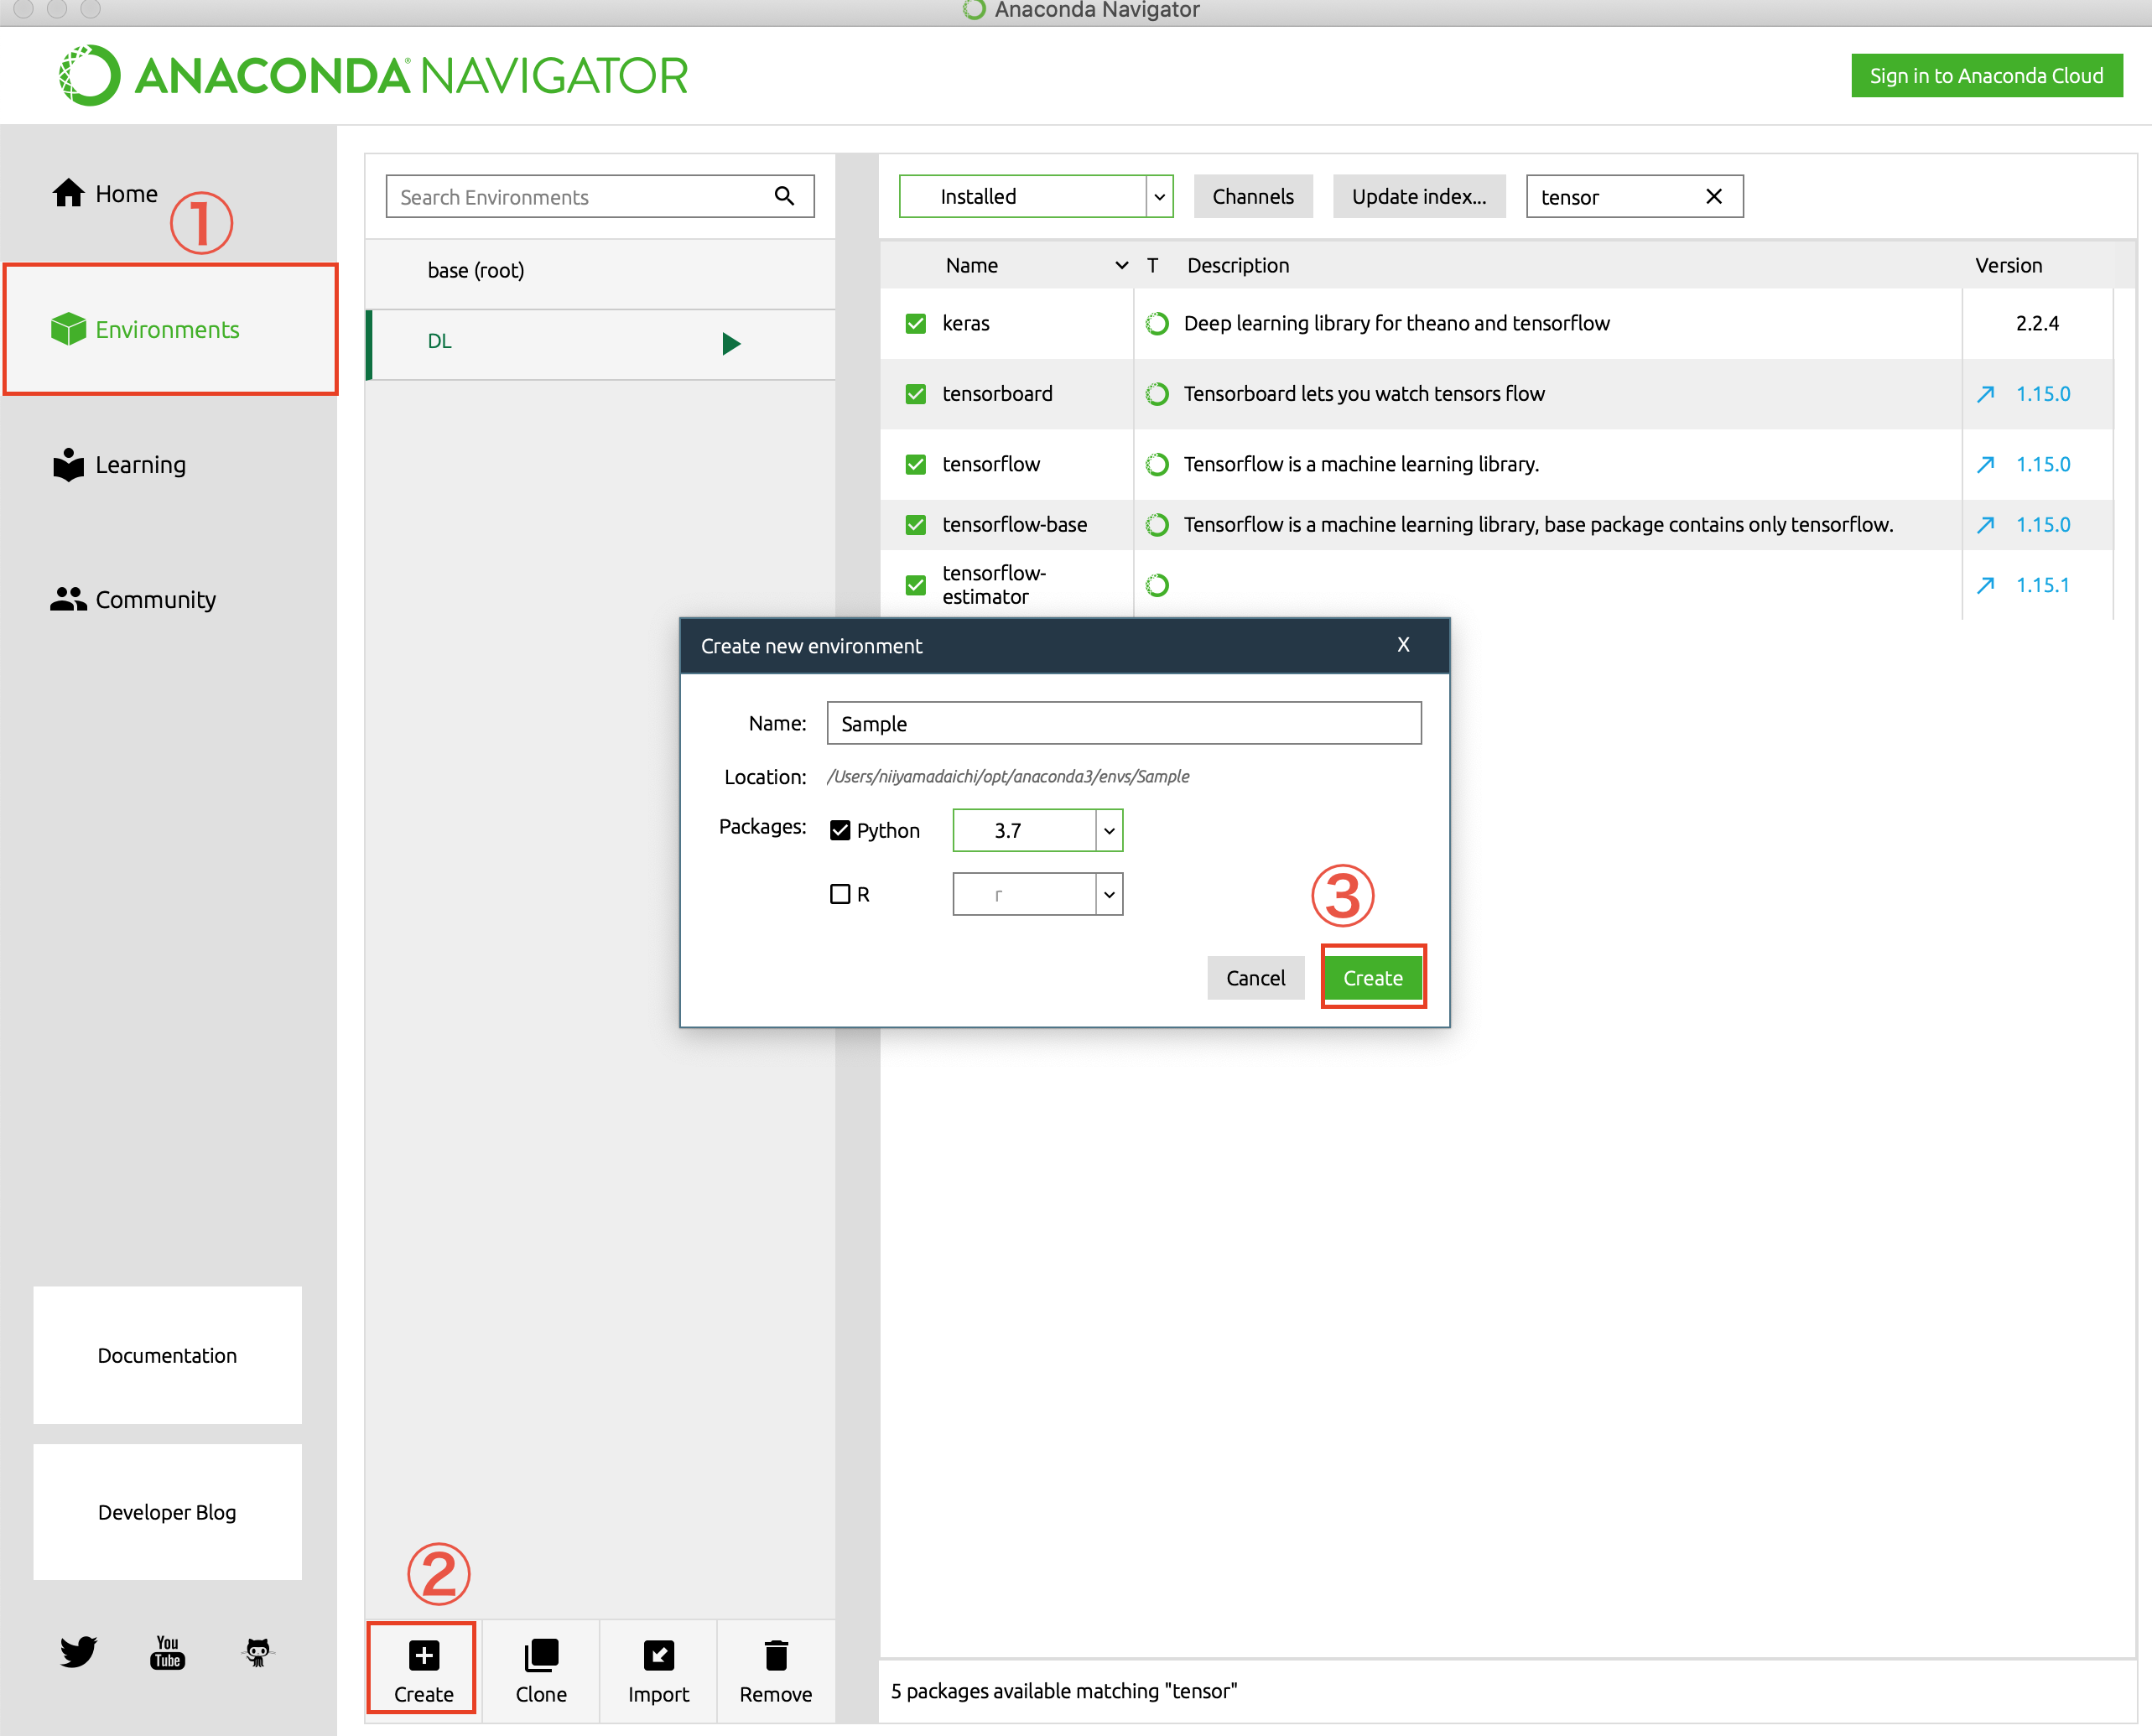
「Enviroments」→「Create」で新しい環境を作ります。base(root)を使用する場合は不要です。
検索条件を「Not installed」に変更し、「tensorflow」と検索します。
そして出てきたパッケージの「keras」、「tensorflow」を選択し、Applyをクリックします。

先程のようにJupyterを起動して次のようにプログラムを書いて実行します。
実行は「control + Enter」もしくは「Shift + Enter」です。
エラーが出ていないことがわかります。使い方はざっとこんな感じです。
追記
nomkl、matplotlib、pillowもインストールしておいてください。
nomklはtensorflowを実行する際にカーネルが死ぬのを防げるみたいです。
matplotlibは画像を表示するために使用します。
pillowは画像をロードするために使用します。
モデルを構築する
TensorFlow Liteのモデルを生成するために、まずはTensorFlowのモデルを作る必要があります。
今回は、cifar10というデータセットを使用します。
https://www.cs.toronto.edu/~kriz/cifar.html
cifar10は、6万枚の画像にラベル付けされたデータセットです。飛行機、自動車、鳥、猫、鹿、犬、カエル、馬、船、トラックに分けられています。これを学習させ、画像分類できるモデルを作っていきます。
以下、画像を学習させるためのコードです。
epoch数を20に設定しているのでかなり時間がかかります。
"""
必要なライブラリのインポートと画像の前処理
"""
from keras.models import Sequential
from keras.layers.convolutional import Conv2D
from keras.layers.pooling import MaxPool2D
from keras.layers.core import Dense,Activation,Dropout,Flatten
from keras.datasets import cifar10
from keras.utils import np_utils

 #cifar10をダウンロード
(x_train,y_train),(x_test,y_test)=cifar10.load_data()

# 画像を0-1の範囲で正規化
x_train=x_train.astype('float32')/255.0
x_test=x_test.astype('float32')/255.0

# 正解ラベルをOne-Hot表現に変換
y_train=np_utils.to_categorical(y_train,10)
y_test=np_utils.to_categorical(y_test,10)

"""
TensorFlowのモデルを構築
"""
model=Sequential()

model.add(Conv2D(32,(3,3),padding='same',input_shape=(32,32,3)))
model.add(Activation('relu'))
model.add(Conv2D(32,(3,3),padding='same'))
model.add(Activation('relu'))
model.add(MaxPool2D(pool_size=(2,2)))
model.add(Dropout(0.25))

model.add(Conv2D(64,(3,3),padding='same'))
model.add(Activation('relu'))
model.add(Conv2D(64,(3,3),padding='same'))
model.add(Activation('relu'))
model.add(MaxPool2D(pool_size=(2,2)))
model.add(Dropout(0.25))

model.add(Flatten())
model.add(Dense(512))
model.add(Activation('relu'))
model.add(Dropout(0.5))
model.add(Dense(10,activation='softmax'))

model.compile(optimizer='adam',loss='categorical_crossentropy',metrics=['accuracy'])

history=model.fit(x_train,y_train,batch_size=128,nb_epoch=20,verbose=1,validation_split=0.1)

# モデルと重みを保存
json_string=model.to_json()
open('cifar10_cnn.json',"w").write(json_string)
model.save_weights('cifar10_cnn.h5')
model.save('cifar10_cnn_model.h5')

# モデルの表示
model.summary()

# 評価
score=model.evaluate(x_test,y_test,verbose=0)
print('Test loss:',score[0])
print('Test accuracy:',score[1])
実行すると
「cifar10_cnn.h5」と「cifar10_cnn_model.h5」というファイルが生成されているかと思います。
「cifar10_cnn.h5」はモデルの重みのみが保存され、「cifar10_cnn_model.h5」はモデル構造と重みが保存されています。精度は78%でした。
以下のサイトを参考にするとより精度を上げられそうです。
CIFAR-10でaccuracy95%--CNNで精度を上げるテクニック--
10層の畳み込みニューラルネットワークでCIFAR-10のValidation Accuracy9割を達成する
実際に画像分類してみる
保存したモデルを使って画像分類していきます。
まず、予測する画像を用意します。

コードに書かれている階層に合わせてフォルダを作成し、その中に画像を入れ、以下のコードを実行します。
"""
拾った画像を使って予測する
"""
from keras.models import model_from_json
import matplotlib.pyplot as plt
from keras.preprocessing.image import img_to_array, load_img
from tensorflow.python.keras.models import load_model

# 画像読み込み
temp_img=load_img("./images/airplane1.jpeg",target_size=(32,32))

# 画像を配列に変換し0-1で正規化
temp_img_array=img_to_array(temp_img)
temp_img_array=temp_img_array.astype('float32')/255.0
temp_img_array=temp_img_array.reshape((1,32,32,3))

# 学習済みのモデルと重みを読み込む
json_string=open('cifar10_cnn.json').read()
model=model_from_json(json_string)
model.compile(optimizer='adam',loss='categorical_crossentropy',metrics=['accuracy'])
model.load_weights('cifar10_cnn.h5')
# model = load_model('cifar10_cnn_model.h5')

# モデルを表示
model.summary()

# 画像を予想
img_pred=model.predict_classes(temp_img_array)
print('\npredict_classes=',img_pred)
print('model=',model)

plt.imshow(temp_img)
plt.title('pred:{}'.format(img_pred))
plt.show()

"""
0 - airplane
1 - automobile
2 - bird
3 - cat
4 - deer
5 - dog
6 - frog
7 - horse
8 - ship
9 - truck
"""
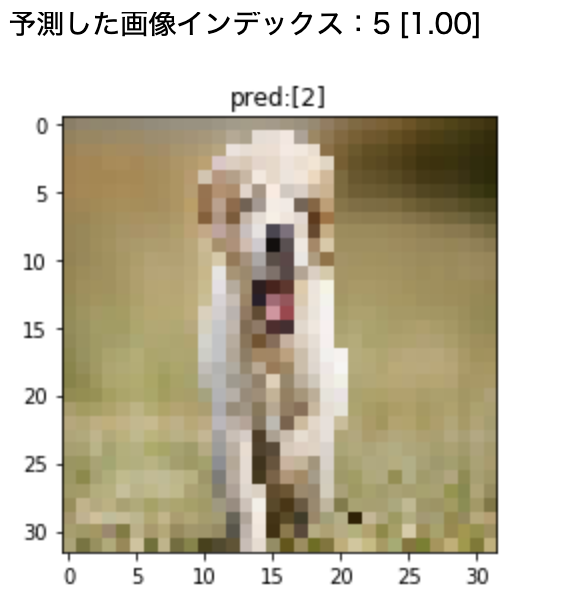
上手くいくと、画像とインデックス番号が出力されます。
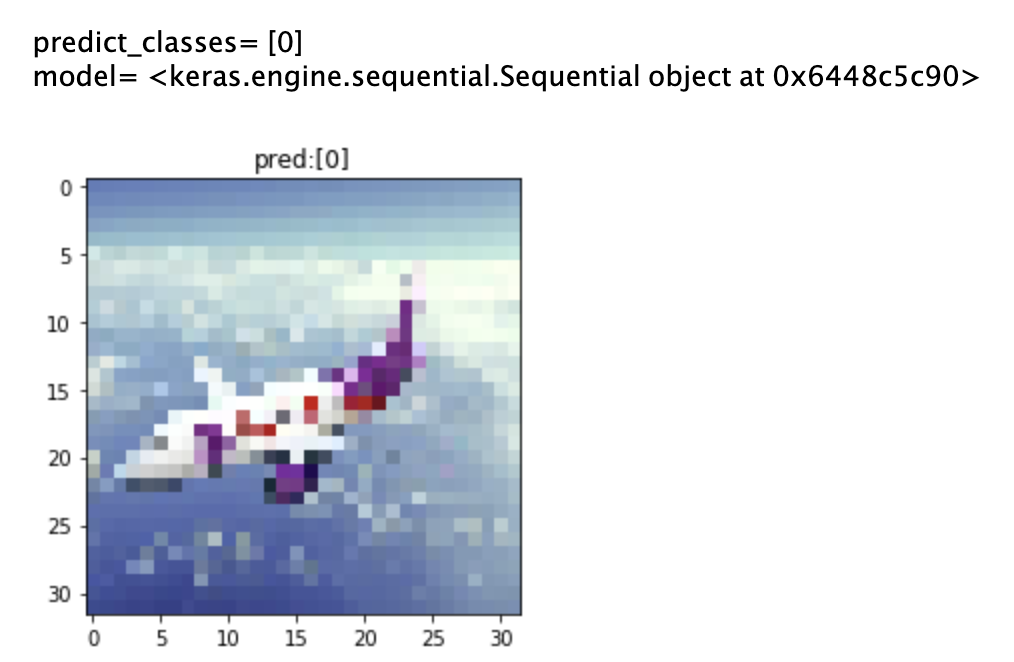
↑こんな感じ
インデックス番号と画像が一致していることがわかります。画像分類成功です。
TensorFlow Lite用モデルに変換
そして、先程生成したモデルをTensorFlowLite用に変換します。
# 既存のKeras用モデル(cifar10_cnn_model.h5)から、TensorFlow Lite用モデル(cifar10_cnn.tflite)を作成

import tensorflow as tf

if __name__ == '__main__':
    converter = tf.lite.TFLiteConverter.from_keras_model_file("cifar10_cnn_model.h5")
    tflite_model = converter.convert()
    open("cifar10_cnn.tflite", "wb").write(tflite_model)
こちらのコードを実行すると「cifar10_cnn.tflite」が生成されます。
これがTensorFlowLite用のモデルです。
このモデルを使用して、画像分類してみます。
# TensorFlow Lite用モデルを使って、入力画像からジャンル識別する

import tensorflow as tf
import numpy as np
from keras.models import model_from_json
import matplotlib.pyplot as plt
from keras.preprocessing.image import img_to_array, load_img
from tensorflow.python.keras.models import load_model

if __name__ == '__main__':
    # prepara input image
    #画像読み込み
    temp_img=load_img("./images/dog1.jpeg",target_size=(32,32))

    #画像を配列に変換し0-1で正規化
    temp_img_array=img_to_array(temp_img)
    img=temp_img_array.astype('float32')/255.0
    img=temp_img_array.reshape((1,32,32,3))

    # load model
    interpreter = tf.lite.Interpreter(model_path="cifar10_cnn.tflite")
    interpreter.allocate_tensors()
    input_details = interpreter.get_input_details()
    output_details = interpreter.get_output_details()

    # set input tensor
    interpreter.set_tensor(input_details[0]['index'], img)

    # run
    interpreter.invoke()

    # get outpu tensor
    probs = interpreter.get_tensor(output_details[0]['index'])

    # print result
    result = np.argmax(probs[0])
    score = probs[0][result]
    print("予測した画像インデックス:{} [{:.2f}]".format(result, score))

    plt.imshow(temp_img)
    plt.title('pred:{}'.format(img_pred))
    plt.show()

"""
0 - airplane
1 - automobile
2 - bird
3 - cat
4 - deer
5 - dog
6 - frog
7 - horse
8 - ship
9 - truck
"""
TensorflowとTensorflowLiteの比較
以下の比較は画像データによって左右されますので参考程度にしてください。
画像を予測するためにかかった時間をそれぞれ計測しました。
keras用のモデル
経過時間:0.8839559555053711
経過時間:0.6288352012634277
経過時間:0.5877768993377686
経過時間:0.5789699554443359
経過時間:0.5908827781677246
経過時間:0.7207329273223877
経過時間:0.7104830741882324
経過時間:0.6035618782043457
経過時間:0.5244758129119873
経過時間:0.5348677635192871
平均経過時間:0.636454225
TensorflowLite用のモデル
経過時間:0.27948904037475586
経過時間:0.05380606651306152
経過時間:0.022572994232177734
経過時間:0.06809115409851074
経過時間:0.07050800323486328
経過時間:0.06940007209777832
経過時間:0.12052798271179199
経過時間:0.17615199089050293
経過時間:0.12544798851013184
経過時間:0.027255773544311523
平均経過時間:0.101325107
TensorflowLiteの方が早いですね。
しかしその分精度に差があります。
keras用のモデルで予測できなかった画像はCatのみでした。
一方でTensorflowLiteのモデルでは、airplane、Bird、cat、Frogが予測することができませんでした。
TensorflowLite用に変換したモデルはかなり精度が下がっているようです。
99.4%の精度を持つMNISTのモデルで実行した場合はkeras用もTensorflowLite用も同じくらい予測することができました。TensorflowLiteを使用する場合は、かなり高い精度を持つモデルを用意する必要がありそうです。
参考
初心者に優しくないTensorflow Lite の公式サンプル
KerasでCNNを構築しCIFAR-10の画像分類をしてみよう
