概要
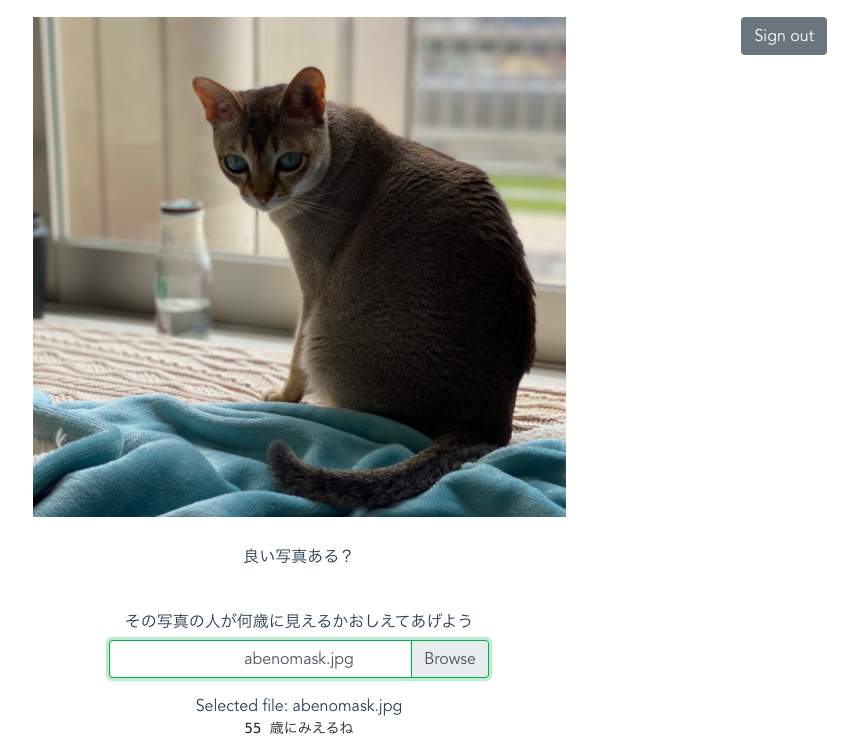
Vue.jsで作ったサイトをFirebaseにユーザー認証をお願いして、ログインしないと入れないページにして、人の顔年齢(Computer Vision API)で遊んで、freenomとNetlifyで独自ドメインで公開する
できたもの
環境
macOS Catalina
Visual Studio Code 1.45.1
Node.js: v13.11.0
npm:6.14.5
Vue:@vue/cli 4.3.1
大まかな流れ
Vue.jsとFirebaseでユーザー認証ありのプロジェクトをつくる
↓
Computer Vision APIをつかって顔認識のぺーじをつくる
↓
freenomでドメインを取る
↓
Netlifyに freenomドメインをあててDeploy
メインの構成はこんな感じです
App.vue
main.js
assets
components
 - Signup.vue
 - HelloWorld.vue
 - Signin.vue
router
 - index.js
Vue.jsとFirebaseでユーザー認証ありのプロジェクトをつくる
こちらがめちゃくちゃわかりやすかったです。
こちらを参考にVue.jsとFirebaseでユーザー認証ありのプロジェクトをつくる
Vue.js + Firebase を使って爆速でユーザ認証を実装する - Qiita
<template>
  <div class="signin">
    <h2>Sign in</h2>
    <b-container class="bv-example-row">
    <b-row class="justify-content-md-center">
    <b-form inline>
    <b-input
      id="inline-form-input-name"
       v-model="username"
      class="mb-2 mr-sm-2 mb-sm-0"
      placeholder="Username"
    ></b-input>
    <b-input type="password" id="text-password" v-model="password" aria-describedby="Password" placeholder="Password"></b-input>
    <!-- <button @click="signIn">Signin</button> -->
    <b-button variant="outline-primary" @click="signIn">Signin</b-button>
    </b-form>
    </b-row>
    <b-row>
    <b-col><p>You don't have an account?
      <router-link to="/signup">create account now!!</router-link>
    </p>
    </b-col>
    </b-row>
    </b-container>
  </div>
</template>

<script>
import firebase from 'firebase'

export default {
  name: 'Signin',
  data: function () {
    return {
      username: '',
      password: ''
    }
  },
  methods: {
    signIn: function () {
      firebase.auth().signInWithEmailAndPassword(this.username, this.password).then(
        user => {
          // alert('Success!')
          this.$router.push('/')
        },
        err => {
          alert(err.message)
        }
      )
    }
  }
}
</script>
<style>
.signin {
  line-height:5;
}
.signin h2{
  margin:2rem auto;
}
button.btn.btn-outline-primary {
    margin: 0 1rem;
}
</style>
<template>
  <div class="signup">
    <h2>Sign up</h2>
    <input type="text" placeholder="Username" v-model="username">
    <input type="password" placeholder="Password" v-model="password">
    <button @click="signUp">Register</button>
    <p>Do you have an account?
      <router-link to="/signin">sign in now!!</router-link>
    </p>
  </div>
</template>

<script>
import firebase from 'firebase'

export default {
  name: 'Signup',
  data () {
    return {
      username: '',
      password: ''
    }
  },
  methods: {
    signUp: function () {
      firebase.auth().createUserWithEmailAndPassword(this.username, this.password)
        .then(user => {
          alert('Create account: ', user.email)
        })
        .catch(error => {
          alert(error.message)
        })
    }
  }
}
</script>
Computer Vision APIをつかって顔認識のぺーじをつくる
こちらを参考に顔認識のページをつくる
Azure画像認識系の機能をいくつか試してみた(Face API / Custom Vision API / Computer Vision API) - Qiita
<template>
  <div class="hello">
    <p class="lh5">{{ msg }}</p>
    <div id="appFaceAPI-File">

      <div class="row">
        <div class="col">
            <h1>その写真の人が何歳に見えるかおしえてあげよう</h1>
        </div>
      </div>

      <div class="row">
        <div class="col">
          <div class="form-group">
            <!-- https://bootstrap-vue.org/docs/components/form-file -->
            <div>
              <!-- Styled -->
              <b-form-file
                v-model="file"
                :state="Boolean(file)"
                placeholder="Choose a file or drop it here..."
                drop-placeholder="Drop file here..."
                @change="handlerFileChange"
              ></b-form-file>
              <div class="mt-3">Selected file: {{ file ? file.name : '' }}</div>
            </div>
          </div>
        </div>
      </div>
      <div class="row">
        <div class="col">
          <pre><code>{{ response }}</code></pre>
        </div>
      </div>

    </div>
    <div class="siout">
    <b-button variant="secondary" @click="signOut">Sign out</b-button>
    </div>
  </div>
</template>
<script>
import firebase from 'firebase'
import axios from 'axios'

export default {
  name: 'HelloWorld',
  data: function () {
    return {
      response: '',
      fill: null,
      msg: '良い写真ある?',
      name: firebase.auth().currentUser.email
    }
  },

  methods: {
    signOut: function () {
      firebase.auth().signOut().then(() => {
        this.$router.push('/signin')
      })
    },
    handlerFileChange: async function (e) {
      console.log('handlerFileChange')
      const files = e.target.files || e.dataTransfer.files
      const file = files[0]
      let contentBuffer = await this.readFileAsync(file)
      // console.log(contentBuffer);
      this.sendCognitiveAsFile(contentBuffer)
    },
    readFileAsync: function (file) {
      return new Promise((resolve, reject) => {
        let reader = new FileReader()
        reader.onload = () => {
          resolve(reader.result)
        }
        reader.onerror = reject
        reader.readAsArrayBuffer(file)
      })
    },
    sendCognitiveAsFile: async function (contentBuffer) {
      // const FACE_API_ENDPOINT_URL = '***'
      const qs = require('querystring')
      const params = qs.stringify({
        'returnFaceId': 'true',
        'returnFaceLandmarks': 'false',
        'returnFaceAttributes': 'age,gender,headPose,smile,facialHair,glasses,' + 'emotion,hair,makeup,occlusion,accessories,blur,exposure,noise'
      })
      const FACE_API_ENDPOINT_URL = `{取得したエンドポイント}/face/v1.0/detect?${params}`

      const config = {
        url: FACE_API_ENDPOINT_URL,
        method: 'post',
        headers: {
          'Content-type': 'application/octet-stream',
          'Ocp-Apim-Subscription-Key': '***'
        },
        data: contentBuffer
      }

      // axios
      try {
        // POSTリクエストで送る
        const responseAzure = await axios.request(config)
        console.log('post OK')
        // データ送信が成功するとレスポンスが来る
        console.log(responseAzure.data)
        // ageを取得
        const lookage = responseAzure.data[0].faceAttributes.age
        this.response = `${lookage} 歳にみえるね`
      } catch (error) {
        console.error(error)
      }
    }
  }
}
</script>
<style >
.col h1{
  font-size:100%;
}
div.form-group {
    max-width: 380px;
    margin: auto;
    width: 80%;
}
.lh5 {
    line-height: 5;
  }
.siout {
    text-align: right;
    padding: 1rem;
    position: fixed;
    top: 1vh;
    right: 3rem;
}
# app{
  position:relative;
}
  </style>
freenomでドメインを取る
こちらを参考にまずは好きなドメインを取得
爆速!Vercelとfreenomで独自ドメインのサイトを無料で作成する - Qiita
NetlifyにDeploy
GitHubのリポジトリを作成して、作成したプロジェクトをPushしましょう。
Netlifyのページへ行き、[Get started in seconds]ボタンを押して
GitHubと連携しましょう
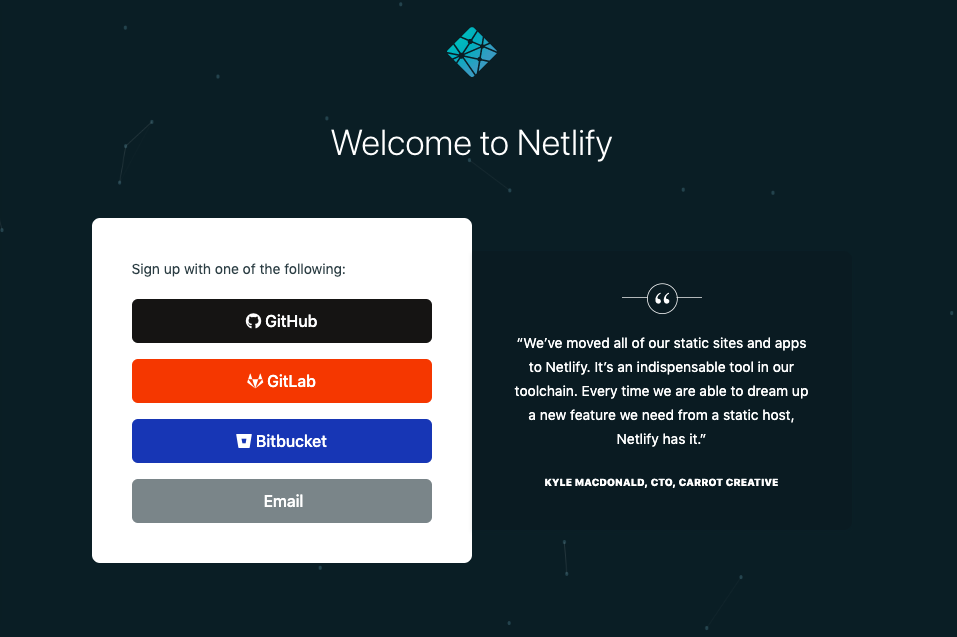
Netlify の管理画面に入れたら、右上にある「New site from Git」を選択します。
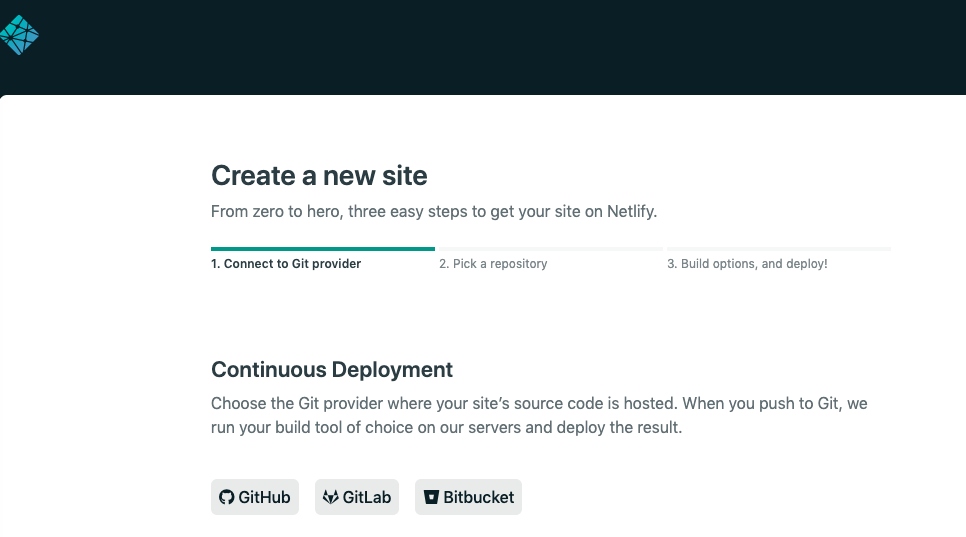
GitHubを選びます
先ほど作ったリポジトリを選んでDeploy settingsを埋めていきます
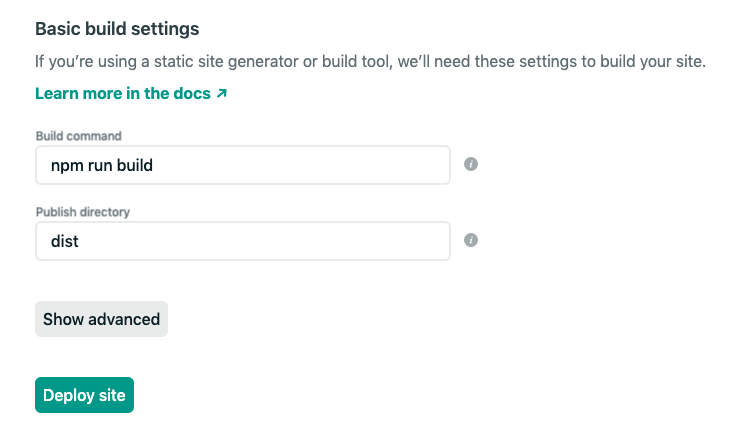
Deploy siteボタンを押せば完了!
*ここでエラーになった人!(わたし!)
Gitの作り方によってはPublish先がdistだけでは展開できず、エラーにあることがあります。
Gitの置いてある位置からみているようなので、
works/fbaseApp/distとかになる場合もあります。
Deployが進んだら、ご丁寧に次の手順が出ています
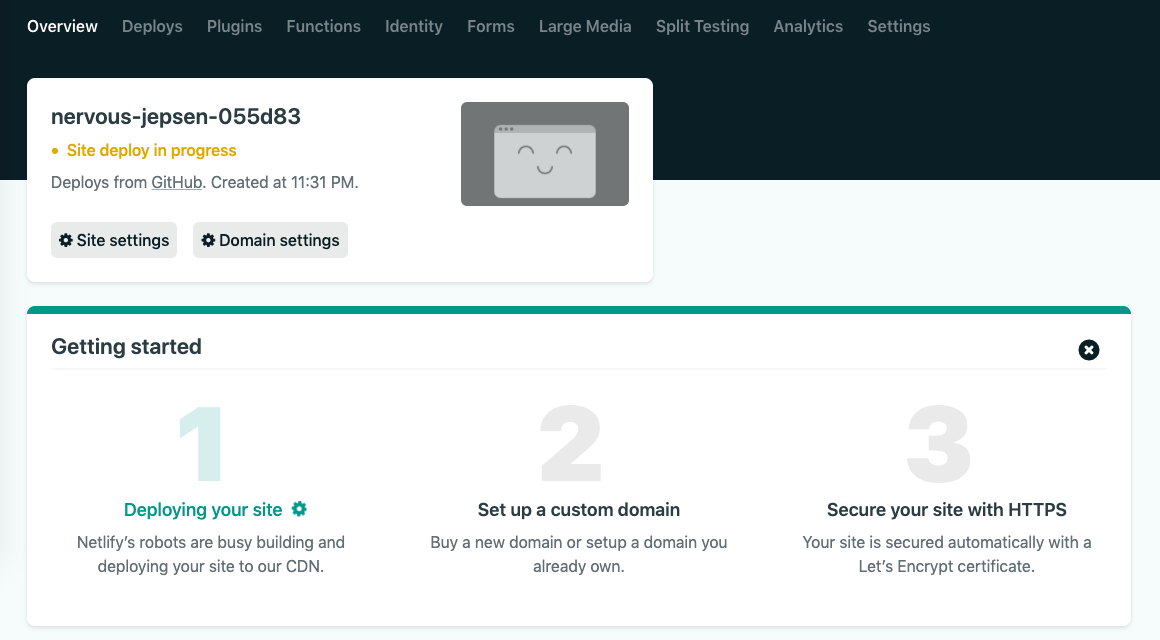
2を押しましょう
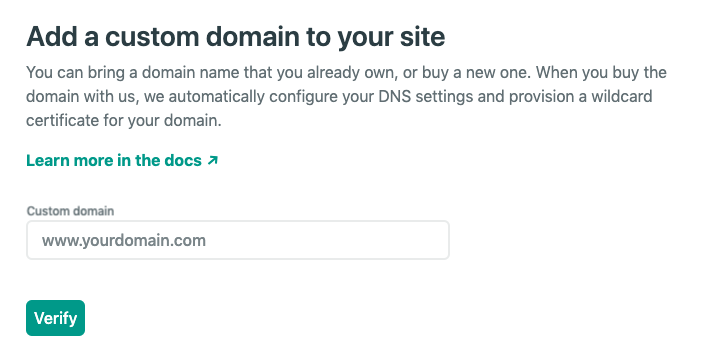
ここに、freenomで作ったドメインを入れます
とりあえずエラーっぽい感じですが気にせずここを押すと
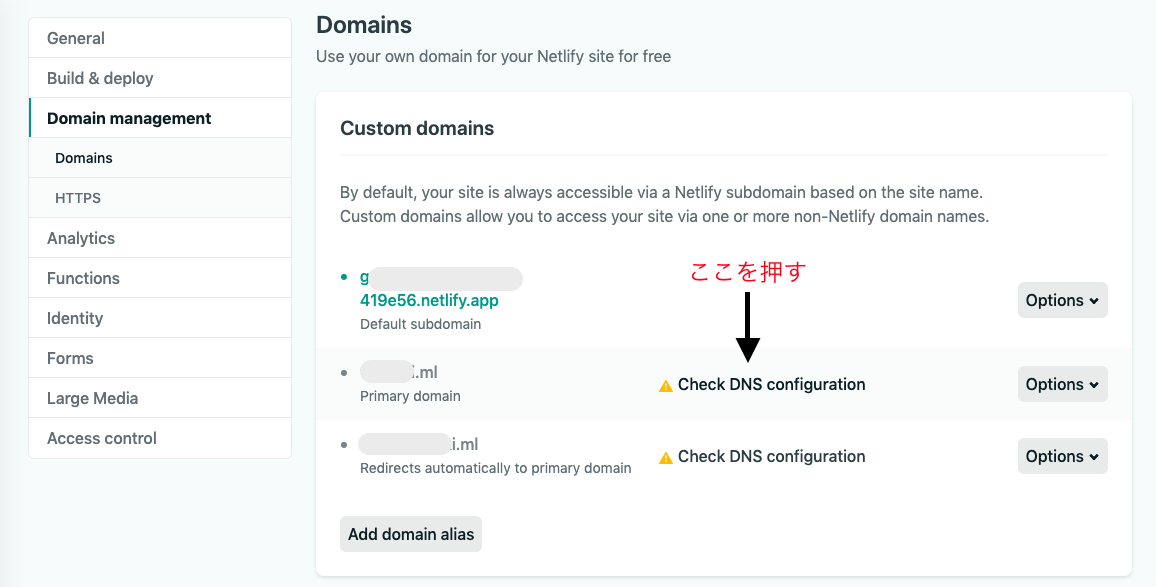
Alternative: point A record to 1**.**.*.**
こういったものが書かれているのでこの番号をだしたまま
つぎにfreenomの管理画面からManage Freenom DNSにいきます
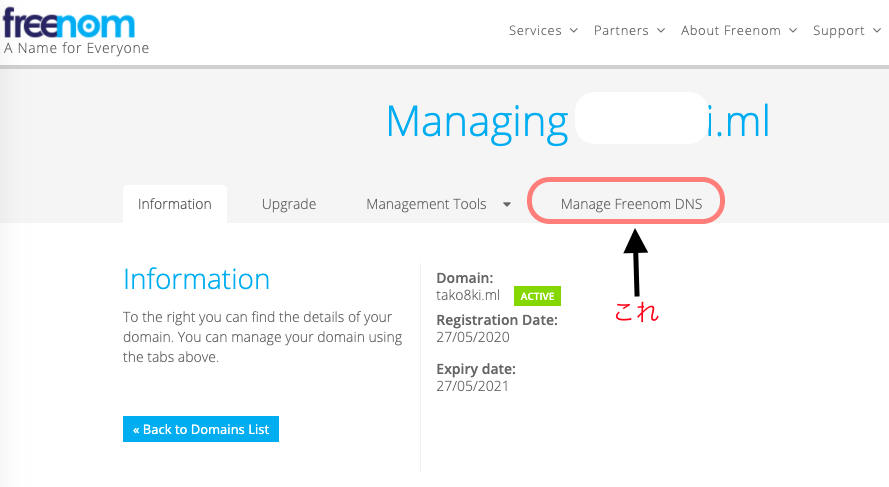
ここに先ほどのNetlifyから取得した番号を入れる
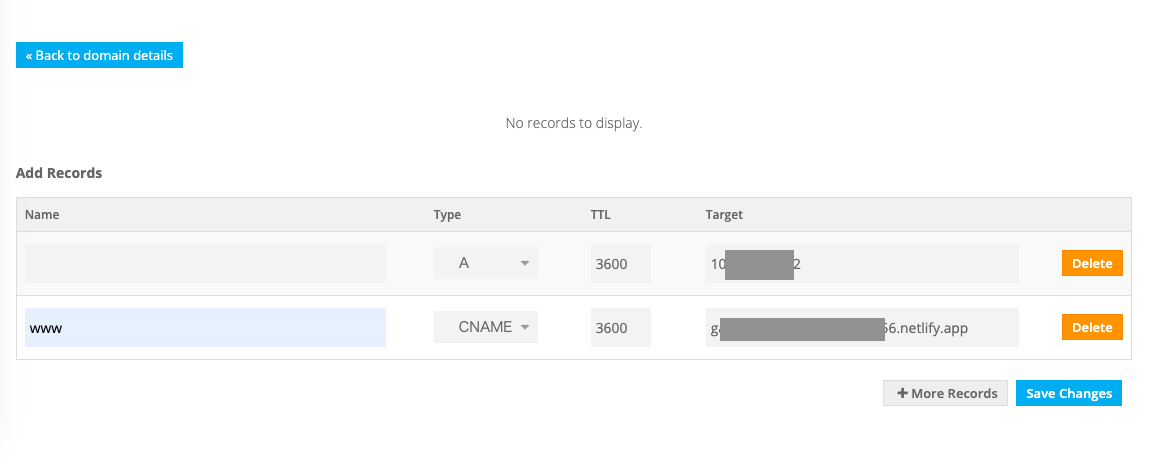
またNetlifyにもどって、さっきの画面の「Check DNS configuration」をおす)(さっきとちがうモーダルが出ます)
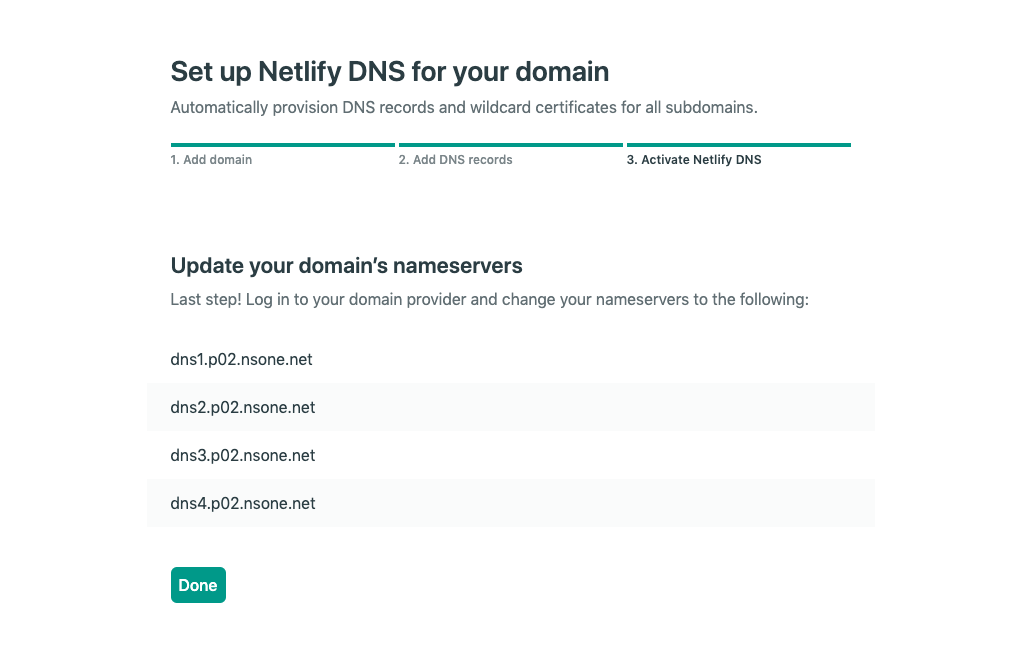
この4つのDNSをfreenomにもどって
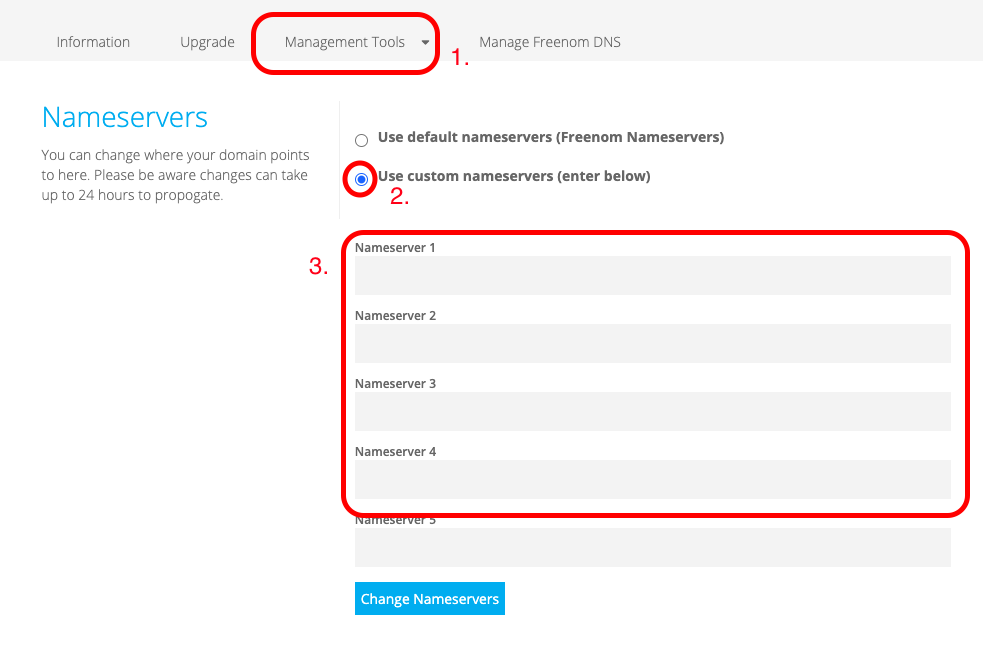
1.Manage Freenom DNS
2.Use custom nameservers (enter below) にCheckを変える
3.NetlifyのNameserverを4ついれていく
せっかくなのでHttpsにしないと!
Netlifyにもどりましょう。
Setting > HTTPS
SSL/TLS certificate
この下の
enebled
Verify Provide your own certificate
二つボタンがあるので左のVerify をおすだけです!
これでしばらく待てばfreenomでとったドメインにへんこうされてHTTPSになっている!
きになるところ
こんなに表示は遅いものなのだろうか・・・
リダイレクトがうまくいっていないような・・・
