私自身初めてMicrosoftのAzureを使ってみました。
ここでは、Azureを使う為にやることと、Face API / Custom Vision API / Computer Vision API の使い方や応用サンプルをまとめます。
1.Microsoft Azureを使ってみる
初めて使う人のための手順を簡単にメモ。
1-1.outlook アドレスを取得する
持ってない場合は下記を参考にアドレスを取得する。
https://qiita.com/TomoyoH/items/fca3f49729d82d9884eb
1-2.Microsoft Learnページにサインインする
下記ページにサインインする。
https://docs.microsoft.com/ja-jp/learn/
1-3.Azureアカウントを作成する
下記ページを参考にAzureアカウントを作成する。
https://docs.microsoft.com/ja-jp/learn/modules/create-an-azure-account/3-exercise-create-an-azure-account
無料版での利用でもクレジットカードの情報も求められる。
これで、Azureを使うための準備はできました!
2.Face API(detect & emotion)
2-0.参考
- デモページ Face Detect / 顔認識 / 感情分析 のデモができます。
- Azure Cognitive Services のLearnのページ
2-1.準備
ここを参考に「キー1」と「エンドポイント」を取得してメモっておく。
https://docs.microsoft.com/ja-jp/learn/modules/identify-faces-with-computer-vision/7-obtain-subscription-keys
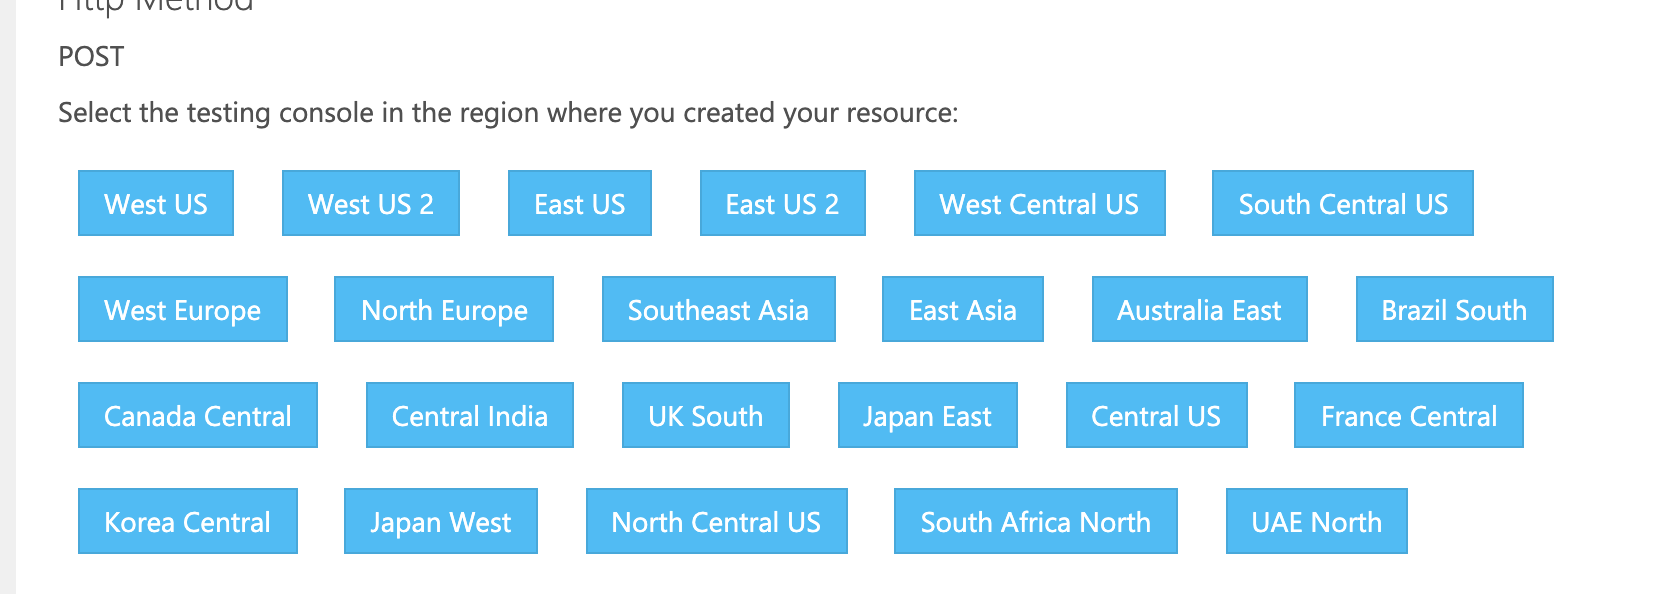
取得できたら、下記ページで使っているリージョンを選択して試してみる。
https://westus.dev.cognitive.microsoft.com/docs/services/563879b61984550e40cbbe8d/
Ocp-Apim-Subscription-Keyに先ほどの「キー1」を入れる。
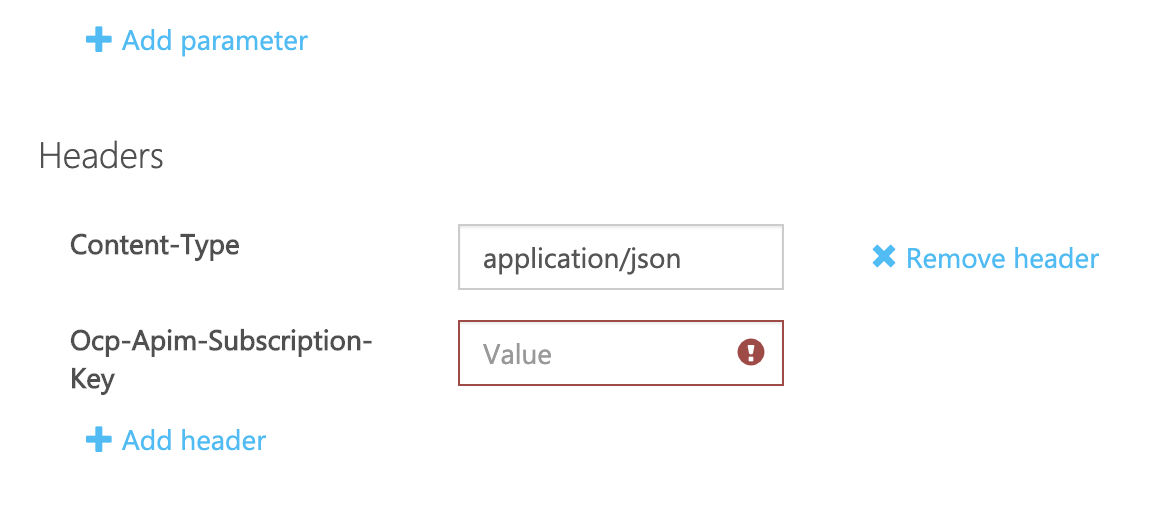
その時、この画像のurlはリンク切れしてるので、自分で適当な画像のurlに張り替えて試してください。
これで、取得したキーを使ってFace APIを試すことができたので、次に応用です。
2-2.応用サンプル
LINEに画像を送ると、人数と感情を返します。
※時々、うまく結果が返ってこない画像があったり、感情も1人分しかとってません。
↑2倍速に編集してます。#Azure の感情分析 pic.twitter.com/hUJ0CUldgV
— shima-07 (@y_kawashima_) May 13, 2020
'use strict';

const express = require('express');
const line = require('@line/bot-sdk');
const axios = require('axios');
const PORT = process.env.PORT || 3000;

const config = {
    channelSecret: '{channelSecretを入力}',
    channelAccessToken: '{channelAccessTokenを入力}'
};

const app = express();

app.post('/webhook', line.middleware(config), (req, res) => {
    console.log(req.body.events);
    Promise
      .all(req.body.events.map(handleEvent))
      .then((result) => res.json(result));
});

const client = new line.Client(config);

function handleEvent(event) {
  console.log(event);

  // 今回は画像投稿を通す
  if (event.type !== 'message' || event.message.type !== 'image' ) {
    return Promise.resolve(null);
  }

  let mes = ''
  if(event.message.type === 'image'){
    mes = '何人か数えています...!';
    getFaceDetect2(event.message.id, event.source.userId, config.channelAccessToken );
  } else{
    mes = event.message.text;
  }

  return client.replyMessage(event.replyToken, {
    type: 'text',
    text: mes
  });
}

const getFaceDetect2 = async (messageId , userId, accessToken) => {
  console.log("getFaceDetect2");
  console.log(messageId);
  console.log(accessToken);

  ///////// 画像取得 /////////////////////////////////////////////////////

  const configImageAPI = {
    url: `https://api.line.me/v2/bot/message/${messageId}/content`,
    method: 'get',
    headers: {
        'Authorization': 'Bearer ' + accessToken,
    },
    responseType: 'arraybuffer'
  };

  let responseImageAPI;
  try {
    // axios はRequest Configで受信データのタイプを設定できる。今回は arraybuffer が適切。
    responseImageAPI = await axios.request(configImageAPI);
    console.log('image data get');
  } catch (error) {
    console.log('post Error');
    console.error(error);
  }

  ///////// Face API //////////////////////////////////////////////

  const FACE_API_ENDPOINT_URL = ' {準備で取得したエンドポイント} + /face/v1.0/detect?returnFaceId=true&returnFaceLandmarks=false&returnFaceAttributes=emotion&recognitionModel=recognition_01&returnRecognitionModel=false&detectionModel=detection_01';

  // サブスクリプションをOcp-Apim-Subscription-Keyヘッダーに
  // JSONで送るのでContent-typeヘッダーにapplication/octet-stream指定
  const configFaceAPI = {
    url: FACE_API_ENDPOINT_URL,
    method: 'post',
    headers: {
      'Content-type': 'application/octet-stream',
      'Ocp-Apim-Subscription-Key':'{key1を入力}'
    },
    data: responseImageAPI.data
  };

  // axios
  let responseAzure;
  try {
      // POSTリクエストで送る
      responseAzure = await axios.request(configFaceAPI);
      //console.log('post OK');
      // データ送信が成功するとレスポンスが来る
      console.log(responseAzure.data);

  } catch (error) {
      console.log('post Error');
      // ダメなときはエラー
      console.error(error);
  }

  const countPerson = responseAzure.data.length;

  if(responseAzure.data[0].faceAttributes){
  // とりあえず[0]でひとり目の感情をとってくる。
  var emo = responseAzure.data[0].faceAttributes.emotion;
  var type;
  var val = 0;
  // 一番大きな感情を返す
  for(let key in emo){
      if(emo[key] > val){
          val = emo[key];
          type = key ;
      }
  }
}

  val = Math.round(val *100);
  console.log(emo);

  // 返信
  await client.pushMessage(userId, {
    type: 'text',
    text: `この中には ${countPerson} 人いるよ!` ,
  });

  await client.pushMessage(userId, {
    type: 'text',
    text: `感情は${type}が${val}%だよ。` ,
  });

}

app.listen(PORT);
console.log(`Server running at ${PORT}`);
LINEbot自体の基本的な説明は下記を参考にしてみてください。
https://qiita.com/n0bisuke/items/ceaa09ef8898bee8369d
3.Custom Vision API
3-0.参考
3-1.準備
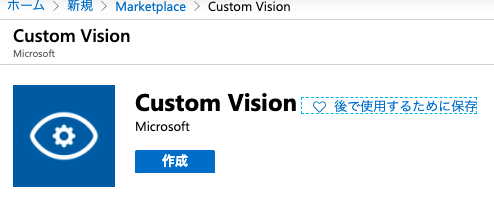
まずは「リソースの作成」からcustom visionのリソースグループやリソースを作ります。

custom visionを探して、目のアイコンが目印。これを新規作成する。
そして、custom vision用のプロジェクトを作ります。
プロジェクトを作成できたら、手順に沿ってラベル付け・学習を行っていきます。
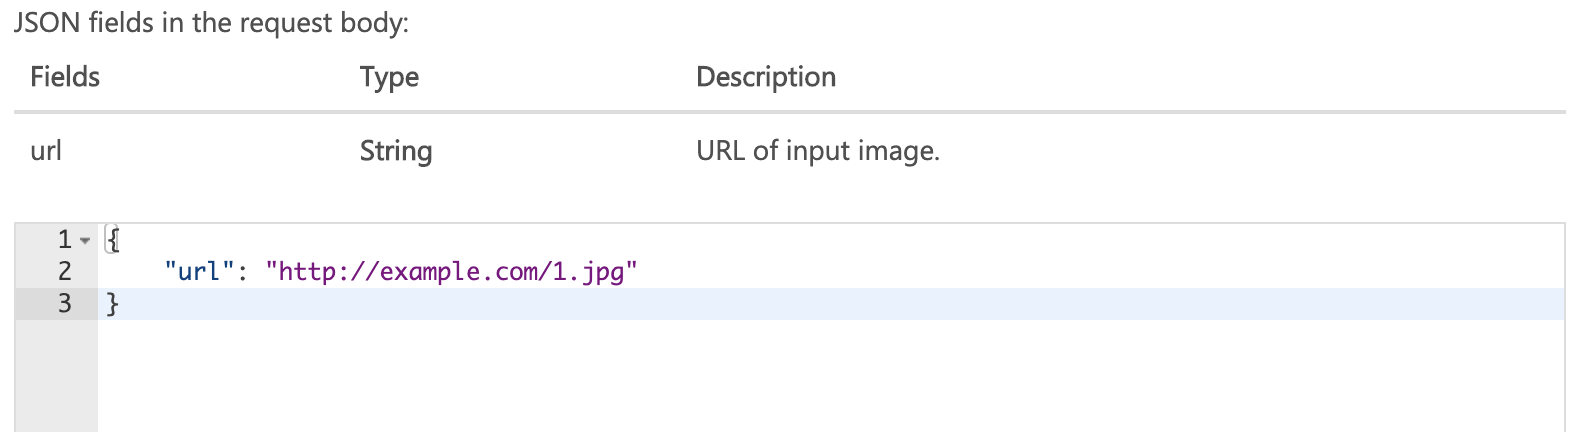
手元で試す為には下記ページにurlとPrediction-keyをメモっておきます。
https://docs.microsoft.com/ja-jp/learn/modules/classify-images-with-custom-vision-service/5-call-the-prediction-endpoint-curl
3-2.応用サンプル
上記で学習したデータを使い、複数の写真のうち「最もピカソっぽい写真」を探す。

const axios = require('axios');
let pic = [
{
name : "A",
url : "https://www.cnn.co.jp/storage/2018/11/26/97e614a5a80cd9b784f4bdc82b4ec331/rembrandt-study-of-the-head-of-a-young-man.jpg"
},
{
name : "B",
url : "https://artmuseum.jpn.org/nakuonna.jpg"
},
{
name : "C",
url : "https://www.pakutaso.com/shared/img/thumb/MAX76_gjmax20140531_TP_V.jpg"
},
]
let items = [];
let name,prob,url;
let pic_len = pic.length;
const sendCustomVision = async (imageURL,picname) => {
// If you have an image URL: にあるエンドポイントを使う
const CUSTOM_VISION_API_ENDPOINT_URL = '{上記でメモったエンドポイント}';
// Prediction-Keyの値を Prediction-Key ヘッダーに入れる
// JSONで送るので Content-type ヘッダーに application/json 指定
const configCustomVisionAPI = {
url: CUSTOM_VISION_API_ENDPOINT_URL,
method: 'post',
headers: {
'Content-type': 'application/json',
'Prediction-Key':'{上記でメモったPrediction-Key}'
},
data: {
url:imageURL
}
};
// axiosの送信設定
let responseCustomVision;
try {
// POSTリクエストで送る
responseCustomVision = await axios.request(configCustomVisionAPI);
//console.log("post OK");
// データ送信が成功するとレスポンスが来る
let len = responseCustomVision.data.predictions.length;
var who = 'picasso';
for(let i = 1; i <= len ; i++){
// ピカソだけ取得
const predictions = responseCustomVision.data.predictions[i];
//console.log(responseCustomVision.data);
if( predictions && predictions.tagName == who){
// console.log('tagName2: ' + predictions.tagName);
name = picname;
url = imageURL;
prob = predictions.probability ;
items.push({name:name,url:url,prob:prob });
}
}
if(items.length == pic.length ){
// 全ての画像のpicassoぽさを表示する
console.log(items);
// picassoぽさが最大の物だけを抽出
let items_len = items.length;
let max_probability = 0;
let max_name , max_url;
for(let k=0; k<=items_len - 1;k++){
if(max_probability < items[k].prob){
max_probability = items[k].prob;
max_name = items[k].name;
max_url = items[k].url;
}
}
// 最もピカソっぽいものを表示
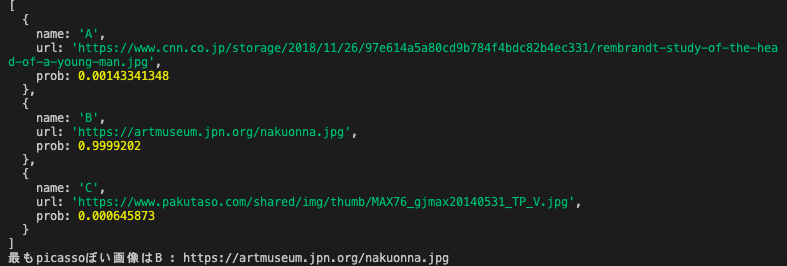
console.log('最も'+ who + 'ぽい画像は' + max_name + ' : ' + max_url);
}
} catch (error) {
console.log("post Error");
// ダメなときはエラー
console.error(error);
}
}
var j;
for(j =0; j <= pic_len - 1 ; j++){
sendCustomVision(pic[j].url,pic[j].name);
}
結果。
Bがダントツでピカソっぽい。
判定したい画像を変えたり、変数whoのところを'pollock'や'rembrandt'に変えたりして遊べます。
Computer Vision API
4-0.参考
4-1.準備
基本的に上記参考ページに沿って進めていけばOKですが、ページ通りに進める為にはサンドボックスを使う必要があります。ページ内に書かれている通りやればできるはずなのでお忘れなく。
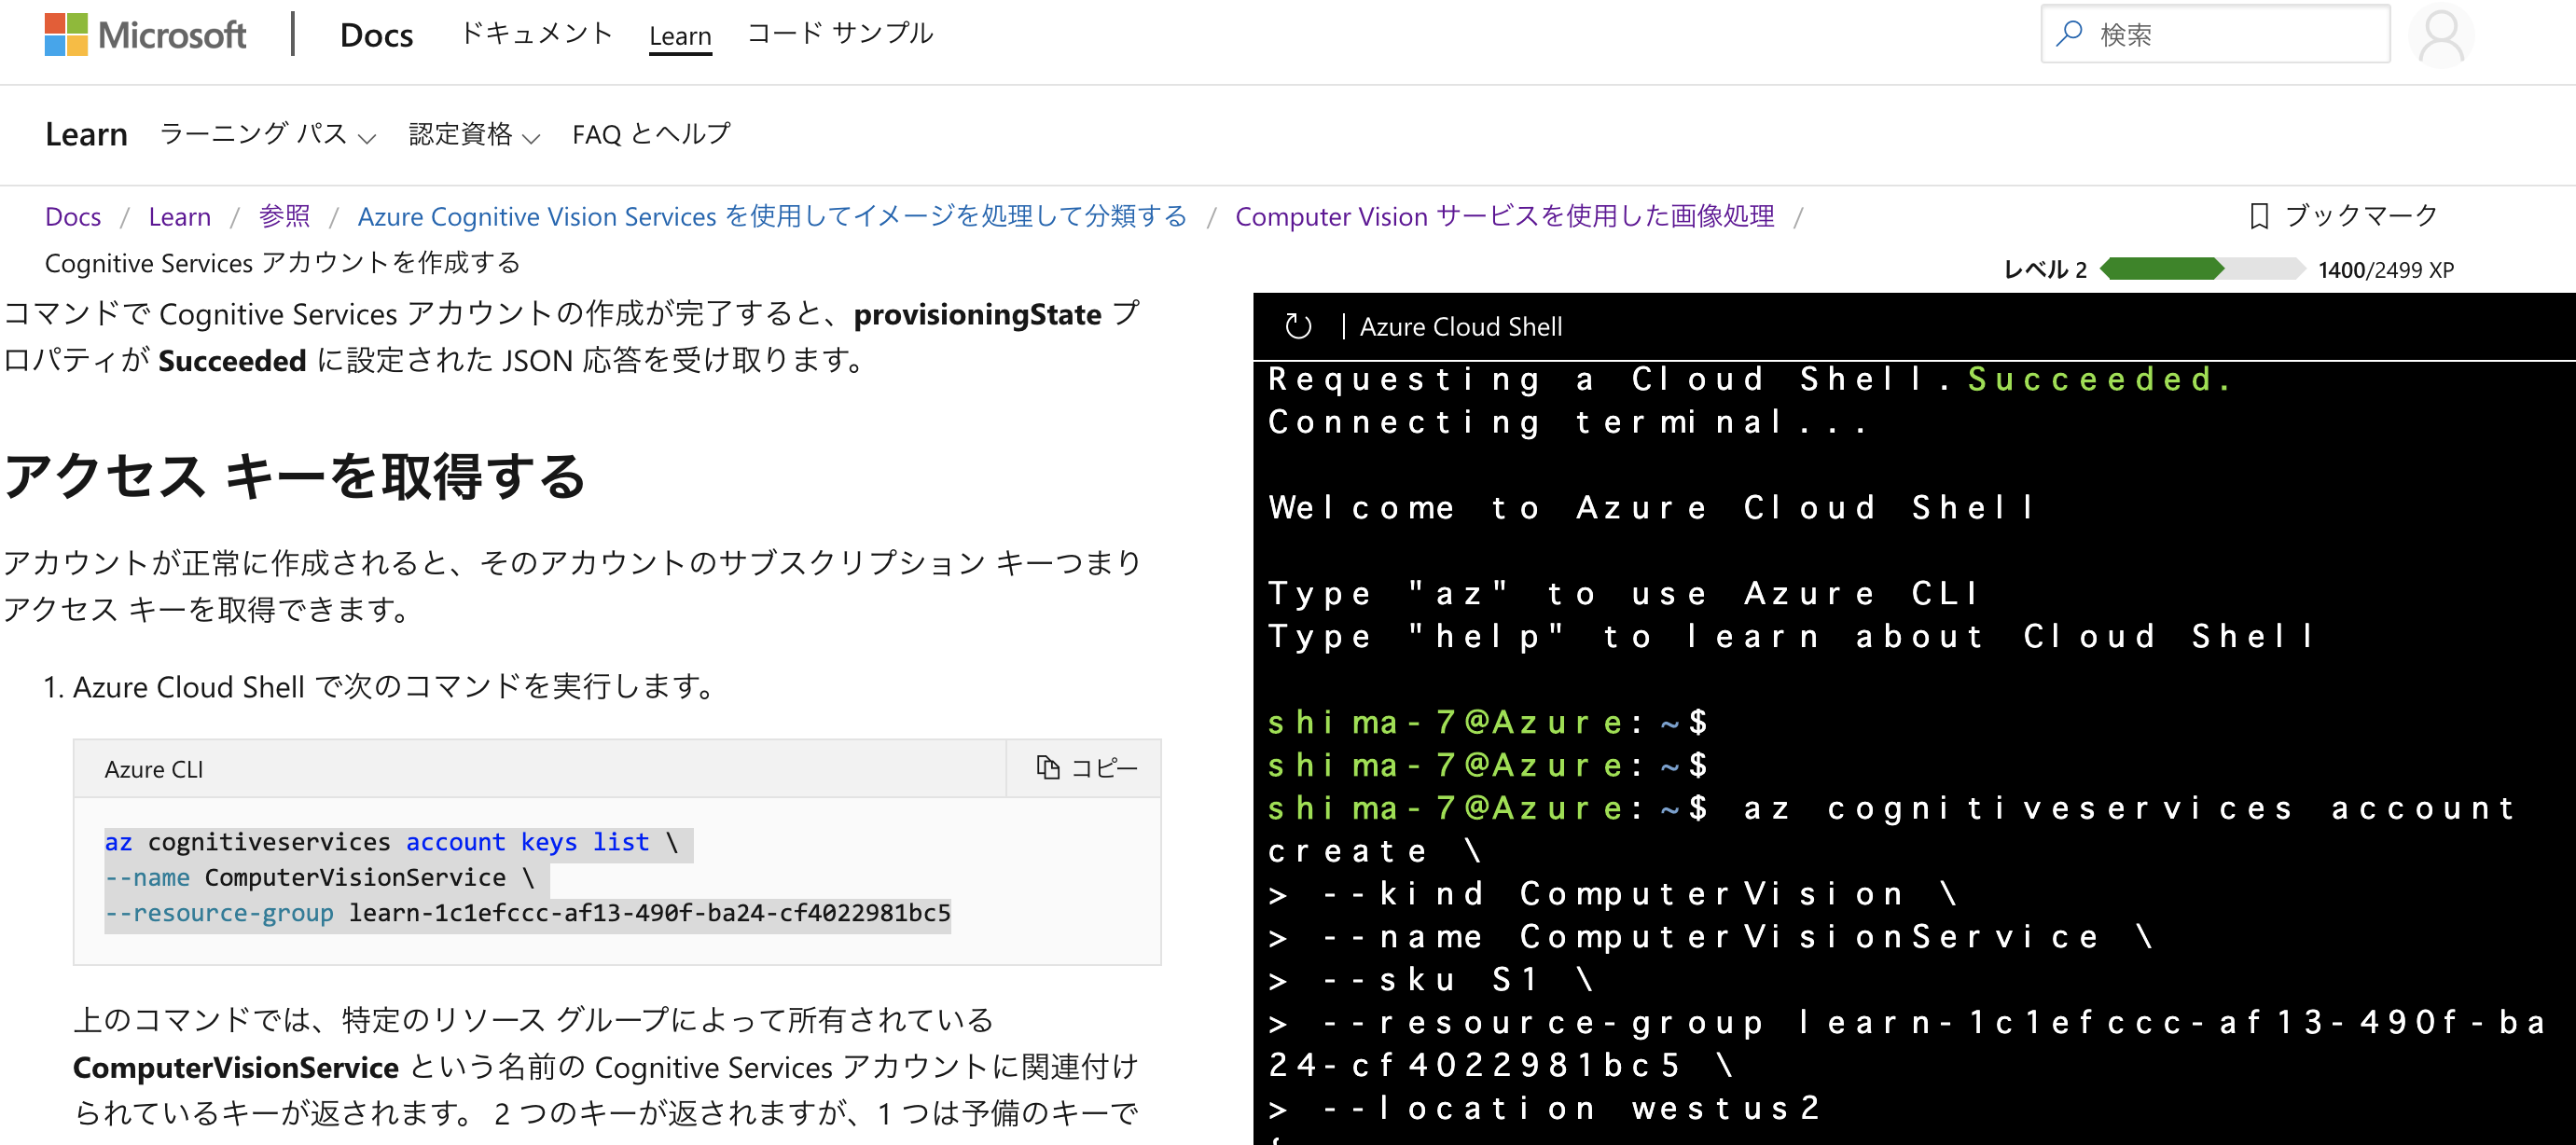
うまくいくと、右側に Azure cloud shellが表示されます。こんな感じ。
あとは基本的にページ内に記載されているコードをコピペで進めていけます。
アクセスキーはずっと使うので取得をお忘れなく。
4-2.手元で使うために
Learnページ内のサンドボックス環境で使うのも良いですが、自分の手元で動かすために、これまで同様リソースを追加します。
リソースを作成して「キーとエンドポイント」から「キー1」と「エンドポイント」をコピペしておきます。
エンドポイントに関しては、これまで
https://westus2.api.cognitive.microsoft.com/vision/v2.0/analyze?visualFeatures=Categories,Description&details=Landmarks
のように使っていた、https://westus2.api.cognitive.microsoft.com/ この部分を今取得したエンドポイントに入れ替えればOKです。
手元で動かすための基本の形
const axios = require('axios');

const ComputerVision = async (imageURL) => {
  //
  const COMPUTER_VISION_API_ENDPOINT_URL = '{# 実行したい処理のエンドポイント}';
// 例:エンドポイント + vision/v2.0/analyze?visualFeatures=Categories,Description&details=Landmarks

  // Prediction-Keyの値を Prediction-Key ヘッダーに入れる
  // JSONで送るので Content-type ヘッダーに application/json 指定
  const configCustomVisionAPI = {
    url: COMPUTER_VISION_API_ENDPOINT_URL,
    method: 'post',
    headers: {
      'Content-type': 'application/json',
      'Ocp-Apim-Subscription-Key':'{# key1}' // key1
    },
    data: {
      url:imageURL
    }
  };

  // axiosの送信設定
  let response;
  try {
    // POSTリクエストで送る
    response = await axios.request(configCustomVisionAPI);
    //console.log("post OK");
    // データ送信が成功するとレスポンスが来る
    console.log(response.data);

  } catch (error) {
    console.log("post Error");
    // ダメなときはエラー
    console.error(error);
  }

}

var url = '{# 処理したい画像のURL}';
ComputerVision(url);
4-3.応用サンプル
上記の基本コード中の、
COMPUTER_VISION_API_ENDPOINT_URL と url 部分を変えることで色々と試せます。
4-3-1.アダルトコンテンツかどうか見分ける
変更箇所
- COMPUTER_VISION_API_ENDPOINT_URL : 4-2のエンドポイント +
/vision/v2.0/analyze?visualFeatures=Adult,Description
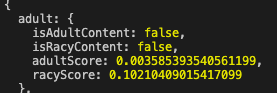
■しみけんさん
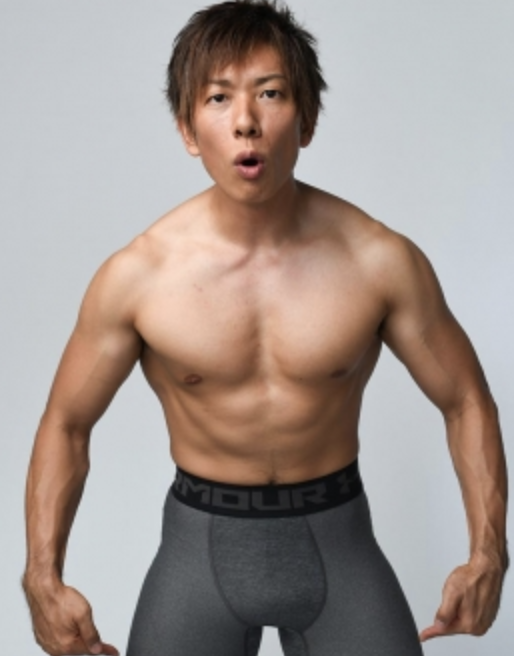
これはアダルトではないらしい。
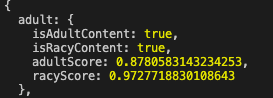
■ベッドにいる外人さん

これはアダルトのようだ。
4-3-2.OCRで文字を読み取ってみる
変更箇所
- COMPUTER_VISION_API_ENDPOINT_URL : 4-2のエンドポイント +
/vision/v2.0/ocr?language=ja
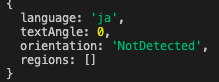
■ みつをさん
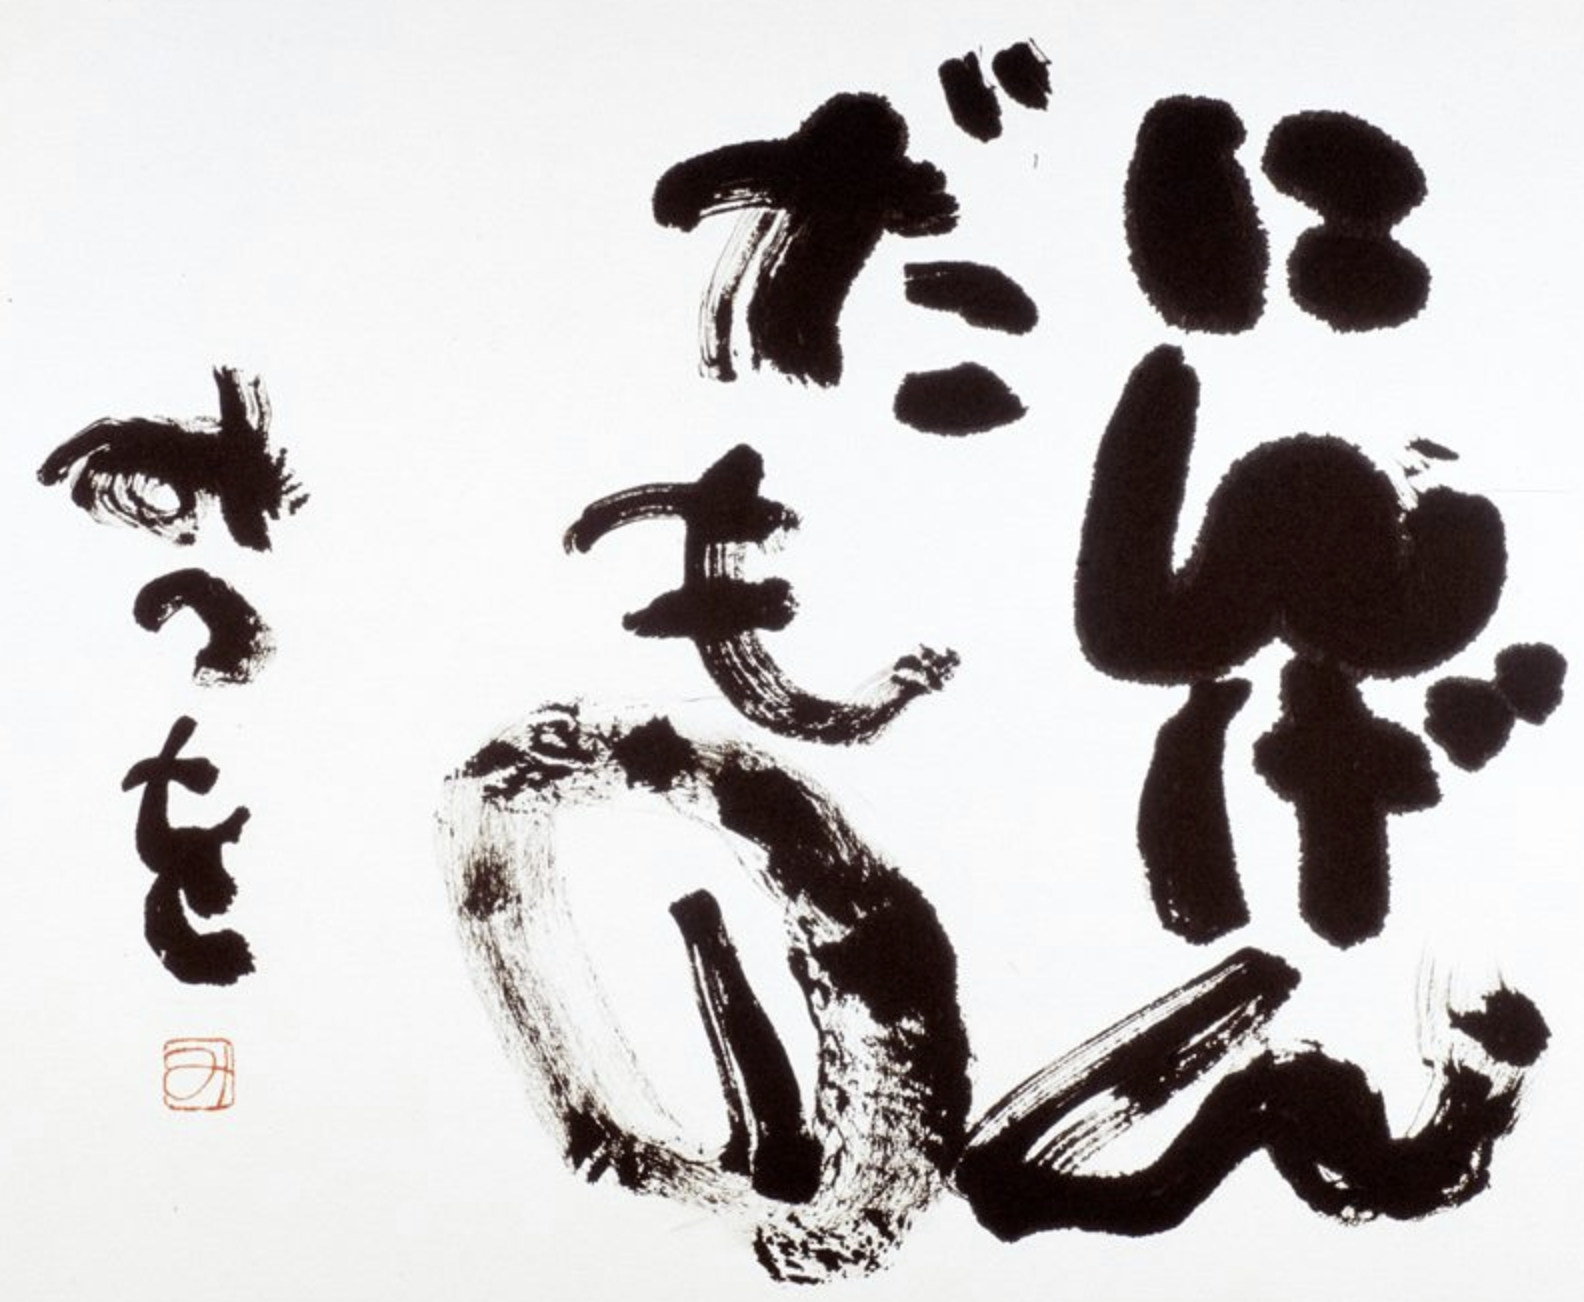
-url : https://www.hankyu-hanshin-dept.co.jp/image/20150928aidamitsuoten03.jpg
NotDetected... 難易度が高すぎたようだ。
気を取り直して。
■エヴァの予告
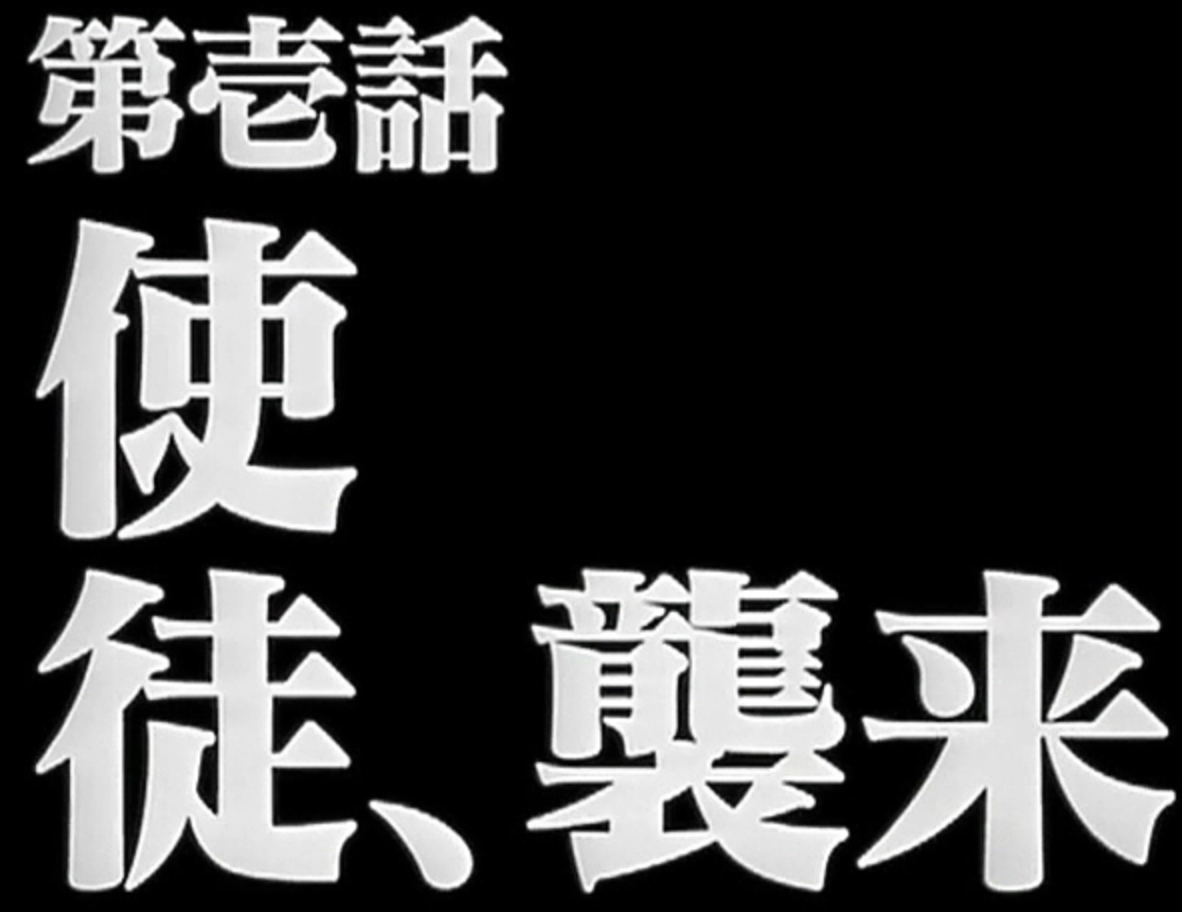
何やら取れてるっぽい。
regionsの中のlinesにいるようだ。

さらに深いところにいた...

ということで、
console.log(response.data); を
    for (let l = 0 ;  l <= response.data.regions[0].lines.length -1; l++){
        console.log(response.data.regions[0].lines[l].words);
    }
に変更して全てを取り出してみると、、、取れてる!!!
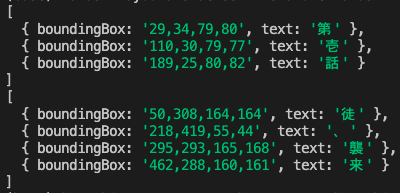
が、、、よく見ると。使徒の「使」が抜けてる。
「第壱話 徒、襲来」 惜しい!
終わりに
こんな手軽に、そしてタダで画像認識系の処理ができました。
便利な世の中です。