こんにちは、リコーの@3215です。
RICOH THETA VはAndroidベースのOSで動いているので、Androidアプリをインストールすることで機能を拡張することができます。
このアプリをTHETAプラグインと呼んでおり、開発・公開する仕組みも提供しています。
この記事ではTHETAプラグインのWeb UIの実装方法を紹介します。
THETAプラグインをご存じない方はこちらをご覧ください。
THETAプラグインを開発してみたいという方はまずは以下の記事をご覧ください。
興味を持たれた方はtwitterのフォローとTHETAプラグイン開発コミュニティ(slack)への参加もよろしくおねがいします。
Web UIとは
THETAプラグインの機能によっては、撮影時のカメラ設定や連携する外部サービスのアカウントなどを、ユーザーが設定できるようにしておきたい場合も多いと思います。
しかしRICOH THETA Vには画面がないので、通常のAndroidアプリのようなレイアウトや画面遷移を使うことができません。
そこでTHETAプラグインのDeveloper Guideには、Webサーバーを立てることでWeb UIを提供できると記載されています。
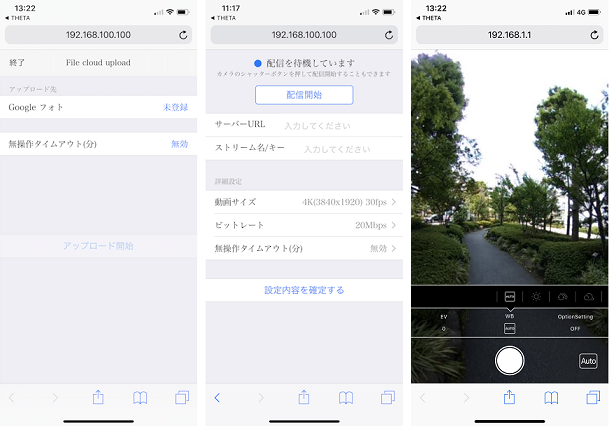
公式プラグイン(クラウドアップロード、無線ライブストリーミング、自動顔ぼかしβ版)でもこの方法で設定画面が提供されています。
プラグイン起動中であれば、スマートフォンのRICOH THETAアプリのカメラ設定からWeb UIにアクセスすることができます。URLを直接入力すればブラウザからアクセスすることも可能です。
今回は簡単なWeb UIを実装する方法を紹介します。
既にある程度実装のイメージがついている方は、公式プラグインのソースコードを参考に実装いただくのも良いかと思います。
THETA Plug-in SDKのプロジェクトをインポートする
まずは以下の記事を参考にしてPlug-in SDKのプロジェクトをAndroid Studioにインポートし、動作することを確認してください。
【THETA プラグイン開発】THETAでRICOH THETA Plug-in SDKを動かす方法
package名やプラグインの表示名は必要に応じて変更しておいてください。
プラグインの表示名はres/values/strings.xmlのapp_nameで変更できます。
THETAのWi-FiをUSB接続中も有効にしておく
Web UIを確認するためには、Wi-Fi経由でTHETAにアクセスする必要があります。
しかしTHETAはそのままの状態ではUSBを接続するとWi-Fiが無効になってしまうので、Android Studioでプラグインを実行しながらWeb UIを確認することができずとても不便です。
そこで、THETAのWi-FiをUSB接続中に有効化する方法でUSB接続中でもWi-Fiが使えるようにしておきます。
Web UIを有効にする
Developer Guideに記載の手順で、スマートフォンのRICOH THETAアプリのプラグイン画面からWeb UIを開くことができるようにしておきます。
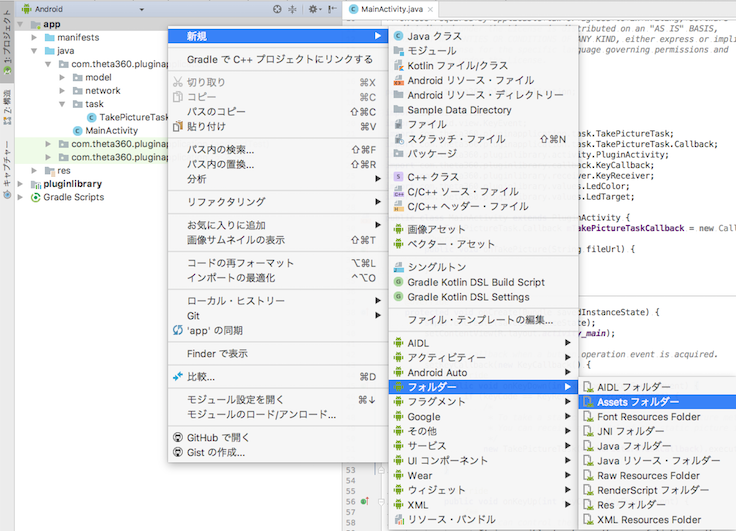
まず、[右クリック]->[新規]->[フォルダー]->[Assetsフォルダー]から、assetsフォルダーを作成します。
フォルダーが作成されたら、settings.jsonファイルを作成します。
settings.jsonには以下を記載します。
{
  "webServer": true
}
スマートフォンとTHETAをWi-Fi接続してAndroid Studioでプロジェクトを実行し、RICOH THETAアプリのプラグイン画面で以下のように「プラグイン起動中」の右がリンク付きの表示になっていればOKです。

HTMLファイルを作成し、assetsに配置する
「Hello World!」と表示されるだけのindex.htmlを作成し、assetsフォルダーの下に作成します。
<html>
  <head>
    <title>Web UI Simple</title>
  </head>
  <body>
    <h1>
      Hello World!
    </h1>
  </body>
</html>
Webサーバーを実装する
今回はNanoHttpdというライブラリを利用してWebサーバーを実装します。
appのbuild.gradleのdependenciesに以下を追加します。
implementation 'org.nanohttpd:nanohttpd-webserver:2.3.1'
NanoHTTPDを継承したクラスを作成し、必要に応じてメソッドをオーバーライドして実装していきます。
最低限、以下2点を実装します。
- コンストラクタで
portに8888を指定する -
serve()メソッドをオーバーライドして受け取ったリクエストに対する処理を実装する
リクエストによらず常にindex.htmlを返すだけのWebサーバーを、MainActivityで立てるのであれば以下のような感じです。
public class MainActivity extends PluginActivity {

  private Context context;
  private WebServer webServer;
  .....

  @Override
  protected void onCreate(Bundle savedInstanceState) {
    .....

    this.context = getApplicationContext();
    this.webServer = new WebServer(this.context);
    try {
      this.webServer.start();
    } catch (IOException e) {
      e.printStackTrace();
    }
    .....

  }
  .....

  protected void onDestroy() {
    super.onDestroy();
    if (this.webServer != null) {
      this.webServer.stop();
    }
  }
  .....

  private class WebServer extends NanoHTTPD {

    private static final int PORT = 8888;
    private Context context;

    public WebServer(Context context) {
      super(PORT);
      this.context = context;
    }

    @Override
    public Response serve(IHTTPSession session) {
      AssetManager assetManager = context.getAssets();
      InputStream is = null;
      try {
        is = assetManager.open("index.html");  // このInputStreamはNanoHTTPD側でcloseしてくれる
        return newChunkedResponse(Status.OK, "text/html", is);
      } catch (IOException e ) {
        e.printStackTrace();
        return newFixedLengthResponse(Status.INTERNAL_ERROR, "text/plain", e.getMessage());
      }
    }

  }

}
プラグインを起動し、Web UIにアクセスするとindex.htmlの内容が表示されます。

Web UIからLEDランプの色を設定できるようにする
ここまででWeb UIの基本的な実装はできているので、あとはindex.htmlやWebサーバーの実装を拡張していくだけです。
今回はTHETAのLEDランプの色をWeb UIから設定できるようにしてみました。

サンプルコードはこの記事の最後にあります。
※エラー処理は省略しているので、流用される際はご注意ください。
実装の概要は以下になります。
- 設定画面を
formとして実装 -
selectパーツで青(デフォルト)、赤、白を選択可能 -
OKボタン押下でLEDランプの色を変更(LEDランプ色変更の方法はこちらを参照) - LEDランプの色は
SharedPreferencesに保存 - 現在選択中の色を初期値として表示するためテンプレートエンジン(Mustache)を利用
まとめ
Web UIの基本的な実装方法を紹介し、THETAのLEDランプの色をTHETAプラグインのWeb UIから変更できるようにしてみました。
ただし、今回のサンプルは最低限の実装しかしていないため、かなり見づらいUIになっています。
スマートフォンから見やすい画面にするためには、cssを適用する必要があります。
JavaScriptを使うことで、より複雑なWeb UIを作ることも可能です。
また、設定値が多くなるようであればSharedPreferencesでなくSQLiteを使った方が良いでしょう。
これらの方法を知りたい場合は、公式プラグインのソースコードを参考にしてみてください。
THETAプラグイン開発に興味を持たれた方はぜひパートナープログラムにご登録ください!
なお、登録時に申請したシリアルナンバーのTHETAについてはメーカーサポート対象外になりますので、ご注意ください。
サンプルコード
package com.theta360.pluginapplication;

import android.content.Context;
import android.content.SharedPreferences;
import android.content.res.AssetManager;
import android.os.Bundle;
import android.preference.PreferenceManager;
import android.view.KeyEvent;
import com.samskivert.mustache.Mustache;
import com.theta360.pluginapplication.task.TakePictureTask;
import com.theta360.pluginapplication.task.TakePictureTask.Callback;
import com.theta360.pluginlibrary.activity.PluginActivity;
import com.theta360.pluginlibrary.callback.KeyCallback;
import com.theta360.pluginlibrary.receiver.KeyReceiver;
import com.theta360.pluginlibrary.values.LedColor;
import com.theta360.pluginlibrary.values.LedTarget;
import fi.iki.elonen.NanoHTTPD;
import fi.iki.elonen.NanoHTTPD.Response.Status;
import java.io.IOException;
import java.io.InputStream;
import java.io.InputStreamReader;
import java.io.OutputStream;
import java.io.OutputStreamWriter;
import java.io.Reader;
import java.io.Writer;
import java.util.HashMap;
import java.util.List;
import java.util.Map;

public class MainActivity extends PluginActivity {

  private Context context;
  private WebServer webServer;
  private static final String PREFERENCE_KEY_COLOR = "color";

  private TakePictureTask.Callback mTakePictureTaskCallback = new Callback() {
    @Override
    public void onTakePicture(String fileUrl) {

    }
  };

  @Override
  protected void onCreate(Bundle savedInstanceState) {
    super.onCreate(savedInstanceState);
    setContentView(R.layout.activity_main);

    this.context = getApplicationContext();
    notificationLedBlink(LedTarget.LED3, this.loadLedColor(), 1000);
    this.webServer = new WebServer(this.context);
    try {
      this.webServer.start();
    } catch (IOException e) {
      e.printStackTrace();
    }

    // Set enable to close by pluginlibrary, If you set false, please call close() after finishing your end processing.
    setAutoClose(true);
    // Set a callback when a button operation event is acquired.
    setKeyCallback(new KeyCallback() {
      @Override
      public void onKeyDown(int keyCode, KeyEvent event) {
        if (keyCode == KeyReceiver.KEYCODE_CAMERA) {
          /*
           * To take a static picture, use the takePicture method.
           * You can receive a fileUrl of the static picture in the callback.
           */
          new TakePictureTask(mTakePictureTaskCallback).execute();
        }
      }

      @Override
      public void onKeyUp(int keyCode, KeyEvent event) {
        /**
         * You can control the LED of the camera.
         * It is possible to change the way of lighting, the cycle of blinking, the color of light emission.
         * Light emitting color can be changed only LED3.
         */
//         notificationLedBlink(LedTarget.LED3, LedColor.BLUE, 1000);
      }

      @Override
      public void onKeyLongPress(int keyCode, KeyEvent event) {

      }
    });
  }

  @Override
  protected void onResume() {
    super.onResume();
  }

  @Override
  protected void onPause() {
    // Do end processing
    close();

    super.onPause();
  }

  protected void onDestroy() {
    super.onDestroy();
    if (this.webServer != null) {
      this.webServer.stop();
    }
  }

  private void saveLedColor(LedColor ledColor) {
    SharedPreferences data = PreferenceManager.getDefaultSharedPreferences(context);
    SharedPreferences.Editor editor = data.edit();
    editor.putString(PREFERENCE_KEY_COLOR, ledColor.toString());
    editor.apply();
  }

  private LedColor loadLedColor() {
    SharedPreferences data = PreferenceManager.getDefaultSharedPreferences(context);
    String savedColor = data.getString(PREFERENCE_KEY_COLOR, LedColor.BLUE.toString());
    return LedColor.getValue(savedColor);
  }

  private class WebServer extends NanoHTTPD {

    private static final int PORT = 8888;
    private Context context;
    private static final String INDEX_TEMPLATE_FILE_NAME = "index_template.html";
    private static final String INDEX_OUTPUT_FILE_NAME = "index_out.html";
    private static final String HTML_SELECTOR_ID_COLOR = "color";

    public WebServer(Context context) {
      super(PORT);
      this.context = context;
    }

    @Override
    public Response serve(IHTTPSession session) {
      Method method = session.getMethod();
      String uri = session.getUri();
      switch (method) {
        case GET:
          return this.serveFile(uri);
        case POST:
          Map<String, List<String>> parameters = this.parseBodyParameters(session);
          this.updatePreferences(uri, parameters);
          return this.serveFile(uri);
        default:
          return newFixedLengthResponse(Status.METHOD_NOT_ALLOWED, "text/plain",
              "Method [" + method + "] is not allowed.");
      }
    }

    private Response serveFile(String uri) {
      switch (uri) {
        case "/":
          return this.newHtmlResponse(this.generateIndexHtmlContext(), INDEX_TEMPLATE_FILE_NAME, INDEX_OUTPUT_FILE_NAME);
        default:
          return newFixedLengthResponse(Status.NOT_FOUND, "text/plain", "URI [" + uri + "] is not found.");
      }
    }

    private Response newHtmlResponse(Map<String, Object> data, String templateFileName, String outFileName) {
      AssetManager assetManager = context.getAssets();
      try(InputStreamReader template = new InputStreamReader(assetManager.open(templateFileName));
          OutputStreamWriter output = new OutputStreamWriter(openFileOutput(outFileName, Context.MODE_PRIVATE))) {
        Mustache.compiler().compile(template).execute(data, output);
        return newChunkedResponse(Status.OK, "text/html", openFileInput(outFileName));
      } catch (IOException e) {
        e.printStackTrace();
        return newFixedLengthResponse(Status.INTERNAL_ERROR, "text/plain", e.getMessage());
      }
    }

    private Map<String, List<String>> parseBodyParameters(IHTTPSession session) {
      Map<String, String> tmpRequestFile = new HashMap<>();
      try {
        session.parseBody(tmpRequestFile);
      } catch (IOException e) {
        e.printStackTrace();
      } catch (ResponseException e) {
        e.printStackTrace();
      }
      return session.getParameters();
    }

    private void updatePreferences(String uri, Map<String, List<String>> parameters) {
      if(parameters == null) return;

      switch (uri) {
        case "/":
          this.updateLedColor(parameters);
          return;
        default:
          return;
      }
    }

    private void updateLedColor(Map<String, List<String>> parameters) {
      if (parameters.get(HTML_SELECTOR_ID_COLOR) == null || parameters.get(HTML_SELECTOR_ID_COLOR).isEmpty()) {
        return;
      }
      String color = parameters.get(HTML_SELECTOR_ID_COLOR).get(0);
      LedColor ledColor = LedColor.getValue(color);
      notificationLedBlink(LedTarget.LED3, ledColor, 1000);
      saveLedColor(ledColor);
    }

    private Map<String, Object> generateIndexHtmlContext() {
      Map<String, Object> context = new HashMap<>();
      context.putAll(this.generateLedColorContext());
      return context;
    }

    private Map<String, Object> generateLedColorContext() {
      Map<String, Object> ledContext = new HashMap<>();
      LedColor ledColor = loadLedColor();
      switch (ledColor) {
        case BLUE:
          ledContext.put("isBlue", true);
          break;
        case RED:
          ledContext.put("isRed", true);
          break;
        case WHITE:
          ledContext.put("isWhite", true);
          break;
        default:
          ledContext.put("isBlue", true);
      }
      return ledContext;
    }

  }

}
<html>
  <head>
    <meta http-equiv="Content-Type" content="text/html" charset="UTF-8">
    <title>Web UI Simple</title>
  </head>
  <body>
    <form action="/" method="post" id="form_id">
      <div id="settings_box">
        <h1>
          <label>LED Color</label>
        </h1>
        <p>
          <select id="color" name="color">
            <option value="blue" {{#isBlue}}selected{{/isBlue}}>Blue</option>
            <option value="red" {{#isRed}}selected{{/isRed}}>Red</option>
            <option value="white" {{#isWhite}}selected{{/isWhite}}>White</option>
          </select>
        </p>
      </div>
      <div id="submit_button_box">
        <button id="submit_button" type="submit" name="action" value="send">OK</button>
      </div>
    </form>
  </body>
</html>