TinyViewPlus As Sensors (tvpas)
1. Overview
tvpas is software designed to work with TinyViewPlus, a lap timing software for FPV drone racing, in conjunction with the race management software FPVTrackside.
In a typical setup, tvpas communicates with FPVTrackside through the tvpas-relay-server. The tvpas-relay-server emulates a standard RotorHazard device, handling the necessary communication with FPVTrackside.
By implementing this configuration, the affordable and easy-to-use ArUco marker-based lap counting available in TinyViewPlus can be utilized within FPVTrackside.
2. System Configurations
This section describes the system configurations when using tvpas and FPVTrackside together. Please consider these as a reference for determining what kind of equipment is practically necessary.
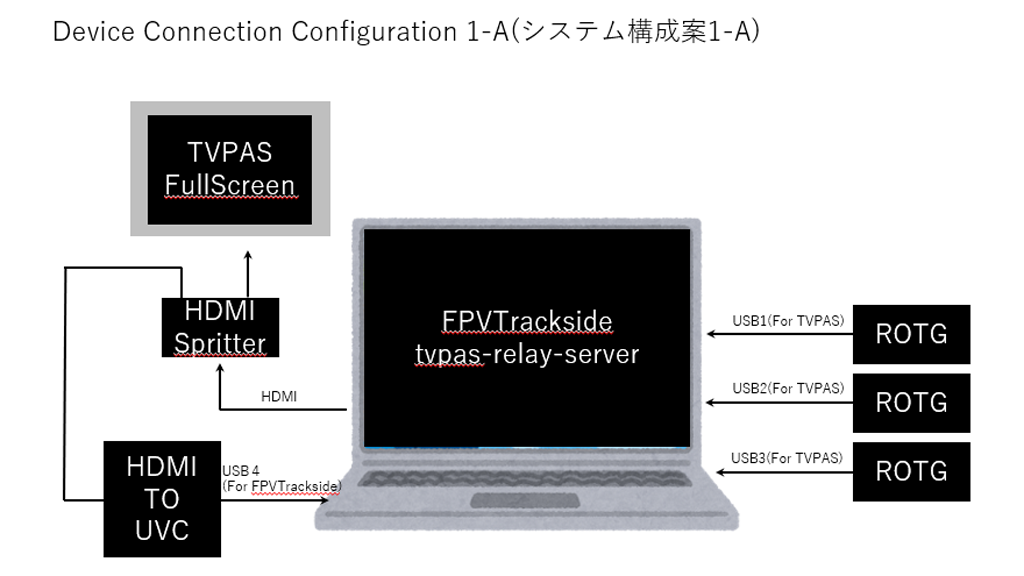
2.1. Configuration 1-A: Using Eachine Skydroid FUAV Receiver's USB Output
-
Pros:
- Requires a relatively powerful PC to run everything on a single machine.
- The output from
tvpasuses an HDMI->UVC device to be recognized as a distribution camera inFPVTrackside, so the PC's second screen is assigned totvpas(an additional monitor is essentially required). - Requires connecting a number of USB video capture devices (UVC) equal to the number of pilots in the race + 1. On a Windows PC, it is not possible to increase UVC device connections using a USB-HUB, so please connect them to separate ports.
2.2. Configuration 1-B: Using HDZero EventVRX
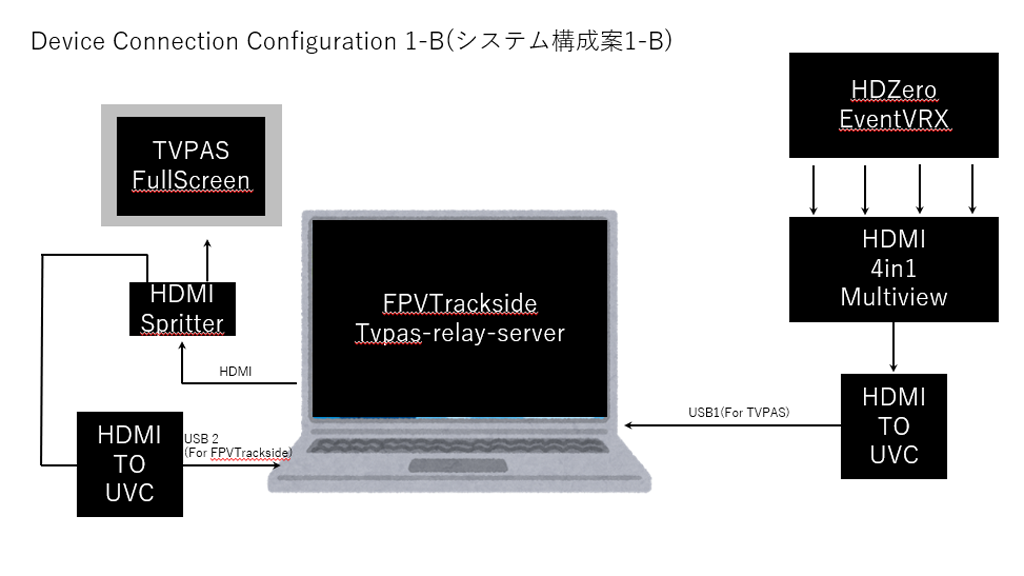
The HDZero EventVRX can simultaneously receive up to four video feeds and output each to a separate HDMI port. It can also combine up to four feeds into a single screen for output. This combined feed is converted to UVC and input into the PC.
-
Pros:
- Reduces the number of UVC devices connected to the PC to one, saving USB ports.
- The HDZero EventVRX accurately handles the interlaced analog video signal, allowing a stable 60FPS feed to be sent to
tvpas, which improves marker detection accuracy.
-
Cons:
- The HDZero EventVRX is expensive.
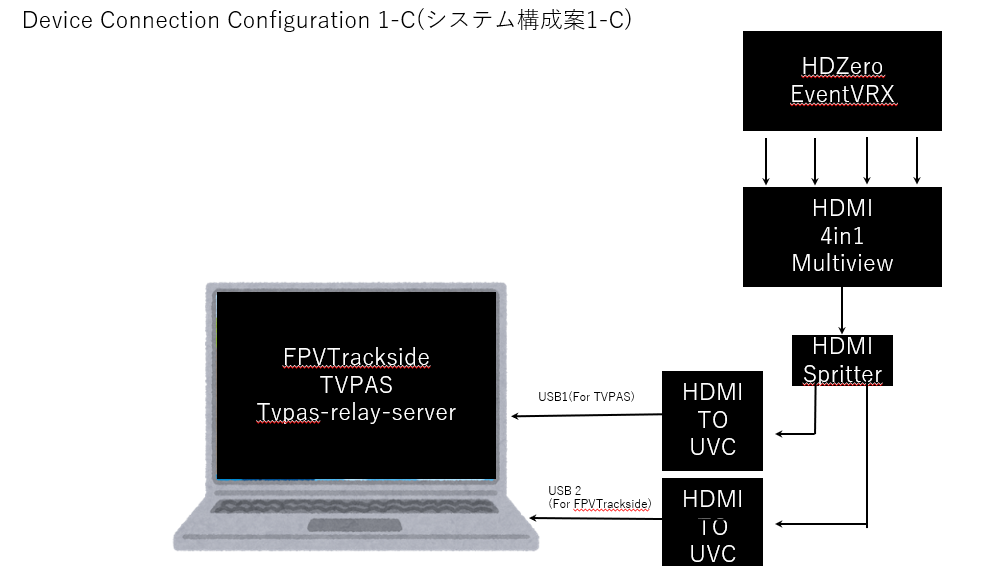
2.3. Configuration 1-C: Using HDZero EventVRX without an External Monitor
-
Pros:
- Since the
tvpasfeed is not used inFPVTrackside, there is no need to displaytvpasin full screen.
- Since the
-
Cons:
- Since the receiver's video is not displayed in
FPVTrackside, the correlation between marker detection and the pilot is not displayed.
- Since the receiver's video is not displayed in
2.4. Configuration 1-D: Using an OBS Plugin to Input a Single UVC
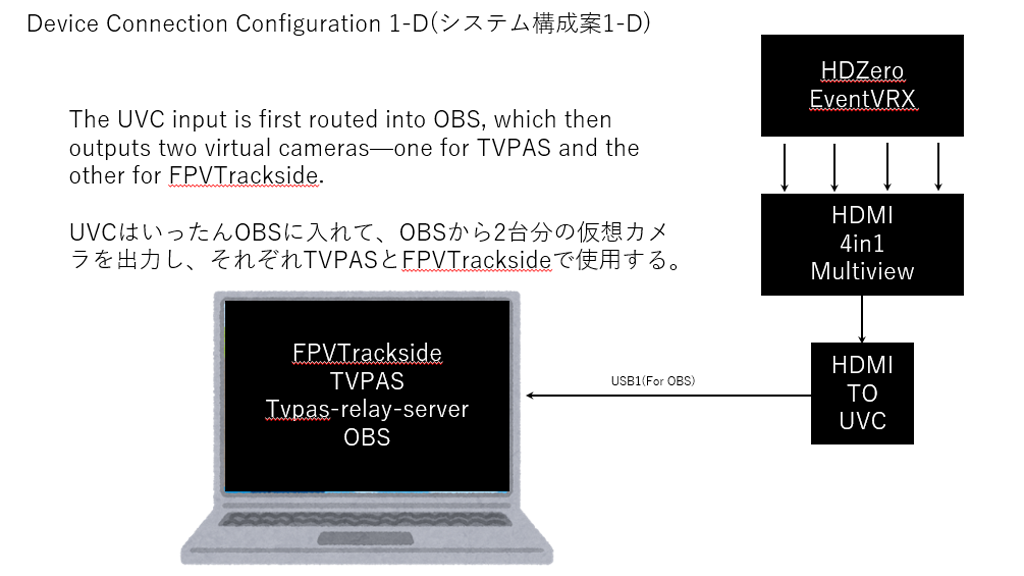
Finally, I will introduce a method that uses OBS to manage with a single HDMI->UVC device. The hardware connection is very simple, but the software setup becomes more complex.
Previously, the receiver's video was distributed to two sources, but a method can be considered where tvpas reads the UVC feed, OBS captures tvpas, outputs it as a distribution camera, and FPVTrackside receives it.
-
Pros:
- Requires the least amount of hardware.
-
Cons:
- The load may be heavy on low-spec PCs.
- Requires OBS configuration.
2.5. Configuration 2: Two-PC Setup
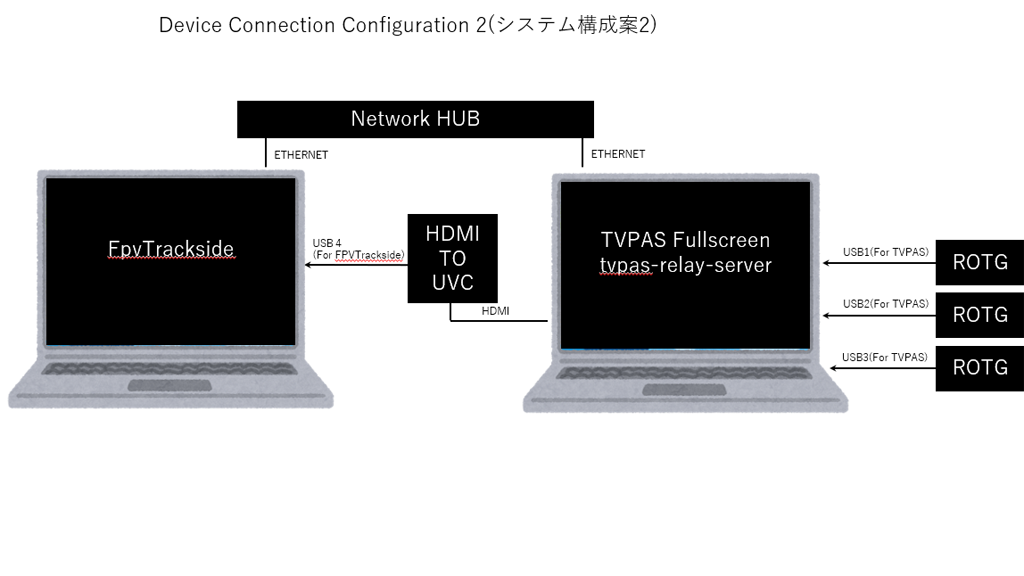
This is my current main configuration.
-
Pros:
- Start with the minimum hardware on one PC, and if the load is heavy, add another PC to flexibly scale the system.
-
Cons:
- Operation on two PCs is cumbersome.
3. Software Installation
Download TinyViewPlusAsSensors1.0.1beta.zip from the release files required for operation. Extract the downloaded file to a suitable location.
3.1. tvpas-relay-server Setup
Next, install Node.js, which is required to run tvpas-relay-server. Download and install it from the official website (the Windows installer is recommended).
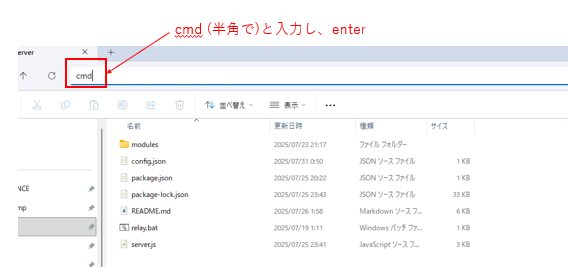
Open the tvpas-relay-server folder, type cmd in the address bar, and press the Enter key.
Type npm install and press the Enter key.
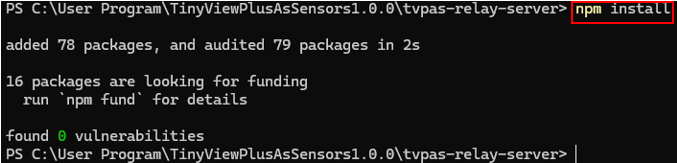
The installation is now complete.
Double-click relay.bat to start the tvpas-relay-server.

Since tvpas is not running, a message "Waiting for tvpas heartbeat..." is displayed. Leave the server running.
3.2. tvpas Setup
If your receiver is a USB-connected type like the ROTG FUAV Skydroid, no special settings are required.
If you are inputting a 4-in-1 video feed into tvpas, UVC settings are necessary.
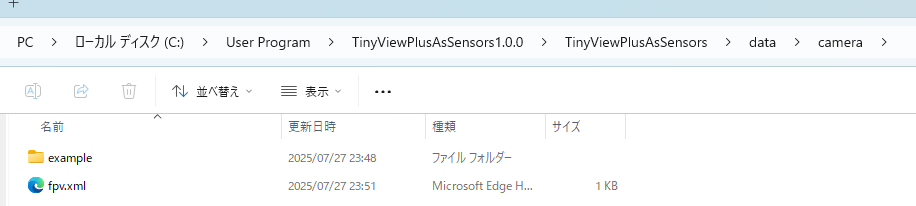
You will need to edit data/camera/fpv.xml. Open the example folder.
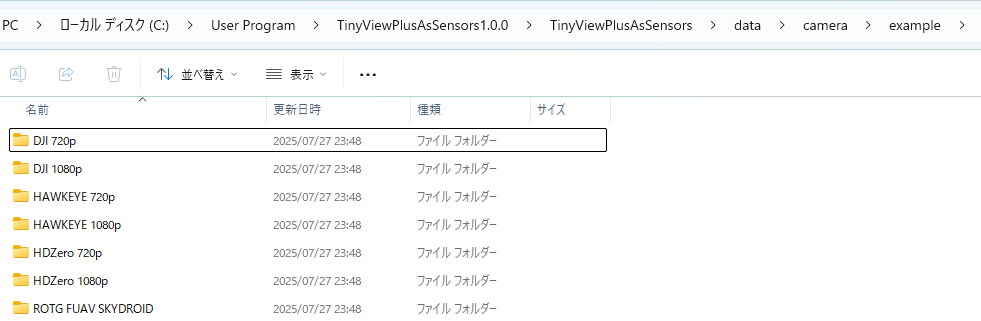
As you can see, there are setting files prepared for each configuration. For example, if you are using a HDZERO Monitor with a 4-in-1 feed, copy the fpv.xml file from the HDZero 720p folder to the data/camera/fpv.xml location mentioned earlier. (For EVENT VRX or HAWKEYE, use the HAWKEYE folder).
After copying, open fpv.xml with a text editor.
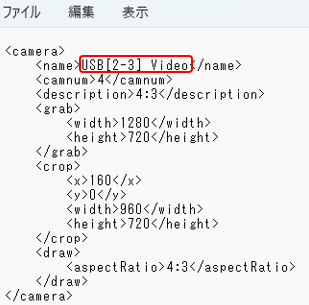
Edit the content of the <device_name> tag to match the UVC device name confirmed in the Device Manager and save the file.
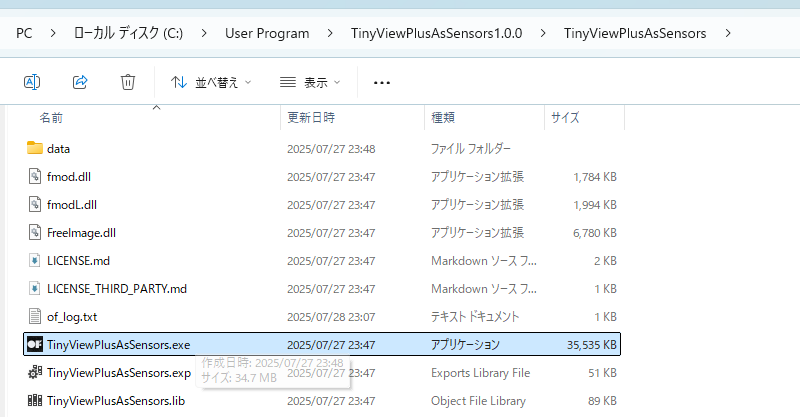
After completing the above steps, run TinyViewPlusAsSensors.exe, and press the space key on the camera selection screen to start marker detection.

The tvpas-relay-server screen will update, receive a heartbeat from tvpas, enter relay mode, and indicate that it is waiting for a connection from FPVTrackside.
Set tvpas to full-screen display on the second screen (by pressing the F key), connect the second screen to a UVC device, and plug it into a USB port on the PC (this is for FPV screen capture in FPVTrackside).
4. FPVTrackside Setup
The initial startup screen of FPVTrackside will look like this.

For testing, three settings are required: Video Settings, Channel Settings, and Timing Settings.
4.1. Channel Settings
From the startup screen, select Channel Settings.
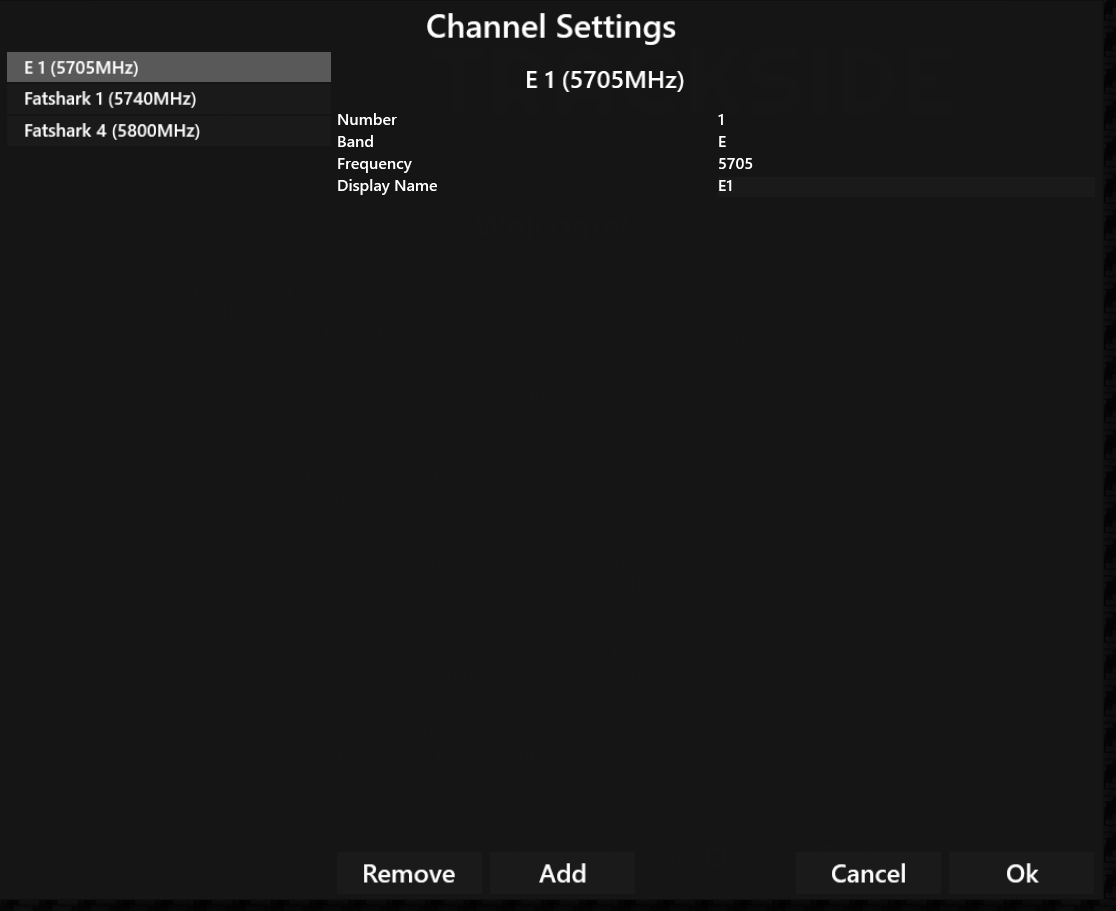
Click Add and add E1, Fatshark1, and Fatshark4. After adding all three, click OK to finish.
4.2. Video Settings
From the startup screen, select Video Settings.
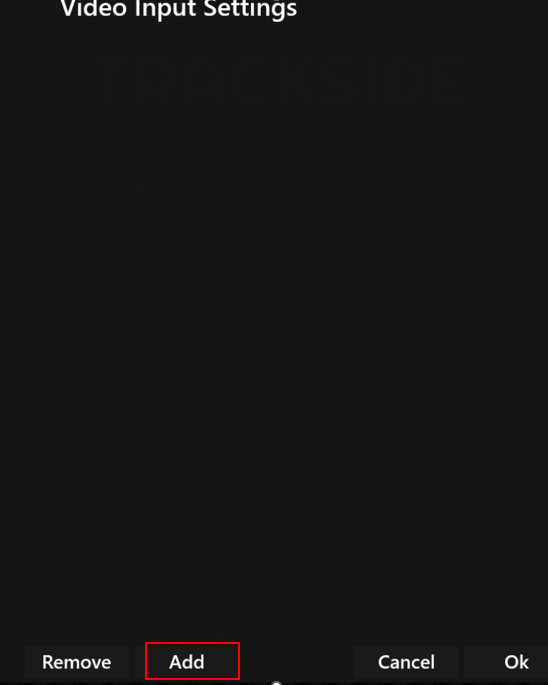
On this screen, click Add.
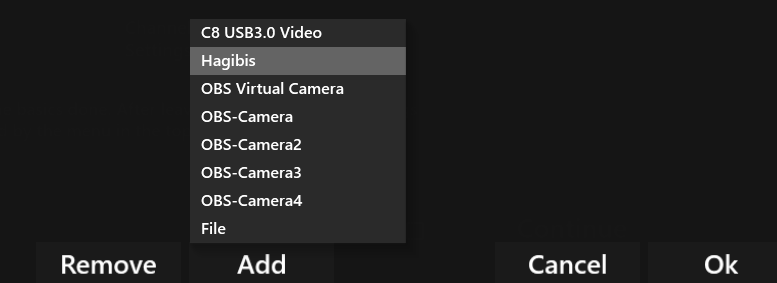
A list of UVC devices will be displayed, so select the UVC device that is capturing the tvpas screen.
(In my case, Hagibis is the UVC device capturing the tvpas screen, and C8 USB3.0 Video is the UVC device for inputting the receiver's video into tvpas.)
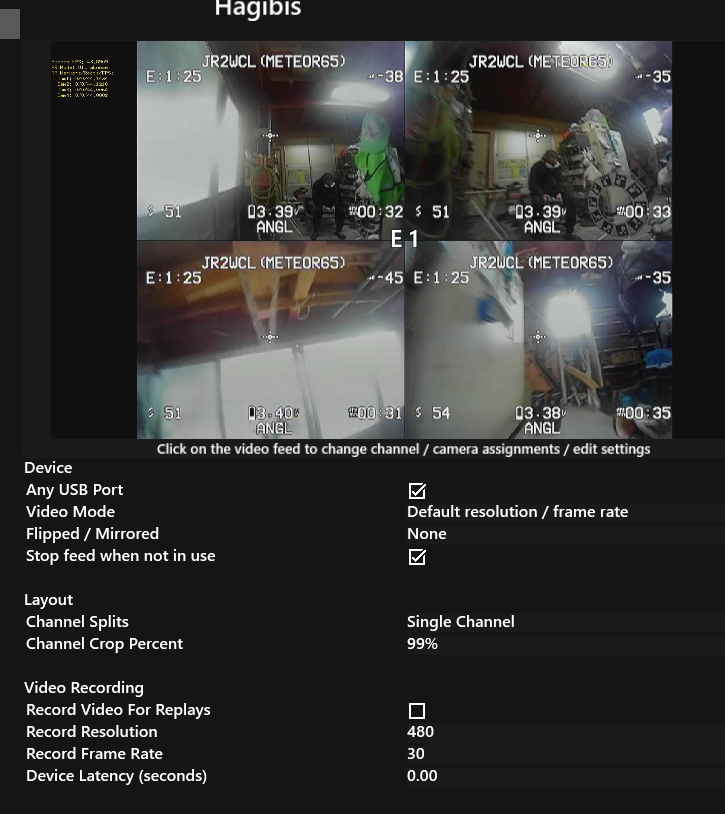
Initially, the entire screen is assigned to E1, so this screen is divided into four parts.
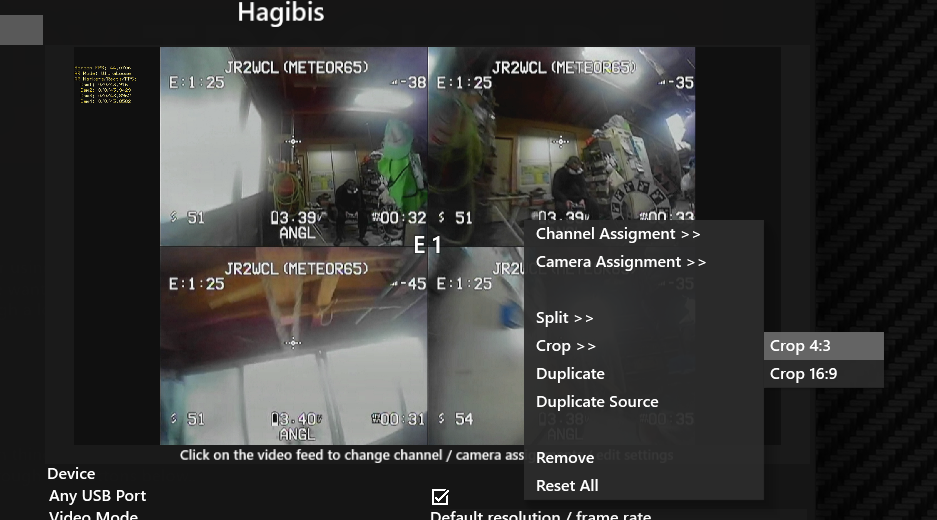
Right-click on the 4-split image and select Crop >> Crop 4:3.
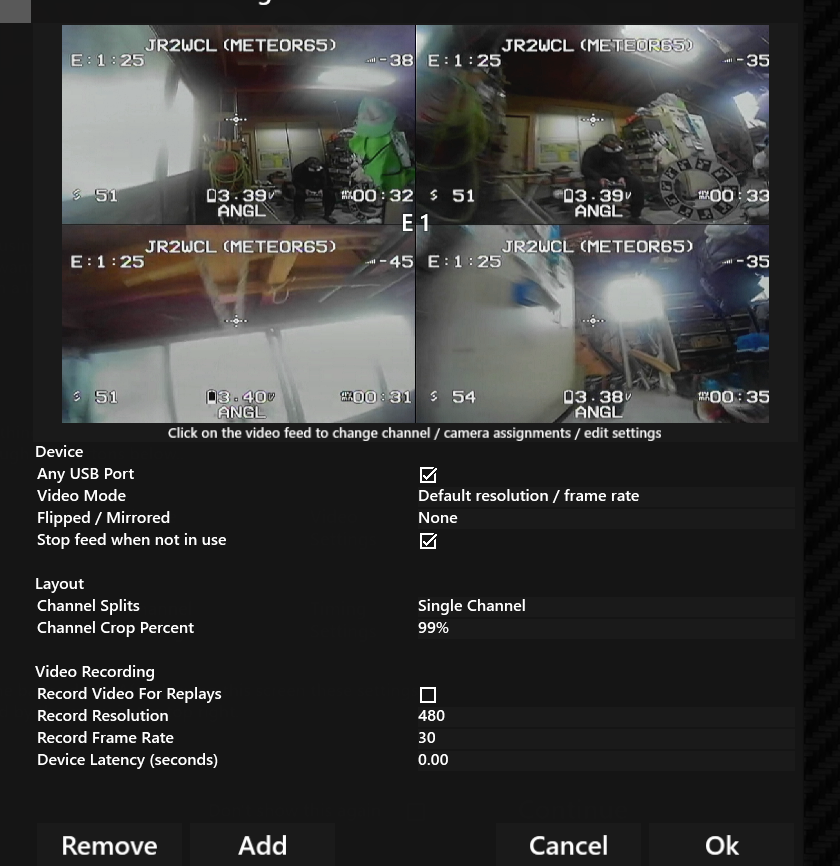
The left and right margins have been cut.
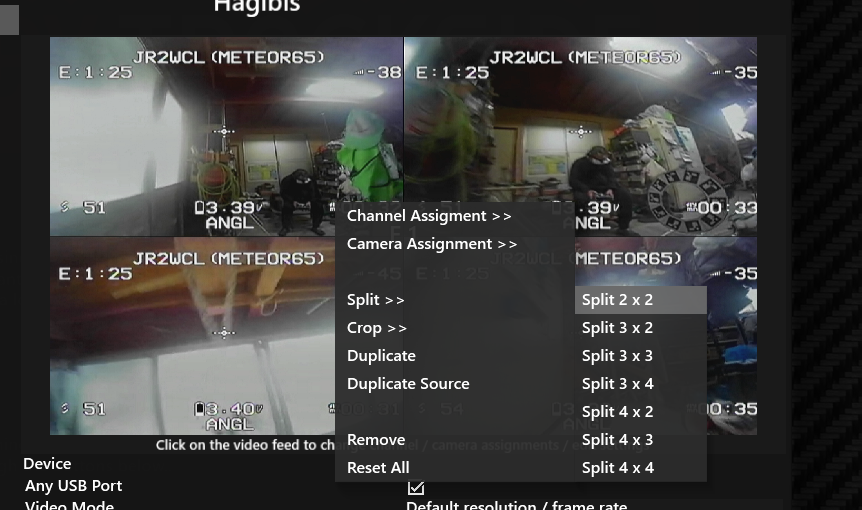
Right-click on the image again and select Split >> Split 2x2.
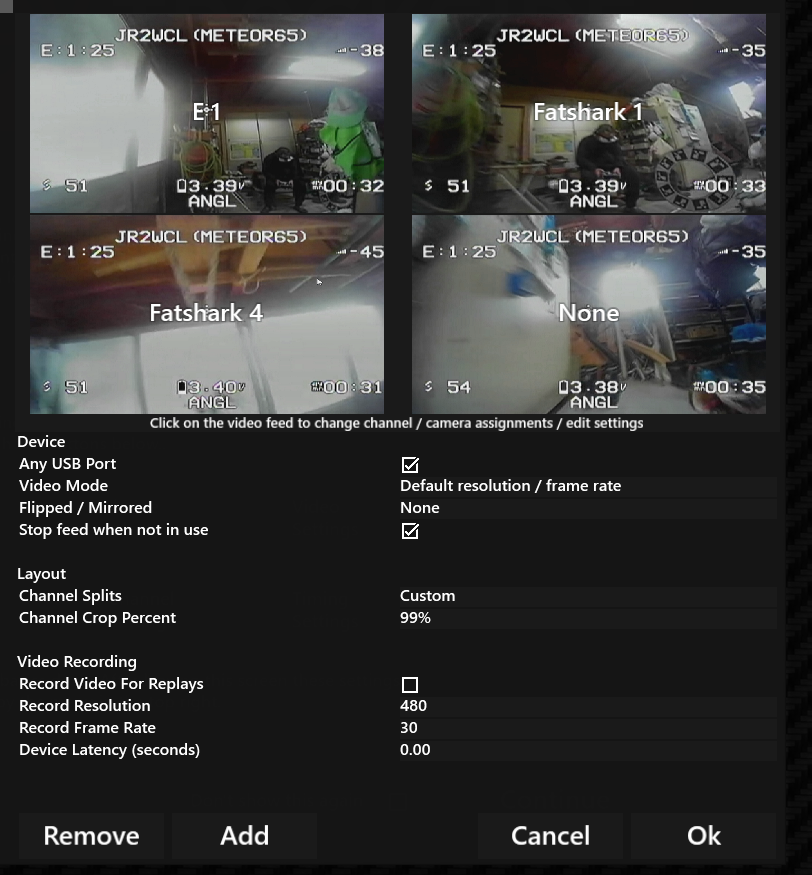
The screen has been split into four, and channels have been assigned to each area.
(Although not checked in the image, checking Record Video Replays for all four sections is convenient as it allows for replays after the race.)
Click OK to finish Video Settings.
4.3. Timing Settings
From the startup screen, select Timing Settings.
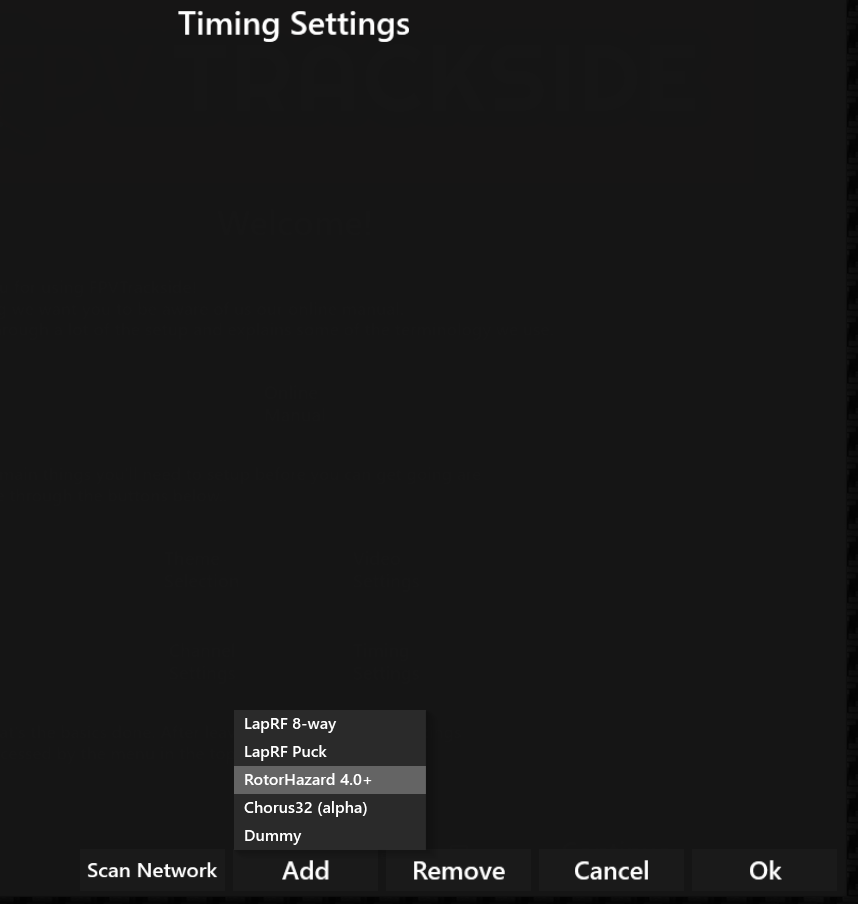
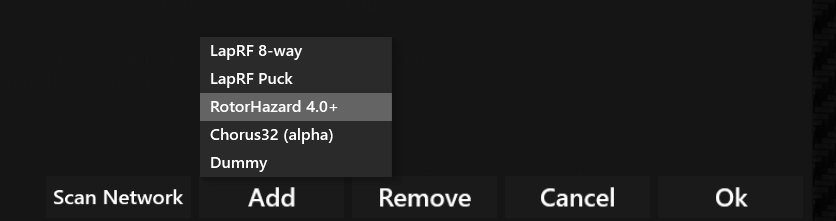
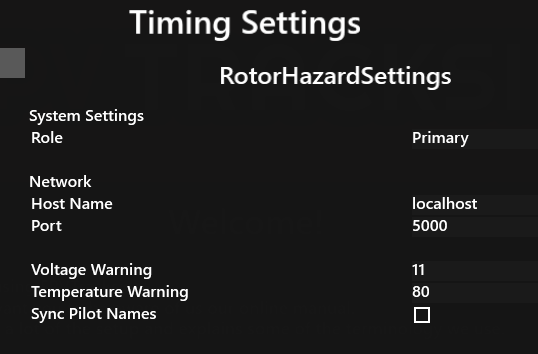
Click Add and select RotorHazard 4.0+.
-
Role:
Primary -
Hostname: This will be the IP address of the PC running
tvpas-relay-server.- If running on the same PC as
FPVTrackside:localhost - If running on a different PC: The IPv4 address of that PC (e.g.,
192.168.1.10)
- If running on the same PC as
-
Port:
5000 - Sync Pilot Names: Leave this unchecked.
After confirming the above, click OK.
5. Final Test
From the startup screen, click Continue.
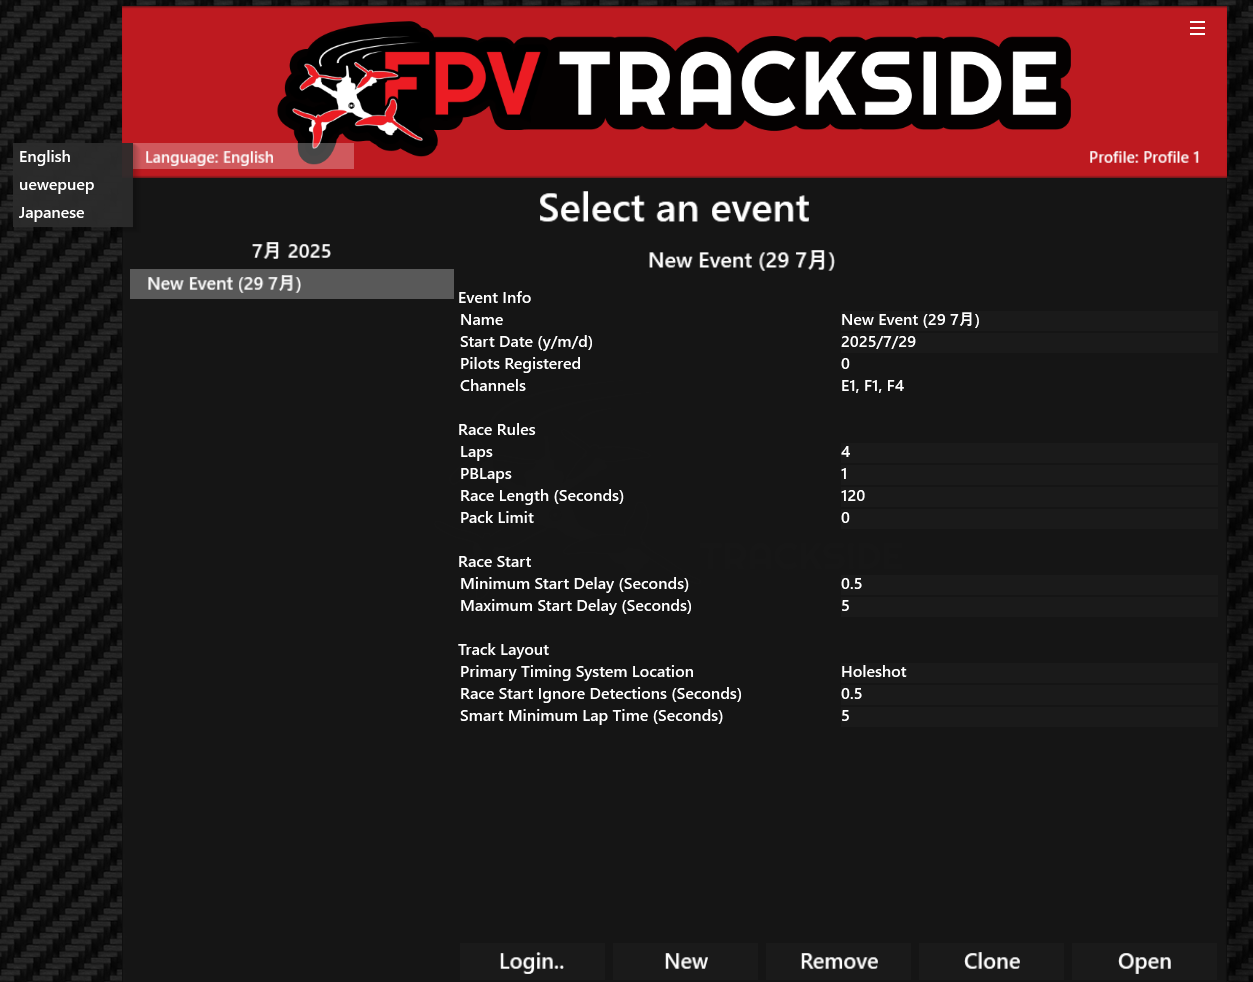
On the event selection screen, you can select Japanese by clicking where it says "Language:".
Click Start to proceed.
5.1. Pilot Registration
You can register a pilot by right-clicking in the empty space in the middle.
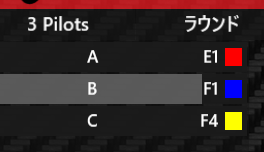
I have added three pilots.
Since the pilot name field does not support IME, if you want to register a name with difficult characters, copy the text from a notepad or similar and paste it with Ctrl+V.
5.2. Round Creation
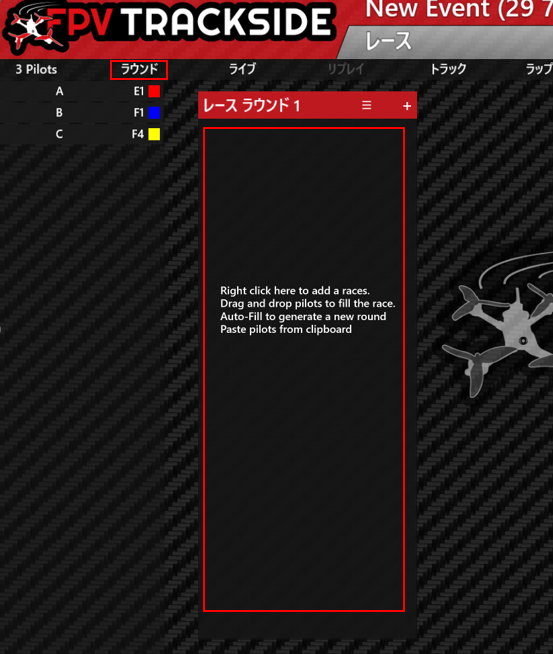
Click Rounds at the bottom right.
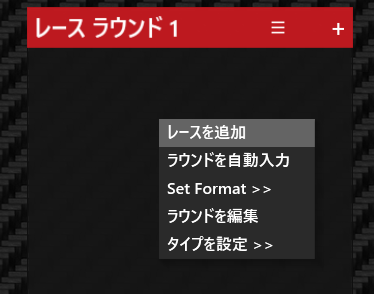
Right-click in the empty space and select "Add Race".
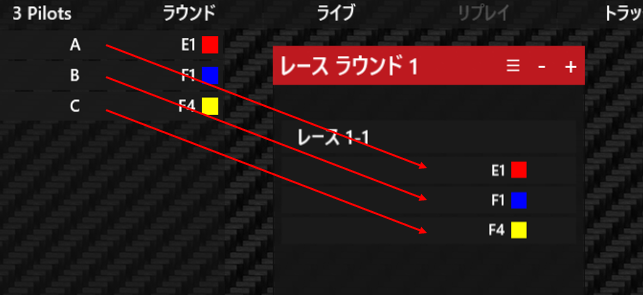
You can add a pilot to the race by clicking and dragging them.
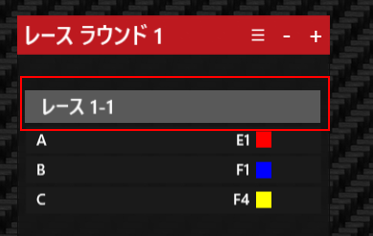
With the pilot registered, click on the empty space to go to the race screen.
5.3. Starting the Race
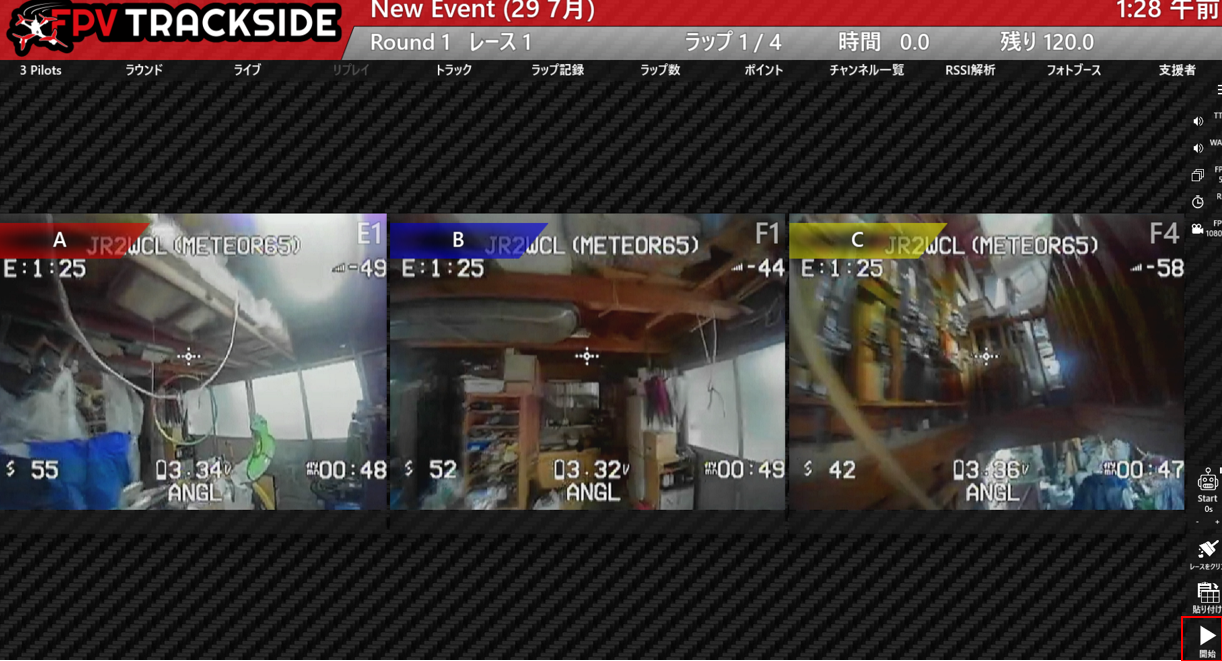
Click the start button at the bottom right to start the race. Please check if the laps are being recorded correctly.