
TinyViewPlus As Sensors (tvpas)
1. Overview
TinyViewPlusAsSensors (tvpas) is software designed to link TinyViewPlus, a lap timing software for FPV drone racing, with the race management software FPVTrackside.
In actual operation, tvpas connects to FPVTrackside via tvpas-relay-server. tvpas-relay-server behaves as if it were Rotorhazard, handling the necessary communication with FPVTrackside.
By following this procedure, you can utilize the convenient ArUco marker-based lap timing realized by TinyViewPlus within FPVTrackside.
We have now released TVPAS Ver2.00. In Ver2.00, by preparing up to 4 types of gates with different ArUco marker IDs, it is possible to measure not only lap times but also intermediate sector times. If you are introducing FPVTrackside and TVPAS for the first time, we recommend reading through this article. This article describes the differences since Ver2.00.
Although multiple gates are now supported, you can of course continue to use a single type of gate as before.
The executable file for Ver2.0.0 can be found here.
Please use this for the TVPAS Relay-server as well. Don't forget to run npm install inside the relay-server to download the libraries♪
2. Multi-gate Support
In Ver2.00, you can launch four Rotorhazard Timing Systems.
Each Timing System can register one or more marker IDs that it is responsible for.

Configuration examples (config.json) are shown below in 2-1 and 2-2.
2.1. Example of Single Gate Setting (Same as before)
{
  "server1_port": 5000,
  "server2_port": 0,
  "server3_port": 0,
  "server4_port": 0,
  "server1_id": [0,1,2,3],
  "server2_id": [],
  "server3_id": [],
  "server4_id": [],
  "tvpas_target": {
    "host": "127.0.0.1",
    "port": 8001
  },
  "relay_osc_listen_port": 8000,
  "useComPort": false,
  "comPort": "COM3",
  "osc_forwarding": false,
  "camera_switcher_osc_target": {
    "host": "127.0.0.1",
    "port": 9000
  }
}
Configure the Websocket servers (RotorHazard compatible) that communicate with FPVTrackside in "serverx_port" and "serverx_id" (where x is a number from 1-4).
The setting here launches only one gate that reacts to all IDs. This server gate reacts to any of marker IDs 0, 1, 2, or 3. (If the port is set to 0, the server will not start.)
"tvpas_target" is the destination (IP address, port) when sending OSC to tvpas.
"relay_osc_listen_port" is the port for receiving OSC from tvpas.

"useComPort" is for controlling LEDs via serial communication from the relay-server. Please leave it as false.
"osc_forwarding" is a setting to automatically control ATEM (Blackmagic switcher) based on tvpas-relay-server information, but since it is currently under testing, please leave it as false for now.
2.2. 3-Sector Configuration
We have prepared a sample video for functional verification.
In the course shown in the video, marker ID2 is the start gate (also sector 3 gate), ID1 is the sector 1 gate, and ID3 is the sector 2 gate.
Therefore, we launch three servers: server1 as the start gate, server2 as the sector 1 gate, and server3 as the sector 2 gate.
{
  "server1_port": 5000,
  "server2_port": 5001,
  "server3_port": 5002,
  "server4_port": 0,
  "server1_id": [2],
  "server2_id": [1],
  "server3_id": [3],
  "server4_id": [0],
  "tvpas_target": {
    "host": "127.0.0.1",
    "port": 8001
  },
  "relay_osc_listen_port": 8000,
  "useComPort": false,
  "comPort": "COM3",
  "osc_forwarding": true,
  "camera_switcher_osc_target": {
    "host": "127.0.0.1",
    "port": 9000
  }
}
3. TVPAS Settings
tvpas has a configuration file called settings.xml, where communication settings with the relay-server are defined.
Let's check it just in case.
<system>
    <sysStat>1</sysStat>
    <logEnabled>0</logEnabled>
    <allFrameDetect>0</allFrameDetect>
</system>
<view>
    <fullscreen>0</fullscreen>
    <camTrim>0</camTrim>
    <camFrame>0</camFrame>
</view>
<aruco>
    <arMode>2</arMode>
    <minSize>5</minSize>
    <flickerLength>100</flickerLength>
</aruco>
<osc>
    <host>localhost</host>
    <port>8000</port>
    <receivePort>8001</receivePort>
</osc>
The part starting with <osc> at the end is the communication setting with the relay-server.
host is the IP address of the PC where the relay-server is running. If it is running on the same PC, localhost or 127.0.0.1 is OK.
port is the receiving port of the relay-server, so it matches the "relay_osc_listen_port" setting in the relay-server's config.json.
receivePort is the receiving port of TVPAS, so it matches the "port" setting inside "tvpas_target" in the relay-server's config.json.
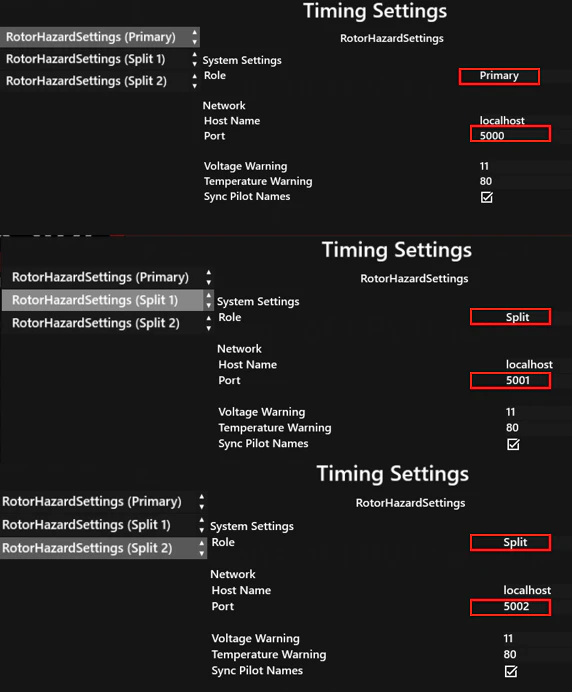
4. FPVTrackside Timing Settings
Finally, here are the TimingSettings for FPVTrackside.
Register three servers.
The top one is the Primary Server, for the Start/Finish gate.
The second and subsequent ones are Split servers.
Split1 is the server measuring Sector 1.
Split2 is the server measuring Sector 2.
5. Reference Video
Once these settings are complete, you should be able to measure sector times as shown in this video. Please give it a try.