はじめに
Docker勉強メモ
- Docker勉強メモ① DockerインストールからHelloWorld
- Docker勉強メモ② Dockerイメージ作ってみる
- Docker勉強メモ③ Dockerfileを作ってDockerイメージ作成からコンテナ起動までやってみる
- Docker勉強メモ④ コンテナ間通信 ←ココ
- Docker勉強メモ⑤ ネットワーク通信
やること
コンテナ間通信やってみる。
コンテナ間通信をする方法は2つ
- Dockerネットワークを作成してコンテナ名で接続できるようにする
- 「--link」オプションを使用する
「--link」オプションは、レガシーで削除の可能性あり、なので本記事ではスルー
豆知識
Docker のインストールは、自動的に3つのネットワークを作成
ネットワーク確認 : docker network ls
docker0 と表示されるブリッジ( bridge )ネットワーク
docker run --net=<ネットワーク名> と指定しないとdocker0になる
docker0情報は、ホストでifconfigで確認できる
コンテナ間通信 : Dockerネットワーク
Dockerネットワーク(bridgeタイプ)を作成
$ docker network create wordpress-network
ネットワークを指定してコンテナを起動する
$ docker run --name mysql --network wordpress-network -e MYSQL_ROOT_PASSWORD=my-secret-pw -d mysql:5.7
$ docker run --name wordpress --network wordpress-network -e WORDPRESS_DB_PASSWORD=my-secret-pw -p 8080:80 -d wordpress
・DBとWebサーバのコンテナを作る
・同じネットワーク wordpress-network を指定する
・MySQLのコンテナ名は「mysql」とする
↑WordPressのDockerイメージは、MySQLへの接続先の指定のホスト名が「mysql」だから
→これで、WordPressコンテナ(wordpress)からMySQLコンテナ(mysql)に向けて通信可になる
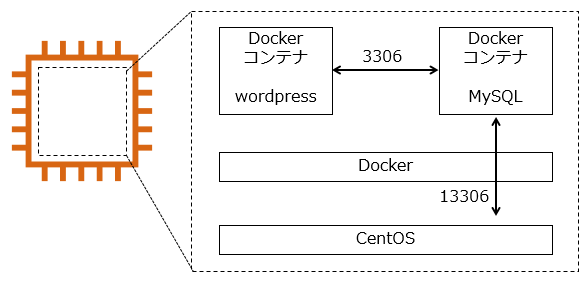
ポート指定の注意点
$ docker run --name mysql --network wordpress-network -p 13306:3306 -e MYSQL_ROOT_PASSWORD=my-secret-pw -d mysql:5.7
図にするとこんな感じのはず
Dockerイメージを用いてコンテナ間で通信
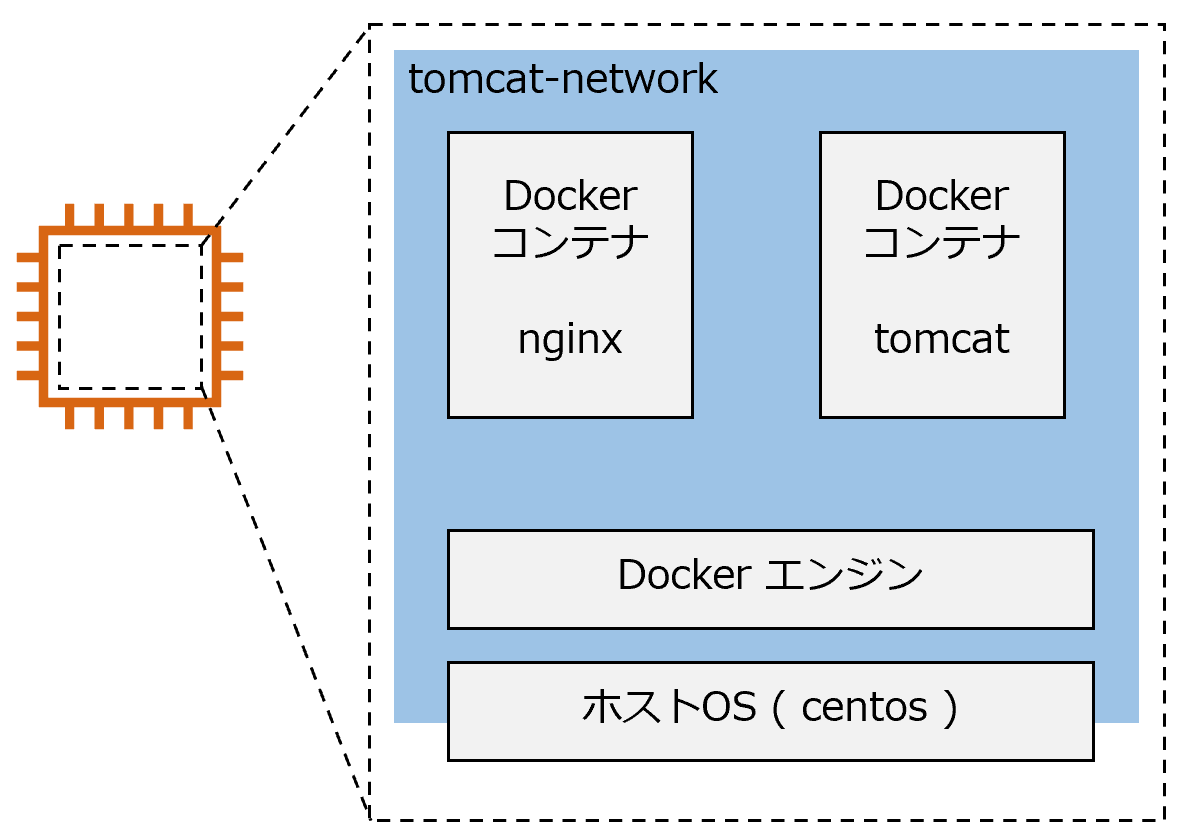
次は、こんなの作ってみる
※Dockerイメージを用いてコンテナ間で通信するためには、定義ファイルなどに接続先としてコンテナ名を指定しておくことが必要
[centos@ip-172-31-0-62 ~]$ mkdir nginx
[centos@ip-172-31-0-62 ~]$ touch nginx/Dockerfile
[centos@ip-172-31-0-62 ~]$ mkdir nginx/files
[centos@ip-172-31-0-62 ~]$ touch nginx/files/tomcat.conf
[centos@ip-172-31-0-62 ~]$ mkdir tomcat
[centos@ip-172-31-0-62 ~]$ touch tomcat/Dockerfile
[centos@ip-172-31-0-62 ~]$ mkdir tomcat/files
[centos@ip-172-31-0-62 ~]$ cd tomcat/files
[centos@ip-172-31-0-62 ~]$ wget http://ftp.riken.jp/net/apache/tomcat/tomcat-9/v9.0.31/bin/apache-tomcat-9.0.31.tar.gz
FROM nginx:latest

RUN rm -f /etc/nginx/conf.d/default.conf
COPY ./files/tomcat.conf /etc/nginx/conf.d/
server {
    location /tomcat/ {
        proxy_pass    http://tomcat-1:8080/;
    }
}
FROM centos:latest
RUN yum install -y java
ADD files/apache-tomcat-9.0.31.tar.gz /opt/
CMD [ "/opt/apache-tomcat-9.0.31/bin/catalina.sh", "run" ]
[centos@ip-172-31-0-62 ~]$ tree
.
├── nginx
│   ├── Dockerfile
│   └── files
│       └── tomcat.conf
└── tomcat
    ├── Dockerfile
    └── files
        └── apache-tomcat-9.0.31.tar.gz
Nginxイメージ、Tomcatイメージの作成
$ cd ${SOME_DIR}/nginx
$ docker build -t nginx-tomcat:1 .
$ cd ${SOME_DIR}/tomcat
$ docker build -t tomcat:1 .
[centos@ip-172-31-0-62 tomcat]$ docker images
REPOSITORY          TAG                 IMAGE ID            CREATED             SIZE
nginx-tomcat        1                   1e137080691f        14 minutes ago      127MB
tomcat              1                   5ad4b2b915cf        3 hours ago         523MB
 ・
 ・
Dockerネットワーク作成、コンテナ起動
$ docker network create tomcat-network
$ docker run --name tomcat-1 --network tomcat-network -d tomcat:1
$ docker run --name nginx-tomcat-1 --network tomcat-network -p 10080:80 -d nginx-tomcat:1
[centos@ip-172-31-0-62 tomcat]$ docker ps -a
                                            CONTAINER ID        IMAGE               COMMAND                  CREATED             STATUS              PORTS                   NAMES
ab41de63e013        nginx-tomcat:1      "nginx -g 'daemon of…"   11 seconds ago      Up 10 seconds       0.0.0.0:10080->80/tcp   nginx-tomcat-1
4949f5632a5a        tomcat:1            "/opt/apache-tomcat-…"   20 seconds ago      Up 19 seconds                               tomcat-1
ホストから以下サイトを開ければ、nginx経由でtomcatのサイトが開けたことになる
http://localhost:10080/tomcat/

