やりたいこと
- Laravel + vue + axiosの連携
- Laravel mixを利用したワークフローの確認
React版もいちおう書きました。
やること
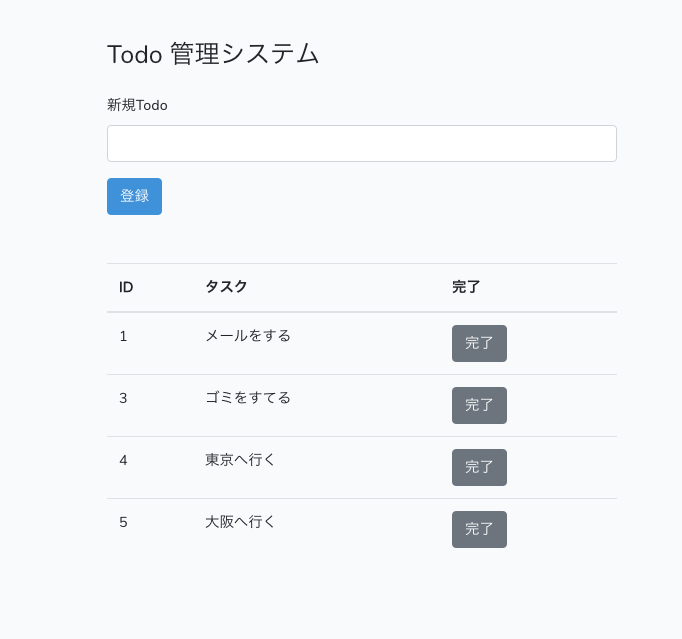
サンプルとして下記のようなTodo管理システムを作ります。
こちらの記事が特に参考になりました。ありがとうございます。
前提知識
vueの開発環境はwebpackやCLIを利用して行うことが普通ですが、LaravelにはLaravel Mixというwebpackを簡単に取り扱うためのラッパーがあります。動作は、webpack.mix.jsに下記のように定義されています。
mix.js('resources/js/app.js', 'public/js')
   .sass('resources/sass/app.scss', 'public/css');
resources/js/app.jsをいじってnpm run devを実行するとコンパイルしてpublic/js(これをViweから指定して利用)に出力してくれます(cssもしかり)。
環境の準備
環境
いちおうnodeだけ。
node -v
v8.12.0
Laravelのインストールと.env
これは割愛。composer create-projectでインストール。MySQL用に.envを編集。
node関連ライブラリのインストール
必要なものはpackage.jsonに書かれているので、npm installでインストールするだけ。
npm install
データの準備
todoを管理するテーブル、モデル。デモデータを用意しておく。
テーブルの作成
migrationファイル作成します。
php artisan make:migration create_todos_table
今回はtitleカラムだけ追加。
<?php

use Illuminate\Support\Facades\Schema;
use Illuminate\Database\Schema\Blueprint;
use Illuminate\Database\Migrations\Migration;

class CreateTodosTable extends Migration
{
    public function up()
    {
        Schema::create('todos', function (Blueprint $table) {
            $table->increments('id');
+           $table->string('title');
            $table->timestamps();
        });
    }

    public function down()
    {
        Schema::dropIfExists('todos');
    }
}
マイグレーション実行。
php artisan migrate
モデルの作成
artisanコマンドで。生成されたファイルは編集しません。
php artisan make:model Todo
テストデータの挿入
無くてもいいですが、表示確認のために少し入れておきます。
php artisan tinker
Psy Shell v0.9.8 (PHP 7.2.8 — cli) by Justin Hileman
>>>
>>> $title = new App\Todo;
=> App\Todo {#2898}
>>> $title->title = '電話をかける';
=> "電話をかける"
>>> $title->save();
=> true
>>> $tile = new App\Todo;
=> App\Todo {#2904}
>>> $title->title = 'メールをする'
=> "メールをする"
>>> $title->save();
=> true
すべてのリクエストをwelcome.blade.phpに飛ばす
SPAなでページ遷移は必要ない。
ルーティングはVue側で行うので全てのWebリクエスト(API除く)を1つのページ(ここではwelcome)に集約します。
なお、今回はvue-routerとかは利用しません。
Route::get('/{any}', function(){
    return view('welcom');
})->where('any','.*');
集約先のView(welcome.blade.php)
既に存在しているwelcome.blade.phpをひとまず下記のように編集します。Bootstrap4のサンプルをベースに最低限のマークアップをしています。
ディレクティブの埋め込みは後で行うとして、ひとまずLaravelの動作に最低限必要な設定をしています。
やってることは下記の3つ
- <meta name="csrf-token" content="{{ csrf_token() }}">
- <link rel="stylesheet" href="{{ asset('css/app.css') }}">
- <script src="{{ asset('js/app.js')}}">
csrf対策のコードの埋め込み。laravel mixがコンパイルする先のファイルの指定(CSSとJS)。
<!doctype html>
<html lang="ja">
<head>
    <!-- Required meta tags -->
    <meta charset="utf-8">
+   <meta name="csrf-token" content="{{ csrf_token() }}">
    <meta name="viewport" content="width=device-width, initial-scale=1, shrink-to-fit=no">
    <!-- CSS -->
+   <link rel="stylesheet" href="{{ asset('css/app.css') }}">

    <title>vue test</title>
</head>

<body>
    <div id="app">
        <div class="container">
            <h3 class="mt-5">Todo 管理システム</h3>

                <div class="form-group mt-4">
                    <label for="todo">新規Todo</label>
                    <input type="text" class="form-control" id="todo">
                </div>

                <button type="submit" class="btn btn-primary">登録</button>

            <table class="table mt-5">
                <thead>
                    <th>ID</th><th>タスク</th><th>完了</th>
                </thead>
                <tbody>
                    <tr>
                        <td>1</td>
                        <td>タスクがでる</td>
                        <td><button class="btn btn-secondary">完了</button></td>
                    </tr>
                    <tr>
                        <td>2</td>
                        <td>タスクがでる</td>
                        <td><button class="btn btn-secondary">完了</button></td></tr>
                </tbody>
            </table>
        </div>
    </div>

    <!-- avaScript -->
+<script src="{{ asset('js/app.js')}}"></script>
</body>
</html>
タスク一覧機能
では、始めにタスクの一覧機能を実装します。
上記ではスタティックに記述していましたが、そこをVue.jsを利用して動的に動作するようにします。
ルートの追加
api.phpに一覧表示用のルートを定義します。
Route::group(['middleware' => 'api'], function(){
    Route::get('get', 'TodoController@getTodos');
});
コントローラー
ルートで指定したControllerを生成します。
php artisan make:controller TodoController
ルートで指定した機能を実装します。配列を戻せばそのままJSONにしてくれるので手抜き。
<?php

namespace App\Http\Controllers;

use Illuminate\Http\Request;
use App\Todo;

class TodoController extends Controller
{
    public function getTodos()
    {
        $todos = Todo::all();
        return $todos;
    }
}
app.jsをいじる
タスク一覧を格納するtodos配列を定義し、/api/getにリクエストした結果を格納しています。
ページを閲覧した際に実行したいので、created()で呼び出ししています。
const app = new Vue({
    el: '#app',
    data: {
        todos: []
    },
    methods: {
        fetchTodos: function(){
            axios.get('/api/get').then((res)=>{
                this.todos = res.data
            });
        }
    },
    created(){
        this.fetchTodos();
    }
});
vディレクティブの追加
取得したtodosをv-forで表示します。埋め込み位置は<tr>のところです。
<!doctype html>
<html lang="ja">
<head>
    <!-- Required meta tags -->
    <meta charset="utf-8">
    <meta name="csrf-token" content="{{ csrf_token() }}">
    <meta name="viewport" content="width=device-width, initial-scale=1, shrink-to-fit=no">
    <!-- CSS -->
    <link rel="stylesheet" href="{{ asset('css/app.css') }}">

    <title>vue test</title>
</head>

<body>
    <div id="app">
        <div class="container">
            <h3 class="mt-5">Todo 管理システム</h3>

                <div class="form-group mt-4">
                    <label for="todo">新規Todo</label>
                    <input type="text" class="form-control" id="todo" placeholder="タスクを入力してください">
                </div>

                <button type="submit" class="btn btn-primary">登録</button>

            <table class="table mt-5">
                <thead>
                    <th>ID</th><th>タスク</th><th>完了</th>
                </thead>
                <tbody>
+                   <tr v-for="todo in todos" v-bind:key="todo.id">
+                       <td>@{{todo.id}}</td>
+                       <td>@{{todo.title}}</td>
+                       <td><button class="btn btn-secondary">完了</button></td>
+                   </tr>
                </tbody>
            </table>
        </div>
    </div>

    <!-- avaScript -->
<script src="{{ asset('js/app.js')}}"></script>
</body>
</html>
v-bind:keyはv-forでは入れること推奨。
コンパイルと確認
npm run devすることで裏でコンパイルが走り、js, cssを出力してれます。
npm run dev
php artisan serve
タスクの追加機能
続いてタスクを追加する機能を実装します。
ルート
まずはルートの追加から。
Route::group(['middleware' => 'api'], function(){
    Route::get('get', 'TodoController@getTodos');
+   Route::post('add', 'TodoController@addTodo');
});
コントローラー
続いてコントローラー。追加して、追加した結果を一覧のときと同じ感じで返すだけ。
<?php

namespace App\Http\Controllers;

use Illuminate\Http\Request;
use App\Todo;

class TodoController extends Controller
{
    public function getTodos()
    {
        $todos = Todo::all();
        return $todos;
    }

+   public function addTodo(Request $request)
+   {
+       $todo = new Todo;
+       $todo->title = $request->title;
+       $todo->save();

+       $todos = Todo::all();
+       return $todos;
+   }

}
js
addTodoを追加します。
const app = new Vue({
    el: '#app',
    data: {
        todos: [],
+       new_todo: ''
    },
    methods: {
        fetchTodos: function(){
            axios.get('/api/get').then((res)=>{
                this.todos = res.data;
            });
        },
+       addTodo: function(){
+           axios.post('/api/add',{
+               title: this.new_todo
+           }).then((res)=>{
+               this.todos = res.data;
+               this.new_todo = '';
+           });
+       }
+   },
    created(){
        this.fetchTodos();
    }
});
vディレクティブ追加
inputにv-modelを設定し、ボタンにv-on:clickを追加し、addTodo()をコールします。
<!doctype html>
<html lang="ja">
<head>
    <!-- Required meta tags -->
    <meta charset="utf-8">
    <meta name="csrf-token" content="{{ csrf_token() }}">
    <meta name="viewport" content="width=device-width, initial-scale=1, shrink-to-fit=no">
    <!-- CSS -->
    <link rel="stylesheet" href="{{ asset('css/app.css') }}">

    <title>vue test</title>
</head>

<body>
    <div id="app">
        <div class="container">
            <h3 class="mt-5">Todo 管理システム</h3>

                <div class="form-group mt-4">
                    <label for="todo">新規Todo</label>
+                   <input type="text" class="form-control" id="todo" v-model="new_todo">
                </div>

+               <button type="submit" class="btn btn-primary" v-on:click="addTodo">登録</button>

            <table class="table mt-5">
                <thead>
                    <th>ID</th><th>タスク</th><th>完了</th>
                </thead>
                <tbody>
                    <tr v-for="todo in todos" v-bind:key="todo.id">
                        <td>@{{todo.id}}</td>
                        <td>@{{todo.title}}</td>
                        <td><button class="btn btn-secondary">完了</button></td>
                    </tr>
                </tbody>
            </table>
        </div>
    </div>

    <!-- avaScript -->
<script src="{{ asset('js/app.js')}}"></script>
</body>
</html>
コンパイルと確認
npm run dev
php artisan serve
タスクの削除機能
最後にタスクの完了(削除)機能を追加します。
ルート
ルートを追加。
Route::group(['middleware' => 'api'], function(){
    Route::get('get', 'TodoController@getTodos');
    Route::post('add', 'TodoController@addTodo');
+   Route::post('del', 'TodoController@deleteTodo');
});
コントローラー
続いてコントローラー。
<?php

namespace App\Http\Controllers;

use Illuminate\Http\Request;
use App\Todo;

class TodoController extends Controller
{
    public function getTodos()
    {
        $todos = Todo::all();
        return $todos;
    }

    public function addTodo(Request $request)
    {
        $todo = new Todo;
        $todo->title = $request->title;
        $todo->save();

        $todos = Todo::all();
        return $todos;
    }

+   public function deleteTodo(Request $request)
+   {
+       $todo = Todo::find($request->id);
+       $todo->delete();

+       $todos = Todo::all();
+       return $todos;
+   }

}
js
app.jsにdeleteTodo()を追加。
const app = new Vue({
    el: '#app',
    data: {
        todos: [],
        new_todo: ''
    },
    methods: {
        fetchTodos: function(){
            axios.get('/api/get').then((res)=>{
                this.todos = res.data;
            });
        },
        addTodo: function(){
            axios.post('/api/add',{
                title: this.new_todo
            }).then((res)=>{
                this.todos = res.data;
                this.new_todo = '';
            });
        },
+       deleteTodo: function(task_id){
+           axios.post('/api/del',{
+               id: task_id
+           }).then((res)=>{
+               this.todos = res.data;
+           });
+       }
    },
    created(){
        this.fetchTodos();
    }
});
vディレクティブ
完了ボタンにv-on:clickを設定し、deleteTodoをコール。引数としてtodo.idを渡します。
<!doctype html>
<html lang="ja">
<head>
    <!-- Required meta tags -->
    <meta charset="utf-8">
    <meta name="csrf-token" content="{{ csrf_token() }}">
    <meta name="viewport" content="width=device-width, initial-scale=1, shrink-to-fit=no">
    <!-- CSS -->
    <link rel="stylesheet" href="{{ asset('css/app.css') }}">

    <title>vue test</title>
</head>

<body>
    <div id="app">
        <div class="container">
            <h3 class="mt-5">Todo 管理システム</h3>

                <div class="form-group mt-4">
                    <label for="todo">新規Todo</label>
                    <input type="text" class="form-control" id="todo" v-model="new_todo">
                </div>

                <button type="submit" class="btn btn-primary" v-on:click="addTodo">登録</button>

            <table class="table mt-5">
                <thead>
                    <th>ID</th><th>タスク</th><th>完了</th>
                </thead>
                <tbody>
                    <tr v-for="todo in todos" v-bind:key="todo.id">
                        <td>@{{todo.id}}</td>
                        <td>@{{todo.title}}</td>
+                       <td><button class="btn btn-secondary" v-on:click="deleteTodo(todo.id)">完了</button></td>
                    </tr>
                </tbody>
            </table>
        </div>
    </div>

    <!-- avaScript -->
<script src="{{ asset('js/app.js')}}"></script>
</body>
</html>
コンパイルと確認
npm run dev
php artisan serve
今後やること
- バリデーション
- 各種エラー処理
- ページネーション
