この記事は Kubernetes Advent Calendar 2020 その2 15日目の記事です。
はじめに
この記事では Thanos という OSS の Receiver というコンポーネントについて調べた内容を書いてみます。
Kubernetes と直接関連している話題ではないのですが、Kubernetes 上で起動した Prometheus のメトリクスを Thanos Receiver の機能を利用してオブジェクトストレージにアップロードし、確認するというところまで試してみたいと思います。
Thanos とは
古い記事とはなってしまいますが、筆者の過去の記事などを参考としてみてください。
また、Thanos のドキュメントの Design のページなどご確認いただくと良いのではないかと思います。
Thanos Receiver とは
Prometheus の Remote Write API を備えた Thanos のコンポーネントの1つです。
Thanos Receiver を使うことで Prometheus から Remote Write API によって送られたメトリクスの情報をオブジェクトストレージに保存することが可能になります。
Thanos Receiver を利用することで Thanos Sidecar を利用してオブジェクトストレージにメトリクスをアップロードする構成ではなく、Prometheus から Thanos Receiver を経由してオブジェクトストレージにメトリクスをアップロードするという構成が取れるようになリます。
Thanos Receiver の技術的な概要
全体的な構成
Thanos Receiver を利用した際の最小構成での全体的な構成は下記のようになります。
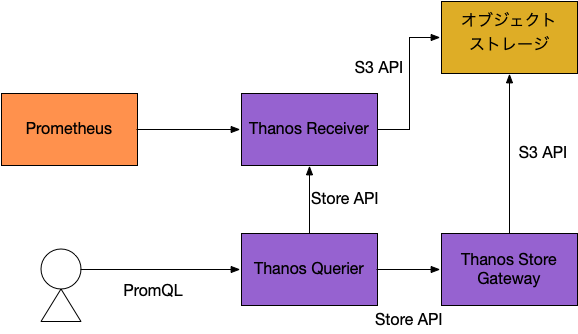
Receiver によってオブジェクトストレージに保存されたデータを参照する際に Thanos Querier を利用する点は Thanos Sidecar を利用する際の構成と特に変わりはありません。
負荷分散について
Thanos Receiver を複数台構成とし、その前にロードバランサを置くことで、Thanos Receiver の負荷分散を行うことが可能となります。
リクエストは全ての Thanos Receiver に分散されますが、担当する Thanos Receiver は Hashring の設定ファイルと送られてきたリクエストの tenant header を元に決まるようです。
[
    {
        "hashring": "tenant-a",
        "endpoints": ["tenant-a-1.metrics.local:19291/api/v1/receive", "tenant-a-2.metrics.local:19291/api/v1/receive"],
        "tenants": ["tenant-a"]
    },
    {
        "hashring": "tenants-b-c",
        "endpoints": ["tenant-b-c-1.metrics.local:19291/api/v1/receive", "tenant-b-c-2.metrics.local:19291/api/v1/receive"],
        "tenants": ["tenant-b", "tenant-c"]
    },
    {
        "hashring": "soft-tenants",
        "endpoints": ["http://soft-tenants-1.metrics.local:19291/api/v1/receive"]
    }
]
参考: https://thanos.io/tip/proposals/201812_thanos-remote-receive.md/
処理のイメージとしては下記のようになります。
tenant A のリクエストを受けた Thanos Receiver はリクエストを tenant A の Thanos Receiver に送ります。
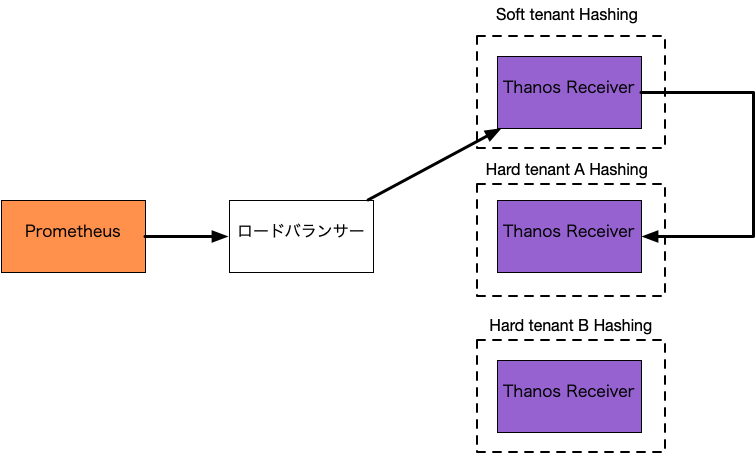
上記の Hashing 設定ファイルにて tenants が設定されている物を Hard tenancy、tenants が設定されていない物を Soft tenancy と言います、Hard tenancy に明示的に一致しないリクエストを Soft tenancy に設定された Tnanos Receiver が担当するという構成を取ることが可能なようです。
また、Thanos Receiver は同じ Hashring 内の Receiver にレプリケーショを行うことが可能です。
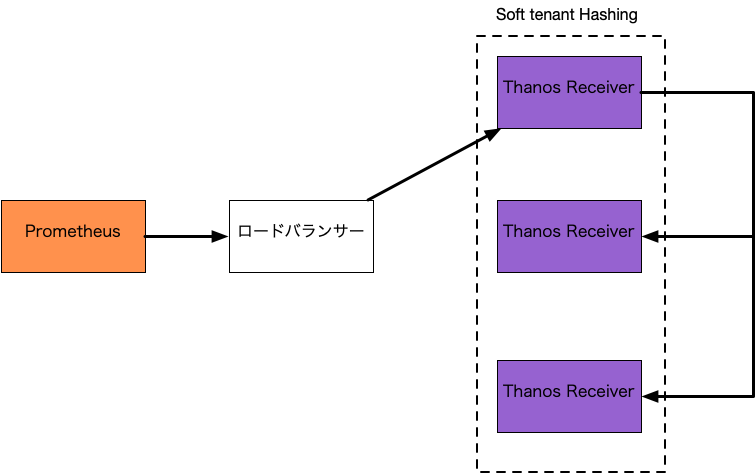
レプリケーションされる Receiver の数は --receive.replication-factor フラグにて設定がされ、(receive.replication-factorフラグにて設定された値 + 1)/2 の数の Receiver に対しての書き込みが完了しなかった場合は、 Thanos Receiver はエラーを返します。
試してみる
では実際に Thanos Receiver を試してみます。
今回は「全体的な構成」で説明した、最小構成をローカルの PC 上に構築して簡単に確認してみたいと思います。
環境構築
まず最初に検証用の Kubernetes のクラスタをローカルの PC 上に構築します。
筆者の PC の OS は macOS catalina なので下記の手順は macOS catalina を利用している前提で記載しています。
別の OS をお使いの方は適宜手順を読み替えていただけますと幸いです。
kubectl 等の CLI については既にインストール済の前提で手順を記載しています。
Kubernetes クラスタの構築には kind を利用しました。
kind のインストール方法は kind の User Guide を確認してください。
下記の設定ファイルを作成します。
kind: Cluster
apiVersion: kind.x-k8s.io/v1alpha4
nodes:
- role: control-plane
  kubeadmConfigPatches:
  - |
    kind: InitConfiguration
    nodeRegistration:
      kubeletExtraArgs:
        node-labels: "ingress-ready=true"
  extraPortMappings:
  - containerPort: 80
    hostPort: 80
    protocol: TCP
  - containerPort: 443
    hostPort: 443
    protocol: TCP
設定ファイルを元に Kubernetes のクラスタを作成します。
$ kind create cluster --name test --config cluster.yaml
クラスタの構築が完了したら nginx ingress controller を apply します。
$ kubectl apply -f https://raw.githubusercontent.com/kubernetes/ingress-nginx/master/deploy/static/provider/kind/deploy.yaml
次に Thanos 用の Namespace を作成します。
$ kubectl create ns thanos
Kubernetes クラスタ上にオブジェクトストレージとして minio を構築します。
マニフェストは thanos-io/kube-thanos リポジトリの example の物を利用しています。
$ kubectl apply -f https://raw.githubusercontent.com/thanos-io/kube-thanos/master/examples/development-minio/deployment.yaml -n thanos
$ kubectl apply -f https://raw.githubusercontent.com/thanos-io/kube-thanos/master/examples/development-minio/pvc.yaml -n thanos
$ kubectl apply -f https://raw.githubusercontent.com/thanos-io/kube-thanos/master/examples/development-minio/secret.yaml -n thanos
$ kubectl apply -f https://raw.githubusercontent.com/thanos-io/kube-thanos/master/examples/development-minio/service.yaml -n thanos
Thanos のコンポーネントの設定
次に Thanos の各コンポーネントの設定をしていきます。
Thanos Receiver の Hashring の設定ファイルを作成します。
apiVersion: v1
kind: ConfigMap
metadata:
  name: hashring
  namespace: thanos
data:
  hashrings.json: |
     [
         {
             "hashring": "default",
             "endpoints": [
                 "thanos-receive-default-0.thanos-receive-default.thanos.svc.cluster.local:10901"
             ]
         }
     ]
作成した ConfigMap のマニフェストを検証用のクラスタに apply します。
$ kubectl apply -f thanos-receiver-hashring-configmap.yaml
Thanos Receiver、Thanos Store Gateway 、Thanos Querier を検証用のクラスタに作成します。
$ kubectl apply -f https://gist.githubusercontent.com/amber-lamp/ef8e0f46ce8b33dcc4f252ac4b8be2e6/raw/4486935e4612a391964171c9efa25930218089d2/demo-thanos-receive.yaml
これで Thanos の各コンポーネントの設定が完了しました。
Promethes の設定
最後に Prometheus の設定をします。
Prometheus の設定は こちらの Helm Chat を使用します。
Helm が必要となりますので、Helm をインストールしていない場合はこちらのページを参考にインストールをしてください。
下記のコマンドを実行し、Kubernetes の default Namespace にインストールしてください。
$ helm repo add prometheus-community https://prometheus-community.github.io/helm-charts
$ helm repo add stable https://charts.helm.sh/stable
$ helm repo update
$ helm install -n default latest prometheus-community/kube-prometheus-stack --set prometheus.ingress.enabled=true --set prometheus.ingress.hosts[0]="cluster.prometheus.local" --set prometheus.prometheusSpec.remoteWrite[0].url="http://thanos-receive-default.thanos.svc.cluster.local:19291/api/v1/receive" --set alertmanager.ingress.enabled=true --set alertmanager.ingress.hosts[0]="cluster.alertmanager.local" --set grafana.ingress.enabled=true --set grafana.ingress.hosts[0]="grafana.local"
確認
/etc/hosts に下記の設定を入れてください。
127.0.0.1 query.local
127.0.0.1 cluster.prometheus.local
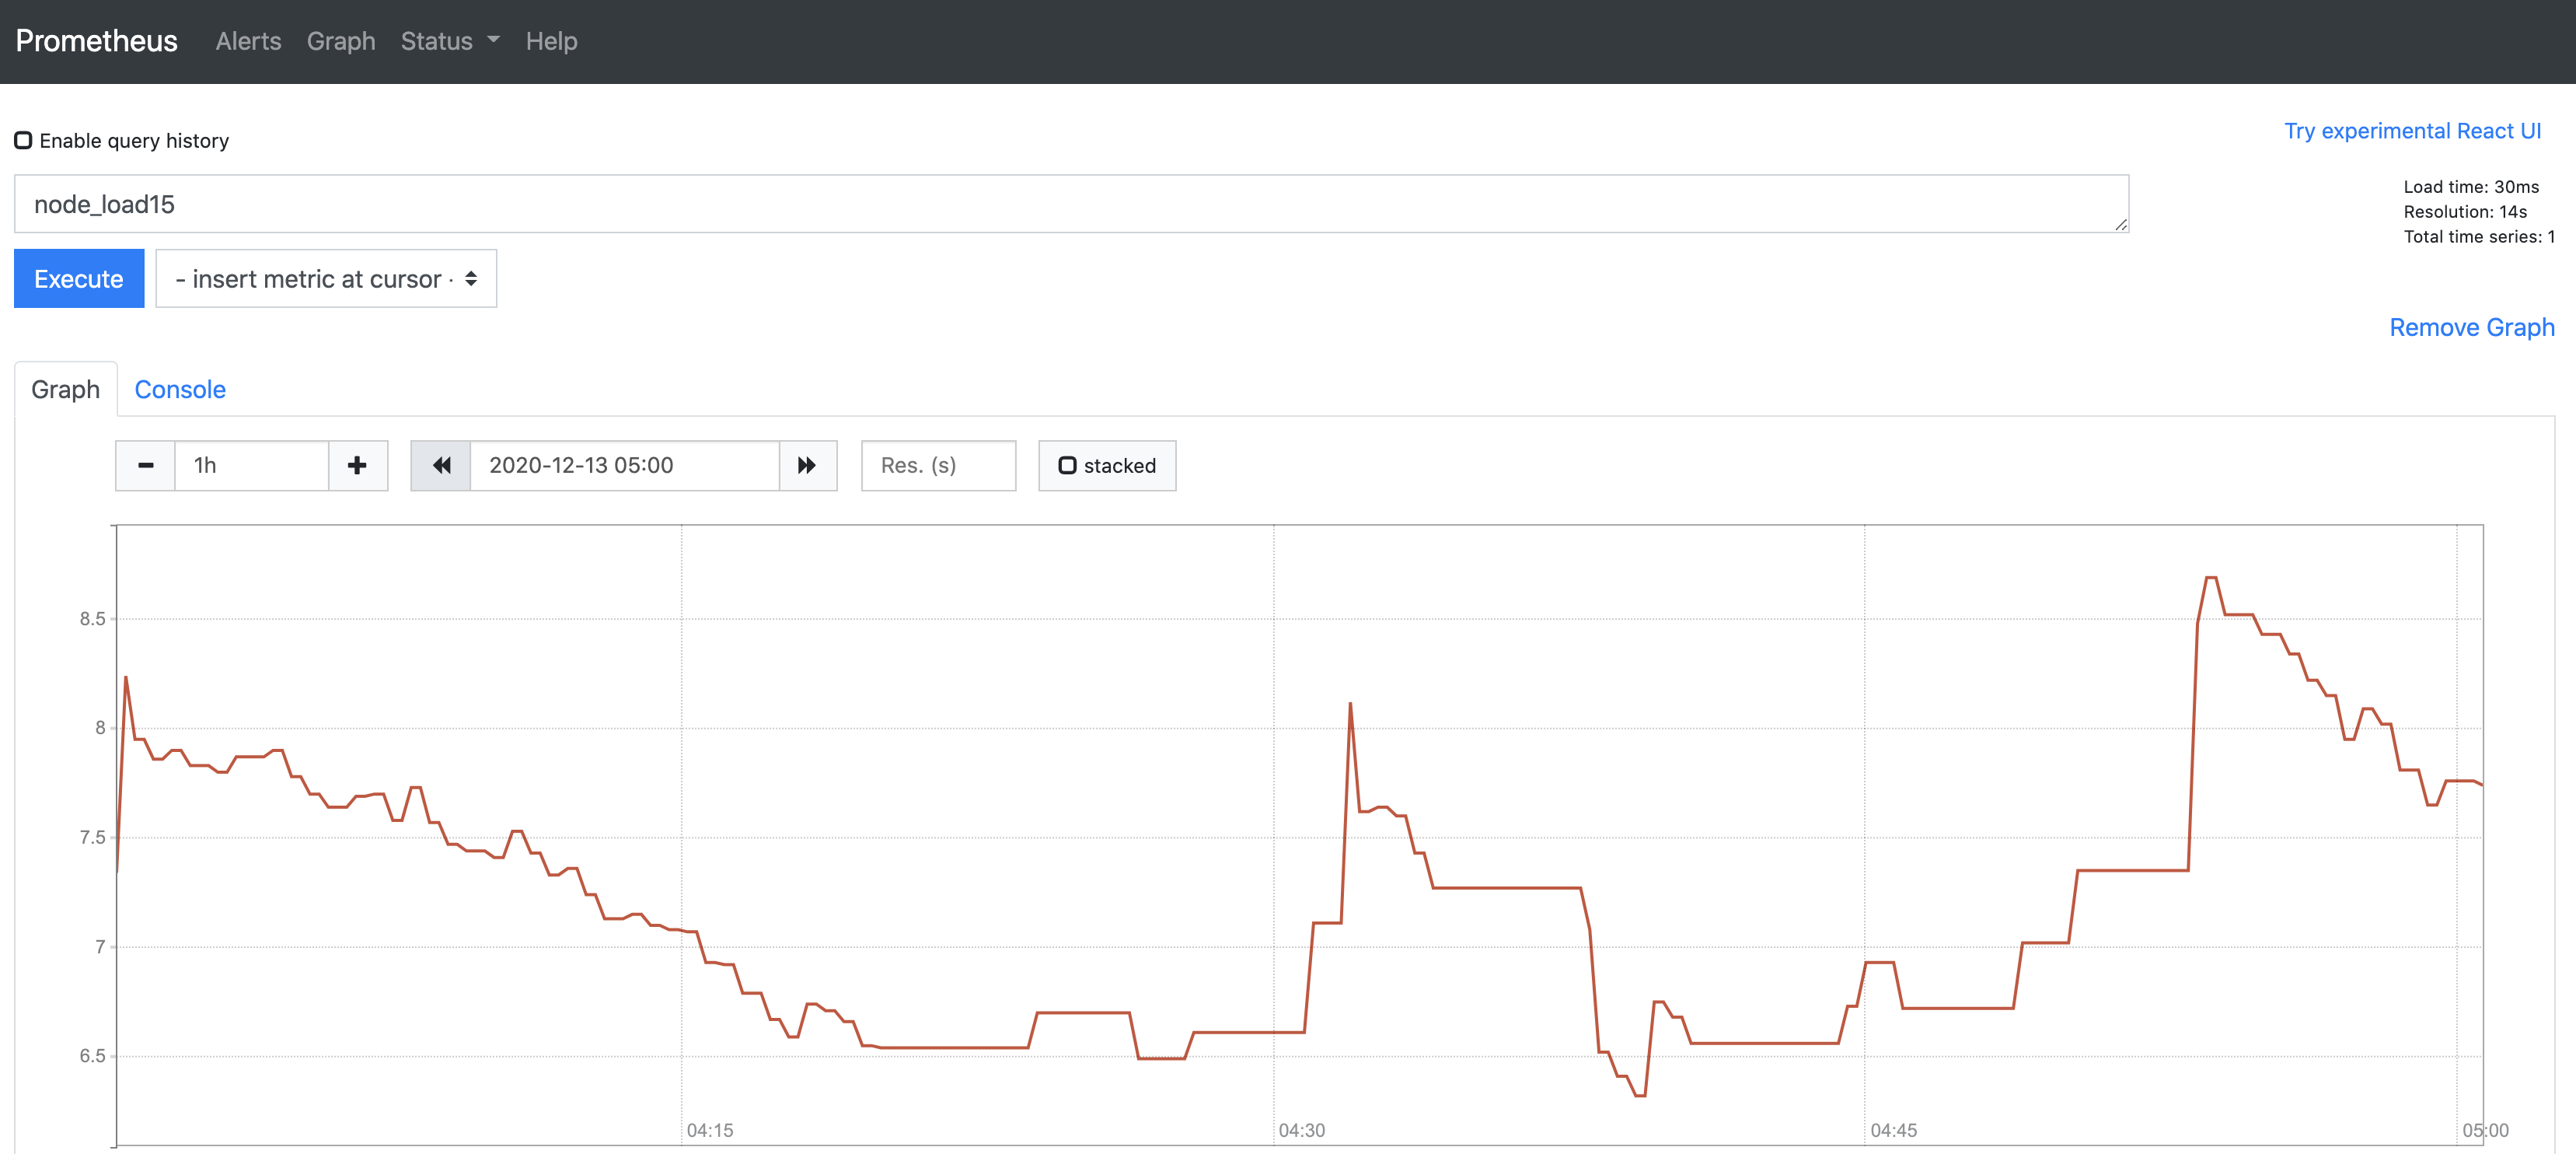
http://cluster.prometheus.local にアクセスすると下記のように Prometheus の UI が確認できると思います。
また、http://query.local にアクセスすると Thanos Query の UI が確認でき、 Thanos Receiver と オブジェクトストレージから Store API 経由で取得したデータを確認できるかと思います。
最後に
確認が完了して、検証用の Kubernetes クラスタが不要になりましたら下記のコマンドでクラスタを削除することが可能です。
$ kind delete cluster --name test
また、/etc/hostsに設定した内容も忘れないうちに元に戻していただければ幸いです。
まとめ
Thanos Receiver について調べてみました。
今回作成した検証環境が Thanos Receiver の負荷分散の設定をしていない物だったので、Thanos Sidecar と比較した時のメリットがわかりずらかったかもしれません。
機会があれば、Thanos Receiver を複数台にして負荷分散をする構成や Thanos Receiver を複数のテナントに分割してマルチテナントとする構成など試してみたいと思います。
最後までお読みいただきまして、ありがとうございます!!
参考資料
-
Using Thanos as a long-term storage for your Prometheus metrics
https://speakerdeck.com/summerwind/using-thanos-as-a-long-term-storage-for-your-prometheus-metrics -
Thanos Docs:Receiver
https://thanos.io/tip/components/receive.md/