この記事は Kubernetes2 Advent Calendar 2019 10日目の記事です。
はじめに
この記事ではThanosというCNCFのSandboxプロジェクト(2019/12/10時点)のOSSについて書いてみたいと思います。
Thanosの概要からKubernetesクラスタ上での動かし方までを書いていきます。
※Thanos自体はKubernetesに依存していないため、Kubernetes環境以外でも利用可能です
Thanosとは
Thanosはデータの長期保存と可用性の高いPrometheusを提供するためのOSSです。
複数のPrometheusに対してPrompQLを実行することができるため、複数のKubernetesクラスタでそれぞれ稼働しているPrometheusを統合的に管理することができます。
また、Thanosはデータ保存用のバックエンドとしてオブジェクトストレージを利用する構成となっており、各Prometheusのメトリクスデータをオブジェクトストレージに保存することによりメトリクスの長期保存を実現することができます。
Thanosのアーキテクチャ
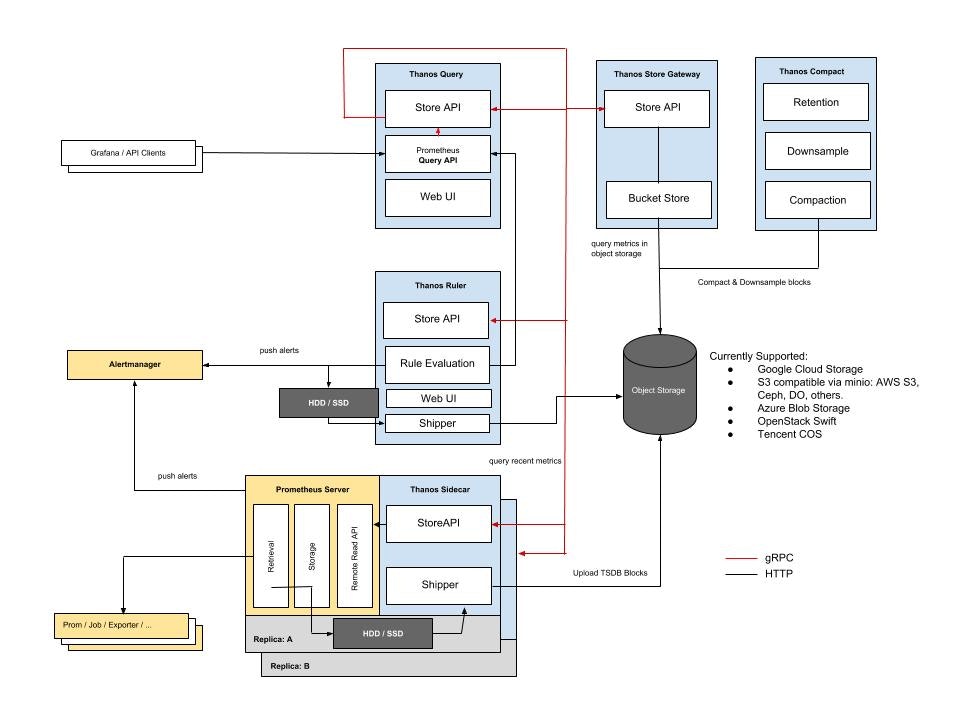
Thanosの全体構成は下記のようになっています。それぞれのコンポーネントについてもう少し細かく見ていきたいと思います。

参考:https://thanos.io/quick-tutorial.md/
Sidecar
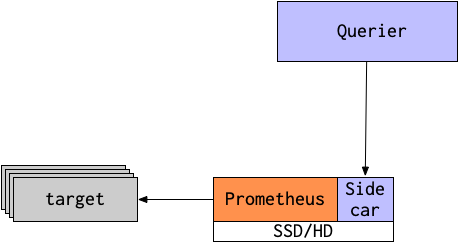
まずはじめにPrometheusのSidecarとして動作しているThanos Sidecarについて見ていきます。
Thanos SidecarはStoreAPIというgRPCのAPIを介してPrometheusのデータをQuerierに提供するプロキシとして動作します。
Sidecarのもう一つの役割はディスクに書き込まれたPrometheusのデータをオブジェクトストレージにアップロードして永続化することです。
Thanos SidecarはPrometheusのDiskへの書き込みを検知してオブジェクトストレージにデータをアップロードするように動作します。

Store Gateway
SidecarがPrometheusのデータをObjectStorageにアップロードすることによってデータの永続化とPrometheusがのっているノードのストレージのデータサイズを抑えることが可能になります。
しかし、オブジェクトストレージにアップロードされたデータを取得する方法がなければ永続化したデータを活用することができません。オブジェクトストレージに保存されたデータをQuerierが取得できるようにするのがStore Gatewayの役割です。
Store GatewayはSidecarと同様にStoreAPIをQuerierに対して提供します。QuerierはStore GatewayのStoreAPIを利用してオブジェクトストレージのbucketに保存されたデータを取得することができます。

Compactor
オブジェクトストレージをスキャンして古いデータの圧縮やコンパクション、ダウンサイジングしたデータのコピーを作成してクエリの実行を高速化します。
Ruler
ThanosではQuerierに対してAlertルールを設定することで複数のPrometheusにまたがった監視や、Prometheus単体の保存期間を超えたルールを設定した監視を行うことができます。

環境構築
Thanosの概要をおさえたところで実際に環境構築をしていきましょう。
今回はローカルのPCにKubernetesを構築してそこにPrometheusとThanosをデプロイしていきます。
筆者のPCのOSはmacOS catalinaです。Kubernetesクラスタの構築にはkindを利用しました。
ThanosのKubernetesクラスタへのデプロイはThanosのドキュメントでCommunity Helm chartsとして紹介されていたThanos Helm chartを使いました。
オブジェクトストレージはGoogleCloudStorageを利用します。
オブジェクトストレージの選択肢としてはAmazon S3やOpenStack Swift等他にも選択肢があるので、他のオブジェクトストレージを利用する場合は下記ドキュメント参考に設定してください。
https://thanos.io/storage.md/
Kubernetesクラスタの構築
最初にHomebrewでkindをインストールします。
$ brew install kind
インストールが完了したらクラスタを作成します。
下記のようにkindのconfigファイルを記述してcontrol-plane1台、worker1台の構成とします。
kind: Cluster
apiVersion: kind.sigs.k8s.io/v1alpha3
nodes:
- role: control-plane
- role: worker
では実際にクラスタを作成してみましょう。
$ kind create cluster --config kind-config.yaml
しばらく待つとKubernetesクラスタが作成されるので、contextを切り替えます。
$ kubectl config use-context kind-kind
$ kubectl config current-context
kind-kind
Thanosのdeploy
デプロイにHelmを使うのでまず最初にHelmのインストールを行います。
$ brew install helm
次にPrometheusのデータをオブジェクトストレージに保存するためのservice accountを作成します。
service accountのポリシーは下記を参考にストレージのオブジェクト作成者とストレージオブジェクト閲覧者を割り当てます。
https://thanos.io/storage.md/#gcs-policies
service accountを作成したら鍵を作成して下記の形式でオブジェクトストレージのconfigファイルに設定します。
type: GCS
config:
  bucket: "thanos"
  service_account: |-
    {
      "type": "service_account",
      "project_id": "project",
      "private_key_id": "abcdefghijklmnopqrstuvwxyz12345678906666",
      "private_key": "-----BEGIN PRIVATE KEY-----\...\n-----END PRIVATE KEY-----\n",
      "client_email": "project@thanos.iam.gserviceaccount.com",
      "client_id": "123456789012345678901",
      "auth_uri": "https://accounts.google.com/o/oauth2/auth",
      "token_uri": "https://oauth2.googleapis.com/token",
      "auth_provider_x509_cert_url": "https://www.googleapis.com/oauth2/v1/certs",
      "client_x509_cert_url": "https://www.googleapis.com/robot/v1/metadata/x509/thanos%40gitpods.iam.gserviceaccount.com"
    }
参考:https://thanos.io/storage.md/#using-inline-a-service-account
ThanosをデプロイするためのNamespaceを作成してデプロイを行います。
$ git clone https://github.com/banzaicloud/banzai-charts.git
$ cd banzaicloud/banzai-charts/thanos

$ helm repo add banzaicloud-stable https://kubernetes-charts.banzaicloud.com
$ helm install thanos banzaicloud-stable/thanos --namespace thanos -f values.yaml --set-file objstoreFile=object-store.yaml
Thanosのデプロイが完了しました。
次にPrometheusをデプロイします。Prometheusのデプロイにはprometheus-operatorを使います。
prometheus-operatorはHelm Chartが存在するのでこちらを使ってデプロイを行います。
Thanosを利用するにはPrometheusにSidecarをデプロイする必要がありますが、こちらはprometheus-operatorに下記の通り設定を追加することでPrometheusのSidecarとしてThanos Sidecarをデプロイすることができます。
prometheus:
  prometheusSpec:
    thanos:
      image: quay.io/thanos/thanos:v0.8.1
      version: v0.8.1
      objectStorageConfig:
        name: thanos
        key: object-store.yaml
上記の内容をthanos-sidecar.yamlというファイル名で保存したら、Helmを使ってPrometheusをデプロイします。
$ helm install prometheus stable/prometheus-operator --namespace thanos -f thanos-sidecar.yaml
Podの一覧を確認してすべてRunningになっていることを確認します。
$ kubectl get pods -n thanos
NAME                                                     READY   STATUS    RESTARTS   AGE
alertmanager-prometheus-prometheus-oper-alertmanager-0   2/2     Running   0          19h
prometheus-grafana-6bd876879f-hf8sb                      2/2     Running   0          19h
prometheus-kube-state-metrics-766476f899-5kshh           1/1     Running   0          19h
prometheus-prometheus-node-exporter-vkfg8                1/1     Running   0          19h
prometheus-prometheus-oper-operator-5bd8d4db69-62j8m     2/2     Running   0          19h
prometheus-prometheus-prometheus-oper-prometheus-0       4/4     Running   1          19h
thanos-bucket-574dcc6585-mb8jl                           1/1     Running   0          19h
thanos-compact-7fbf995746-rgp9t                          1/1     Running   0          19h
thanos-query-f754c67c9-5n6fm                             1/1     Running   0          19h
thanos-store-0-6d967bc966-m22fk                          1/1     Running   0          19h
kubectl port-forwardを利用してPrometheusのUIを確認します。
$ kubectl port-forward svc/prometheus-prometheus-oper-prometheus 9090
Forwarding from 127.0.0.1:9090 -> 9090
Forwarding from [::1]:9090 -> 9090
別ターミナルで下記を実行してブラウザでUIを確認します。
$ open http://localhost:9090

次にThanos Queryを見てみます。
$ kubectl port-forward svc/thanos-query-http 10902
Forwarding from 127.0.0.1:10902 -> 10902
Forwarding from [::1]:10902 -> 10902

$ open http://localhost:10902

Thanos Bucket Viewerでオブジェクトストレージのbucketにアップロードされているデータを確認できます。
$ kubectl port-forward svc/thanos-bucket 8080
Forwarding from 127.0.0.1:8080 -> 8080
Forwarding from [::1]:8080 -> 8080

$ open http://localhost:8080
2時間毎にPrometheusがTSDB Blockを生成し、Thanos SidecarがそれをオブジェクトストレージにアップロードするのでThanos Bucket Viewerにデータが表示されるには時間がかかります。

まとめ
Thanosの概要について調べてみました。
Prometheusを複数にスケールして統合的に管理したいかつデータを永続化したいという要件がある場合に利用を検討しても良いのではないかと感じました。
一方でPrometheus単体で運用するよりもコンポーネントが結構増えてしまうので、本番環境等で運用する際にどの程度手間がかかるのかは気になりました。
