はじめに
この記事は、3本立ての3本目です。
- Laravel と Vue と Docker でシンプルな SPA を作る ①【フロントエンド】
- Laravel と Vue と Docker でシンプルな SPA を作る ②【バックエンド】
- Laravel と Vue と Docker でシンプルな SPA を作る ③【フロントエンドとバックエンドの通信】←今ここ
今回は、下記のコミットの内容です。
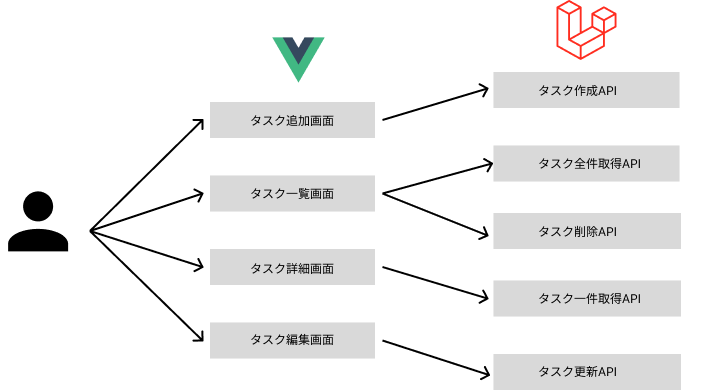
全体像をおさらい
今まで作成してきた画面とAPIの連携は、下記のようになっています。

この記事では、VueからLaravelに向かう矢印の部分を実装します。
より詳しいシステムの構成図は、下記の記事をご参照ください。
タスク追加画面と、タスク作成APIの連携
src/resources/js/components/TaskCreate.vueのscriptタグ内を、以下のように修正します。
<script setup>
import { ref } from 'vue'
import router from '../router'
import Button from './Button.vue'

const task = ref({})

function submit(title, content, person_in_charge) {
  fetch('http://localhost:80/api/tasks', {
    method: 'POST',
    headers: {
      'Content-Type': 'application/json'
    },
    body: JSON.stringify({
      title: title,
      content: content,
      person_in_charge: person_in_charge
    })
  })
  .then(res => router.push('/tasks'))
}
</script>
このタスク追加画面では、「追加」ボタンが押下された際、画面のフォームに入力された値を使ってタスク生成APIを叩きます。
そのためには、フォームに入力された値を常に監視しておく必要があります。
つまり、入力されたタスクの内容を、リアクティブなオブジェクトとして扱う必要があります。
リアクティブという概念の詳細な解説は既に多くの記事があるので当記事では割愛します。以下のドキュメントや記事が参考になります。
Vueのrefメソッドを使って、リアクティブなオブジェクトを生成します。
const task = ref({})
以下の部分で、タスク生成APIを叩いています。今回はFetch APIを使いました。Axiosでも全く問題ありません。
フォームに入力された内容を、bodyにJSONで格納しています。
APIを叩いて、レスポンスが返ってきたらタスク一覧画面に遷移させています。本来はAPI呼び出し時のエラーハンドリングなども実装すべきなのですが、今回は割愛しています。
function submit(title, content, person_in_charge) {
  fetch('http://localhost:80/api/tasks', {
    method: 'POST',
    headers: {
      'Content-Type': 'application/json'
    },
    body: JSON.stringify({
      title: title,
      content: content,
      person_in_charge: person_in_charge
    })
  })
  .then(res => router.push('/tasks'))
}
次に、templateタグ内を、以下のように修正します。
<template>
  <v-sheet width="300" class="mx-auto">
    <v-form>
      <v-text-field
        label="タイトル"
+       v-model="task.title"
      ></v-text-field>
      <v-text-field
        label="内容"
+       v-model="task.content"
      ></v-text-field>
      <v-text-field
        label="担当者"
        v-model="task.person_in_charge"
      ></v-text-field>
-     <Button name="追加" block class="mt-2"/>
+     <Button name="追加"
+             block
+             class="mt-2"
+             @click="submit(task.title, task.content, task.person_in_charge)"
+     />
  </v-form>
  </v-sheet>
</template>
v-modelを使って、フォームに入力された内容を動的にtasksに反映させています。
タイトルの部分を例にすると、以下の記述と同じことをしています。
<v-text-field
  label="タイトル"
  :value="task.title"
  @input="task.title = $event.target.value"
/>
「追加」ボタンを押下した際に、scriptタグ内で定義したsubmitメソッドを呼び出しています。
引数には、現在フォームに入力されている各値を渡しています。
 <Button name="追加"
              block
              class="mt-2"
              @click="submit(task.title, task.content, task.person_in_charge)"
      />
タスク一覧画面と、タスク全件取得API & タスク削除APIの連携
src/resources/js/components/TaskList.vueのscriptタグ内を、以下のように修正します。
<script setup>
import { ref, onMounted } from 'vue';
import Button from './Button.vue'
const tasks = ref([])
function getTasks() {
  fetch('http://localhost:80/api/tasks')
    .then(res => res.json())
    .then(json => tasks.value = json)
}
onMounted(() => {
  getTasks()
})
function deleteTask(id) {
  fetch('http://localhost:80/api/tasks/' + id, {
    method: 'DELETE',
  })
  .then(res => getTasks())
}
</script>
getTasksメソッドでタスク全件取得APIを呼び出して、配列のref要素として宣言したtasksにレスポンスを格納しています。一覧画面がレンダリングされるときには毎回最新のタスク一覧を取得したいので、onMountedメソッド内でgetTasksメソッドをコールバックで呼び出しています。
function getTasks() {
  fetch('http://localhost:80/api/tasks')
    .then(res => res.json())
    .then(json => tasks.value = json)
}
onMounted(() => {
  getTasks()
})
また、タスク削除APIを叩くための関数も定義しています。
APIからレスポンスが返ってきたら再度getTasksメソッドを呼んで最新のタスク一覧を取得しています。
function deleteTask(id) {
  fetch('http://localhost:80/api/tasks/' + id, {
    method: 'DELETE',
  })
  .then(res => getTasks())
}
次に、templateタグ内を、以下のように修正します。
<template>
  <v-table>
    <thead>
      <tr>
        <th>番号</th>
        <th>タイトル</th>
        <th>内容</th>
        <th>担当者</th>
        <th>詳細</th>
        <th>編集</th>
        <th>削除</th>
      </tr>
    </thead>
    <tbody>
      <tr v-for="task in tasks" :key="task.id">
        <th>{{ task.id }}</th>
        <td>{{ task.title }}</td>
        <td>{{ task.content }}</td>
        <td>{{ task.person_in_charge }}</td>
        <td><Button :link="'/tasks/' + task.id" name="詳細" /></td>
        <td><Button :link="'/tasks/' + task.id + '/edit'" name="編集" /></td>
        <td><Button name="削除" @click="deleteTask(task.id)"/></td>
      </tr>
    </tbody>
  </v-table>
</template>
v-forでtasksの個数分レンダリングしています。
「詳細」ボタンと「編集」ボタンにはそれぞれ遷移先のリンクを設定していて、「削除」ボタンが押下されて際にはscriptタグ内で定義したdeketeTaskメソッドを呼び出しています。
タスク詳細画面と、タスク一件取得APIの連携
src/resources/js/components/TaskShow.vueを、以下のように修正します。
<script setup>
import { ref, onMounted } from 'vue'
import Button from './Button.vue'
const props = defineProps({
  taskId: String
})
const task = ref({})
function getTask() {
  fetch('http://localhost:80/api/tasks/' + props.taskId)
    .then(res => res.json())
    .then(data => task.value = data)
}
onMounted(() => {
  getTask()
})
</script>
親コンポーネントのTaskList.vueからtaskIdを受け取れるように、propsを定義しています。
const props = defineProps({
  taskId: String
})
タスク詳細画面がレンダリングされる際に、propsで受け取ったtaskIdを使ってタスク一件取得APIが呼び出されるようにしています。
function getTask() {
  fetch('http://localhost:80/api/tasks/' + props.taskId)
    .then(res => res.json())
    .then(data => task.value = data)
}
onMounted(() => {
  getTask()
})
次に、templateタグ内を、以下のように修正します。
<template>
  <v-sheet width="300" class="mx-auto">
    <v-form disabled>
      <v-text-field
        label="番号"
        v-model="task.id"
      ></v-text-field>
      <v-text-field
        label="タイトル"
        v-model="task.title"
      ></v-text-field>
      <v-text-field
        label="内容"
        v-model="task.content"
      ></v-text-field>
      <v-text-field
        label="担当者"
        v-model="task.person_in_charge"
      ></v-text-field>
      <Button link="/tasks" block name="戻る" />
  </v-form>
  </v-sheet>
</template>
ここはシンプルに、APIを叩いて取得したタスクの内容をレンダリングしています。
「戻る」ボタンに、遷移先のタスク一覧画面を設定しています。
タスク編集画面と、タスク更新APIの連携
src/resources/js/components/TaskEdit.vueを、以下のように修正します。
<script setup>
import { ref, onMounted } from 'vue'
import router from '../router'
import Button from './Button.vue'

const props = defineProps({
  taskId: String
})

const task = ref({})

function getTask() {
  fetch('http://localhost:80/api/tasks/' + props.taskId)
    .then(res => res.json())
    .then(data => task.value = data)
}

function submit(title, content, person_in_charge) {
  fetch('http://localhost:80/api/tasks/' + props.taskId, {
    method: 'PUT',
    headers: {
      'Content-Type': 'application/json'
    },
    body: JSON.stringify({
      title: title,
      content: content,
      person_in_charge: person_in_charge
    })
  })
  .then(res => router.push('/tasks'))
}

onMounted(() => {
  getTask()
})
</script>

<template>
  <v-sheet width="300" class="mx-auto">
    <v-form>
      <v-text-field
        label="番号"
        v-model="task.id"
        readonly
      >
      </v-text-field>
      <v-text-field
        label="タイトル"
        v-model="task.title"
      ></v-text-field>
      <v-text-field
        label="内容"
        v-model="task.content"
      ></v-text-field>
      <v-text-field
        label="担当者"
        v-model="task.person_in_charge"
      ></v-text-field>
      <Button name="保存"
              block
              @click="submit(task.title, task.content, task.person_in_charge)"
      />
  </v-form>
  </v-sheet>
</template>
今までの3つの画面で行った実装と基本的には同様なので、詳しい説明は割愛させていただきます。
終わりに
3本立ての記事もこれで終了です。
ご参考になりましたら、幸いです。