こちらの続きです。
まずはやりたいことの復習から。
困っていたこと
LINEを使っていて、よくあるのが、
イベントのときに、なんかのグループ作って、
情報をやり取りし、イベント後に写真をLINEに投稿し合うってやつ、ありますよね。
正直、写真の保存がマジでしんどいのです。
保存が面倒なら、自動でグーグルドライブに保存してくれるBot作ったらいいじゃない!
やりたいこと
LINEでやり取りしている写真を、グーグルドライブに放り込みたい。
自動で。
今回書くこと
- Local Debugの方法
- pyDriveもサーバーレスでやる
ここでDebugの方法を考えて見ましょう。
コードを追加するたびに毎回、AWS上にデプロイしてもいいのですが、
毎回、chalice deploy は効率的ではないので、ローカルで実行することにします。
Chaliceのローカル実行
chaliceはローカル実行のコマンドがすでに用意されており、
コマンド一発でローカルで実行できます。
$ $ chalice local
Serving on localhost:8000
これでPCから、ポート8000で接続できます。
ですが、Lineからのリクエストを実際に受け付けたいときもありますよね。
そこでngrokを使います。
ngrokでLINEからのメッセージをローカルで実行する
ngrokはローカルサーバーをトンネル経由で、公開してくれるサービスです。
つまり、chalice local でローカル実行しているLINE botアプリケーションに、
ngrok経由で、LINEからのリクエストをハンドリングすることができるわけです。
ngrokの細かい仕組みは、いったんおいておいて、インストールしてみましょう。
(今度書いてみようと思います。。。思います。)
$ brew cask install ngrok
そして実行、
$ ngrok http 8000
そうすると、以下のように表示されます。
grok by @inconshreveable                                                           (Ctrl+C to quit)

Session Status                online
Account                       xxxxxxxx (Plan: Free)
Version                       2.2.8
Region                        United States (us)
Web Interface                 http://127.0.0.1:4040
Forwarding                    http://0cd043fd.ngrok.io -> localhost:8000
Forwarding                    https://0cd043fd.ngrok.io -> localhost:8000

Connections                   ttl     opn     rt1     rt5     p50     p90
                              0       0       0.00    0.00    0.00    0.00
つまり、
http://0cd043fd.ngrok.io へのアクセスを
localhost:8000 へルーティングしてくれるよ、ということです。
ローカルでLINEからのリクエストを処理してみる
さっそく、LINEからのリクエストをローカルに投げるようにしてみましょう。
サーバーサイドは、前回のプログラムを利用します。
- ngrokを起動する。
$ ngrok http 8000

Session Status                online
Account                       xxxxxxx (Plan: Free)
Version                       2.2.8
Region                        United States (us)
Web Interface                 http://127.0.0.1:4040
Forwarding                    http://c85d6c7e.ngrok.io -> localhost:8000
Forwarding                    https://c85d6c7e.ngrok.io -> localhost:8000

Connections                   ttl     opn     rt1     rt5     p50     p90
                              0       0       0.00    0.00    0.00    0.00
こちらがLINEからのリクエストをルーティングする先になります。
2. Chaliceをローカル起動
$ $ chalice local
Serving on localhost:8000
これで、ローカルのChaliceへリクエストを飛ばす準備ができました。
3. Lineからのリクエスト先を設定する。
LINEのコンソールから、上記ドメインで設定します。
接続確認のボタンを押下すると、「成功しました」と表示されるかと思います。

ngrokにもリクエストが来ています。
Session Status                online
Account                       xxxxxxxx (Plan: Free)
Version                       2.2.8
Region                        United States (us)
Web Interface                 http://127.0.0.1:4040
Forwarding                    http://c85d6c7e.ngrok.io -> localhost:8000
Forwarding                    https://c85d6c7e.ngrok.io -> localhost:8000

Connections                   ttl     opn     rt1     rt5     p50     p90
                              0       1       0.00    0.00    0.00    0.00

HTTP Requests
-------------

POST /bot                      200 OK
chaliceにも無事に届いていますね。
127.0.0.1 - - [30/May/2018 22:35:16] "POST /bot HTTP/1.1" 200 -
それでは、LINEからリクエストを飛ばしてみましょう。
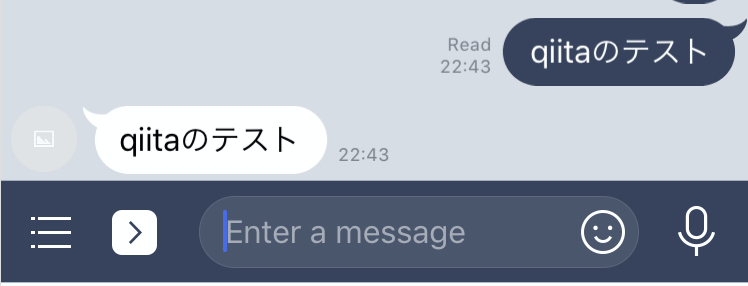
オッケェェェイイーーーーーー!!
pyDriveもサーバーレスでやる
前回はオウム返しするline-botをサーバーレスで動かしました。
今度は、当初の目的に近づくために、pyDriveもサーバーレスで動かします。
pyDriveをvendorディレクトリへ
chaliceでパッケージングするために
vendorディレクトリにパッケージをDLします。
$ pip install -U PyDrive==1.3.1 -t ./vendor/
client_secrets.jsonはchalicelibへ
ドキュメントの通り、設定ファイルなどは、
chalicelibディレクトリに配置します。
__init__.py も忘れずに。
パッケージングされると、chalicelibディレクトリは、app.pyと並列に置かれます。
その結果、pyDriveで必要な client_secrets.json が同一ディレクトリではなくなってしまうので、
このままでは、NotFoundでエラーが発生してしまいます。
なので、インスタンス化したら、LoadClientConfigFileメソッドでファイルの在処を教えてあげます。
gauth = GoogleAuth()
gauth.LoadClientConfigFile('./chalicelib/client_secrets.json')
結果、ファイルは以下のような配置になると思います。
├── app.py
├── chalicelib
│   ├── __init__.py
│   └── client_secrets.json
└── vendor
    ├── PyDrive-1.3.1.dist-info
:
:
パッケージングされると、chalicelibディレクトリは、app.pyと並列に置かれます。
その結果、pyDriveで必要な client_secrets.json が同一ディレクトリではなくなってしまうので、
このままでは、NotFoundでエラーが発生してしまいます。
デプロイして動かす。
今度は、前回のコードに、pyDriveを追加した、以下のコードを使用しました。
また今回、callbackのpathを追加しています。
google側でOAuthのcallback先を、デプロイしたAPIへと設定しておけば、
認可コードがここに送られてきます。
(前回のURLを設定すればいいかと思います。)
import sys
import os
import chalicelib

from chalice import Chalice, Response
from flask import Flask, request, abort, render_template

from linebot import (
    LineBotApi, WebhookParser
)
from linebot.exceptions import (
    InvalidSignatureError
)
from linebot.models import (
    MessageEvent, TextMessage, TextSendMessage,
    ImageMessage
)
from linebot.models.events import (
    SourceGroup, SourceRoom, SourceUser
)

from pydrive.auth import GoogleAuth
from pydrive.drive import GoogleDrive

"""
logging
"""
import logging
from logging import getLogger

logger = getLogger(__name__)
logger.setLevel(logging.DEBUG)

"""
Line TOKEN
"""
CHANNEL_ACCESS_TOKEN = os.getenv('CHANNEL_ACCESS_TOKEN', None)
CHANNEL_SECRET = os.getenv('CHANNEL_SECRET', None)
print(CHANNEL_ACCESS_TOKEN)
print(CHANNEL_SECRET)
if CHANNEL_SECRET is None:
    print('Specify LINE_CHANNEL_SECRET as environment variable.')
    sys.exit(1)
if CHANNEL_ACCESS_TOKEN is None:
    print('Specify LINE_CHANNEL_ACCESS_TOKEN as environment variable.')
    sys.exit(1)

line_bot_api = LineBotApi(CHANNEL_ACCESS_TOKEN)
parser = WebhookParser(CHANNEL_SECRET)

# app = Flask(__name__)
app = Chalice(app_name='python-line-google')
app.debug = True

@app.route("/", methods=['GET'])
def test():
    return 'ok'

@app.route("/callback")
def callback():
    print("header:", app.current_request.headers)
    print("code",app.current_request.query_params.get('code'))
    return Response(body="Setup Complete. You can close this page",
                    status_code=200,
                    headers={'Content-Type': 'text/plain'})

def handle_message(event: MessageEvent):
    message = event.message.text
    if message == "設定" or message == "setup":
        # from user message is "設定"
        if isinstance(event.source, SourceUser):
            code_key = event.source.user_id
        if isinstance(event.source, SourceRoom) :
            code_key = event.source.room_id
        if isinstance(event.source,SourceGroup):
            code_key = event.source.group_id

        gauth = GoogleAuth()
        gauth.LoadClientConfigFile('./chalicelib/client_secrets.json')
        gauth.GetFlow()

        auth_url = gauth.flow.step1_get_authorize_url(state=code_key)

        line_bot_api.reply_message(
            event.reply_token,
            TextSendMessage(text=auth_url)
        )
    else:
        # from user message is not "設定"
        line_bot_api.reply_message(
            event.reply_token,
            TextSendMessage(text=event.message.text)
        )

@app.route("/bot", methods=['POST'])
def bot():
    signature = app.current_request.headers['X-Line-Signature']
    body = app.current_request.raw_body.decode('utf-8')
    print('signature:{}'.format(signature))
    print('request body:{}'.format(body))

    try:
        events = parser.parse(body, signature)
    except InvalidSignatureError:
        abort(400)

    # if event is MessageEvent and message is TextMessage, then echo text
    for event in events:
        # return if callback test request
        if event.reply_token == "00000000000000000000000000000000":
            print('request is callback test')
            return "ok"

        # skip if not MessageEvent
        if not isinstance(event, MessageEvent):
            print("not Message Event")
            continue

        # skip if not TextMessage
        if not isinstance(event.message, TextMessage) and not isinstance(event.message, ImageMessage):
            print("not TextMessage and ImageMessage")
            continue

        message_type = event.message
        print("message_type = {}".format(message_type))
        if isinstance(message_type, TextMessage):
            handle_message(event)

        if isinstance(message_type, ImageMessage):
            print("image message")
        # get message text

    return 'OK'
認証用のURLが返ってきました。
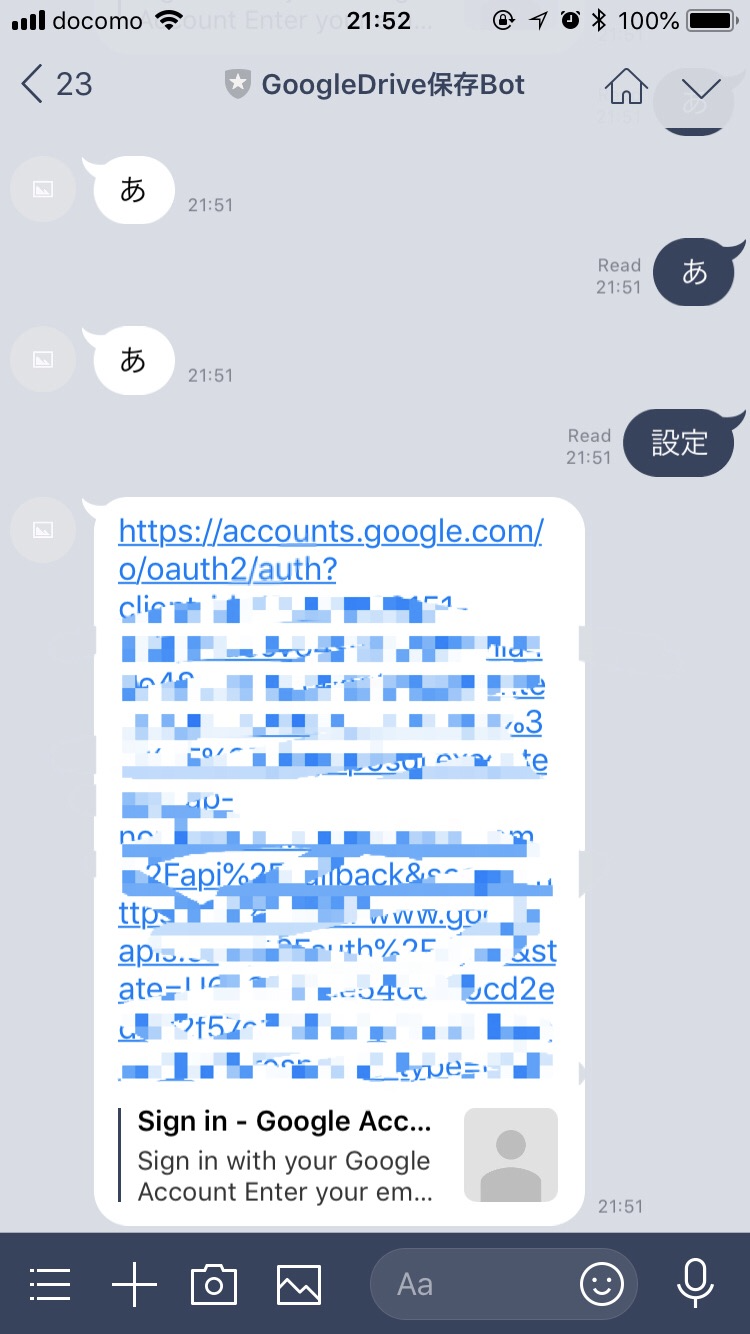
AWS上のログでも、認可コードが確認できました。

この認可コードを使えば、GoogleDriveへアップロードできるはず!!
この認可コードはどこかに保持しておかないと、毎回認証しないといけなくなっちゃいますね。
保存もAWSのサービスに乗っかります。が、また次に続くことにします。