ラズパイの取得したデータをリアルタイムでグラフで見れたらいいなと思い、Google Spread Sheetを使えばできるというのが分かった。まず、最初のステップとして、ラズパイからGoogle Spread Sheetに書き込むまでを確認した。
環境
Python version:3.9.7
OS: windows: 10.0
Linux raspberrypi: 5.10.63+
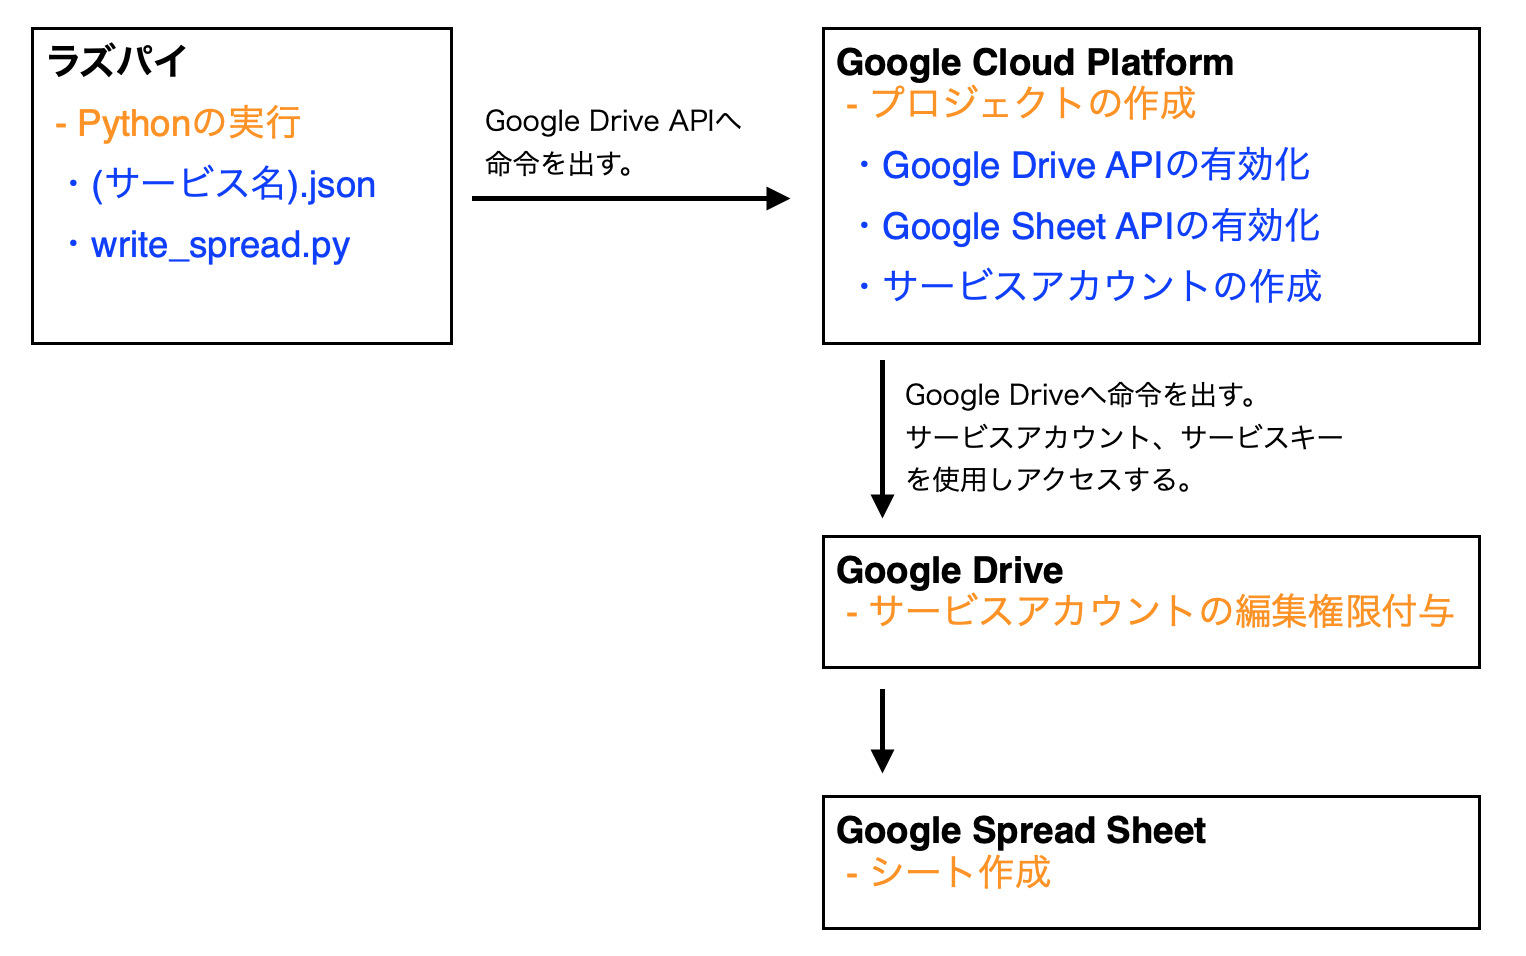
プログラムの実行イメージ
ラズパイからコマンドをたたき、Google Driveの指定したディレクトリへGoogle Spread Sheetを作成する。
Google Cloud Platform(GCP)の設定、Google Drive の設定をしてプログラムを走行する必要がある。

1.1 GCPの設定
GCPからGoogle Drive APIとGoogle Sheets APIを有効にしたサービスを取得する。Google Driveとスプレッドシートを操作できる。
1.1.1 Google Drive APIとGoogle Sheets APIを有効化
- Google Cloud Platformを開く。
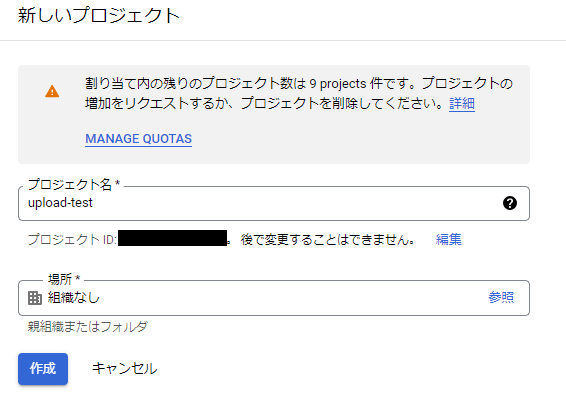
- プロジェクトの選択 -> 新しいプロジェクトを選択する。
- プロジェクト名を入力し、作成をクリックする。

- ライブラリ-> Google Drive APIを選択し、「有効にする」をクリック。Google Sheets APIも同様。
1.1.2 サービスアカウントキーの取得
- 認証情報 -> 認証情報を作成 -> サービスアカウントを選択
- サービスアカウント名を入力、完了をクリック。これでサービスアカウントのメールアドレスが作成される。
- 認証情報 -> メールアドレス -> キー ->鍵を追加 ->新しいカギを追加 -> JSON -> 作成をクリック。サービスアカウントキーが生成する。ここで生成したjsonファイルをラズパイに置く。
2. Google Drive の共有
Google Driveのフォルダを共有し、スプレッドシートを作成できるようにする。
2.1 Google Driveの権限付与
- Google Drive を開き、保存したいフォルダを選択する。ここで「共有」ボタンをクリックし、サービスアカウントで生成したメールアドレスを追加する。
- Google DriveのフォルダIDを確認する。フォルダIDは、folders以下の分。
※Google Driveを日本語に設定していた場合フォルダIDの末尾に?hl=jaと表示されるが、その部分はフォルダIDではないので不要。
https://drive.google.com/drive/folders/<フォルダのID>
Google DriveのフォルダのIDの補足
フォルダIDをxxxxxxxxxxxx?hl=jaとしてしまい、下記のようなエラーが出た。
pydrive.files.ApiRequestError: <HttpError 404 when requesting https://www.googleapis.com/drive/v2/files?alt=json returned "File not found:
はまってしまったので、解説。<フォルダのID>末尾にある?hl=jaは、ページを表示するパラメータなので不要。jaは、日本語を表している。
3. プログラムの実行
3.3.1 ライブラリのインストール
ラズパイに下記ライブラリをインストールした。
pip install gspread oauth2client google-api-python-client google-auth-httplib2 google-auth-oauthlib pydrive
3.3.2 プログラムの実行
ラズパイにGCPで生成したjosnファイルを置いて、下記プログラムを実行すると、指定したGoogle DriveへGoogle Spread Sheetを書き込むことができた。
import gspread
from oauth2client.service_account import ServiceAccountCredentials
from pydrive.auth import GoogleAuth
from pydrive.drive import GoogleDrive
import pprint

scope = ['https://spreadsheets.google.com/feeds',
         'https://www.googleapis.com/auth/drive']
json_keyfile_path = 'サービスアカウントキー.json'

# サービスアカウントキーを読み込む
credentials = ServiceAccountCredentials.from_json_keyfile_name(
    json_keyfile_path, scope)

# pydrive用にOAuth認証を行う
gauth = GoogleAuth()
gauth.credentials = credentials
drive = GoogleDrive(gauth)

folder_id = '<フォルダのID>'
f = drive.CreateFile({
    'title': 'sample_spread',
    'mimeType': 'application/vnd.google-apps.spreadsheet',
    "parents": [{"id": folder_id}]})
f.Upload()

# 作成したスプレッドシートの情報を出力
pprint.pprint(f)

# gspread用に認証
gc = gspread.authorize(credentials)

# スプレッドシートのIDを指定してワークブックを選択
workbook = gc.open_by_key(f['id'])
worksheet = workbook.sheet1

# A1のセルに入力
worksheet.update_acell('A1', 'Hello World!')

# 2行目の1~3列目に入力
cell_list = worksheet.range(2, 1, 2, 3)
cell_list[0].value = '連番'
cell_list[1].value = '名前'
cell_list[2].value = '電話番号'

# スプレッドシートを更新
worksheet.update_cells(cell_list)
今後
ラズパイから取得したデータをSpread Sheetに書き込めるようにする。
また、Google BigQueryとMetabaseを利用したグラフの作成が面白そうなので、調べて試してみたい。
リンク
下記サイトを参考にさせていただいた。
pythonでGoogle Driveの任意のフォルダにスプレッドシートを作成・編集する