DIVE INTO CODE Advent Calendar 2016 の 12/20 のエントリーです。
試行錯誤の末、PowerShell と Bash on Ubuntu on Windows (以下、BoW) の CUI のみで、Windows マシンのローカル上に Rails/PostgreSQL の開発環境を構築できたので、その手順を Step by Step で紹介します。
ただし、2016/12 現在、BoW は PostgreSQL のインストールでエラーとなるため、BoW では PostgreSQL クライアントのみをインストールし、PostgreSQL サーバーとして PostgreSQL for Windows を直接 Windows にインストールすることにより、通常の Ubuntu と同様に扱えるようにします。(GitHub、Heroku への git push や、既存のリポジトリを git clone して bundle install も可能)
はじめに
対象
- Windows マシンのローカル上に Rails/PostgreSQL の開発環境を構築したい
- CUI (PowerShell, BoW) のみで構築したい
- Windows 10 の将来性に少し期待している
- 逆に、MacBook (Pro 含む) のキーボード薄型化や高額な Touch Bar モデルなどの方向性に...
- Touch Bar よりもタッチスクリーンの方が操作も単純だし便利なのでは...
- Windows マシンに Linux を直接入れるのもアリだが、ハードウェア/周辺機器の互換性が...
動作環境
- 仮想マシン (試行錯誤用)
- VMware Fusion 8.5 の仮想マシン (Core i5-5257U、メモリ 4GB)
- Windows 10 Home x64, build 14393.576
- 物理マシン
- Lenovo YOGA 710 80V6000XJP (Core i5-7Y54、メモリ 8GB)
- Windows 10 Home x64, build 14393.576
なお、メモリが少ないと、後述のように bundle install が失敗する場合があるため、4GB 以上のメモリを載せたマシンが無難です。(Windows 10 自体もメモリは 4GB 以上が無難...)
BoW のシステム要件
参考までに、BoW の Installation Guide では、以下が BoW のシステム要件となっています。(Windows 10 Home でも可)
- Your PC must be running a 64-bit version of Windows 10 Anniversary Update build 14393 or later
実行内容の凡例
PowerShell の実行内容
> command
BoW の実行内容
$ command
BoW のインストール
デフォルトのシェルの変更
Windows 10 では、Build 14971 以降で、デフォルトのシェルがコマンドプロンプトから PowerShell に変更される予定です。本題とは直接は関係ありませんが、特にコマンドプロンプトに思い入れがなければ、流れに身を任せて先取りしておきます。
[Windows] キー > powershell を検索して [Windows PowerShell] を起動し、以下のレジストリを追加することにより、WinX メニューのシェルを PowerShell に変更します。
> New-ItemProperty -Path HKCU:\SOFTWARE\Microsoft\Windows\CurrentVersion\Explorer\Advanced -Name DontUsePowerShellOnWinX -PropertyType DWord -Value 0 -Force
設定を反映するために、Explorer を再起動します。(Stop-Process ですが再起動されます。)
> Stop-Process -Name explorer
BoW のインストール
[Windows] キー + [X] キー > [Windows PowerShell (管理者)] を開き、以下の 2 つのレジストリを追加することにより、開発者モードを有効にします。
> New-ItemProperty -Path HKLM:\SOFTWARE\Microsoft\Windows\CurrentVersion\AppModelUnlock -Name AllowAllTrustedApps -PropertyType DWord -Value 1 -Force
> New-ItemProperty -Path HKLM:\SOFTWARE\Microsoft\Windows\CurrentVersion\AppModelUnlock -Name AllowDevelopmentWithoutDevLicense -PropertyType DWord -Value 1 -Force
Windows Subsystem for Linux (beta) を有効化し、Y で OS を再起動します。
> Enable-WindowsOptionalFeature -Online -FeatureName Microsoft-Windows-Subsystem-Linux
この操作を完了するために、今すぐコンピューターを再起動しますか?
[Y] Yes  [N] No  [?] ヘルプ (既定値は "Y"): Y
OS の再起動後、[Windows] キー + [X] キー > [Windows PowerShell] を開き、BoW のインストールを開始します。
> bash
y で続行します。
-- ベータ機能 --
これにより Windows に Ubuntu がインストールされます。Ubuntu は Canonical によって配布される製品であり、
次のサイトに示される条件に基づいてライセンスされています。
https://aka.ms/uowterms

続行するには、"y" を入力してください: y
処理の完了まで数分待ちます。
Windows ストアからダウンロードしています... 100%
ファイル システムを展開しています。この処理には数分かかります...
BoW の任意のユーザー名とパスワードを入力します。
既定の UNIX ユーザー アカウントを作成してください。ユーザー名は、Windows のユーザー名と一致する必要はありません。
詳細: https://aka.ms/wslusers を参照してください
新しい UNIX ユーザー名を入力してください: bowuser
新しい UNIX パスワードを入力してください: (パスワードを入力)
新しい UNIX パスワードを再入力してください: (パスワードを再入力)
インストールが完了し、Bash が起動すると、プロンプトが $ になります。
passwd: password updated successfully
インストールが正常に終了しました
環境が間もなく開始されます...
ドキュメントを参照できる場所: https://aka.ms/wsldocs
bowuser@BOWHOST:/mnt/c/Users/winuser$
BoW の初期設定
sudo を実行すると "sudo: ホスト <ホスト名> の名前解決ができません" と怒られるので /etc/hosts の最初の行にホスト名を追記します。
$ sudo sed -i -e "/127.0.0.1 localhost/s/$/ $(hostname)/g" /etc/hosts
sudo: ホスト BOWHOST の名前解決ができません
[sudo] password for bowuser: (パスワードを入力)
日本語が表示されなかったりずれたりするので、ロケールを英語に変更します。
$ sudo update-locale LANG=en_US.UTF-8
$ source /etc/default/locale
Ubuntu 日本語 Remix っぽく、リポジトリの URL を jp に変更します。(お好みで他でも可)
$ sudo sed -i -e 's/archive/jp.archive/g' /etc/apt/sources.list
デフォルトでは umask が 0000 なので、0022 に変更します。
$ echo 'umask 022' >> ~/.bashrc
$ source ~/.bashrc
作業用のディレクトリの作成
Microsoft の中の人が警告しているように、BoW のファイルシステム (%localappdata%\lxss) 配下のファイルを Windows 側から作成/編集すると、ファイルが破損する可能性があります。
そのため、Windows 側のファイルシステム配下に作業用のディレクトリ (C:\workspace) を作成し、BoW から扱いやすいようにシンボリックリンクを作成します。
$ mkdir /mnt/c/workspace
$ ln -s /mnt/c/workspace ~/workspace
Ruby のインストール
パッケージを更新します。
$ sudo apt-get update
$ sudo apt-get upgrade
必要なパッケージをインストールします。
$ sudo apt-get install git nodejs build-essential libreadline-dev libyaml-dev libxslt-dev libcurl4-openssl-dev libffi-dev sqlite3 libsqlite3-dev
rbenv をインストールします。
$ git clone https://github.com/rbenv/rbenv.git ~/.rbenv
$ echo 'export PATH="$HOME/.rbenv/bin:$PATH"' >> ~/.bashrc
$ echo 'eval "$(rbenv init -)"' >> ~/.bashrc
$ source ~/.bashrc
ruby-build をインストールします。
$ git clone https://github.com/rbenv/ruby-build.git ~/.rbenv/plugins/ruby-build
$ echo 'export PATH="$HOME/.rbenv/plugins/ruby-build/bin:$PATH"' >> ~/.bashrc
$ source ~/.bashrc
Ruby をインストールします。rbenv install の完了まで 15 分程度待ちます。(ruby 2.3.0 の例)
$ rbenv install 2.3.0
$ rbenv global 2.3.0
$ ruby -v
ruby 2.3.0p0 (2015-12-25 revision 53290) [x86_64-linux]
ドキュメントを除外し、Bundler をインストールします。
$ echo 'gem: --no-document' >> ~/.gemrc
$ gem install bundler
PostgreSQL のインストール
BoW では PostgreSQL クライアントのみをインストールし、PostgreSQL サーバーとして、PostgreSQL for Windows を直接 Windows のローカルにインストールします。
PostgreSQL クライアントのインストール
PostgreSQL クライアントをインストールします。(postgresql-client-9.5 の例)
$ sudo sh -c 'echo "deb http://apt.postgresql.org/pub/repos/apt/ $(lsb_release -cs)-pgdg main" > /etc/apt/sources.list.d/pgdg.list'
$ wget --quiet -O - https://www.postgresql.org/media/keys/ACCC4CF8.asc | sudo apt-key add -
$ sudo apt-get update
$ sudo apt-get install postgresql-client-9.5 libpq-dev
PostgreSQL for Windows のインストール
BoW を終了して PowerShell に戻り、PostgreSQL for Windows をダウンロードします。(postgresql-9.5.5-1 の例)
$ exit
> Start-BitsTransfer -Source http://get.enterprisedb.com/postgresql/postgresql-9.5.5-1-windows-x64.exe -Destination C:\workspace\postgresql-9.5.5-1-windows-x64.exe
postgres ユーザーの任意のパスワードと Locale を指定し、PostgreSQL をインストールします。
> C:\workspace\postgresql-9.5.5-1-windows-x64.exe --mode unattended --superpassword <postgres ユーザーのパスワード> --locale C
Setup のプログレスバーが終了したら、BoW に戻ります。
> bash
PostgreSQL の初期設定
postgres ユーザーで接続テスト後、問題なければ ¥q で抜けます。
$ psql -h localhost -U postgres
Password for user postgres: (postgres ユーザーのパスワードを入力)
psql (9.5.5)
Type "help" for help.

postgres=# \q
デフォルトで接続するホスト名を localhost に設定します。
$ echo 'export PGHOST=localhost' >> ~/.bashrc
$ source ~/.bashrc
BoW と同名のユーザーをスーパーユーザーで作成します。
$ createuser $(whoami) -s -U postgres
Password: (postgres ユーザーのパスワードを入力)
認証方法を md5 から trust に変更します。
$ sed -i -e '/^host/s/md5/trust/g' /mnt/c/Program\ Files/PostgreSQL/9.5/data/pg_hba.conf
Rails のインストール
ようやく本題の Rails をインストールし、アプリケーションを作成します。
Rails のインストール
Rails をインストールします。インストールの完了まで数分待ちます。(rails 4.2.3 の例)
$ cd ~/workspace
$ gem install rails -v 4.2.3
アプリケーションの作成
データベースに PostgreSQL を指定し、アプリケーションを作成します。(アプリケーション名が bowapp の例)
$ rails _4.2.3_ new bowapp -d postgresql
作成したアプリケーションのディレクトリに移動し、bin を再構成します。(a はすべて上書きするオプション)
$ cd bowapp
$ bundle config --delete bin
$ rake rails:update:bin
Expected string default value for '--rc'; got false (boolean)
       exist  bin
   identical  bin/bundle
    conflict  bin/rails
Overwrite /mnt/c/workspace/bowapp/bin/rails? (enter "h" for help) [Ynaqdh] a
以降は、scaffold を使用した例です。
$ rails generate scaffold surfboard model:string shaper:string company:string
$ rake db:create db:migrate
動作確認
テーブルの作成後、URI を確認し、rails server を起動します。
$ rake routes
        Prefix Verb   URI Pattern                    Controller#Action
    surfboards GET    /surfboards(.:format)          surfboards#index
               POST   /surfboards(.:format)          surfboards#create
 new_surfboard GET    /surfboards/new(.:format)      surfboards#new
edit_surfboard GET    /surfboards/:id/edit(.:format) surfboards#edit
     surfboard GET    /surfboards/:id(.:format)      surfboards#show
               PATCH  /surfboards/:id(.:format)      surfboards#update
               PUT    /surfboards/:id(.:format)      surfboards#update
               DELETE /surfboards/:id(.:format)      surfboards#destroy
$ rails s
=> Booting WEBrick
=> Rails 4.2.3 application starting in development on http://localhost:3000
=> Run `rails server -h` for more startup options
=> Ctrl-C to shutdown server
[2016-12-20 00:15:34] INFO  WEBrick 1.3.1
[2016-12-20 00:15:34] INFO  ruby 2.3.0 (2015-12-25) [x86_64-linux]
[2016-12-20 00:15:34] INFO  WEBrick::HTTPServer#start: pid=13342 port=3000
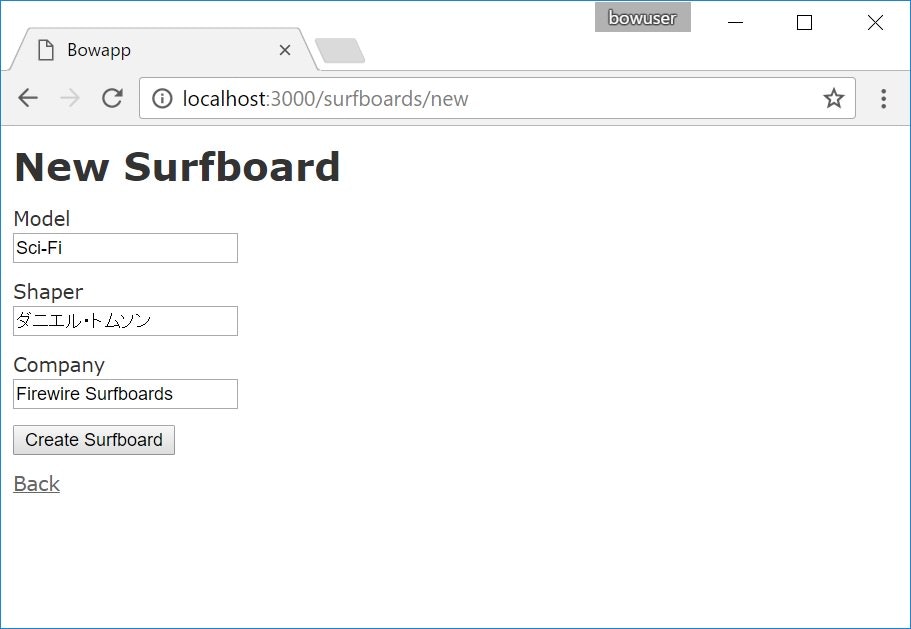
Windows 上のブラウザからアクセスして動作確認します。
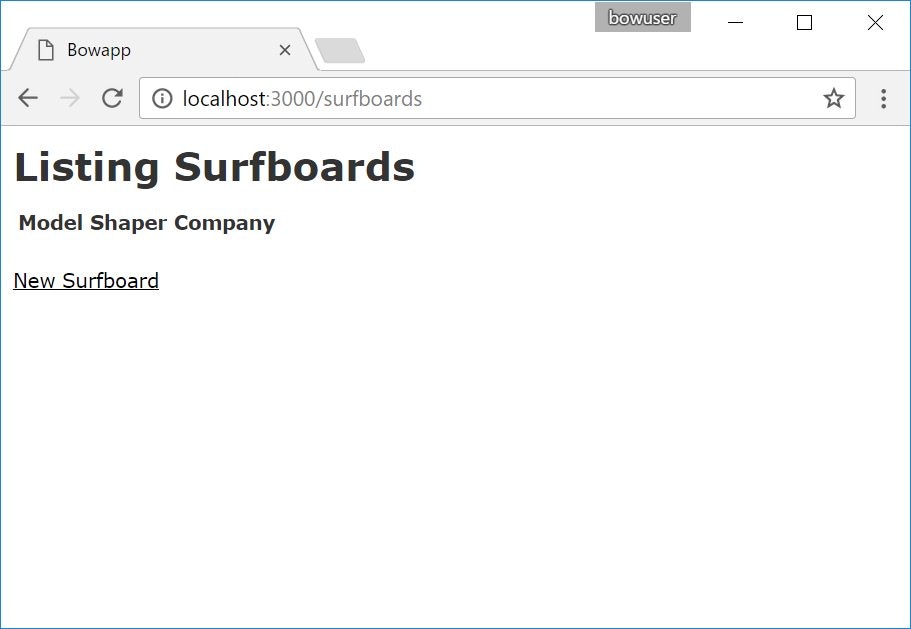
適当にデータを追加します。
rails server を [Ctrl] キー + [C] キーで終了し、rails console からテーブルのデータを確認します。
$ rails c
Loading development environment (Rails 4.2.3)
irb(main):001:0> Surfboard.all
  Surfboard Load (0.7ms)  SELECT "surfboards".* FROM "surfboards"
=> #<ActiveRecord::Relation [#<Surfboard id: 1, model: "Sci-Fi", shaper: "ダニエル・トムソン", company: "Firewire Surfboards", created_at: "2016-12-19 15:22:26", updated_at: "2016-12-19 15:22:26">]>
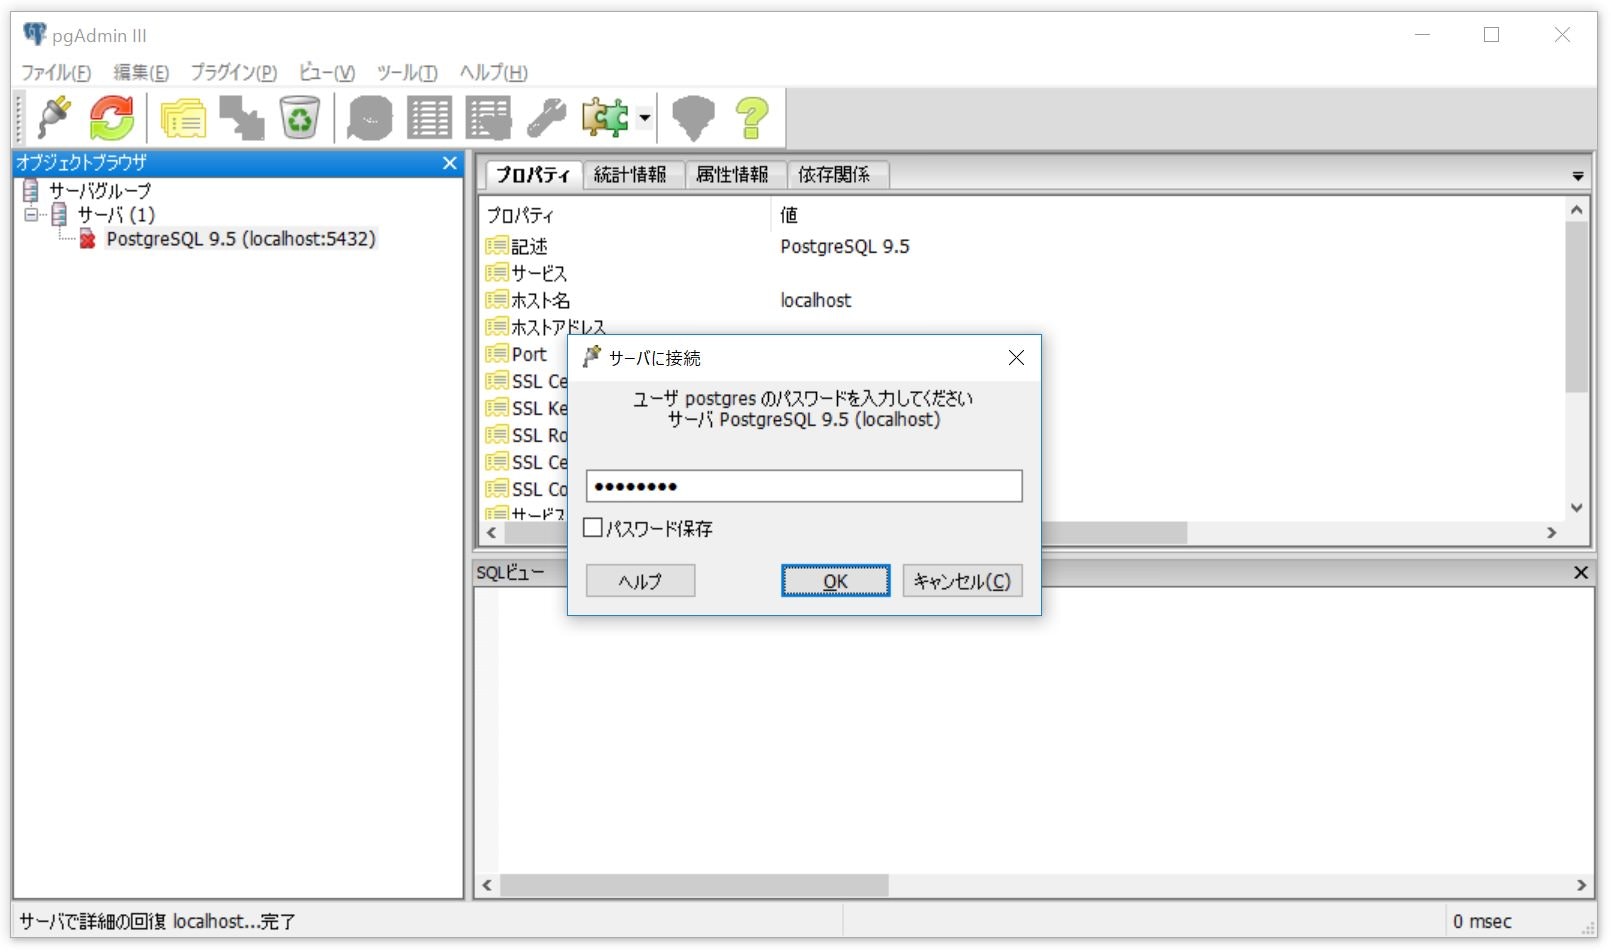
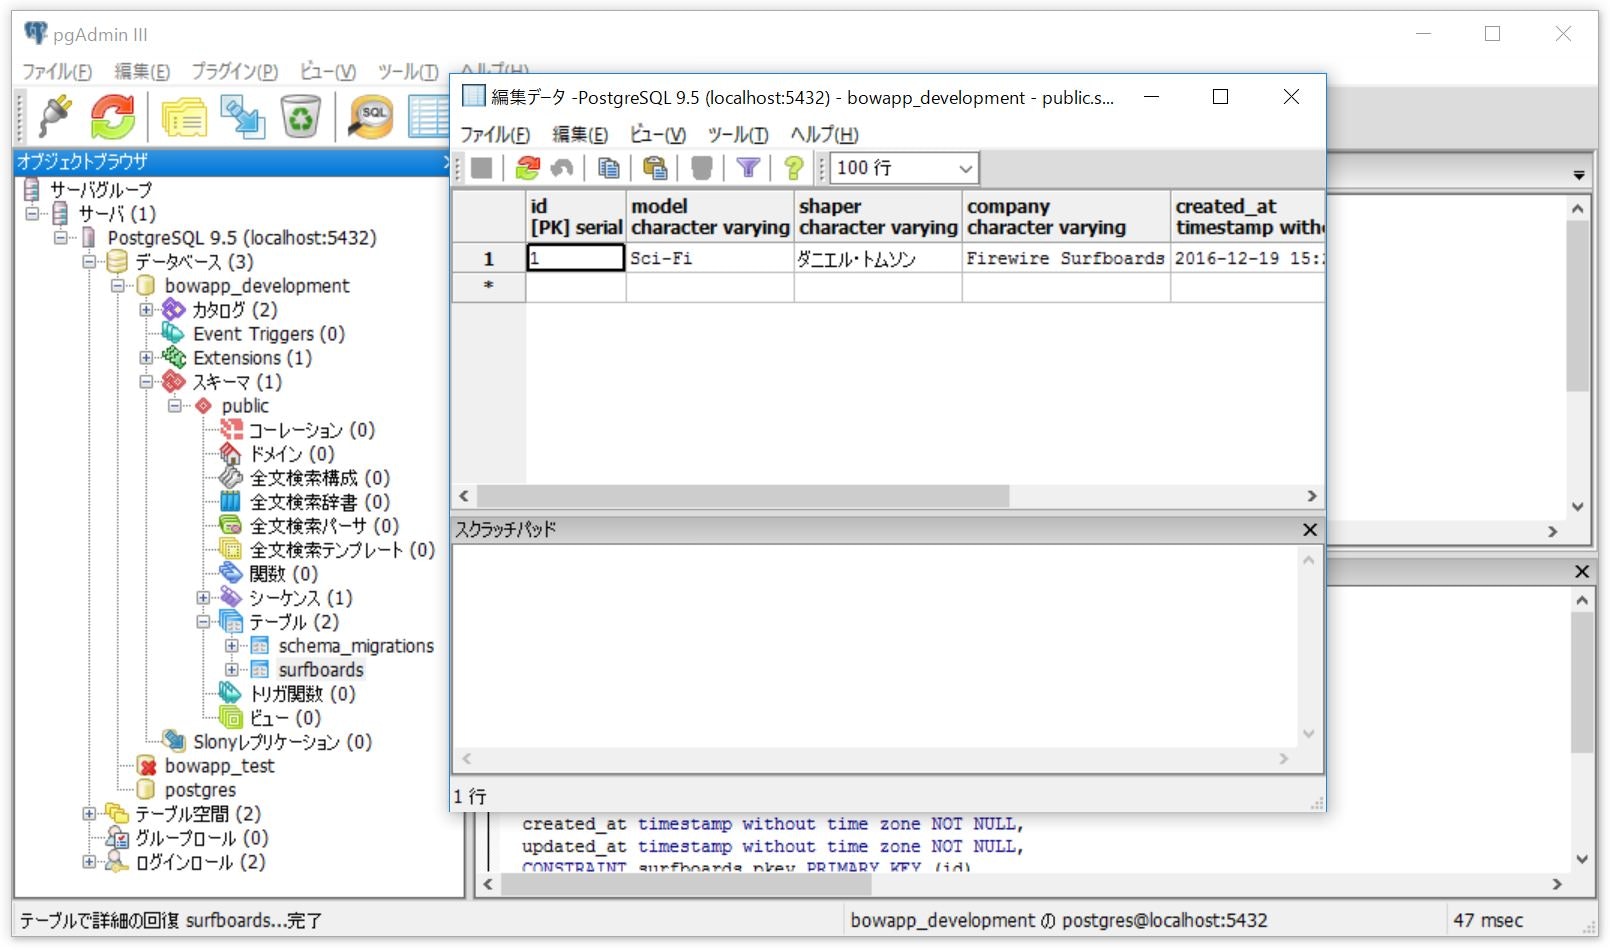
また、PostgreSQL for Windows の管理コンソールから、テーブルのデータを確認することもできます。
[Windows] キー > pgadmin を検索して [pgAdmin III] を起動します。

[PostgreSQL 9.5 (localhost:5432)] を右クリック > [接続] を開き、postgres ユーザーのパスワードを入力して [OK] で接続します。
[PostgreSQL 9.5 (localhost:5432)] > [データベース] > [<アプリケーション名>_development] > [スキーマ] > [public] > [テーブル] > [<テーブル名>] の順に開きます。
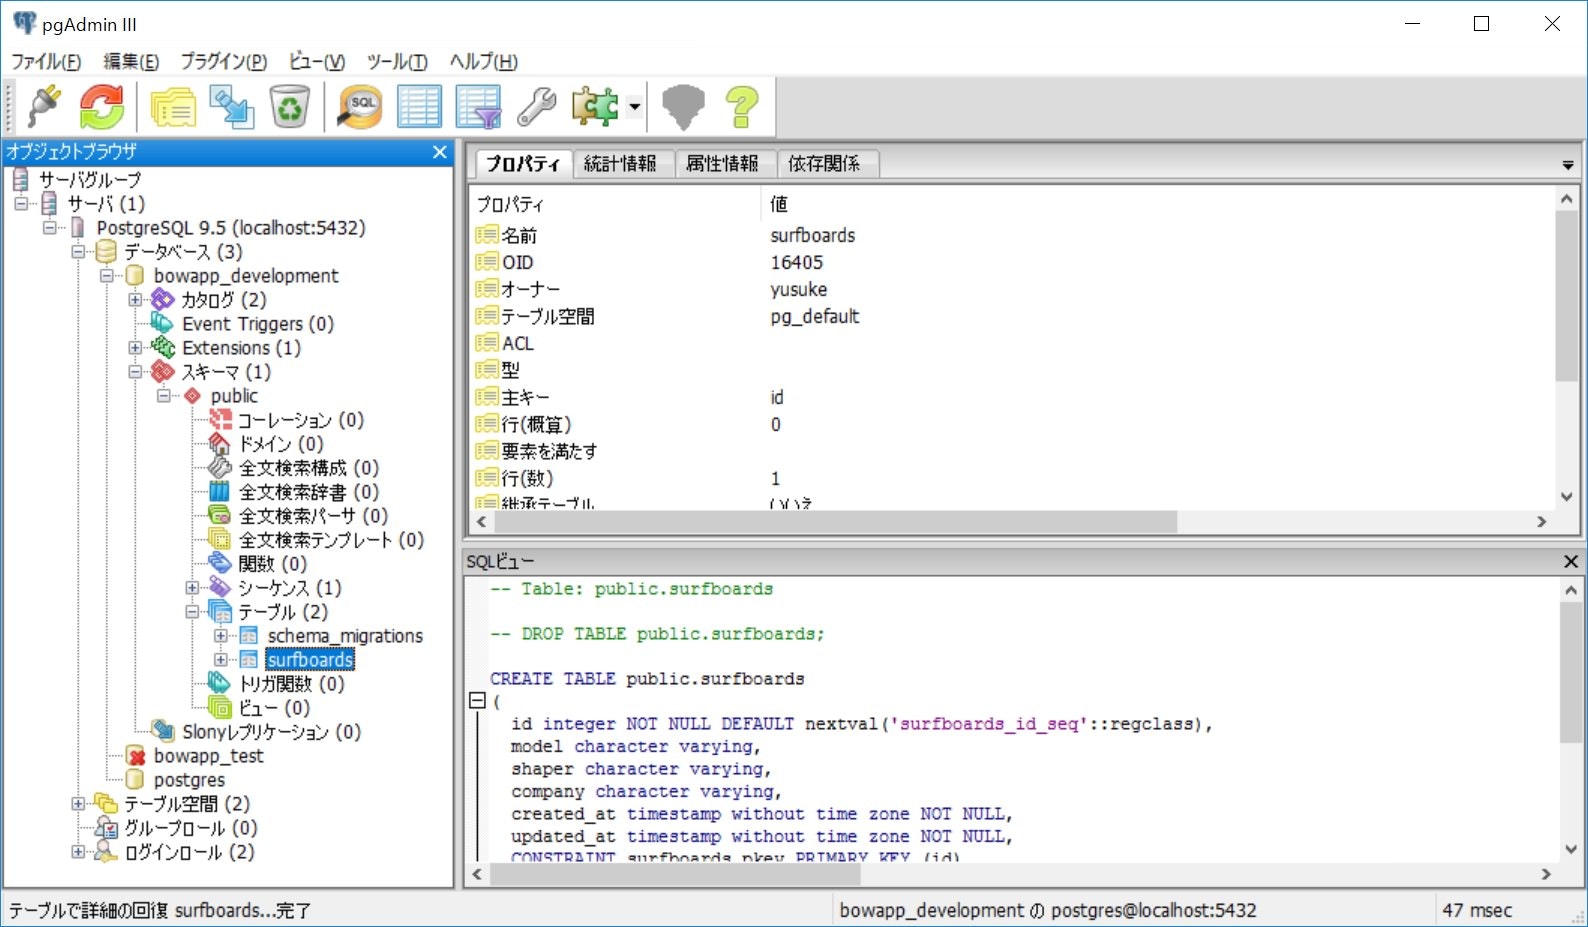
[<テーブル名>] を右クリック > [データビュー] > [先頭 100 行の表示] を開くと、保存されたデータの確認や編集ができます。
トラブルシューティング
gem や rails の実行時に警告が出力される
gem や rails の実行時に、"warning: Insecure world writable dir /home/<ユーザー名>/.rbenv/versions in PATH, mode 040777" のような警告が出力されます。
$ gem install bundler
Fetching: bundler-1.13.6.gem (100%)
/home/bowuser/.rbenv/rbenv.d/exec/gem-rehash/rubygems_plugin.rb:6: warning: Insecure world writable dir /home/bowuser/.rbenv/versions in PATH, mode 040777
Successfully installed bundler-1.13.6
1 gem installed
BoW のデフォルトでは、umask が 0000 となっているため、0022 に変更します。
$ umask
0000
$ echo 'umask 022' >> ~/.bashrc
$ source ~/.bashrc
$ umask
0022
/home/<ユーザー名>/.rbenv の配下に、すでに 777 のディレクトリが作成されてしまっている場合、権限を変更します。
$ chmod -R go-w ~/.rbenv
PostgreSQL のインストールがエラーで失敗する
BoW で PostgreSQL をインストールすると、"FATAL: could not create shared memory segment: Function not implemented" が出力され、インストールに失敗します。
$ sudo apt-get install postgresql-9.5 libpq-dev
...
Setting up postgresql-9.5 (9.5.5-1.pgdg14.04+1) ...
Creating new cluster 9.5/main ...
  config /etc/postgresql/9.5/main
  data   /var/lib/postgresql/9.5/main
  locale en_US.UTF-8
FATAL:  could not create shared memory segment: Function not implemented
DETAIL:  Failed system call was shmget(key=1, size=56, 03600).
child process exited with exit code 1
initdb: removing contents of data directory "/var/lib/postgresql/9.5/main"
Error: initdb failed
Error: could not create default cluster. Please create it manually with

  pg_createcluster 9.5 main --start

or a similar command (see 'man pg_createcluster').
update-alternatives: using /usr/share/postgresql/9.5/man/man1/postmaster.1.gz to provide /usr/share/man/man1/postmaster.1.gz (postmaster.1.gz) in auto mode
initctl: Unable to connect to Upstart: Failed to connect to socket /com/ubuntu/upstart: Connection refused
runlevel:/var/run/utmp: No such file or directory
invoke-rc.d: policy-rc.d denied execution of start.
...
この問題は根が深そうだったため、BoW で PostgreSQL をインストールするのは一旦保留にしました…。BoW では PostgreSQL クライアントのみをインストールし、PostgreSQL サーバーは PostgreSQL for Windows を直接 Windows にインストールします。(具体的な手順は本文に記載)
bundle install がエラーで失敗する
bundle install で "Gem::Ext::BuildError: ERROR: Failed to build gem native extension." が出力され、インストールに失敗します。
Gem::Ext::BuildError: ERROR: Failed to build gem native extension.

current directory:
/home/bowuser/.rbenv/versions/2.3.0/lib/ruby/gems/2.3.0/gems/debug_inspector-0.0.2/ext/debug_inspector
/home/bowuser/.rbenv/versions/2.3.0/bin/ruby -r ./siteconf20161215-200-qnw3kc.rb
extconf.rb
Cannot allocate memory - /home/bowuser/.rbenv/versions/2.3.0/bin/ruby -r
./siteconf20161215-200-qnw3kc.rb extconf.rb 2>&1

Gem files will remain installed in
/home/bowuser/.rbenv/versions/2.3.0/lib/ruby/gems/2.3.0/gems/debug_inspector-0.0.2
for inspection.
Results logged to
/home/bowuser/.rbenv/versions/2.3.0/lib/ruby/gems/2.3.0/extensions/x86_64-linux/2.3.0-static/debug_inspector-0.0.2/gem_make.out

An error occurred while installing debug_inspector (0.0.2), and Bundler cannot
continue.
Make sure that `gem install debug_inspector -v '0.0.2'` succeeds before
bundling.
         run  bundle exec spring binstub --all
bundler: command not found: spring
Install missing gem executables with `bundle install`
エラーメッセージ内に示唆された個別の gem install は成功するものの、次の bundle install では別の gem で同じエラーになり、毎回 "Cannot allocate memory" も出力されていました。当初は、VMware Fusion の仮想マシンに 2GB しかメモリを割り当てていなかったため、割り当てを 4GB に増やしてみたところ...、あっさり解決しました。
rails g や rails c がエラーで失敗する
rails g (rails generate) や rails c (rails console) で "Error: Command 'rails' not recognized" が出力され、失敗します。
$ rails generate scaffold surfboard model:string shaper:string company:string
Version: 2.0.0

Usage: spring COMMAND [ARGS]

Commands for spring itself:

  binstub         Generate spring based binstubs. Use --all to generate a binstub for all known commands. Use --remove to revert.
  help            Print available commands.
  server          Explicitly start a Spring server in the foreground
  status          Show current status.
  stop            Stop all spring processes for this project.

Commands for your application:

  rails           Run a rails command. The following sub commands will use spring: console, runner, generate, destroy, test.
  rake            Runs the rake command
Error: Command 'rails' not recognized
Usage: rails COMMAND [ARGS]

The most common rails commands are:
 generate    Generate new code (short-cut alias: "g")
 console     Start the Rails console (short-cut alias: "c")
 server      Start the Rails server (short-cut alias: "s")
 dbconsole   Start a console for the database specified in config/database.yml
             (short-cut alias: "db")
 new         Create a new Rails application. "rails new my_app" creates a
             new application called MyApp in "./my_app"

In addition to those, there are:
 destroy      Undo code generated with "generate" (short-cut alias: "d")
 plugin new   Generates skeleton for developing a Rails plugin
 runner       Run a piece of code in the application environment (short-cut alias: "r")

All commands can be run with -h (or --help) for more information.
先人の知恵を拝借し、以下を実行します。
$ bundle config --delete bin
$ rake rails:update:bin
Expected string default value for '--rc'; got false (boolean)
       exist  bin
   identical  bin/bundle
    conflict  bin/rails
Overwrite /mnt/c/workspace/bowapp/bin/rails? (enter "h" for help) [Ynaqdh] a
       force  bin/rails
    conflict  bin/rake
       force  bin/rake
   identical  bin/setup
git で管理している場合、以下も実行します。
$ git add bin
試行錯誤しすぎたので環境を初期化したい
PowerShell、BoW、PostgreSQL のコンソールなどを事前に終了させた上で、BoW と PostgreSQL for Windows をアンインストールし、作業用のディレクトリも不要であれば削除します。
[Windows] キー + [X] キー > [Windows PowerShell (管理者)] を開き、BoW をアンインストールします。
> lxrun /uninstall /full /y
続いて、PostgreSQL for Windows をアンインストールします。ポップアップが表示されたら [Yes] や [OK] で続行します。
> C:\Program` Files\PostgreSQL\9.5\uninstall-postgresql.exe
アンインストールの終了後、C:\Program Files\PostgreSQL を削除します。
> Remove-Item -Path 'C:\Program Files\PostgreSQL' -Recurse -Force
作業用のディレクトリも不要であれば削除します。
> Remove-Item -Path C:\workspace -Recurse -Force
参考
Web サイト
- Bash on Ubuntu on Windows - Installation Guide
- Announcing Windows 10 Insider Preview Build 14971 for PC
- Script Add or remove item from the Win-X menu
- デバイスを開発用に有効にする
- Bash on Ubuntu on Windowsをインストールしてみよう!
- Tech TIPS:Windows 10のBash on Windowsのロケールを英語モードに切り替える
- Bash on WindowsでRails開発
- Do not change Linux files using Windows apps and tools
- Setup Ruby On Rails on
Windows 10 - RubyGems Guides
- Apt - PostgreSQL wiki
- WindowsでPostgreSQLを使ってみよう
- 4.4.4 Reference - Command Line Options
- install postgresql issue · Issue #61 · Microsoft/BashOnWindows
- 第1章 ゼロからデプロイまで | Rails チュートリアル
- Unable to execute rails, cannot find it even though it's installed · Issue #451 · Microsoft/BashOnWindows
- 第2章 Toyアプリケーション | Rails チュートリアル
- Tech TIPS:Windows 10のBash on Ubuntu on Windows環境を初期化/再インストールする