PlayCanvasでカスタムシェーダーを書く際の便利用スクリプト
前日に続き、PlayCanvasアドベントカレンダーカレンダー 6日目の記事となります。
はが(@mxcn3)です。PlayCanvasでカスタムシェーダーを書く場合のスクリプトを紹介します。PlayCanvasでは標準で用意されているマテリアルの他に、GLSLを利用してシェーダーを記述することが出来ます。シェーダーを記述する際に個人的に最近利用しているスクリプトを紹介します。
内容について
この記事ではこの4つの方法のスクリプトについて紹介します。
- カスタムシェーダー
- ポストエフェクト
- シェーダーチャンク
- シェーダーチャンク(グローバルの値をオーバライドする方法)
作成したプロジェクト

実行URL(アカウント無しでみれます): https://playcanv.as/b/3244eaae
プロジェクトURL(PlayCanvasのPublicプロジェクとなります): https://playcanvas.com/project/1016432
1. カスタムシェーダー

カスタムシェーダーのチュートリアルはこちらにあります。バーテックスシェーダーと、フラグメントシェーダーを元に、pc.Shaderオブジェクトを作成しマテリアルを新規に作成します。
スクリプトファイル
const CustomShader = pc.createScript('customshader');

CustomShader.attributes.add('vert', {
    type: 'asset',
    assetType: 'shader',
    title: 'Vertex Shader'
});

CustomShader.attributes.add('frag', {
    type: 'asset',
    assetType: 'shader',
    title: 'Fragment Shader'
});

CustomShader.prototype.initialize = function () {
    const vshader = this.vert.resource;
    const fshader = this.frag.resource;
    const shaderDefinition = {
        attributes: {
            aVertexPosition: pc.SEMANTIC_POSITION,
            aUv: pc.SEMANTIC_TEXCOORD0,
            aNormal: pc.SEMANTIC_NORMAL,
        },
        vshader: vshader,
        fshader: fshader
    };

    this.shader = new pc.Shader(this.app.graphicsDevice, shaderDefinition);

    this.material = new pc.Material();
    this.material.setShader(this.shader);
    const render = this.entity.render;
    render.meshInstances[0].material = this.material;

    this.timer = 0; // 追加
    this.material.setParameter("iTime", this.timer);
};

CustomShader.prototype.update = function (dt) {
    this.timer += dt;
    if (this.timer > 1) this.timer = 0;
    this.material.setParameter("iTime", this.timer);
};
バーテックスシェーダー
#version 300 es
precision highp float;

// uniformの値の一覧はpc.app.graphicsDevice.scope.variablesで取得可能です。
uniform mat4 matrix_model;
uniform mat4 matrix_viewProjection;
uniform mat4 matrix_view;
uniform mat4 matrix_viewInverse;
uniform mat4 matrix_projection;
uniform vec3 view_position;
uniform vec3 light0_direction;
uniform vec3 light0_color;
in vec3 aVertexPosition;
in vec2 aUv;
in vec3 aNormal;

out vec2 vUv0;
out vec3 vNormal;

void main(void){
    gl_Position =  matrix_viewProjection * matrix_model * vec4(aVertexPosition, 1.0);
    vUv0 = aUv;
    vNormal = aNormal;
}
フラグメントシェーダー
#version 300 es
precision highp float;
in vec2 vUv0;
in vec3 vNormal;

uniform float iTime;
uniform vec4 uScreenSize;

out vec4 fragColor;

void main(void)
{
    fragColor = vec4(vNormal, 1.0);
}
2. ポストエフェクト
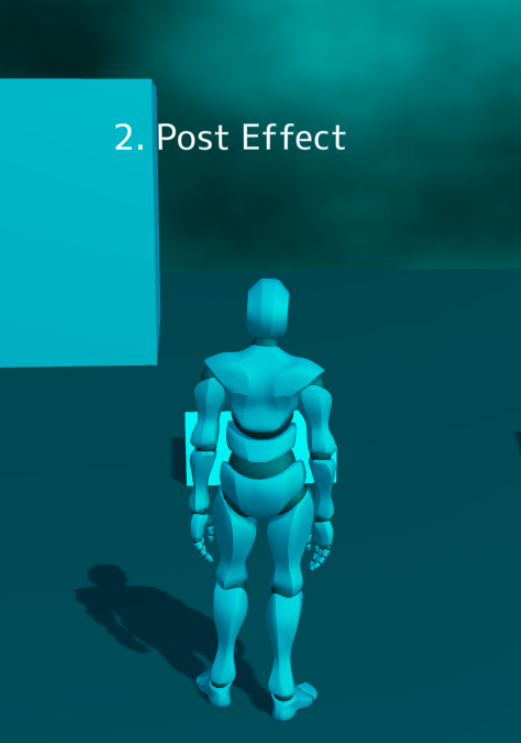
ポストエフェクトについては2023年 5月にこちらで追記致しました。
https://qiita.com/yushimatenjin/items/6c5c1666794efdf12924
ポストエフェクトでは、カメラに対してスクリプトの設定を行います。
スクリプトファイル
class PostEffectRenderer extends pc.PostEffect {
    constructor(props) {
        const { graphicsDevice, fshader, vshader } = props;

        super(graphicsDevice);
        const attributes = {
            aVertexPosition: pc.SEMANTIC_POSITION,
        };

        this.customShader = new pc.Shader(graphicsDevice, {
            attributes: attributes,
            vshader: vshader,
            fshader: fshader,
        });
    }
    render(inputTarget, outputTarget, rect) {
        const device = this.device;
        const scope = device.scope;
        scope.resolve("uColorBuffer").setValue(inputTarget.colorBuffer);

        pc.drawFullscreenQuad(
            this.device,
            outputTarget,
            this.vertexBuffer,
            this.customShader,
            rect
        );
    }
}

class CustomPostEffect extends pc.ScriptType {
    initialize() {
        this.entity.camera.renderSceneColorMap = true;
        this.entity.camera.renderSceneDepthMap = true;

        const vshader = this.vert.resource;
        const fshader = this.frag.resource;
        this.time = 0;
        this.effect = new PostEffectRenderer({
            graphicsDevice: this.app.graphicsDevice,
            vshader,
            fshader,
        });
        this.queue = this.entity.camera.postEffects;
        this.queue.addEffect(this.effect);

        this.app.mouse.on(pc.EVENT_MOUSEMOVE, (e) => {
            this.app.graphicsDevice.scope.resolve("iMouse").setValue([e.x, e.y]);
        });

        this.on("state", function (enabled) {
            if (enabled) {
                this.queue.addEffect(this.effect);
            } else {
                this.queue.removeEffect(this.effect);
            }
        });
        this.on("destroy", function () {
            this.queue.removeEffect(this.effect);
        });
    }
    update(dt) {
        this.time += dt;
        this.app.graphicsDevice.scope.resolve("iTime").setValue(this.time);
    }
}

pc.registerScript(CustomPostEffect);
CustomPostEffect.attributes.add('vert', {
    type: 'asset',
    assetType: 'shader',
    title: 'Vertex Shader'
});

CustomPostEffect.attributes.add('frag', {
    type: 'asset',
    assetType: 'shader',
    title: 'Fragment Shader'
});
バーテックスシェーダー
#version 300 es
precision highp float;

in vec2 aVertexPosition;
out vec2 vUv0;

void main(void){
    gl_Position = vec4(aVertexPosition, 0.0, 1.0);
    vUv0 = (aVertexPosition.xy + 1.0) * 0.5;
}
フラグメントシェーダー
#version 300 es
precision highp float;
uniform vec4 uScreenSize;
uniform vec2 iMouse;
uniform float iTime;
uniform sampler2D uSceneColorMap;
uniform sampler2D uSceneDepthMap;
uniform sampler2D uColorBuffer;

in vec2 vUv0;
out vec4 fragColor;


void main(void) {
    vec4 color = texture(uColorBuffer, vUv0);
    color.r = 0.0;
    fragColor = color;
}
3. シェーダーチャンク(マテリアル)
v1.62.0にてシェーダーチャンクの記述方法が変わりました。こちらをご覧ください。
Engine v1.62
PlayCanvasには、2つのシェーダーチャンクがあります。1つはシェーダーフロントエンドと呼ばれ、ライティングアルゴリズムに渡される引数の値を提供します。もう1つはシェーダーバックエンドと呼ばれ、またライティングアルゴリズムとも呼ばれます。1.62では、これら2つの間に明確な区別を作成し、バックエンドに渡される値が事前に明確に定義され、自動生成されないようにします。これにより、ネイティブのマテリアルと同様に、ライティングコードとインターフェースすることができる完全にカスタム化されたシェーダーを作成できます。その結果、ほとんどのバックエンドチャンクが変更され、分割に対応するようになりました。これは、カスタムバックエンドシェーダーチャンクがグローバル変数を使用するのではなく、ライティングバックエンドから渡された引数を使用するように移行する必要があることを意味します。この変更により、クリアコートの特定のチャンクなど、いくつかのチャンクは不要になりました。これらの機能は、グローバル値に依存しなくなったため再利用できるようになりました。
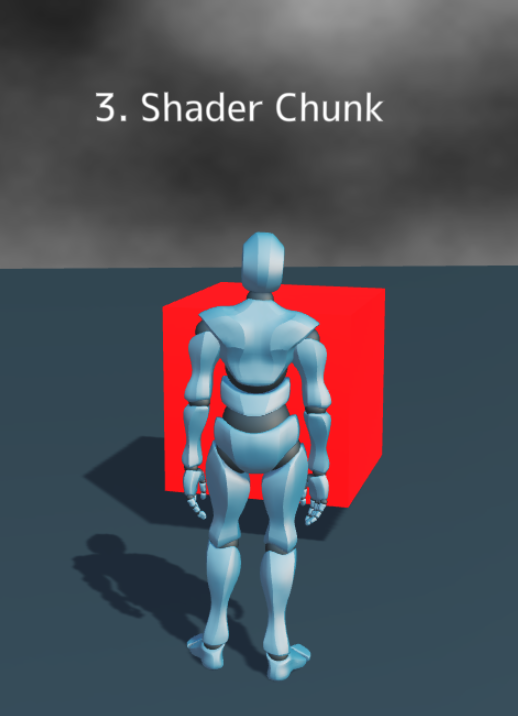
シェーダーチャンクは、PlayCanvasのStandardマテリアル等のDiffuseやEmissiveの特定のプロパティを変更するために利用するAPIとなっております。シェーダーチャンクについては、Shader Chunk Migrationsこちらのチュートリアル記事があります。直近でAPIの変更が多く行われているため今後また変更が加えられる可能性があります。
スクリプトファイル
const CustomShaderChunk = pc.createScript('customShaderChunk');
CustomShaderChunk.attributes.add('material', { type: 'asset', assetType: "material" });
CustomShaderChunk.attributes.add('frag', { type: 'asset', assetType: "shader" });
CustomShaderChunk.attributes.add('isGenerateDiffuseMap', { type: 'boolean', default: true });

CustomShaderChunk.attributes.add('chunk', {
    type: 'string',
    enum: [
        { "emissivePS": "emissivePS" },
        { "diffusePS": "diffusePS" },
        { "normalMapPS": "normalMapPS" },
        { "opacityPS": "opacityPS" },
        { "ambientConstantPS": "ambientConstantPS" }
    ],
    default: "emissivePS"
});
CustomShaderChunk.prototype.initialize = function () {
    this.time = 0;
    const frag = this.frag.resource;
    this.mat = this.material.resource;
    this.mat.chunks[this.chunk] = frag;
    if (this.isGenerateDiffuseMap) {
        this.mat.diffuseMap = new pc.Texture(this.app.graphicsDevice, {
            width: 1,
            height: 1,
            format: pc.PIXELFORMAT_R8_G8_B8
        });
    }

    this.mat.update();
};

CustomShaderChunk.prototype.update = function (dt) {
    this.time += dt;
    /**@type {pc.Material} */
    const material = this.mat;
    material.setParameter("iTime", this.time);
};
フラグメントシェーダー(Emissive)
uniform vec4 uScreenSize;
uniform float iTime;
uniform float iTimeDelta;
uniform sampler2D uSceneColorMap;
uniform sampler2D uSceneDepthMap;

void getEmission() {
    dEmission = vec3(sin(iTime), 0.0, 0.0);
}
フラグメントシェーダー(diffuse)
uniform vec4 uScreenSize;
uniform float iTime;
uniform float iTimeDelta;
uniform sampler2D uSceneColorMap;
uniform sampler2D uSceneDepthMap;

void getAlbedo() {
    dAlbedo = vec3(0.0, 1.0, 0.0);
}
フラグメントシェーダー(normakMap)
uniform vec4 uScreenSize;
uniform float iTime;
uniform float iTimeDelta;
uniform sampler2D uSceneColorMap;
uniform sampler2D uSceneDepthMap;

float rnd(vec2 p){
    return fract(sin(dot(p ,vec2(12.9898,78.233))) * 43758.5453);
}

void getNormal() {
    vec3 col =  vec3(rnd(vUv0));
    dNormalW = col;
}
4. シェーダーチャンク(グローバルの値をオーバーライドする方法 Skybox)
シェーダーチャンクに付きまして、PlayCanvasのバージョンアップによりAPIが変わっております、最新バージョンを使う場合には下記をご参照ください
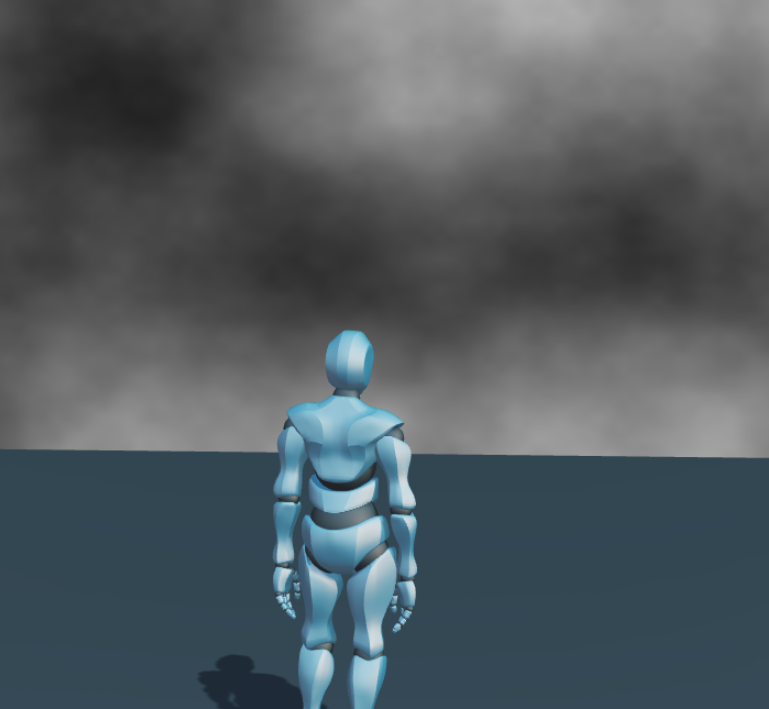
最後にマテリアル毎ではなく、PlayCanvasで定義をされている、シェーダーを書き換えるスクリプトとなります。
今回の例ではSkyboxを書き換えています。PlayCanvasのシェーダーチャンクの一覧はこちらより、確認できます。
window.onload = () => {
    pc.shaderChunks.skyboxHDRPS = getSkyboxHDRPS();
    let time = 0;
    pc.app.on("update", (dt) => {
        time += dt;
        pc.app.graphicsDevice.scope.resolve("iTime").setValue(time);
    });
};

function getSkyboxHDRPS() {
    const noise = `float random (in vec2 st) {
    return fract(sin(dot(st.xy,
                         vec2(12.9898,78.233)))*
        43758.5453123);
    }
    // Author @patriciogv - 2015
    // http://patriciogonzalezvivo.com
    // Based on Morgan McGuire @morgan3d
    // https://www.shadertoy.com/view/4dS3Wd
    float noise (in vec2 st) {
        vec2 i = floor(st);
        vec2 f = fract(st);

        // Four corners in 2D of a tile
        float a = random(i);
        float b = random(i + vec2(1.0, 0.0));
        float c = random(i + vec2(0.0, 1.0));
        float d = random(i + vec2(1.0, 1.0));

        vec2 u = f * f * (3.0 - 2.0 * f);

        return mix(a, b, u.x) +
                (c - a)* u.y * (1.0 - u.x) +
                (d - b) * u.x * u.y;
    }

    #define OCTAVES 6
    float fbm (in vec2 st) {
        // Initial values
        float value = 0.0;
        float amplitude = .5;
        float frequency = 0.;
        //
        // Loop of octaves
        for (int i = 0; i < OCTAVES; i++) {
            value += amplitude * noise(st);
            st *= 2.;
            amplitude *= .5;
        }
        return value;
    }`;

    const main = `
    void main(void) {
        vec2 st = gl_FragCoord.xy/uScreenSize.xy;
        vec3 color = vec3(0.0);
        color += fbm(st * 3.0);
        gl_FragColor = vec4(color, 1.0);
    }
    `;

    const fshaderSkybox = `varying vec3 vViewDir;
    uniform float iTime;
    uniform vec2 iMouse;
    uniform vec4 uScreenSize;
    uniform samplerCube texture_cubeMap;
    ${noise}
    ${main}
    `;

    return fshaderSkybox;
}
個人的に、PlayCanvasでのシェーダーに関して勉強・利用をしている4つの方法のスクリプトををまとめてみました。なにかご不明な点などがありましたらお気軽にご連絡下さい。
明日のアドベントカレンダー12月7日については、
自分が代打で投稿をさせて頂いた内容となっております!お楽しみにして下さい!