AppsSDKとは
ChatGPT内でアプリを作成するためのSDKです。
今までもMCPでアプリ作成ができていましたが、AppsSDKを使うとウィジェットを表示することができます。以下に紹介動画があります。
仕組み
AppsSDKはMCPのmetaデータを拡張することで実現しています。
widget_resource = _embedded_widget_resource(widget)
meta: Dict[str, Any] = {
    "openai.com/widget": widget_resource.model_dump(mode="json"),
    "openai/outputTemplate": widget.template_uri,
    "openai/toolInvocation/invoking": widget.invoking,
    "openai/toolInvocation/invoked": widget.invoked,
    "openai/widgetAccessible": True,
    "openai/resultCanProduceWidget": True,
}

return types.ServerResult(
    types.CallToolResult(
        content=[
            types.TextContent(
                type="text",
                text=widget.response_text,
            )
        ],
        structuredContent={"pizzaTopping": topping},
        _meta=meta,
    )
)
各metaデータについては https://developers.openai.com/apps-sdk/reference/ を参照してください。 "openai.com/widget"にウィジェットのHTMLが含まれています。
動作イメージ
以下がAppsSDKの動作イメージとなります。まずMCPサーバと通信(1)を行いmetaデータ内にあるwidgetをみてWebリソースを取得(2)する流れです。

そのため、サーバは2つ(MCPサーバ・Webサーバ)必要となります。
MCPサーバはngrokで構築し、WebサーバはS3+CloudFrontで構築しました。(S3 静的ウェブサイトホスティングではうまくいきませんでした)
動かしてみた
公式サンプルは難しかったので改変しながら動かしました。最終的なコードは以下にあります。
正常に動くと以下のような動作になります。

ウィジェットでできること
呼び出しパラメータを取得する
ウィジェットが呼び出された時のパラメータを取得することができます。
toolInputにはChatGPTから入力されたデータが入り、toolOutputはMCPサーバで処理した結果が入ります。
const inputParam = useOpenAiGlobal("toolInput") || "default value";
const outputParam = useOpenAiGlobal("toolOutput") || "default value";
return (
  <div>
    <p>Sample View1</p>
    <p>
      toolInput parameter: <strong>{JSON.stringify(inputParam)}</strong>
    </p>
    <p>
      toolOutput parameter: <strong>{JSON.stringify(outputParam)}</strong>
    </p>

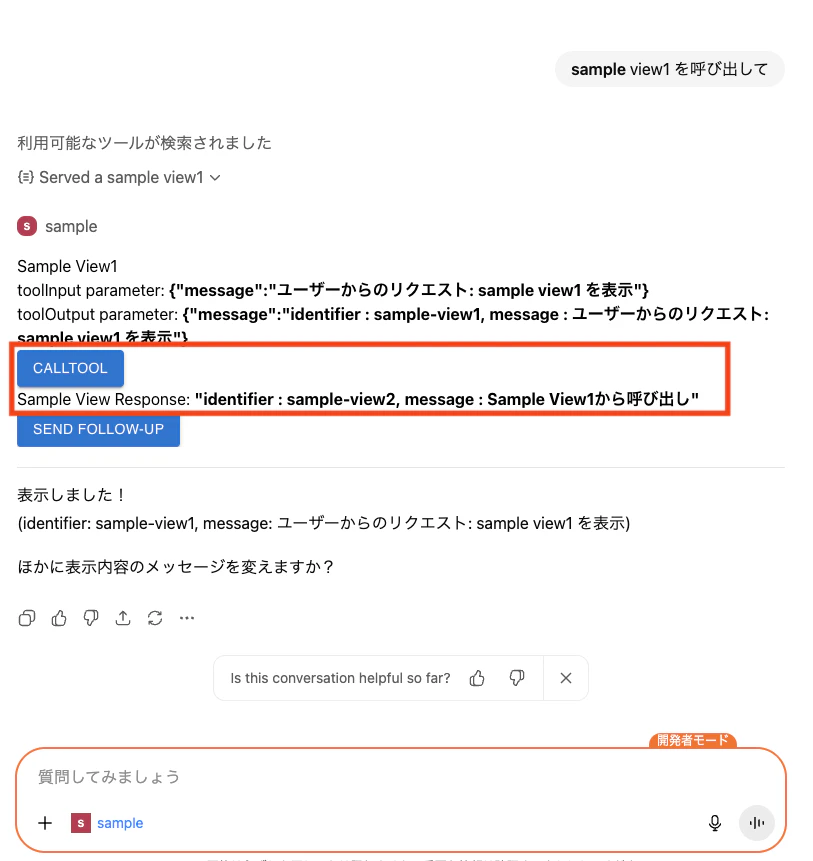
他のツールを呼び出す
ウィジェットから他のツールを呼び出すことも可能です。以下はsample-view2ツールを呼び出すコードです。
function callToolSampleView(name, message){
  console.log("callToolSampleView name:", name, "message:", message);
  window.openai?.callTool(name, { message }).then((response) => {
    console.log("response:", response);
    setSampleViewResponse(response["structuredContent"]["message"]);
  }).catch((error) => {
    console.error("error:", error);
  });
}

〜 省略 〜
<Button
  variant="contained"
  onClick={() => callToolSampleView("sample-view2", "Sample View1から呼び出し")}
  >
  CallTool
</Button>
<p>
  Sample View Response: <strong>{JSON.stringify(sampleViewResponse)}</strong>
</p>
sample-view2ツールのコードです。
async def _call_tool_request(req: types.CallToolRequest) -> types.ServerResult:

〜 省略 〜

    text = f"identifier : {widget.identifier}, message : {payload.message}"

〜 省略 〜

    return types.ServerResult(
        types.CallToolResult(
            content=[
                types.TextContent(
                    type="text",
                    text=widget.response_text,
                )
            ],
            structuredContent={
                "message": text,
            },
            _meta=meta,
        )
    )
動作させた結果
ChatGPTへメッセージを入力する
ウィジェットからChatGPTへメッセージを入力することも可能です。
function sendFollowUpMessage(message){
  console.log("sendFollowUpMessage message:", message);
  window.openai?.sendFollowUpMessage({ prompt: message }).then((response) => {
    console.log("response:", response);
  }).catch((error) => {
    console.error("error:", error);
  });
}

〜 省略 〜

<Button
  variant="contained"
  onClick={() => sendFollowUpMessage("日本の有名な観光地を教えてください。")}
  >
  Send Follow-Up
</Button>
Send Follow-Upボタンを押すと以下のようになります。

最後に
今後作成したアプリは申請が行えるようになるみたいです。申請が通ったアプリはどのように一般公開されるのか?MCPサーバやHTMLリソースの格納場所はどうなるのか?など気になります。アプリ申請が始まったら調べてみようと思います。
いずれにせよアプリが多くなることでChatGPTが視覚的に使いやすくなるため楽しみです。