こんな吹き出し部品が欲しかったので作ってみました。
- iOSとAndroidでできるだけ同じような実装をしたい → 宣言的UIフレームワークを使用する
- 外部ライブラリは使用しない → SwiftUI(iOS)、Jetpack Compose(Android)のみで実装する
- 基本的にText()と同じ仕様にしたい → Text()を自前のBalloonText()に置き換えるだけで使えるようにする
- Text()の大きさに合わせて動的に吹き出し図形を表示したい → Text()は文字数に応じて幅や高さが変わるので、それに応じて吹き出しの大きさやパディングを連動させる
- 最終的にはLINEっぽいチャットビューを作りたい → 吹き出しのしっぽの向きを左と右に変えられるようにする
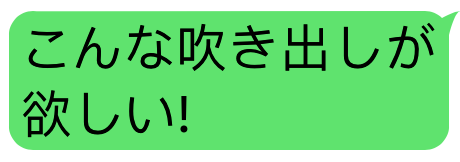
完成イメージ
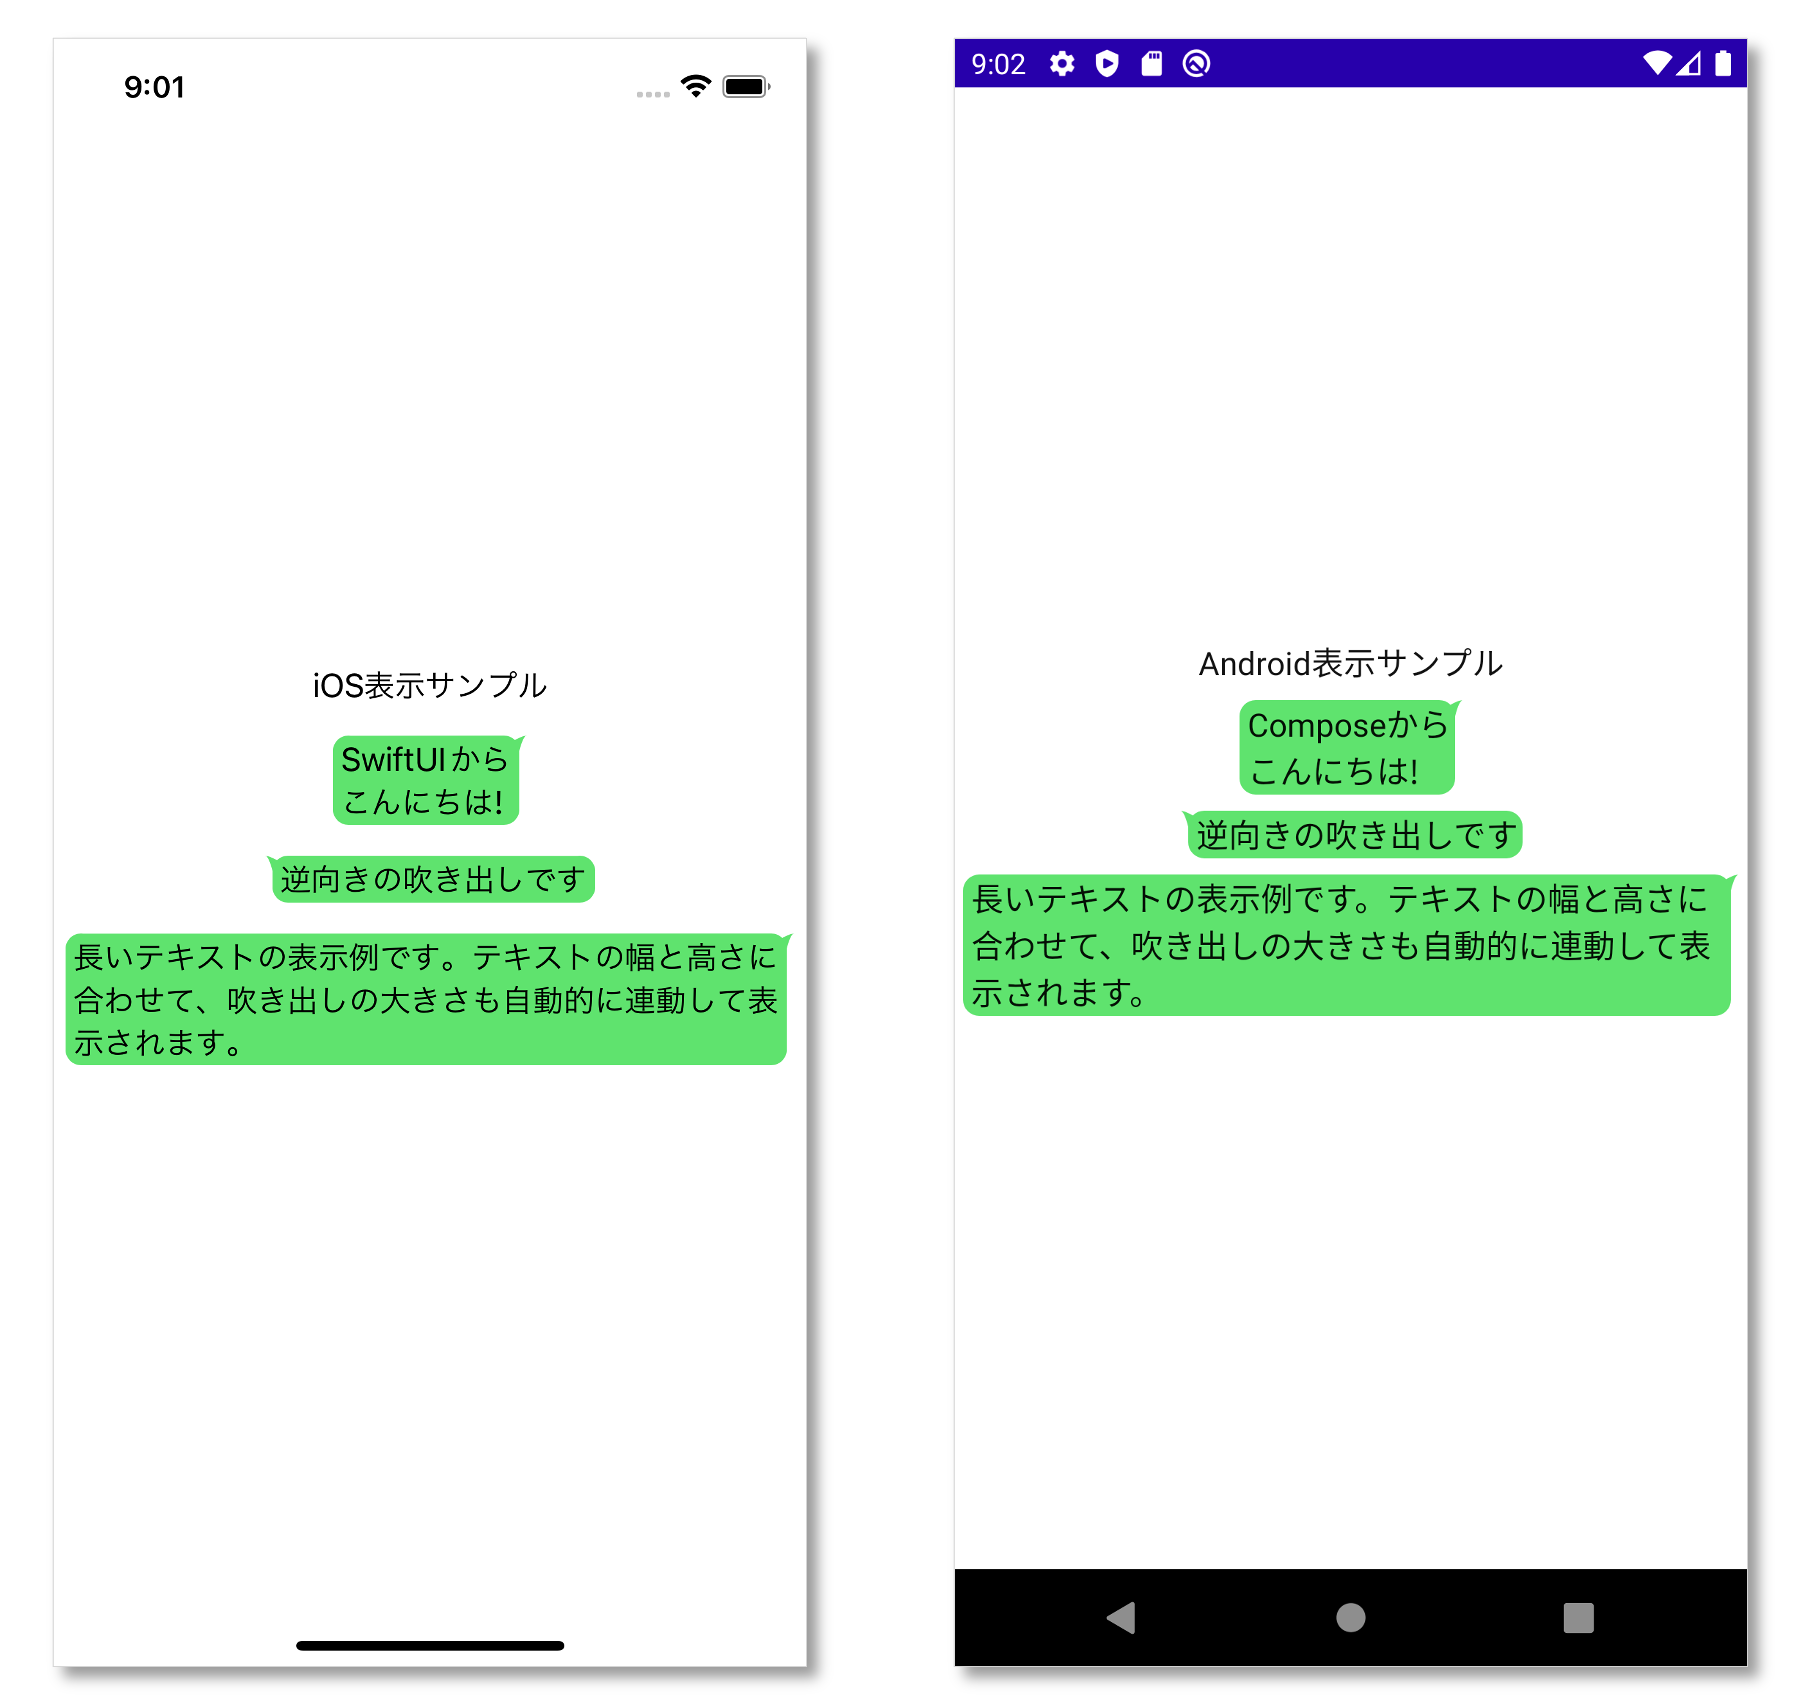
完成した吹き出しの動作イメージです。iOSと Androidで見た目も、実装もほぼ同じです!
struct ContentView: View {
    var body: some View {
        VStack {
            Text("iOS表示サンプル")
                .padding(4)
            BalloonText("SwiftUIから\nこんにちは!")
                .padding(4)
            BalloonText("逆向きの吹き出しです", mirrored: true)
                .padding(4)
            BalloonText("長いテキストの表示例です。テキストの幅と高さに合わせて、吹き出しの大きさも自動的に連動して表示されます。")
                .padding(4)
        }
    }
}
class MainActivity : ComponentActivity() {
    override fun onCreate(savedInstanceState: Bundle?) {
        super.onCreate(savedInstanceState)
        setContent {
            BalloonSampleTheme {
                Surface(
                    modifier = Modifier.fillMaxSize(),
                    color = MaterialTheme.colors.background
                ) {
                    Column(
                        verticalArrangement = Arrangement.Center,
                        horizontalAlignment = Alignment.CenterHorizontally,
                    ) {
                        Text("Android表示サンプル",
                            modifier = Modifier.padding(4.dp))
                        BalloonText("Composeから\nこんにちは!",
                            modifier = Modifier.padding(4.dp))
                        BalloonText("逆向きの吹き出しです", mirrored = true,
                            modifier = Modifier.padding(4.dp))
                        BalloonText("長いテキストの表示例です。テキストの幅と高さに合わせて、吹き出しの大きさも自動的に連動して表示されます。",
                            modifier = Modifier.padding(4.dp))
                    }
                }
            }
        }
    }
}
吹き出し図形の作り方
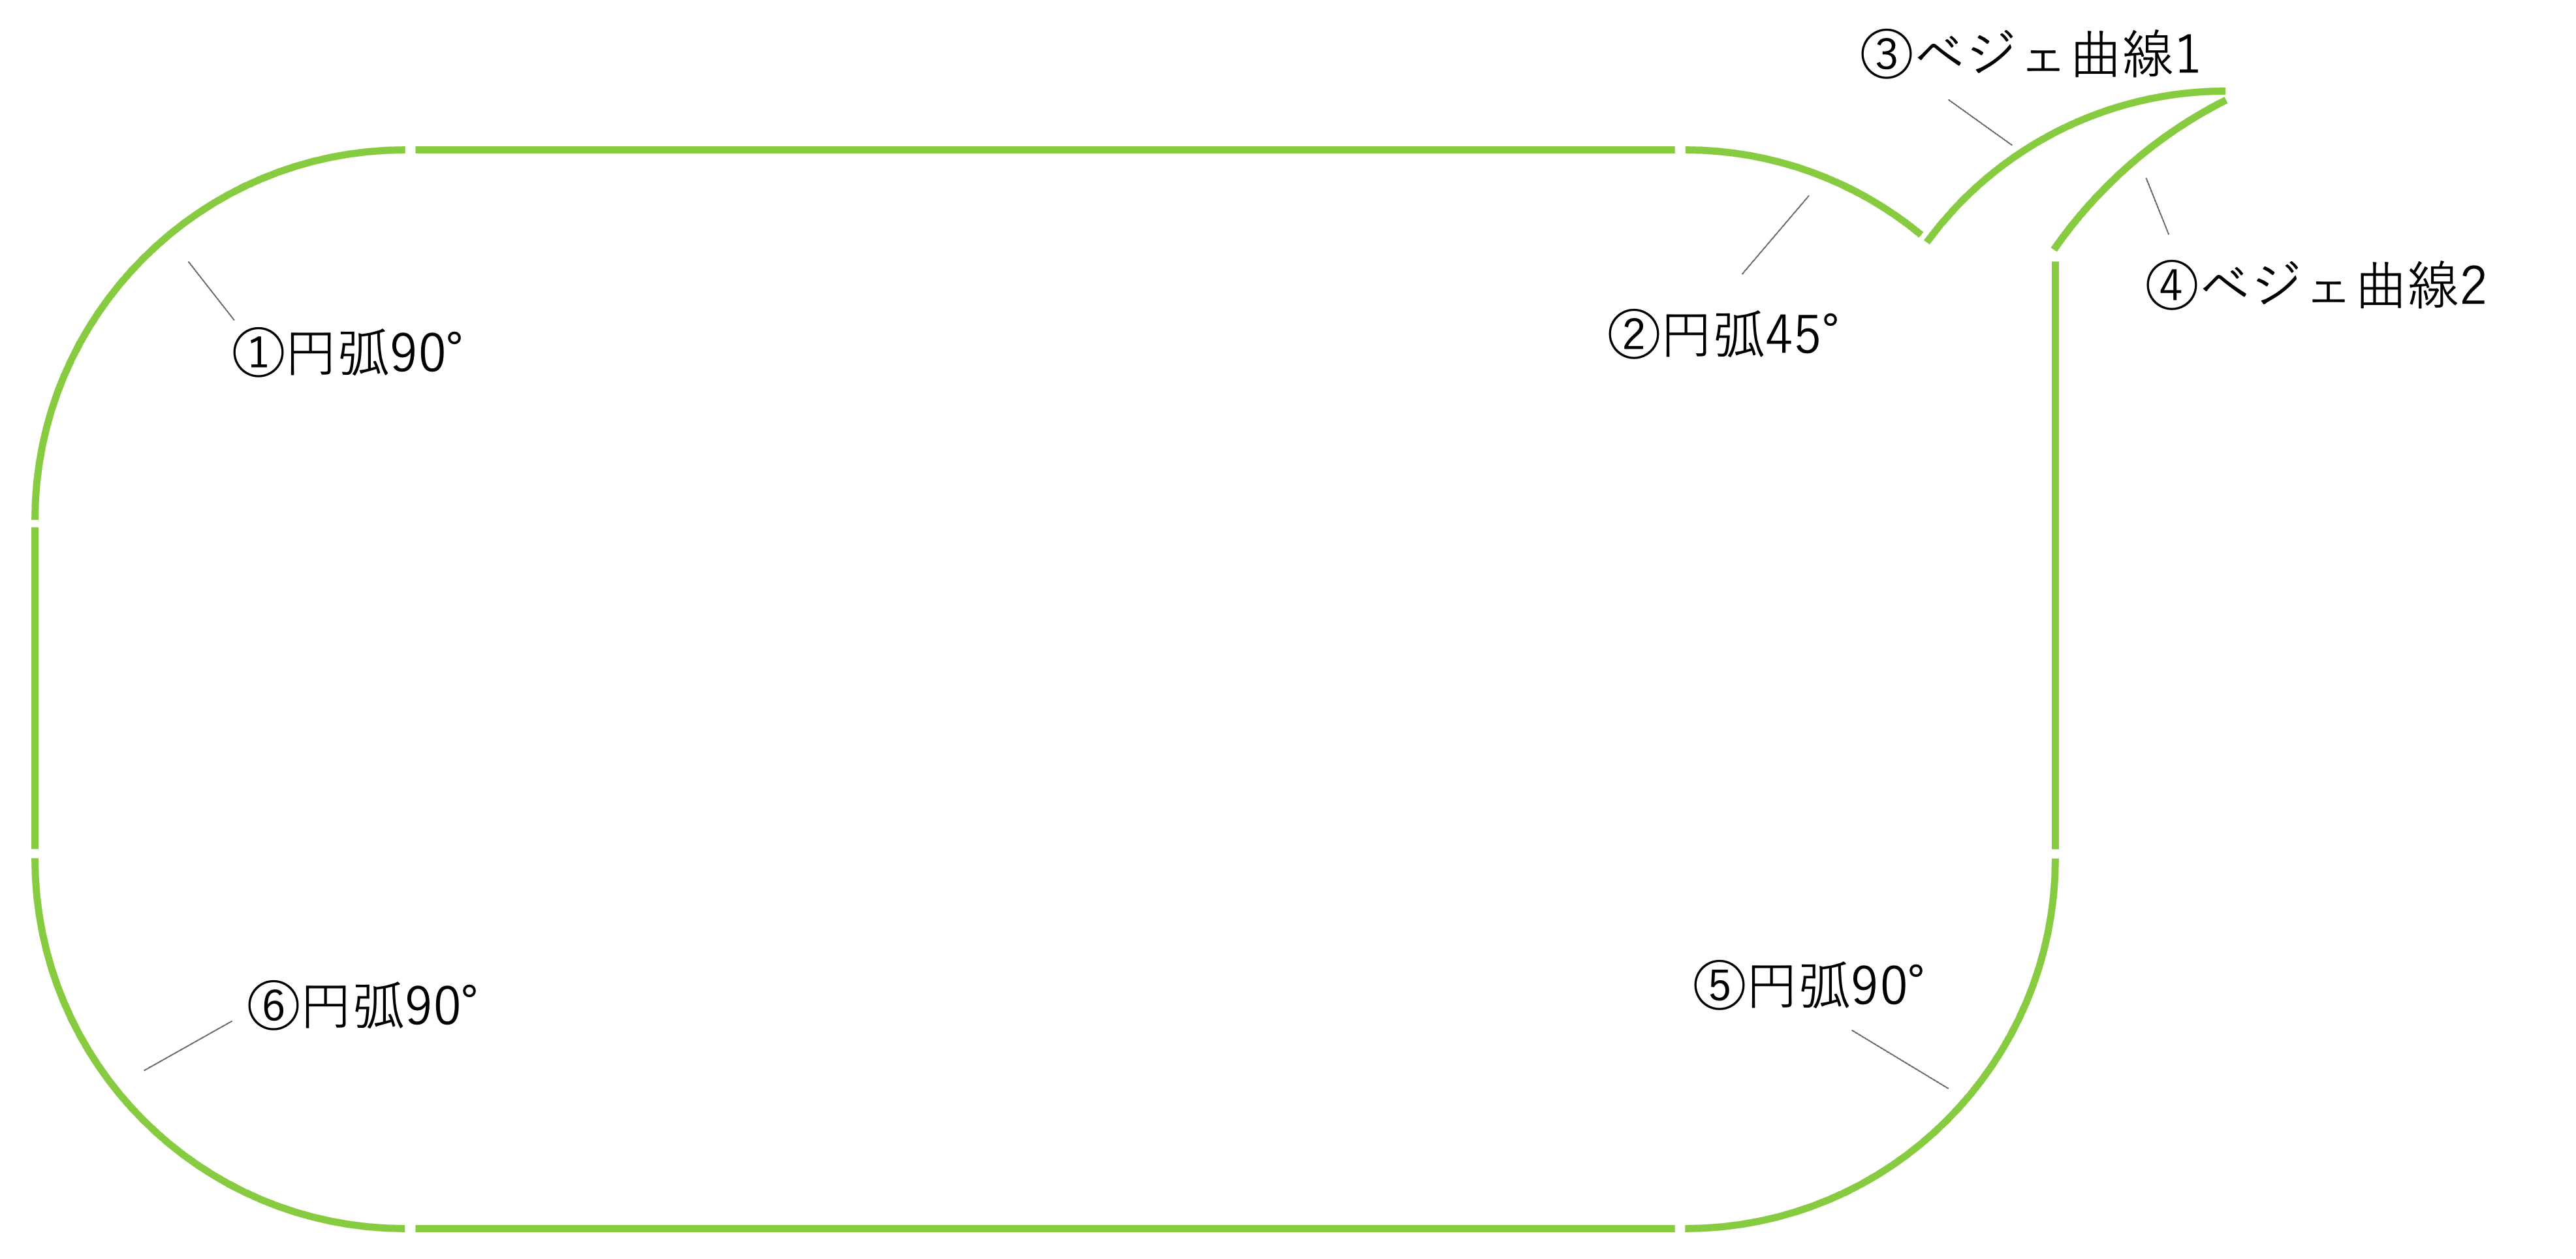
角丸の長方形にしっぽを生やすと吹き出しっぽくなりますが、標準shapeを使用すると、角丸部分からしっぽを出すための位置調整が面倒なので、一から自前で吹き出し図形を描いていきます。
描画の順番として、左上の円弧から時計回りにPathを辿っていきます。直線部は自動的にPathが閉じるので描画するコードは不要なので、曲線部だけコードを記述します。角丸の一箇所からしっぽを出すと吹き出しの形になります。
まずは角丸を描画する必要があるので、円弧の描き方を練習します。
円弧の描画
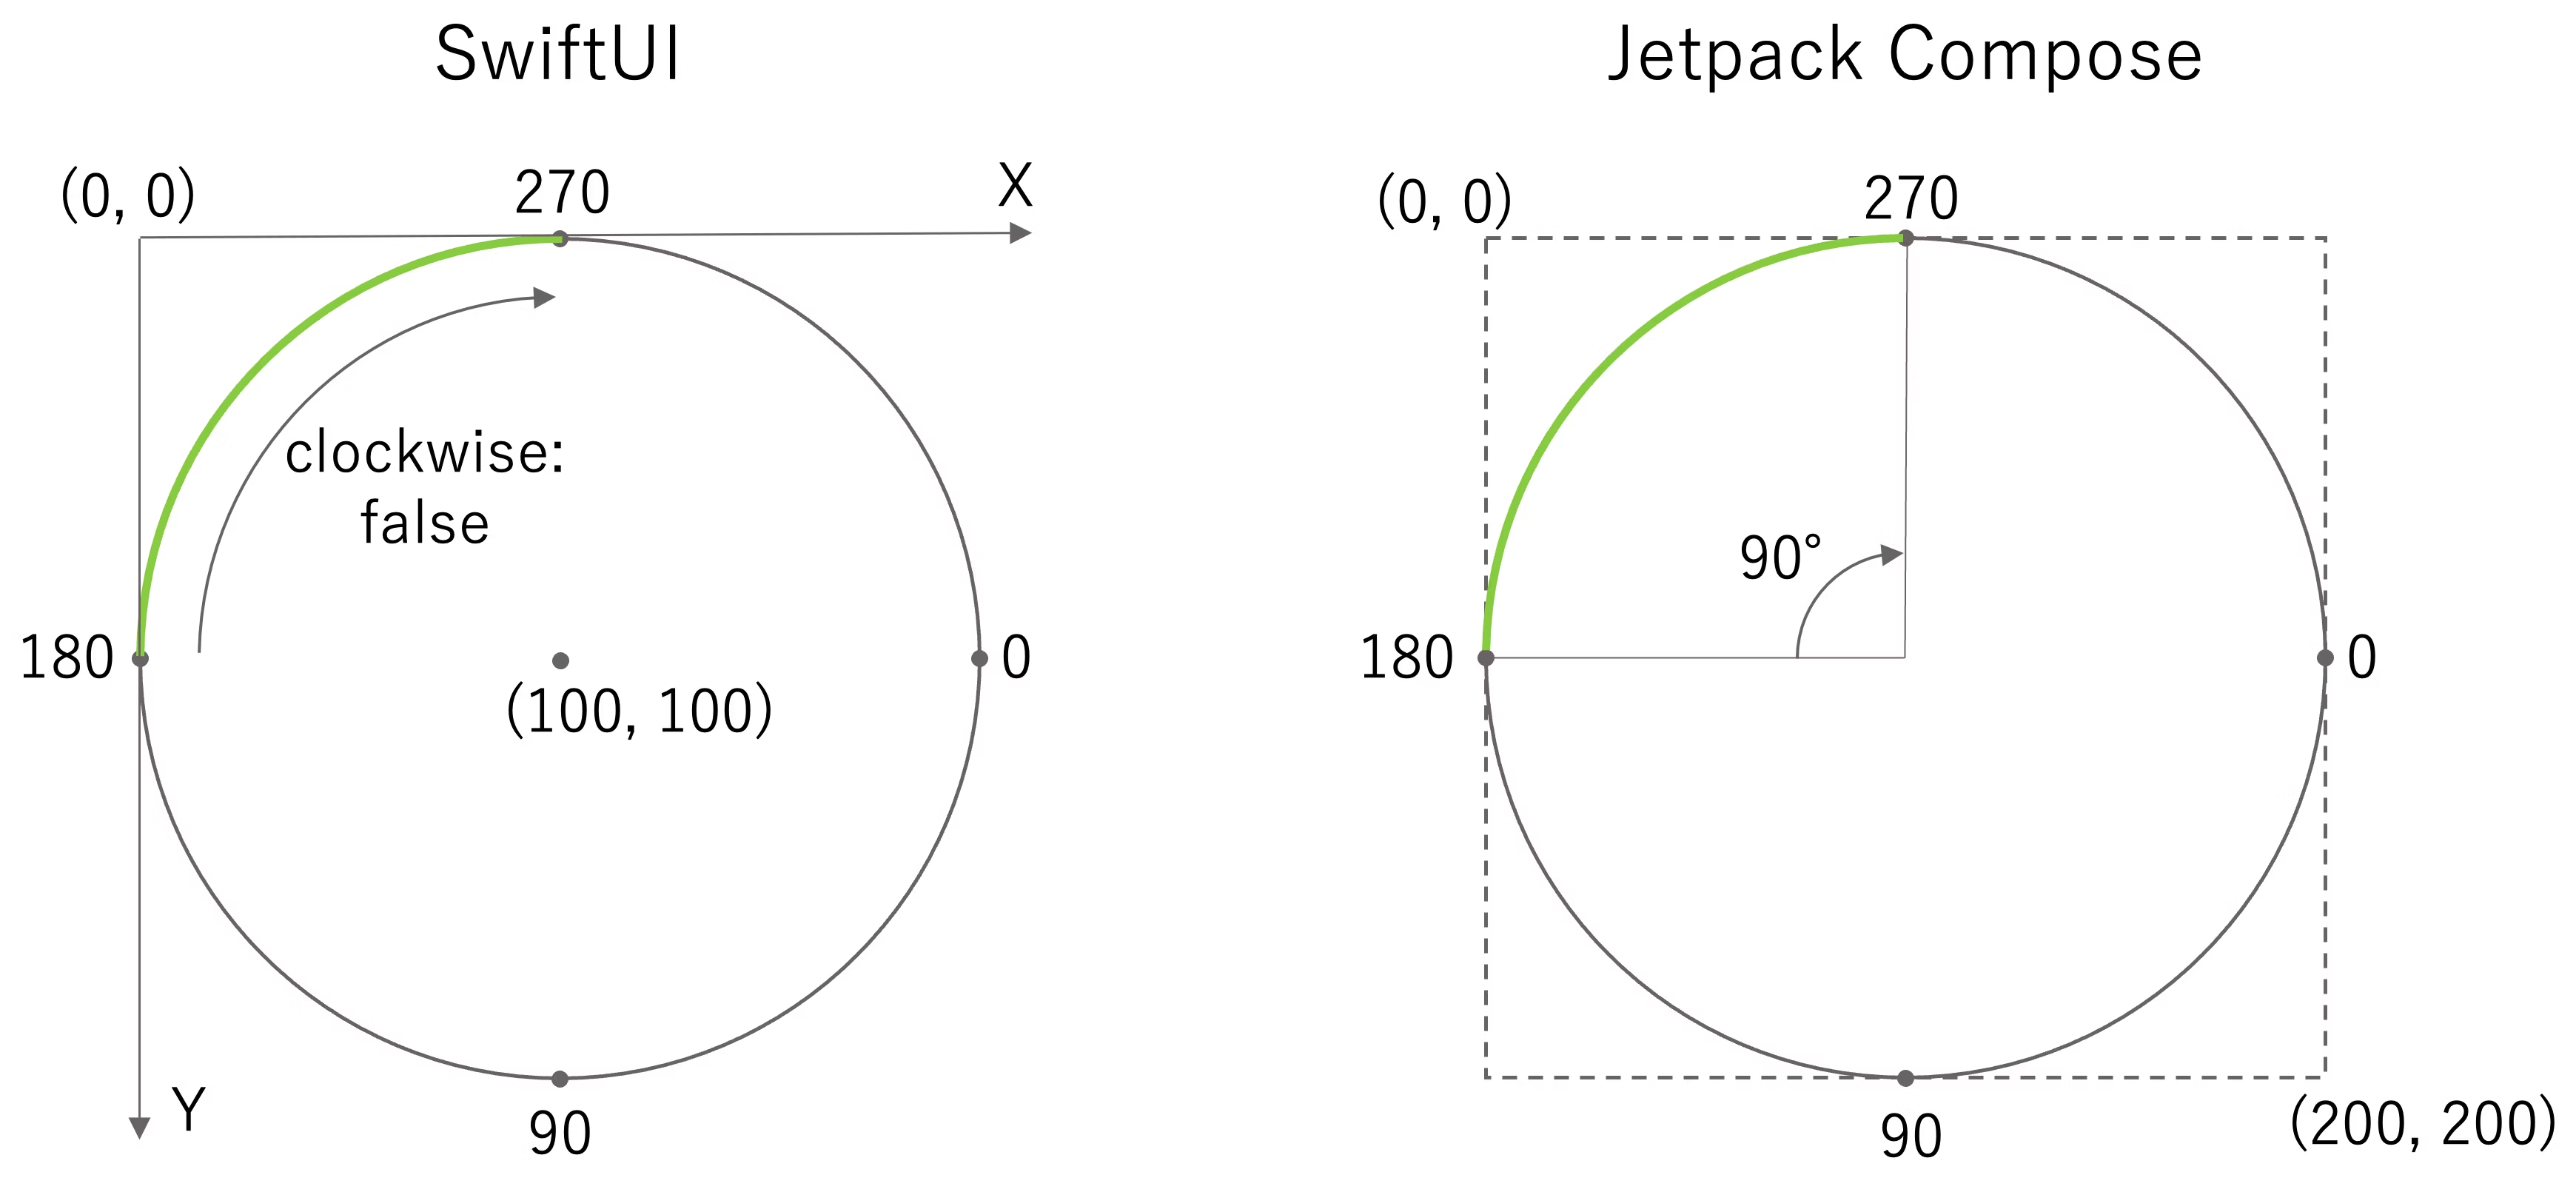
SwiftUIもJetpack Composeのどちらも時計の三時の位置が0°です。円弧の指定方法が少々異なりますので、コード例で違いを見ていきます。
SwiftUIで円弧を描画
SwiftUIでは中心点を基準に円弧を描画します。円弧の開始角度と終了角度を指定します。clockwiseで円弧の回り込み方向を指定できますが、trueを指定すると反時計回りになります。感覚と逆?ってなりますが、これはpath座標が左上を原点する反転座標のため、trueとfalseが逆になります。
path.addArc(
  center: CGPoint(
     x: 100.0,						// 中心点
     y: 100.0), 					// 中心点
  radius: 100.0, 					// 半径
  startAngle: Angle(degrees: 180),	// 円弧の開始角度
  endAngle: Angle(degrees: 270),	// 円弧の終了角度
  clockwise: false)					// 周回方向: 反転座標のため、falseで時計まわり
Jetpack Composeで円弧を描画
Jetpack Composeの場合は、円の矩形を指定する必要があるので少々ややこしいかもしれません。開始角度の指定はSwiftUIと同じですが、終了角度は指定せずに代わりにsweepAngleDegreesで円弧の角度を指定するので、これはこっちのほうが直感的です。
arcTo(
  rect = Rect(
        Offset(0f, 0f),		// 外周円の矩形(原点)
        Size(200f, 200f)	// 外周円の矩形(サイズ)
  ),
  startAngleDegrees = 180f,	// 円弧の開始角度
  sweepAngleDegrees = 90f,	// 時計回りの弧の角度
  forceMoveTo = false		// trueの場合、常に新しい輪郭を開始
)
しっぽの生やしかた
吹き出しのしっぽの部分はそれっぽくするために、ベジェ曲線でニョキっと感を出します。しっぽの上部と下部に分けて2つのベジェ曲線を使って突起部を作ります。そして、力点のcontrol pointから引っ張っることでいい感じの曲線になります。
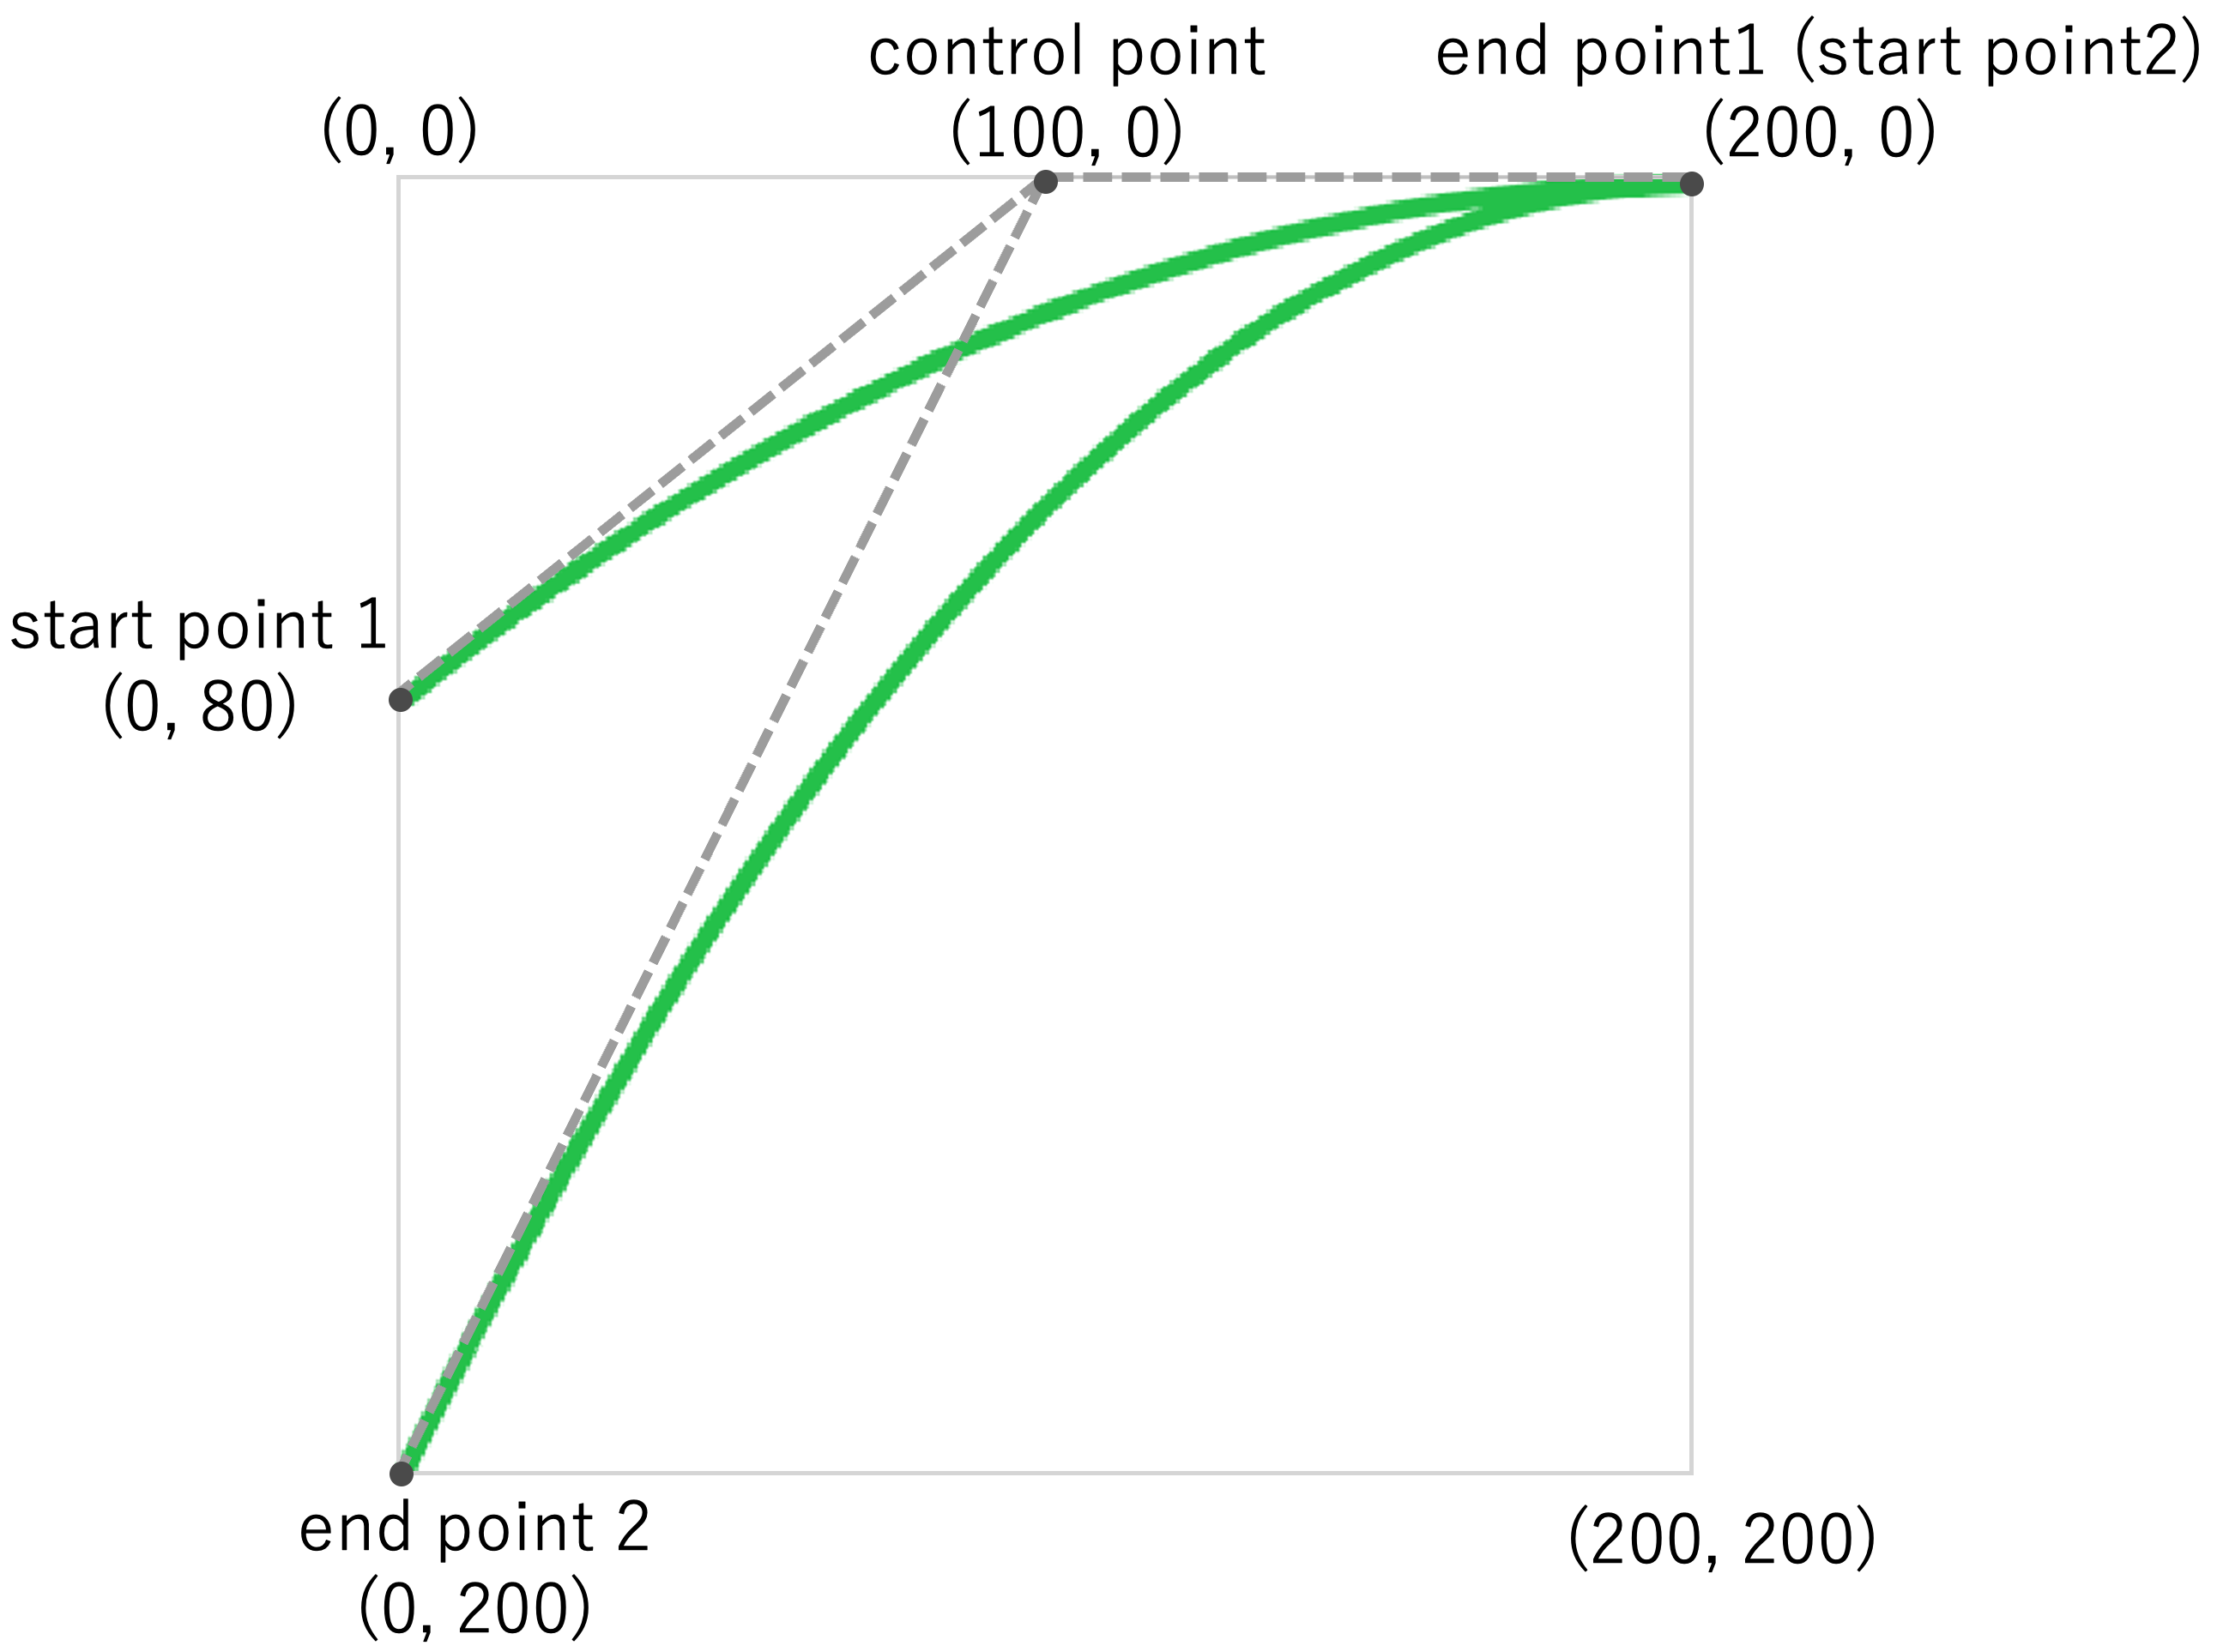
座標値は説明用に仮の値を使用しています。実際に吹き出しを描くときは、テキストエリアの大きさから座標値を求める必要があるので、その方法は後で説明します。
SwiftUIでしっぽを描画
ベジェ曲線用の関数addQuadCurveを使って、しっぽの上部と下部とで二つの曲線を描画します。座標の値は上の図と見比べてください。
struct QuadCurveSample: View {
    var body: some View {
        Path { path in
            // しっぽの上部
            path.move(to: CGPoint(x:0 , y: 80))     // start point 1
            path.addQuadCurve(
                to: CGPoint(x: 200, y: 0),          // end point 1 (start point 2)
                control: CGPoint(x: 100, y: 0))     // control point

            // しっぽの下部
            path.addQuadCurve(
                to: CGPoint(x: 0, y: 200),          // end point 2
                control: CGPoint(x: 100, y: 0))     // control point
        }
        .stroke(lineWidth: 3)
        .fill(.green)
        .frame(width: 200, height: 200)
    }
}
Jetpack Composeでしっぽを描画
SwiftUIとほぼ同じコードで描画できます。Pathはピクセルで指定するのでデバイス解像度に依存しないように、toPx()でDPをピクセルに変換しています。
@Composable
fun QuadCurveSample() {
    Canvas(modifier = Modifier.size(200.dp)) {
        val path = Path().apply {
            // しっぽの上部
            moveTo(x = 0.dp.toPx(), y = 80.dp.toPx())   // start point 1
            quadraticBezierTo(
                x1 = 100.dp.toPx(), y1 = 0.dp.toPx(),   // control point
                x2 = 200.dp.toPx(), y2 = 0.dp.toPx()    // end point 2 (start point 2)
            )

            // しっぽの下部
            quadraticBezierTo(
                x1 = 100.dp.toPx(), y1 = 0.dp.toPx(),   // control point
                x2 = 0.dp.toPx(), y2 = 200.dp.toPx()    // end point 2
            )
        }
        drawPath(
            path = path,
            Color.Green
        )
    }
}
quadraticBezierToの引数で、end point と control point の指定位置がSwiftUIと逆になっています。リファレンスの説明もcontrol pointの説明が後ろになっているので、まんまと引っかかりました。(わざと?)
しっぽの向きを変える
SwiftUIでは、吹き出し図形も通常のビューなので、モディファイアを使って一発で左右反転ができるので、しっぽの方向を簡単に変えることができます。
    // 左右反転
    .rotation3DEffect(180, axis: (x: 0, y: 1, z: 0))
Jetpack Composeでは、Shapeを使いますが左右反転する方法を見つけることができませんでした(モディファイアを使うとTextも反応してしまう)・・・。なので、しっぽの方向を変えるために、力技(逆向きのしっぽを描画する)で実装しました。
Textと図形を重ねる方法
標準のTextビュー/コンポーザブルの背景に吹き出し図形を重ね合わせることで、吹き出しテキストを作成します。こうすることで、Textの幅と高さが背景の大きさになるので、現在のTextのサイズを意識することなく、吹き出し図形をぴったりと重ねることができます。

SwiftUIの場合は、ビューの背景にビューを入れ子で置けるので、吹き出し図形のビューを作成しておきTextビューの背景に設定します。Jetpack Composeの場合は、コンポーザブルの背景にコンポーザブルを入れ子で置けないので代わりにShapeを使います。ShapeもPathを使って自由に図形を描画できます。
SwiftでTextと図形を重ねるサンプル
Textの背景に四角形を描画するサンプルです。Swiftの場合は、GeometryReaderで自分のサイズ( = Textのサイズ)を求めて、Textの領域いっぱいに四角形を描画します。Jetpack Composeの場合は、引数でsizeが渡されるのでそのまま使用します。
struct BackgroundView: View {
    var body: some View {
        GeometryReader { geometry in
            let width = geometry.size.width
            let height = geometry.size.height

            Path { path in
                let rect = CGRect(x: 0, y: 0, width: width, height: height)
                path.addRect(rect)
            }
            .fill(.green)
        }
    }
}

struct BackgroudSample: View {
    var body: some View {
        Text("背景サンプル")
            .background(BackgroundView())
    }
}
@Composable
fun BackgroundSample() {
    val myShape = GenericShape { size, _ ->
        addRect(Rect(0f, 0f, size.width, size.height))
    }

    Text(
        "背景サンプル",
        modifier = Modifier.background(Color.Green, shape = myShape)
    )
}
あとは四角形の部分を吹き出し図形に変更することで、吹き出しテキストビュー/コンポーザブルの完成です!
サンプルコード全文
吹き出しの実装サンプルの全文を掲載しておきますので参考にしてください。
iOS版
import SwiftUI

struct ContentView: View {
    var body: some View {
        VStack {
            Text("iOS表示サンプル")
                .padding(4)
            BalloonText("SwiftUIから\nこんにちは!")
                .padding(4)
            BalloonText("逆向きの吹き出しです", mirrored: true)
                .padding(4)
            BalloonText("長いテキストの表示例です。テキストの幅と高さに合わせて、吹き出しの大きさも自動的に連動して表示されます。")
                .padding(4)
        }
    }
}

struct ContentView_Previews: PreviewProvider {
    static var previews: some View {
        ContentView()
    }
}


struct BalloonText: View {
    let text: String
    let color: Color
    let mirrored: Bool

    init(_ text: String,
         color: Color = Color(UIColor(red: 109/255, green: 230/255, blue: 123/255, alpha: 1.0)),
         mirrored: Bool = false
    ) {
        self.text = text
        self.color = color
        self.mirrored = mirrored
    }

    var body: some View {
        let cornerRadius = 8.0

        Text(text)
            .padding(.leading, 4 + (mirrored ? cornerRadius / 2 : 0))
            .padding(.trailing, 4 + (!mirrored ? cornerRadius / 2 : 0))
            .padding(.vertical, 2)
            .background(BalloonShape(
                cornerRadius: cornerRadius,
                color: color,
                mirrored: mirrored)
            )
    }
}

struct BalloonShape: View {
    var cornerRadius: Double
    var color: Color
    var mirrored = false

    var body: some View {
        GeometryReader { geometry in
            Path { path in
                let tailSize = CGSize(
                    width: cornerRadius / 2,
                    height: cornerRadius / 2)
                let shapeRect = CGRect(
                    x: 0,
                    y: 0,
                    width: geometry.size.width,
                    height: geometry.size.height)

                // 時計まわりに描いていく

                // 左上角丸
                path.addArc(
                    center: CGPoint(
                        x: shapeRect.minX + cornerRadius,
                        y: shapeRect.minY + cornerRadius),
                    radius: cornerRadius,
                    startAngle: Angle(degrees: 180),
                    endAngle: Angle(degrees: 279), clockwise: false)

                // 右上角丸
                path.addArc(
                    center: CGPoint(
                        x: shapeRect.maxX - cornerRadius - tailSize.width,
                        y: shapeRect.minY + cornerRadius),
                    radius: cornerRadius,
                    startAngle: Angle(degrees: 270),
                    endAngle: Angle(degrees: 270 + 45), clockwise: false)

                // しっぽ上部
                path.addQuadCurve(
                    to: CGPoint(
                        x: shapeRect.maxX,
                        y: shapeRect.minY),
                    control: CGPoint(
                        x: shapeRect.maxX - (tailSize.width / 2),
                        y: shapeRect.minY))

                // しっぽ下部
                path.addQuadCurve(
                    to: CGPoint(
                        x: shapeRect.maxX - tailSize.width,
                        y: shapeRect.minY + (cornerRadius / 2) + tailSize.height),
                    control: CGPoint(
                        x: shapeRect.maxX - (tailSize.width / 2),
                        y: shapeRect.minY))

                // 右下角丸
                path.addArc(
                    center: CGPoint(
                        x: shapeRect.maxX - cornerRadius - tailSize.width,
                        y: shapeRect.maxY - cornerRadius),
                    radius: cornerRadius,
                    startAngle: Angle(degrees: 0),
                    endAngle: Angle(degrees: 90), clockwise: false)

                // 左下角丸
                path.addArc(
                    center: CGPoint(
                        x: shapeRect.minX + cornerRadius,
                        y: shapeRect.maxY - cornerRadius),
                    radius: cornerRadius,
                    startAngle: Angle(degrees: 90),
                    endAngle: Angle(degrees: 180), clockwise: false)
            }
            .fill(self.color)
            .rotation3DEffect(.degrees(mirrored ? 180 : 0), axis: (x: 0, y: 1, z: 0))
        }
    }
}
Android版
package com.example.composeplayground

import android.os.Bundle
import androidx.activity.ComponentActivity
import androidx.activity.compose.setContent
import androidx.compose.foundation.background
import androidx.compose.foundation.layout.*
import androidx.compose.foundation.shape.GenericShape
import androidx.compose.material.MaterialTheme
import androidx.compose.material.Surface
import androidx.compose.material.Text
import androidx.compose.runtime.Composable
import androidx.compose.ui.Alignment
import androidx.compose.ui.Modifier
import androidx.compose.ui.geometry.Offset
import androidx.compose.ui.geometry.Rect
import androidx.compose.ui.geometry.Size
import androidx.compose.ui.graphics.Color
import androidx.compose.ui.platform.LocalDensity
import androidx.compose.ui.tooling.preview.Preview
import androidx.compose.ui.unit.dp
import com.example.composeplayground.ui.theme.ComposePlaygroundTheme

class MainActivity : ComponentActivity() {
    override fun onCreate(savedInstanceState: Bundle?) {
        super.onCreate(savedInstanceState)
        setContent {
            ComposePlaygroundTheme {
                Surface(
                    modifier = Modifier.fillMaxSize(),
                    color = MaterialTheme.colors.background
                ) {
                    MainScreen()
                }
            }
        }
    }
}

@Preview(showBackground = true)
@Composable
fun DefaultPreview() {
    ComposePlaygroundTheme {
        MainScreen()
    }
}

@Composable
fun MainScreen() {
    Column(
        verticalArrangement = Arrangement.Center,
        horizontalAlignment = Alignment.CenterHorizontally,
    ) {
        Text("Android表示サンプル",
            modifier = Modifier.padding(4.dp))
        BalloonText("Composeから\nこんにちは!",
            modifier = Modifier.padding(4.dp))
        BalloonText("逆向きの吹き出しです", mirrored = true,
            modifier = Modifier.padding(4.dp))
        BalloonText("長いテキストの表示例です。テキストの幅と高さに合わせて、吹き出しの大きさも自動的に連動して表示されます。",
            modifier = Modifier.padding(4.dp))
    }
}

@Composable
fun BalloonText(
    text: String,
    balloonColor: Color = Color(red = 109, green = 230, blue = 123),
    mirrored: Boolean = false,
    modifier: Modifier = Modifier
) {
    if (mirrored) {
        YourBalloonText(text, balloonColor, modifier)
    } else {
        MyBalloonText(text, balloonColor, modifier)
    }
}

@Composable
fun MyBalloonText(
    text: String,
    balloonColor: Color = Color.Green,
    modifier: Modifier = Modifier
) {
    val cornerRadius = with(LocalDensity.current) { 8.dp.toPx() }
    val tailSize = Size(cornerRadius / 2, cornerRadius / 2)
    val tailWidthDp = with(LocalDensity.current) { tailSize.width.toDp() }

    val balloonShape = GenericShape { size, _ ->
        val shapeRect = Rect(Offset(0f, 0f), Size(size.width, size.height))
        val arcSize = Size(cornerRadius * 2, cornerRadius * 2)
        var arcRect: Rect
        var x: Float
        var y: Float
        var controlX: Float
        var controlY: Float

        // 時計回りに描いていく

        // 左上角丸
        x = shapeRect.left
        y = shapeRect.top
        arcRect = Rect(Offset(x, y), arcSize)
        arcTo(
            rect = arcRect,
            startAngleDegrees = 180f,
            sweepAngleDegrees = 90f,
            forceMoveTo = false
        )

        // 右上角丸
        x = shapeRect.right - (cornerRadius * 2) - tailSize.width
        y = shapeRect.top
        arcRect = Rect(Offset(x, y), arcSize)
        arcTo(arcRect, 270f, 45f, false)

        // しっぽ上部
        x = shapeRect.right
        y = shapeRect.top
        controlX = shapeRect.right - tailSize.width / 2
        controlY = shapeRect.top
        //lineTo(x, y)
        quadraticBezierTo(controlX, controlY, x, y)

        // しっぽ下部
        x = shapeRect.right - tailSize.width
        y = shapeRect.top + (cornerRadius / 2) + tailSize.height
        controlX = shapeRect.right - tailSize.width / 2
        controlY = shapeRect.top
        //lineTo(x, y)
        quadraticBezierTo(controlX, controlY, x, y)

        // 右下角丸
        x = shapeRect.right - tailSize.width - cornerRadius * 2
        y = shapeRect.bottom - (cornerRadius * 2)
        arcRect = Rect(Offset(x, y), arcSize)
        arcTo(arcRect, 0f, 90f, false)

        // 左下角丸
        x = shapeRect.left
        y = shapeRect.bottom - (cornerRadius * 2)
        arcRect = Rect(Offset(x, y), arcSize)
        arcTo(arcRect, 90f, 90f, false)
    }

    Text(
        text,
        modifier = modifier
            .background(balloonColor, shape = balloonShape)
            .padding(start = 4.dp, end = tailWidthDp + 2.dp)
            .padding(vertical = 1.dp)
    )
}

@Composable
fun YourBalloonText(
    text: String,
    balloonColor: Color = Color.White,
    modifier: Modifier = Modifier
) {
    val cornerRadius = with(LocalDensity.current) { 8.dp.toPx() }
    val tailSize = Size(cornerRadius / 2, cornerRadius / 2)
    val tailWidthDp = with(LocalDensity.current) { tailSize.width.toDp() }

    val BalloonShape = GenericShape { size, _ ->
        val shapeRect = Rect(Offset(0f, 0f), Size(size.width, size.height))
        val arcSize = Size(cornerRadius * 2, cornerRadius * 2)
        var arcRect: Rect
        var x: Float
        var y: Float
        var controlX: Float
        var controlY: Float

        // 反時計回りに描画していく

        // 左上角丸
        x = shapeRect.left + tailSize.width
        y = shapeRect.top
        arcRect = Rect(Offset(x, y), arcSize)
        arcTo(arcRect, 270f, -45f, false)

        // しっぽ上部
        x = shapeRect.left
        y = shapeRect.top
        controlX = shapeRect.left + tailSize.width / 2
        controlY = shapeRect.top
        //lineTo(x, y)
        quadraticBezierTo(controlX, controlY, x, y)

        // しっぽ下部
        x = shapeRect.left + tailSize.width
        y = shapeRect.top + (cornerRadius / 2) + tailSize.height
        controlX = shapeRect.left + tailSize.width / 2
        controlY = shapeRect.top
        //lineTo(x, y)
        quadraticBezierTo(controlX, controlY, x, y)

        // 左下角丸
        x = shapeRect.left + tailSize.width
        y = shapeRect.bottom - (cornerRadius * 2)
        arcRect = Rect(Offset(x, y), arcSize)
        arcTo(arcRect, 180f, -90f, false)

        // 右下角丸
        x = shapeRect.right - cornerRadius
        y = shapeRect.bottom - cornerRadius * 2
        arcRect = Rect(Offset(x - cornerRadius, y), arcSize)
        arcTo(arcRect, 90f, -90f, false)

        // 右上角丸
        x = shapeRect.right - cornerRadius * 2
        y = shapeRect.top
        arcRect = Rect(Offset(x, y), arcSize)
        arcTo(arcRect, 0f, -90f, false)
    }

    Text(
        text,
        modifier = modifier
            .background(balloonColor, shape = BalloonShape)
            .padding(start = tailWidthDp + 4.dp, end = 2.dp)
            .padding(vertical = 1.dp)
    )
}
さいごに
宣言的UIで気軽にカスタムUIを作れるようになったのはいい時代になりましたね。これまではカスタムUIは面倒で、ライブラリに頼りがちで依存関係に悩まされていましたが、徐々にカスタムUIに移行していきたいと思います。
次回は、今回の吹き出しTextを使って、LINEっぽいチャットビューをiOS版とAndroid版の両方で作り比べてみたいと思います。
