概要
今回は、表題に記載の通り、Spring Boot + WebFluxをKotlinで書きつつ、さらにはDocker上で動こすことにチャレンジしてみたいと思います。
構成
Kotlin + Spring Boot + WebFluxでAPIを作り、それをdocker上で動くようにする
プロジェクト作成
今回は、IntelliJを利用してプロジェクトの作成をしてみます。
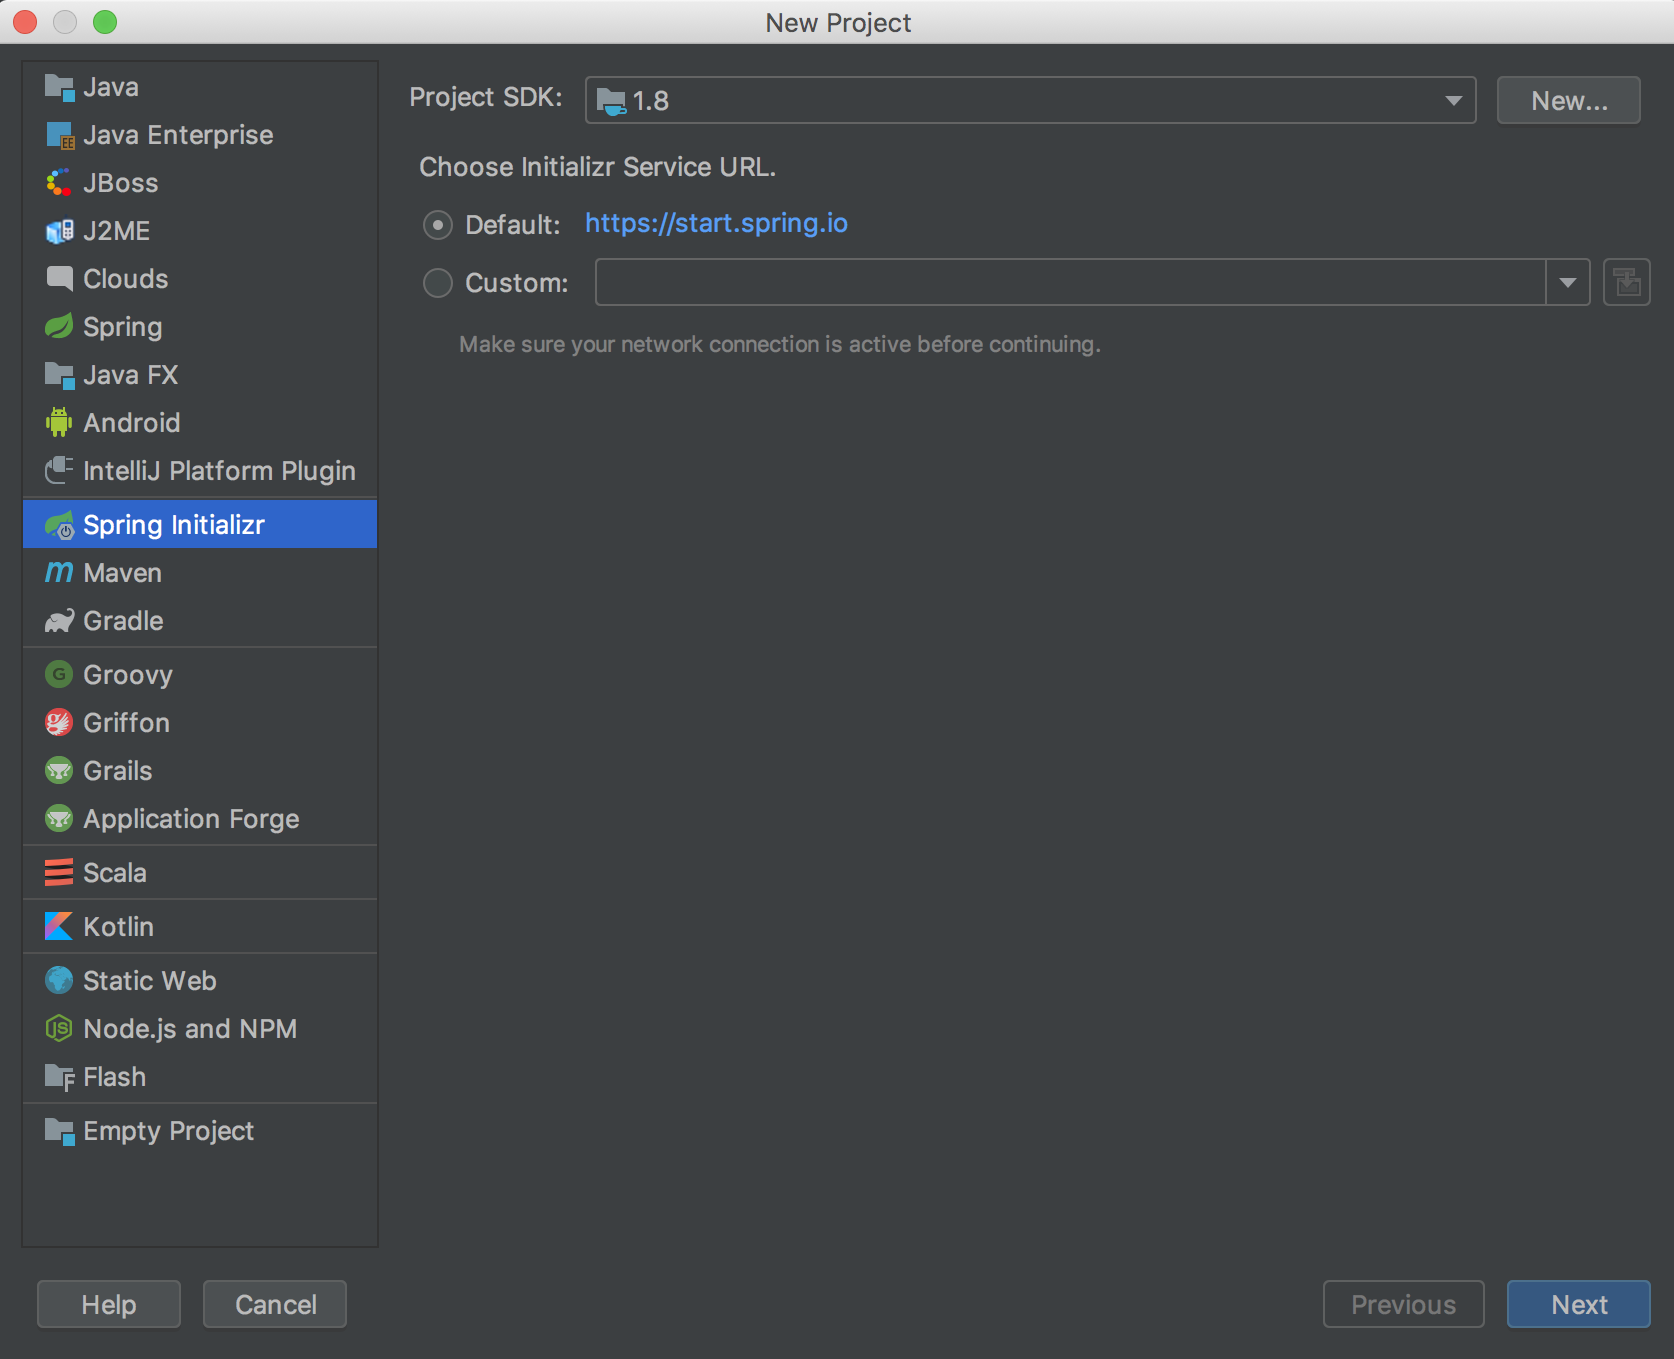
新規プロジェクト作成で、Spring Initializrを選択。

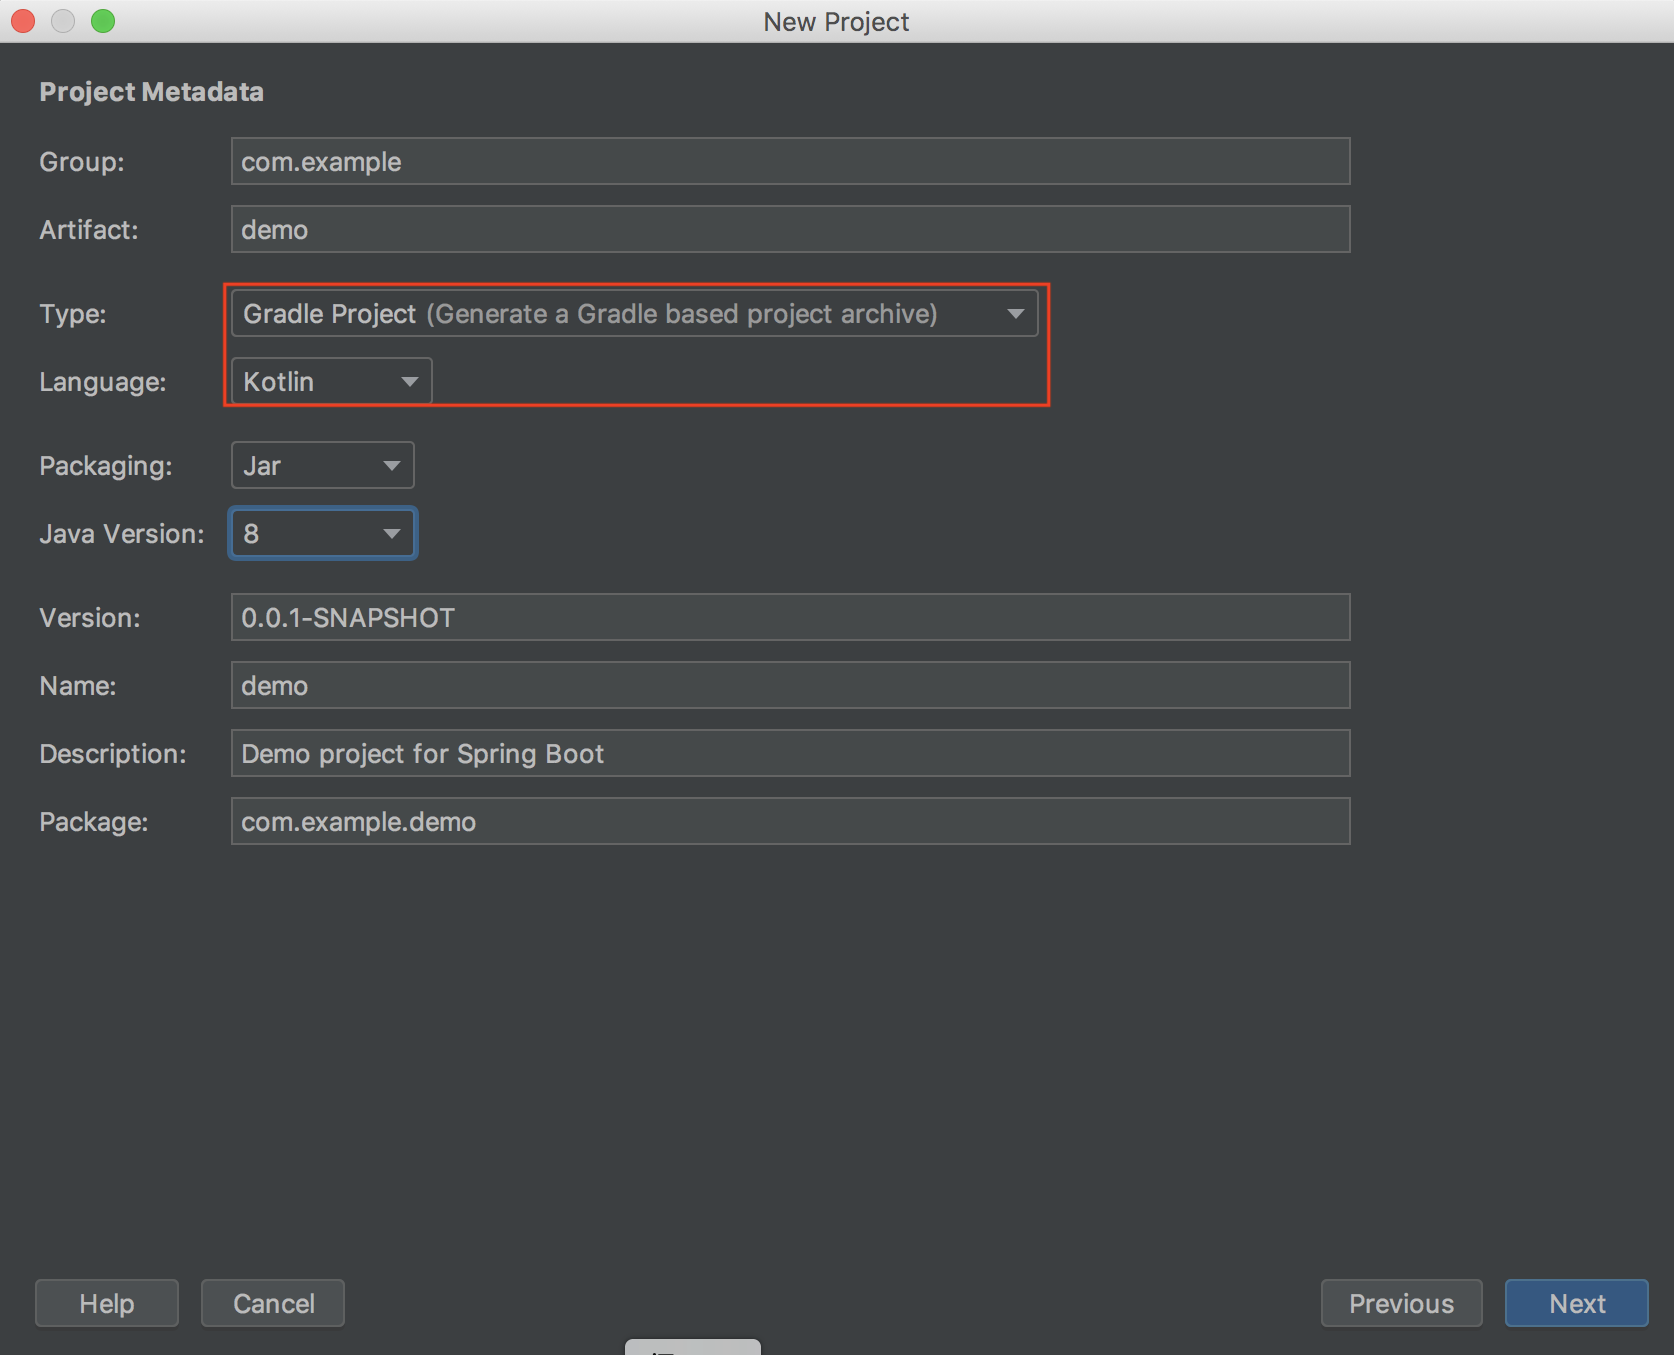
プロジェクトタイプはGradle Project、LanguageはKotlinにしておく。

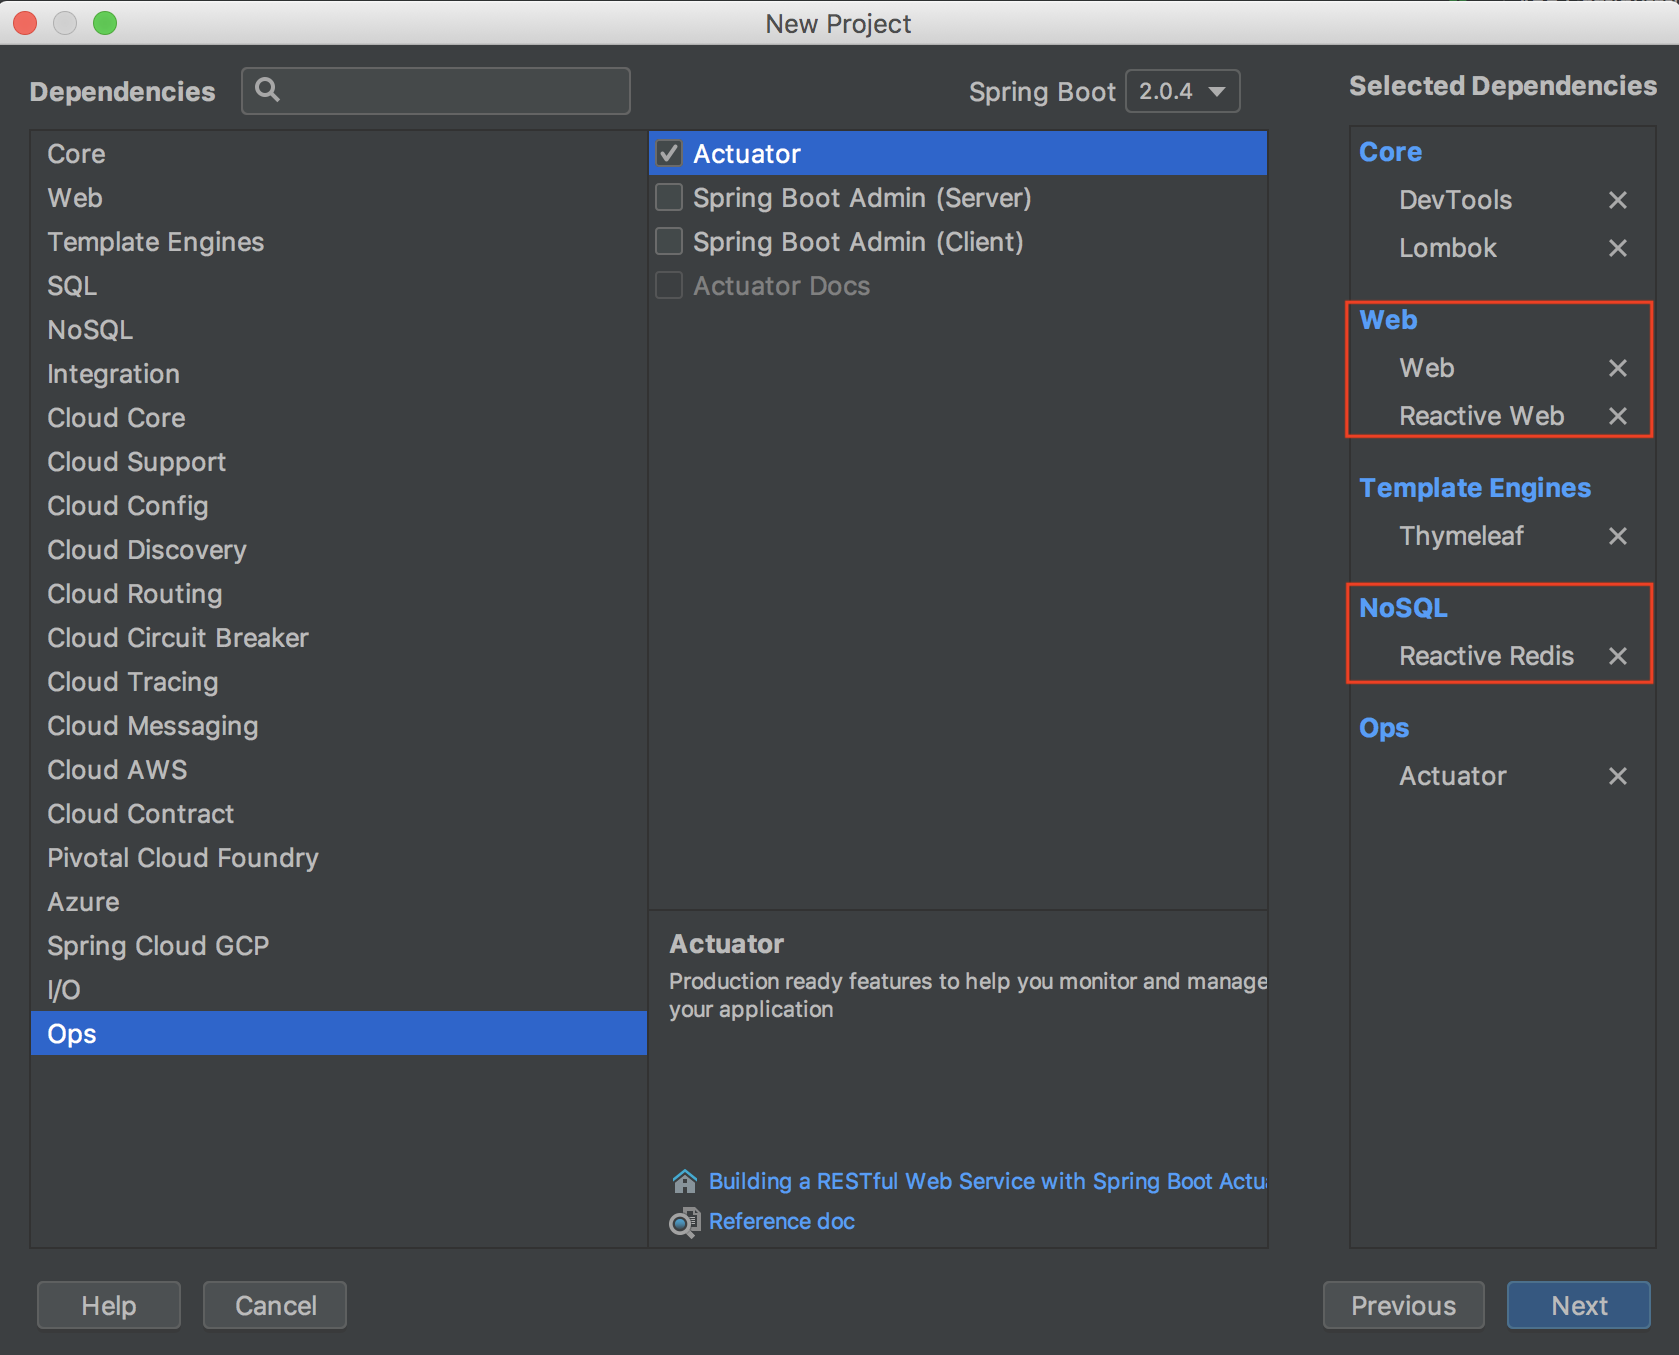
依存関係に関しては、Reactive-webとReactive-redisが必須で、それ以外はお好みで設定。

※redisを入れたのは今後やってみたいためなので、ここではなくても問題ありません。
ここまでの手順でプロジェクトを作成しておきます。
(最初は依存関係のダウンロードなどで多少時間がかかるかもしれません)
私が試した時は、特に問題も起きずにビルドが成功しましたが、詰まるようでしたら、下記のGradle情報をご参考にしてみてくださいmm
buildscript {
    ext {
        kotlinVersion = '1.2.51'
        springBootVersion = '2.0.4.RELEASE'
    }
    repositories {
        mavenCentral()
    }
    dependencies {
        classpath("org.springframework.boot:spring-boot-gradle-plugin:${springBootVersion}")
        classpath("org.jetbrains.kotlin:kotlin-gradle-plugin:${kotlinVersion}")
        classpath("org.jetbrains.kotlin:kotlin-allopen:${kotlinVersion}")
    }
}

apply plugin: 'kotlin'
apply plugin: 'kotlin-spring'
apply plugin: 'eclipse'
apply plugin: 'org.springframework.boot'
apply plugin: 'io.spring.dependency-management'

group = 'com.darmaso.spring'
version = '0.0.1-SNAPSHOT'
sourceCompatibility = 1.8
compileKotlin {
    kotlinOptions {
        freeCompilerArgs = ["-Xjsr305=strict"]
        jvmTarget = "1.8"
    }
}
compileTestKotlin {
    kotlinOptions {
        freeCompilerArgs = ["-Xjsr305=strict"]
        jvmTarget = "1.8"
    }
}

repositories {
    mavenCentral()
}

dependencies {
    compile('org.springframework.boot:spring-boot-starter-actuator')
    compile('org.springframework.boot:spring-boot-starter-data-redis-reactive')
    compile('org.springframework.boot:spring-boot-starter-thymeleaf')
    //compile('org.springframework.boot:spring-boot-starter-web')
    compile('org.springframework.boot:spring-boot-starter-webflux')
    compile('com.fasterxml.jackson.module:jackson-module-kotlin')
    compile("org.jetbrains.kotlin:kotlin-stdlib-jdk8")
    compile("org.jetbrains.kotlin:kotlin-reflect")
    runtime('org.springframework.boot:spring-boot-devtools')
    compileOnly('org.projectlombok:lombok')
    testCompile('org.springframework.boot:spring-boot-starter-test')
    testCompile('io.projectreactor:reactor-test')
}
そのまま何も考えずに実行し、 下記のようなログが吐かれたらOK。
・・・Started KotlinwebfluxApplicationKt in 8.127 seconds (JVM running for 10.728)
http://localhost:8080 にアクセスすると、下記のようなページが表示されます。

現状だと、パスに対する処理を記載していないので、この表示になることは問題ございません。
WebFluxを試してみる
まずは、APIをサクッと作るため、WebFluxとKotlinでReactive Webを参考にユーザのリストを返すAPIを実装してみました。
上記リンク通りに実装してみたサンプルがこちらです。簡単な説明は下記に続けます。
Routing
どのパスに対しては、どのハンドラを実行するかというものを設定してあげます。
@Configuration
class Router(private val demoHandler: DemoHandler, private val userHandler: UserHandler) {
    @Bean
    fun apiRouter() = router {
        accept(MediaType.APPLICATION_JSON_UTF8).nest {
            GET("/v1/demo", demoHandler::getDemo)
            GET("/v1/users", userHandler::findAll)
        }
        accept(MediaType.TEXT_EVENT_STREAM).nest {
            GET("/stream/users", userHandler::streamOneSec)
        }
    }
}
上記の例だと、 application/json へのそれぞれのパスへのリクエストを設定しているというものになります。
特徴的なのが、2つ目のacceptでストリーム形式をサポートしているところです。
handler
userHandlerの実装例が下記(サンプルのまんまですが)です。
@Component
class UserHandler {
    private val users = Flux.just(
            User("1", "tarou", "1999-09-09"),
            User("2", "hanako", "2002-02-02"),
            User("3", "tonkichi", "1988-08-08")
    )
    private val streamingUsers = Flux
            .zip(Flux.interval(Duration.ofSeconds(1)), users.repeat())
            .map { it.t2 }

    fun findAll(req: ServerRequest): Mono<ServerResponse> {
        return ServerResponse.ok().contentType(MediaType.APPLICATION_JSON_UTF8)
                .body(users, User::class.java)
    }

    fun streamOneSec(req: ServerRequest) = ServerResponse.ok()
            .bodyToServerSentEvents(streamingUsers)
}
引っかかったところ
あとは実行してみるだけなのですが、一点躓いたところを記載しておきます。
build.gradleでspring-boot-starter-webを読み込んでいると、
アプリケーションの起動時にTomcatが起動して、期待通りのマッピングができなくなる模様><
webflux側の、nettyが起動することを期待して、該当箇所はコメントアウトしてみました。
ただし、application.yamlなどに設定をすると良い?という記事を読んだ気もしたのですが、
記載場所を忘れてしまいました。。。どなたかご存知でしたら教えてくださいmm
実行結果
$ curl -H "accept: application/json" http://localhost:8080/v1/users
[
 {"id":"1","name":"tarou","birth":"1999-09-09"},
 {"id":"2","name":"hanako","birth":"2002-02-02"},
 {"id":"3","name":"tonkichi","birth":"1988-08-08"}
]

$ curl -H "accept: application/json" http://localhost:8080/v1/demo
{"message":"hello kotlin"}

$ curl -H "accept: text/event-stream" http://localhost:8080/stream/users
data:{"id":"1","name":"tarou","birth":"1999-09-09"}

data:{"id":"2","name":"hanako","birth":"2002-02-02"}

data:{"id":"3","name":"tonkichi","birth":"1988-08-08"}

data:{"id":"1","name":"tarou","birth":"1999-09-09"}

data:{"id":"2","name":"hanako","birth":"2002-02-02"}

data:{"id":"3","name":"tonkichi","birth":"1988-08-08"}

data:{"id":"1","name":"tarou","birth":"1999-09-09"}
ちなみに
上記でbuild.gradleでspring-boot-starter-webをコメントアウトしましたが、
@Controller を利用したHTML表示などは通常通り表示できました(静的ページを表示しているのみ)
@Controller
class IndexController {

    @RequestMapping("/")
    fun index(): String {
        return "index"
    }
}
<!DOCTYPE html>
<html lang="ja">
<head>
    <meta charset="UTF-8">
    <title>Kotlin, Spring Boot2, WebFlux</title>
</head>
<body>
<p>Hello! Kotlin, Sprint Boot2, WebFlux</p>
</body>
</html>
実行結果は下記
$ curl http://localhost:8080/
<!DOCTYPE html>
<html lang="ja">
<head>
    <meta charset="UTF-8">
    <title>Kotlin, Spring Boot2, WebFlux</title>
</head>
<body>
<p>Hello! Kotlin, Sprint Boot2, WebFlux</p>
</body>
</html>
Dockerで動かす
GCPのRun a Kotlin Spring Boot application on Google Kubernetes Engineを参考にDocker上で動かすようにしてみる
Dockerfile
上記サンプルをそのまま使用
FROM openjdk:8-jdk-alpine
VOLUME /tmp
RUN mkdir /work
COPY . /work
WORKDIR /work
RUN /work/gradlew build
RUN mv /work/build/libs/*.jar /work/app.jar
ENTRYPOINT ["java","-Djava.security.egd=file:/dev/./urandom","-jar","/work/app.jar"]
この Dockerfile を使ってビルドしてみる
$ docker build --no-cache -t demo .
Sending build context to Docker daemon  430.6kB
Step 1/8 : FROM openjdk:8-jdk-alpine
8-jdk-alpine: Pulling from library/openjdk
4fe2ade4980c: Pull complete
6fc58a8d4ae4: Pull complete
fe815adf554b: Pull complete
Digest: sha256:a2d7b02891b158d01523e26ad069d40d5eb2c14d6943cf4df969b097acaa77d3
Status: Downloaded newer image for openjdk:8-jdk-alpine
・・・・<<省略>>・・・・・
BUILD SUCCESSFUL in 3m 11s
6 actionable tasks: 6 executed
Removing intermediate container d931cb7f17f1
 ---> 51321afaedb9
Step 7/8 : RUN mv /work/build/libs/*.jar /work/app.jar
 ---> Running in 730bad53d9e7
Removing intermediate container 730bad53d9e7
 ---> 65a15aec971d
Step 8/8 : ENTRYPOINT ["java","-Djava.security.egd=file:/dev/./urandom","-jar","/work/app.jar"]
 ---> Running in bd139be8b399
Removing intermediate container bd139be8b399
 ---> d388bccfcf18
Successfully built d388bccfcf18
Successfully tagged demo:latest
ビルドがうまくいったので、最後に実行し動作を確認。
$ docker run -it --rm -p 8080:8080 demo

  .   ____          _            __ _ _
 /\\ / ___'_ __ _ _(_)_ __  __ _ \ \ \ \
( ( )\___ | '_ | '_| | '_ \/ _` | \ \ \ \
 \\/  ___)| |_)| | | | | || (_| |  ) ) ) )
  '  |____| .__|_| |_|_| |_\__, | / / / /
 =========|_|==============|___/=/_/_/_/
 :: Spring Boot ::        (v2.0.4.RELEASE)
・・・・・<<省略>>・・・・・
〜: Started HttpServer on /0.0.0.0:8080
〜: Netty started on port(s): 8080
〜: Started KotlinwebfluxApplicationKt in 7.599 seconds (JVM running for 8.422)
上記のようなログが出て、前述の「実行結果」と同じ結果が得られればOK。
あとは Command + C とかでdockerを止めておく ( --rm を指定しているので自動的にコンテナは破棄される )
このようにコンテナ化しておけば、あとはお好きなPF(AWS、GCP、Azureなど)にのっければ良さげ。
今後やりたいこと
Redisとの接続
- せっかくWebFluxを使うので、Non-BlockingのNoSQLと接続してみるために、Redisを利用
- ローカル環境で開発するために、docker-composeでredisを動かす
- クラウド環境で接続するときは、接続先を変えるなど
AWS上でのCI/CD
- GithubにPushしたら、テストコードの実行とビルドまでが自動で動くようにする
- CIが完了すると、特定の環境(Fargateなど)にデプロイされるようにする