前提: ローカルとEC2にDockerがインストール済み
1. Docker のリモート用ポートを開ける
1-1. リモート側の /etc/docker 配下に daemon.json を作成して、下記を記述する
{"host":["tcp://0.0.0.0:2375","unix:///var/run/docker.sock"]}
1-2. リモート側の /etc/systemd/system 配下に docker.service.d ディレクトリを作成し、その配下に override.conf ファイルを作成して、下記を記述する
[Service]
ExecStart=
ExecStart=/usr/bin/dockerd
1-3. Docker を再起動する
sudo systemctl daemon-reload
sudo systemctl restart docker.service
2. SSHキーを生成する
2-1. ローカルで下記を実行する
ssh-keygen
2-2. パブリックとプライベートのキーペアが生成される
id_rsa
id_rsa.pub
2-3. リモート側の ~/.ssh/authorized_keys に id_rsa.pub を末尾に追加する
※ .ssh ディレクトリ、authorized_keys ファイルがない場合は作成する
cat id_rsa.pub >> ~/.ssh/authorized_keys
2-4. ローカル(~/.ssh)で実行し、プライベートキーを追加する
ssh-add id_rsa
2-5. パスワードなしで、インスタンスに SSH 接続が可能になる
ssh <user>@<host>
3. Dockerコンテキストを生成する
3-1. コンテキストを作成する
docker context create <context name> --docker "host=ssh://<user>@<host>"
3-2. コンテキストを切り替える
docker context use <context name>
4. VS Codeの設定をする
4-1. プラグインをインストールする
5. VS Code からEC2上のコンテナに接続する
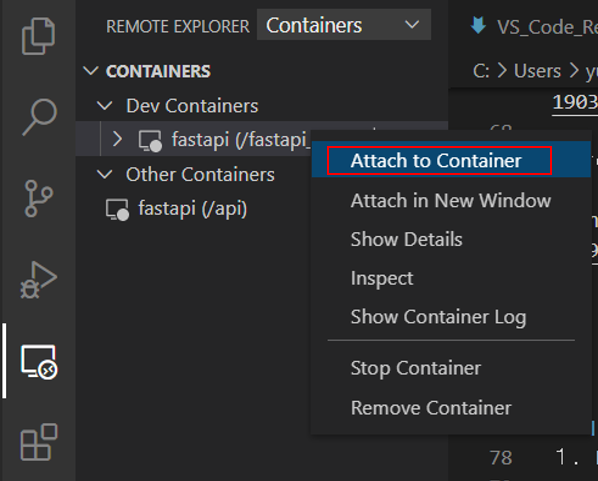
5-1. VS Code の Remote Explorer にコンテナ名が表示される
5-2. 右クリックで、「Attach to container」 を選択するとコンテナ内のVS Codeが開く
参照

