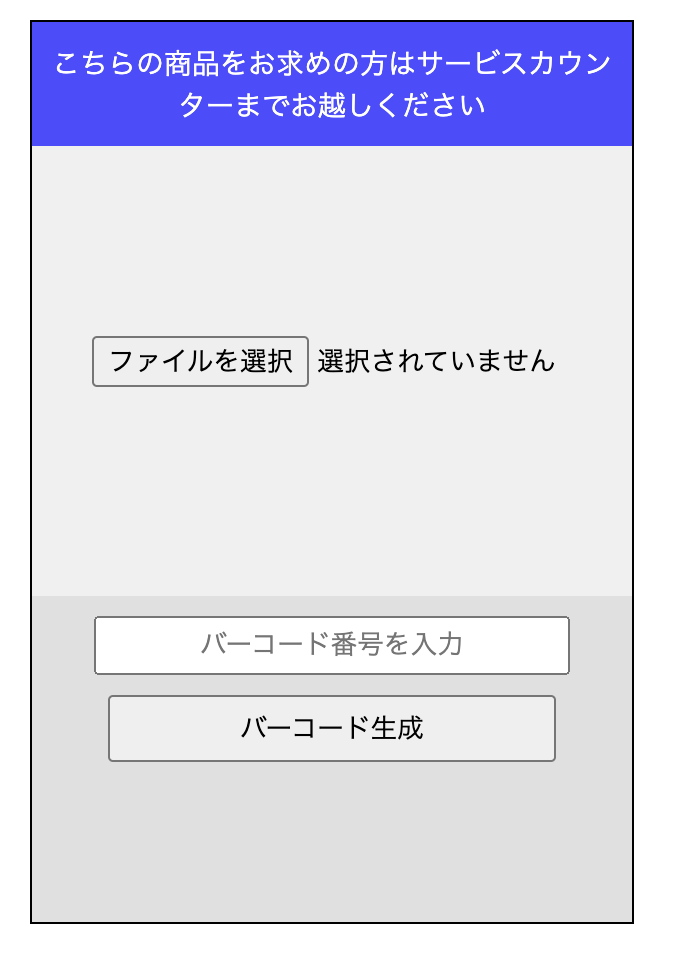
ClaudeにHTML、CSS、JavaScriptを使って、商品陳列時の盗難防止用ダミーPOPを作成するWEBアプリを生成してもらったので、忘れないように記録しておきます。
▫️できたもの

(↑印刷してラミネートかける前)
▫️できること
商品画像のアップロードと表示
バーコードの生成と表示
▫️なかみ
コード全体
htmlCopy<!DOCTYPE html>
<html lang="ja">
<head>
    <meta charset="UTF-8">
    <meta name="viewport" content="width=device-width, initial-scale=1.0">
    <title>お酒の見本カード</title>
    <script src="https://cdnjs.cloudflare.com/ajax/libs/jsbarcode/3.11.0/JsBarcode.all.min.js"></script>
    <style>
        .card {
            width: 300px;
            height: 450px;
            border: 1px solid #000;
            margin: 20px auto;
            display: flex;
            flex-direction: column;
        }
        .text-overlay {
            background-color: rgba(0, 0, 255, 0.7);
            color: white;
            padding: 10px;
            font-size: 14px;
            text-align: center;
        }
        .sample-image {
            height: calc(66.7% - 34px);
            background-color: #f0f0f0;
            display: flex;
            align-items: center;
            justify-content: center;
            overflow: hidden;
        }
        .sample-image img {
            max-width: 100%;
            max-height: 100%;
            object-fit: contain;
        }
        .barcode-container {
            height: 33.3%;
            background-color: #e0e0e0;
            display: flex;
            flex-direction: column;
            align-items: center;
            justify-content: center;
            padding: 10px;
        }
        input, button {
            margin-bottom: 10px;
            padding: 5px;
            text-align: center;
            width: 80%;
        }
        #barcode {
            width: 100%;
            height: 80px;
        }
    </style>
</head>
<body>
    <div class="card">
        <div class="text-overlay">こちらの商品をお求めの方はサービスカウンターまでお越しください</div>
        <div class="sample-image">
            <input type="file" id="image-upload" accept="image/*">
            <img id="preview-image" src="/api/placeholder/300/300" alt="お酒の見本" style="display:none;">
        </div>
        <div class="barcode-container">
            <input type="text" id="barcode-input" placeholder="13桁のバーコード番号を入力">
            <button id="generate-button">バーコード生成</button>
            <svg id="barcode"></svg>
        </div>
    </div>
    <script>
        // 画像アップロード処理
        document.getElementById('image-upload').addEventListener('change', function(event) {
            const file = event.target.files[0];
            if (file) {
                const reader = new FileReader();
                reader.onload = function(e) {
                    const img = document.getElementById('preview-image');
                    img.src = e.target.result;
                    img.style.display = 'block';
                    document.getElementById('image-upload').style.display = 'none';
                }
                reader.readAsDataURL(file);
            }
        });
        // バーコード生成処理
        document.getElementById('generate-button').addEventListener('click', function() {
            var input = document.getElementById('barcode-input').value;
            if (input && input.length === 13 && /^\d+$/.test(input)) {
                JsBarcode("#barcode", input, {
                    format: "EAN13",
                    width: 3,
                    height: 80,
                    displayValue: false,
                    margin: 10
                });
                this.style.display = 'none';
                document.getElementById('barcode-input').readOnly = true;
            } else {
                alert('13桁の数字を入力してください。');
            }
        });
    </script>
</body>
</html>
▫️かいせつ
●HTMLの部分●
card クラスの div 要素で全体を囲み、カード状のデザインを作成します。
・テキストオーバーレイ:
text-overlay クラスの div に案内文を記載します。
サンプル画像:
sample-image クラスの div 内に画像アップロード用の input タグと、プレビュー用の img タグを配置します。
バーコード:
barcode-container クラスの div 内にバーコード入力用の input、生成ボタン、そしてバーコード表示用の svg タグを配置します。
●CSSの部分●
カードのスタイリング:
card クラスで全体のサイズと配置を定義します。
テキストオーバーレイのスタイリング:
text-overlay クラスで、青い半透明の背景とと白いテキストを設定します。
画像エリアのスタイリング:
sample-image クラスで、画像表示エリアのサイズと背景色を設定します。
バーコードエリアのスタイリング:
barcode-container クラスで、バーコード関連要素の配置を設定します。
●JavaScriptの部分●
画像アップロード処理:
ファイル選択時に、選択された画像をプレビュー表示します。
FileReader APIを使用して、選択された画像ファイルを読み込みます。
バーコード生成処理:
入力された数字(13桁)を検証し、正しい場合はバーコードを生成します。
JsBarcode ライブラリを使用して、EAN-13形式のバーコードを生成します。
▫️つかってみる
HTMLファイルをウェブブラウザで開きます。
「ファイルを選択」ボタンをクリックして商品画像をアップロードします。
バーコード入力欄に13桁の数字を入力し、「バーコード生成」ボタンをクリックします。
生成されたダミーPOPを確認します。
新しいものを作成したくなったらF5を押して更新してください。
▫️きづいたこと
レジシステムはバーコードを読む「規格」みたいなものがあるので、必ずバーコードを作れたとしてもレジを通過するかのチェックをするようにしてください。
▫️あとがき
本来であればこのようなものを作らなくてもいいのが一番なのですが、どうしてもスーパーやコンビニはリフター(万引き)との戦いになりがちなので、改めて札を作成しました。
パートさんには「そのうち棚に札しかならば無くなるかもね!」なんて笑われましたが、ぜひそんなことのないような社会になってくれるといいな〜と思います。
また、今回は作成にあたってclaudeをフル活用し、コード作成してもらってからの微調整はほぼ30分程度で終わりました。
(バーコード生成したものをレジが読まなかったりしたので、読むようなものに変えたりしてたら結構時間かかっちゃいました)
記事の執筆もほぼclaudeです。とてつもなく便利。おすすめです。
「コード? なにそれおいしいの??」くらいの者でも、こんな便利なものが作れるなんていい時代になりました。
