はじめに
2026年6月16日、AWSから AWS Blocks がパブリックプレビューとして発表されました。
AWS Blocksは、フルスタックアプリケーション向けのオープンソースのバックエンド開発フレームワークです。データベース・認証・ストレージ・AIエージェントといった「よくあるバックエンド機能」を独立した部品(Block)として提供しており、必要なものを選んで組み合わせることで、バックエンドを開発することができます。
試してみて惹かれた点は、これらのBlockがローカル環境ではAWSアカウントなしで動作し、同じコードをそのままAWSへデプロイできることです。
本記事では実際にプロジェクトを作ってローカルで動かし、AWSへのデプロイまで一通り体験してみます。
なお本記事は、JAWS-UG 山梨 の勉強会で発表した内容をまとめ直したものです。
当日の発表資料はこちらです。
本記事の情報は2026年6月時点(プレビュー版)のものです。
最新情報については公式ドキュメントをご確認ください。
この記事のゴール
- AWS Blocksとは何か、IfC(Infrastructure from Code)という考え方を理解する
-
npm create一発でプロジェクトを作り、AWSアカウントなしでローカル動作させる - 「同じコードがローカルではJSONファイル、本番ではDynamoDBになる」仕組みの内部実装を理解する
- 同じコードをAWSへデプロイする流れを把握する
1. AWS Blocksとは
AWS Blocksは、AWS上でフルスタックアプリを構築するためのオープンソースのTypeScriptフレームワークです。
1つ1つの「Block」が、自己完結したバックエンド機能(アプリのコード・ローカル開発環境・実行インフラ)を1パッケージにまとめたものになっています。
このツールは、IfC(Infrastructure from Code)という考え方のもと作成されています。
IfCは「コードからインフラを導出する」という考え方で、CloudFormationやCDKのテンプレートを別途書かなくても、アプリのコードに new DistributedTable(...) と1行宣言すれば、それがそのままDynamoDBテーブルになります。
特に嬉しいのは、ローカル開発時はAWSアカウントすら不要で、同じコードがそのままAWSへデプロイできる点です。
公式が掲げているポイントのうち、特に開発体験に効くものは以下です。
- 数秒で開発を始められる — 1コマンドでローカル動作するアプリが手に入る。AWSアカウントはデプロイ時まで不要
- エンドツーエンドの型安全 — バックエンドを定義すると、フロントエンドの型が自動で追従する。コード生成も型の不一致もなし
- 抽象化に閉じ込められない — 細かく制御したくなったらCDKに降りて直接リソースを設定できる
- 既存構成に少しずつ足せる — 1つのBlockから段階的に導入できる
従来のIaC(CloudFormation/CDK)は「インフラの定義」と「アプリのコード」が別物でしたが、AWS Blocksはアプリのコードがそのままインフラの定義になる点が大きく異なります。
なお、ソースはオープンソースとして公開されています。本記事の後半では、このリポジトリの中身も覗いていきます。
2. 用意されているBlock一覧
AWS Blocksには、記事執筆時点で公式リファレンス掲載分だけで約20種類のBlockが用意されていました。
基本的に @aws-blocks/blocks から import して使い、それぞれ裏側で使われるAWSサービスが決まっているのが特徴です(Hosting のみ @aws-blocks/blocks/cdk から import します)。
下表は、コア概念である Scope / ApiNamespace も合わせて整理したものです。
| カテゴリ | Block | 用途 | 裏側のAWSサービス |
|---|---|---|---|
| 基盤(コア) | Scope |
バックエンドのリソース境界・グルーピング(名前空間) | (コア構成要素) |
ApiNamespace |
フロントと自動で繋がる型安全なAPI | API Gateway + Lambda | |
| データ・ストレージ | KVStore |
シンプルなキーバリュー(設定・フラグ・キャッシュ) | DynamoDB |
DistributedTable |
インデックス・クエリ対応の構造化データ(多くのデータの既定) | DynamoDB | |
DistributedDatabase |
サーバーレスSQL。ゼロスケール対応 | Aurora DSQL | |
Database |
フルPostgreSQL(FK・RLS・トリガー、既存DB) | Aurora(PostgreSQL) | |
FileBucket |
ファイルストレージ(アップロード・署名付きURL) | S3 | |
| 認証 | AuthBasic |
ユーザー名/パスワード認証(プロトタイプ・社内ツール) | DynamoDB + JWT |
AuthCognito |
Cognito User Pools(MFA・グループ・ホスト型ID) | Cognito | |
AuthOIDC |
外部OIDCプロバイダによるサインイン | OIDC/OAuth | |
| リアルタイム・非同期 | Realtime |
ブラウザへのプッシュ(チャット・プレゼンス・ライブ更新) | API Gateway WebSocket |
AsyncJob |
投げっぱなしのバックグラウンド処理 | SQS + Lambda | |
CronJob |
スケジュール・定期実行 | EventBridge + Lambda | |
| AI | KnowledgeBase |
セマンティック検索・RAG | Bedrock Knowledge Bases + S3 Vectors |
Agent |
AIエージェント(ツール利用・ストリーミング・会話履歴) | Amazon Bedrock | |
| 通信 | EmailClient |
トランザクションメール | SES |
| 設定 | AppSetting |
単一の設定値・シークレット(フラグ・APIキー) | SSM Parameter Store |
| 可観測性 |
Logger / Metrics / Tracer / Dashboard
|
構造化ログ・メトリクス・トレース・ダッシュボード | CloudWatch / X-Ray |
| ホスティング | Hosting |
フロントエンドのデプロイ(SPA / 静的 / Next.js SSR) | CloudFront + S3 |
このように、「やりたいこと」を選ぶと「使うAWSサービス」が裏側で決まるのがAWS Blocksの特徴です。
「データベースが必要」なら DistributedTable を、「ファイルアップロード用のストレージが欲しい」なら FileBucket をインポートするといった具合に、裏側のAWSサービスを直接意識することなく、抽象度の高いコードでバックエンドを組み立てられます。
3. 実際に試してみた
ここからは、実際にAWS Blocksでプロジェクトを作り、ローカルでの動作確認 → 仕組みの調査 → AWSデプロイまでを順に試していきます。
3.1 検証環境
特別なCLIのインストールは不要で、Node.js さえあれば始められます。今回の検証環境は以下の通りです。
- OS: macOS
- Node.js:
v22.20.0(要件: v22 以降) - npm:
11.7.0(要件: v10 以降) - エディタ: VS Code(TypeScript対応エディタ)
- AWS リージョン: 東京 (
ap-northeast-1) ※デプロイ時 - AWSアカウント: ローカル開発では不要(デプロイ時のみ必要)
3.2 プロジェクトを作成する
プロジェクトの雛形は npm create 一発で作れます。
$ npm create @aws-blocks/blocks-app@latest my-todo-app

> Creating Blocks app in ...
> ✓ Blocks app created!

$ cd my-todo-app
$ npm install
数十秒で、認証付きのToDoアプリが丸ごと生成されます。生成されたディレクトリ構成は次の通りです。
my-todo-app/
├── aws-blocks/          # バックエンド(IFC層)
│   ├── scripts/          # dev/sandbox/deploy などの実行スクリプト
│   ├── client.js         # フロント用APIクライアント(dev起動時に自動生成)
│   ├── index.cdk.ts      # CDK層(デプロイ時の設定)
│   ├── index.handler.ts  # Lambdaランタイム用ハンドラ
│   ├── index.ts          # Block定義 + API定義(主にここを書く)
│   └── package.json
├── src/                 # フロントエンド
│   └── index.ts
├── test/                # E2Eテスト
│   └── e2e.test.ts
├── AGENTS.md            # AIコーディングエージェント向けの手引き(steering)
├── README.md
├── cdk.json
├── index.html
├── package.json
├── tsconfig.json
└── vite.config.ts
ちなみに AGENTS.md が同梱されているのもAWS Blocksの特徴です。AIコーディングエージェントが正しいコードを書けるよう、Blockの使い方を記したガイドが最初から入っています。
AGENTS.md
# Agent Guide

## Quick Reference

- **Backend:** `aws-blocks/index.ts` — APIs, auth, data models
- **Frontend:** `src/` — imports backend APIs via `import { api } from 'aws-blocks'`
- **Tests:** `test/e2e.test.ts` — run with `npm run test:e2e`
- **Full guide:** `node_modules/@aws-blocks/blocks/README.md` — architecture, workflow, best practices, common mistakes
- **Block catalog + decision tree:** `node_modules/@aws-blocks/blocks/docs/index.md`
- **Per-block docs:** `node_modules/@aws-blocks/blocks/docs/<package-name>.md`

## Workflow

1. Make changes to backend (`aws-blocks/index.ts`) or frontend (`src/`)
2. Test with `npm run test:e2e` — starts a dev server automatically if one isn't running
3. For faster iteration: run `npm run dev &` in the background, then run `npm run test:e2e` repeatedly (reuses the running server)
4. Do NOT use curl/fetch against the API unless troubleshooting connectivity

## Rules

- **Use Building Blocks** for all persistence and cloud abstractions — never local files, in-memory arrays, or local databases.
- **Read block docs** at `node_modules/@aws-blocks/blocks/docs/<package-name>.md` before using a block.
- **The JSON-RPC transport is invisible** — do not construct RPC payloads manually. Import and call the typed API directly.

## Deploying (requires AWS credentials)

- `npm run sandbox` — deploy backend to AWS, serve frontend locally
- `npm run deploy` — full production deploy to AWS
- `npm run sandbox:destroy` — tear down sandbox resources
3.3 ローカルで動かす
以下コマンドで開発サーバーを起動可能です。
npm run dev
実行ログ
$ npm run dev

> my-todo-app@0.1.0 dev
> tsx watch aws-blocks/scripts/server.ts

Loading backend...
Deploying local resources...
  🔌 Attaching dev server (from @aws-blocks/bb-realtime/ws-server)
📝 Generating client code...
AWS Blocks local server running on http://localhost:3000

  ➜  http://localhost:3000/
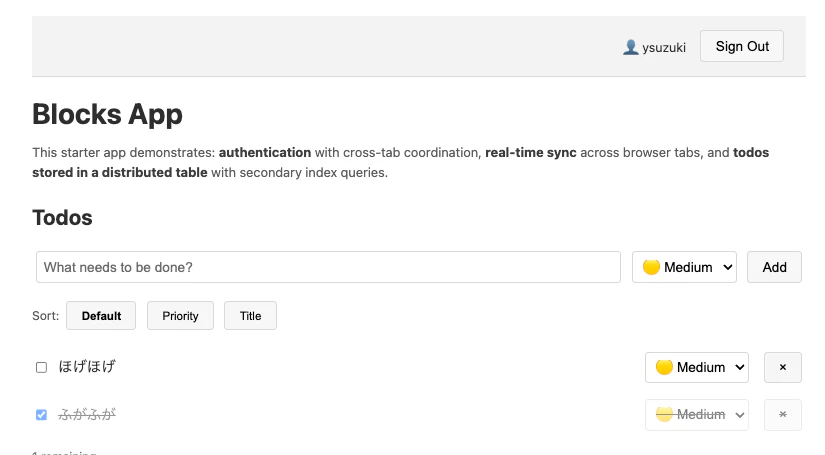
ブラウザで http://localhost:3000 を開くと、認証・CRUD・並び替えまで備わったToDoアプリがすでに動いています。AWSアカウントもネット接続も不要で、この時点では一切お金がかかりません。

このとき、各Blockは以下のローカル実装で動いています。
-
DistributedTable→ ローカルのファイルストレージ -
AuthBasic→ ローカルのJWTトークン -
ApiNamespace→ ローカルのHTTPサーバー経由でルーティング
3.4 バックエンドのコードを読む
バックエンドの本体は aws-blocks/index.ts の1ファイルに集約されています。Blockの宣言とAPIの定義が同居しているのがポイントです。(以下、コード抜粋)
import { ApiNamespace, Scope, DistributedTable, AuthBasic } from '@aws-blocks/blocks';

// すべてのBlockは Scope(名前空間)の中で宣言する
const scope = new Scope('my-app');

const auth = new AuthBasic(scope, 'auth');
const todos = new DistributedTable(scope, 'todos', {
  schema: { id: 'string', title: 'string', completed: 'boolean', userId: 'string' },
  key: { partition: 'userId', sort: 'id' },
});

// フロントから直接呼べる型安全なAPI
export const api = new ApiNamespace(scope, 'api', (context) => ({
  async createTodo(title: string) {
    const user = await auth.getCurrentUser(context);
    const id = crypto.randomUUID();
    await todos.put({ id, title, completed: false, userId: user.userId });
    return { id, title, completed: false };
  },
  async listTodos() {
    const user = await auth.getCurrentUser(context);
    const results = [];
    for await (const item of todos.query({ where: { userId: user.userId } })) {
      results.push(item);
    }
    return results;
  },
}));

export { auth };
元コード全文
/**
 * Backend — aws-blocks/index.ts
 *
 * Real-time todo app with per-user isolation, optimistic locking, and secondary indexes.
 *
 * This file defines your API, auth, data model, and real-time channels.
 * The frontend imports these exports directly via `import { ... } from 'aws-blocks'`.
 *
 * ─── IMPORTANT ───────────────────────────────────────────────────────────────
 * Do NOT use local files, in-memory arrays, or local databases for persistence.
 * Use Building Blocks for cloud persistence and other common cloud abstractions.
 * They work locally with automatic mocks and deploy to AWS with zero configuration.
 *
 * For the full list of blocks and how to use them, see:
 *   node_modules/@aws-blocks/blocks/README.md
 * ─────────────────────────────────────────────────────────────────────────────
 */
import { ApiNamespace, Scope, AuthBasic, DistributedTable, Realtime } from '@aws-blocks/blocks';
import { z } from 'zod';

const scope = new Scope('my-app');

// ─── Auth ────────────────────────────────────────────────────────────────────
const auth = new AuthBasic(scope, 'auth', {
  passwordPolicy: { minLength: 8 },
  crossDomain: process.env.BLOCKS_SANDBOX === 'true',
});
export const authApi = auth.createApi();

// ─── Data ────────────────────────────────────────────────────────────────────
// Zod schema = runtime validation + TypeScript types + DynamoDB table shape.
const todoSchema = z.object({
  userId: z.string(),       // partition key — per-user isolation
  todoId: z.string(),       // sort key — unique within a user
  title: z.string(),
  completed: z.boolean(),
  priority: z.number(),     // 1=high, 2=medium, 3=low
  version: z.number(),      // optimistic locking — incremented on each update
  createdAt: z.number(),
});

const todos = new DistributedTable(scope, 'todos', {
  schema: todoSchema,
  key: { partitionKey: 'userId', sortKey: 'todoId' },
  indexes: {
    // Secondary indexes: query todos sorted by priority or title.
    // The partition key is always userId (per-user isolation), the sort key varies.
    byPriority: { partitionKey: 'userId', sortKey: 'priority' },
    byTitle: { partitionKey: 'userId', sortKey: 'title' },
  },
});

// ─── Realtime ────────────────────────────────────────────────────────────────
const rt = new Realtime(scope, 'live', {
  namespaces: {
    todos: Realtime.namespace(z.object({
      action: z.enum(['created', 'updated', 'deleted']),
      todoId: z.string(),
    })),
  },
});

// ─── API ─────────────────────────────────────────────────────────────────────
export const api = new ApiNamespace(scope, 'api', (context) => ({

  async subscribeTodos() {
    const user = await auth.requireAuth(context);
    return rt.getChannel('todos', user.username);
  },

  async createTodo(title: string, priority: number = 2) {
    const user = await auth.requireAuth(context);
    const todoId = `${Date.now().toString(36)}-${Math.random().toString(36).slice(2, 8)}`;
    const todo = {
      userId: user.username,
      todoId,
      title,
      completed: false,
      priority,
      version: 1,
      createdAt: Date.now(),
    };
    await todos.put(todo);
    await rt.publish('todos', user.username, { action: 'created' as const, todoId });
    return todo;
  },

  /** List todos, optionally sorted by a secondary index. */
  async listTodos(sortBy?: 'priority' | 'title') {
    const user = await auth.requireAuth(context);
    if (sortBy) {
      const index = sortBy === 'priority' ? 'byPriority' : 'byTitle';
      return await Array.fromAsync(
        todos.query({ index, where: { userId: { equals: user.username } } })
      );
    }
    // Default: sorted by todoId (creation order)
    return await Array.fromAsync(
      todos.query({ where: { userId: { equals: user.username } } })
    );
  },

  /**
   * Toggle todo completion with optimistic locking.
   * Uses `ifFieldEquals` to detect concurrent writes. On conflict,
   * throws ConditionalCheckFailedException — caller should re-read and retry.
   */
  async toggleTodo(todoId: string) {
    const user = await auth.requireAuth(context);
    const todo = await todos.get({ userId: user.username, todoId });
    if (!todo) throw new Error('Todo not found');
    await todos.put(
      { ...todo, completed: !todo.completed, version: todo.version + 1 },
      { ifFieldEquals: { version: todo.version } },
    );
    await rt.publish('todos', user.username, { action: 'updated' as const, todoId });
    return { success: true };
  },

  /** Update a todo's priority with optimistic locking. */
  async updatePriority(todoId: string, priority: number) {
    const user = await auth.requireAuth(context);
    const todo = await todos.get({ userId: user.username, todoId });
    if (!todo) throw new Error('Todo not found');
    await todos.put(
      { ...todo, priority, version: todo.version + 1 },
      { ifFieldEquals: { version: todo.version } },
    );
    await rt.publish('todos', user.username, { action: 'updated' as const, todoId });
    return { success: true };
  },

  /** Delete a todo. Broadcasts 'deleted' to all connected clients. */
  async deleteTodo(todoId: string) {
    const user = await auth.requireAuth(context);
    await todos.delete({ userId: user.username, todoId });
    await rt.publish('todos', user.username, { action: 'deleted' as const, todoId });
    return { success: true };
  },
}));
そしてフロントエンド(src/)側は、このAPIを普通の関数のようにimportして呼ぶだけです。
import { api, authApi } from 'aws-blocks';
APIクライアントを自分で生成する手順も、エンドポイントURLの設定も、SDKの初期化も不要です(クライアントは裏で自動生成されます)。
3.5 ローカルのデータはどこに保存される?
ここで気になったのが「ローカル実行時、データはどこに保存されているのか」という点でした。実際に確認したところ、答えはプロジェクト直下の .bb-data/ ディレクトリにあるただのJSONファイルでした。
.bb-data/
├── settings.json
├── my-app-todos/
│   └── data.json          ← DistributedTable「todos」のデータ本体
└── my-app-auth-users/
    └── store.json         ← ユーザー情報(メール + bcryptハッシュ)
data.json の中身はプレーンなJSONでした。
-
フロントで2件データをプッシュ
-
data.jsonの中身[ [ "[\"ysuzuki\",\"mqngi9so-gwock9\"]", { "userId": "ysuzuki", "todoId": "mqngi9so-gwock9", "title": "ほげほげ", "completed": false, "priority": 2, "version": 1, "createdAt": 1782026399256 } ], [ "[\"ysuzuki\",\"mqngii98-msplw8\"]", { "userId": "ysuzuki", "todoId": "mqngii98-msplw8", "title": "ふがふが", "completed": true, "priority": 2, "version": 2, "createdAt": 1782026410220 } ] ]
ローカル実装のソース(node_modules/@aws-blocks/bb-distributed-table/dist/index.mock.js)を読むと、使っているのはNode標準の node:fs だけで、@aws-sdkやDynamoDB、Dockerなどの記述がありませんでした。
import { existsSync, readFileSync, writeFileSync } from 'node:fs';
// put/delete のたびに JSON ファイルへ書き戻す
writeFileSync(this.filePath, JSON.stringify([...this.data.entries()], null, 2));
つまり、ローカル開発の実体は
- DynamoDBは使わない
- DynamoDB Localも使わない(Java/Docker不要)
- 「DynamoDB風に振る舞う軽量なJSONファイルストア」をメモリ + ファイルで再現している
という設計でした。起動が爆速で依存ゼロな一方、本物のDynamoDBと挙動が100%同一とは限らないため、実サービス特有の挙動を確かめたいときは後述のsandboxで実DynamoDBに対してテストする、という棲み分けになっています。
3.6 AWSへデプロイする
AWS環境へデプロイする際は、AWS BlocksのアプリはCDKアプリなので、初回だけ以下のセットアップが必要です。
# ① 認証情報の確認
aws sts get-caller-identity

# ② 初回のみ CDK bootstrap(アカウント×リージョンごと)
npx cdk bootstrap aws://<ACCOUNT_ID>/<REGION>
デプロイには2種類あります。
| コマンド | 用途 |
|---|---|
npm run sandbox |
Lambdaホットスワップで数秒デプロイ。実サービスに対する高速な検証用 |
npm run deploy |
Hosting(CloudFront + S3)込みのフルデプロイ。ステージング/本番向け |
# sandboxデプロイ
$ npm run sandbox

# or

# フルデプロイ
$ npm run deploy

> 🏗️  Preparing deployment... #デプロイ開始
📝 Generating client code...
[Realtime] BLOCKS_RT_WS_URL not set — getChannel() will return incomplete descriptors
🚀 Deploying to AWS...
   (This may take a few minutes on first deploy)
   - Backend API (Lambda + API Gateway)
   - Frontend hosting (S3 + CloudFront)
Bundling asset my-todo-app-stack-prod/Handler/Code/Stage...
リソースの削除コマンドは以下の通りです。
# フルデプロイの削除
npm run destroy

# sandboxの削除
npm run sandbox:destroy
ローカルでJSONファイルだった todos が、デプロイすると前述の cdk 実装に切り替わり、自動でDynamoDBテーブルに解決されます。

4. 気になった点を深掘りする
前半で見た「同じコードが、ローカルではJSONファイル・本番ではDynamoDBになる」という挙動。これがどう実現されているのか気になったので、公式GitHub(aws-devtools-labs/aws-blocks)と node_modules の中身を追ってみました。
なお本記事では、数あるBlockのうち DistributedTable(DynamoDB)1つに絞って仕組みを追います(他のBlockも基本的な仕様は同じと思われます)。
4.1 1つのimportが3つの顔を持つ
まず全体像を図にすると、こうなっています。new DistributedTable(...) という同じ1行が、実行コンテキストに応じて別々の実装に解決されます。
4.1.1 ポイント:Node.js の conditional exports
仕掛けの中心は、Node.jsの conditional exports(条件付きエクスポート) です。同じ import 文を、実行コンテキストに応じて別ファイルへ解決します。
各Blockの package.json を覗くと、その対応表がそのまま書かれていました。
// node_modules/@aws-blocks/bb-distributed-table/package.json
"exports": {
  ".": {
    "browser":     "./dist/index.browser.js",   // フロントエンド向け
    "cdk":         { "types": "./dist/index.cdk.d.ts", "default": "./dist/index.cdk.js" },  // デプロイ時:インフラ定義
    "aws-runtime": "./dist/index.aws.js",        // Lambda実行時:SDK呼び出し
    "types":       "./dist/index.mock.d.ts",     // 既定の型定義
    "default":     "./dist/index.mock.js"        // ローカル:JSONファイル
  }
}
new DistributedTable(scope, 'todos', {...}) という1行は、文脈によって次のように姿を変えます。
| コンテキスト | 解決される実装 | 実際に起こること |
|---|---|---|
ローカル開発(default) |
index.mock.js |
.bb-data/ 配下のJSONファイル |
CDK合成・デプロイ時(cdk) |
index.cdk.js |
new Table(...) でDynamoDBテーブルを定義 |
Lambda実行時(aws-runtime) |
index.aws.js |
DynamoDB SDK で本物のテーブルを読み書き |
フロントエンド(browser) |
index.browser.js |
ブラウザ向けの実装 |
4.1.2 「どの顔を使うか」はどこで切り替わる?
ローカル開発とデプロイで「どの条件(condition)を使うか」はプロジェクトの package.json のスクリプトで定義されていました(一般的なAWS CDKでの運用と同様)。
// プロジェクトの package.json(抜粋)
"scripts": {
  "dev":             "tsx watch aws-blocks/scripts/server.ts",          // 条件指定なし → default(mock)
  "sandbox:destroy": "tsx -C cdk aws-blocks/scripts/sandbox-destroy.ts", // → cdk 実装
  "test:e2e":        "tsx -C browser test/e2e.test.ts"                   // → browser 実装
}
-
npm run devは条件指定なし →default(ローカルのmock実装) - デプロイ系のスクリプトは
-C cdkを渡す → CDK実装が読まれ、CloudFormationテンプレートが生成される - Lambda上では実行環境側で
aws-runtime条件が立ち、SDK実装が動く
このように、「どの実装を読み込むか」を起動コマンド(条件)が裏で切り替えているため、同じコードでローカル・デプロイ・本番の3つの場所で動かすことができます。
4.2 フロント↔バックの型安全なRPC
もう一つ気になっていたのが「なぜAPIクライアントを生成しなくても、フロントからバックの関数が型付きで呼べるのか」という点です。これも実装を追うと腑に落ちました。
4.2.1 クライアントは自動生成される薄いRPCプロキシ
npm run dev の起動ログに 📝 Generating client code... とあった通り、開発サーバーは aws-blocks/client.js を自動生成します。中身はこうでした。
// aws-blocks/client.js(AUTO-GENERATED — 手で編集禁止)
import { ApiNamespaceClient as __BLOCKS_ApiNamespaceClient__ } from '@aws-blocks/blocks/client';

export const api     = __BLOCKS_ApiNamespaceClient__('api');
export const authApi = __BLOCKS_ApiNamespaceClient__('authApi');
api の実体は ApiNamespaceClient というプロキシで、メソッド呼び出しをRPCリクエストにエンコードしてHTTP POSTするだけの薄い層です。コア実装はこうなっていました。
// @aws-blocks/core/dist/client/index.js(抜粋)
import { encodeRpcRequest, decodeRpcResponse } from '../rpc.js';
...
const response = await fetch(apiUrl, {
  method: 'POST',
  body: encodeRpcRequest(request.apiNamespace, request.method, request.args),
});
const rpcBody = await response.json();
const result = decodeRpcResponse(rpcBody); // RPCエラー時は例外を投げる
-
ローカル:この
fetchの宛先がローカルHTTPサーバー - 本番:同じ呼び出しが API Gateway → Lambda へ届く
呼び出し側のコードは何も変わらず、フロントがバックエンドの index.ts を直接importしているため、TypeScriptの型推論だけで端から端までつながるようになっています。
まとめ
プレビュー版のAWS Blocksを、プロジェクト作成からローカル動作、AWSデプロイまで触ってみました。
ローカルで気軽に始められて、同じコードがそのまま本番で動く体験は新鮮でした。
まだプレビュー版なので、今後のアップデートも追っていきたいと思います。