寒すぎ.mp4
帰ったら既に温まってる部屋欲しい・・・欲しくない?
ということでIoTの勉強がてら作ってみました。
初めてということでかなり苦戦しましたがNode-REDくんのおかげで実現できました。IoTやってみたいけど何から手を付けて良いか分からないという方の参考になれば幸いです。
使ったもの
Raspberry Pi3
Arduino UNO
GroveのArduinoベースシールド、LED、赤外線受光器
ラズパイの電源とかシリアル通信用のUSBとかLANケーブルとか
概要
- Raspberry PiとNode-REDでtwitterの自分のアカウントの特定のキーワードを読み取る
- キーワードに合わせてpythonでArduinoに指示を送る
- ArduinoからLEDを通じてエアコンに赤外線を飛ばす
Arduinoの準備
赤外線の解析はこちらのサイトを参考にして下さい。
Arduinoで赤外線リモコンの信号を解析する
以下スケッチ
int ir_out = 3;
byte str=0;

//暖房
unsigned int dh[] = {/*ここに赤外線のデータ*/};
//停止
unsigned int ds[] = {/*ここに赤外線のデータ*/};


void setup() {
        pinMode(ir_out, OUTPUT);
        Serial.begin(9600);
}

//暖房起動
void heater() {
  int dataSize = sizeof(dh) / sizeof(dh[0]);
  for (int cnt = 0; cnt < dataSize; cnt++) {
    unsigned long len = dh[cnt]*10;
    unsigned long us = micros();
    do {
      digitalWrite(ir_out, 1 - (cnt&1));
      delayMicroseconds(8);
      digitalWrite(ir_out, 0);
      delayMicroseconds(7);
    } while (long(us + len - micros()) > 0);
  }
}

//エアコン停止
void stop() {
  int dataSize = sizeof(ds) / sizeof(ds[0]);
  for (int cnt = 0; cnt < dataSize; cnt++) {
    unsigned long len = ds[cnt]*10;
    unsigned long us = micros();
    do {
      digitalWrite(ir_out, 1 - (cnt&1));
      delayMicroseconds(8);
      digitalWrite(ir_out, 0);
      delayMicroseconds(7);
    } while (long(us + len - micros()) > 0);
  }
}

void loop() {

        if(Serial.available() > 0){

                str = Serial.read();

                if(str == 'h'){
                        heater();
                        str = 0;
                }//hが送られてきたら暖房起動

                else if(str == 's'){
                        stop();
                        str = 0;
                }//sが送られてきたらエアコン停止
        }
        //delay(1000);
}
Raspberry Piの準備
pipのインストールがまだなら
$ sudo apt-get install python-dev
$ sudo apt-get install python-pip
でインストール
node-redのインストールについては
Raspverry Pi にNode-RED をインストールする
を参考にして下さい。
以下プログラム
import serial
import time

ser = serial.Serial('/dev/ttyACM0', 9600)
time.sleep(2)
ser.write("h")
import serial
import time

ser = serial.Serial('/dev/ttyACM0', 9600)
time.sleep(2)
ser.write("s")
Node-RED
ソーシャル欄のtwitter(入力)とその他欄のexec(出力)を使います。
(注:twitterノードを使うためにはTwitterデベロッパー登録が必要です)
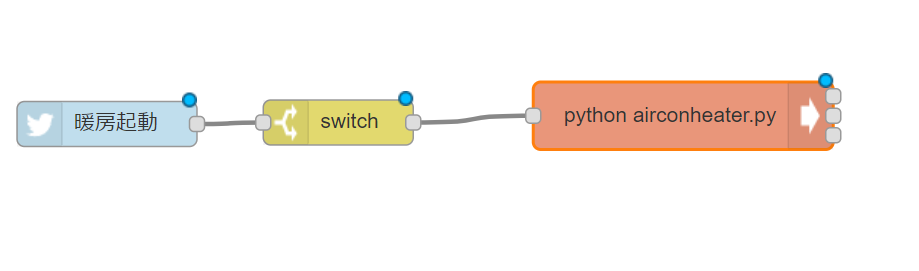
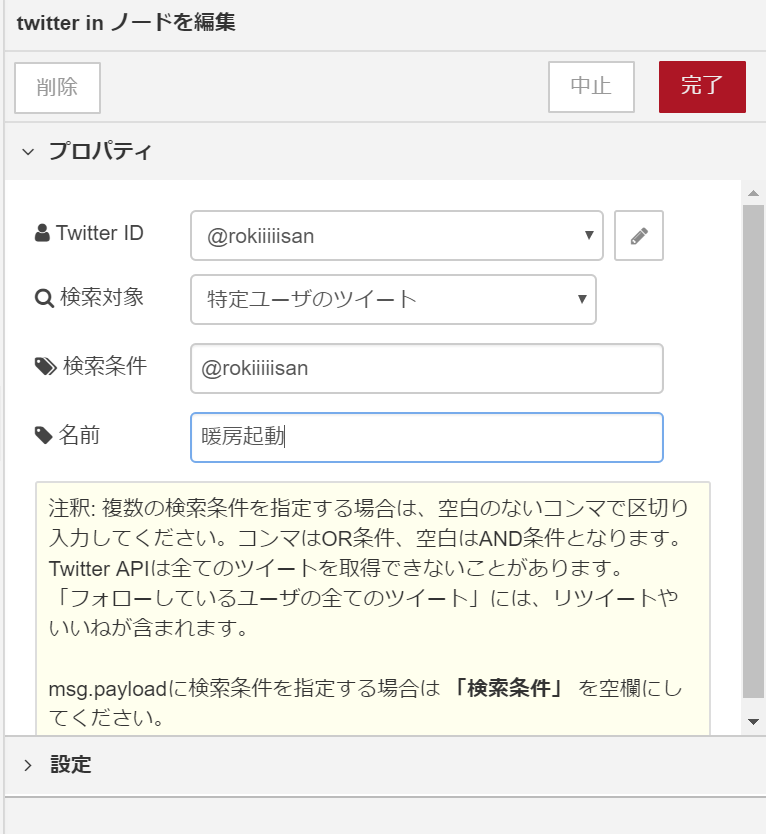
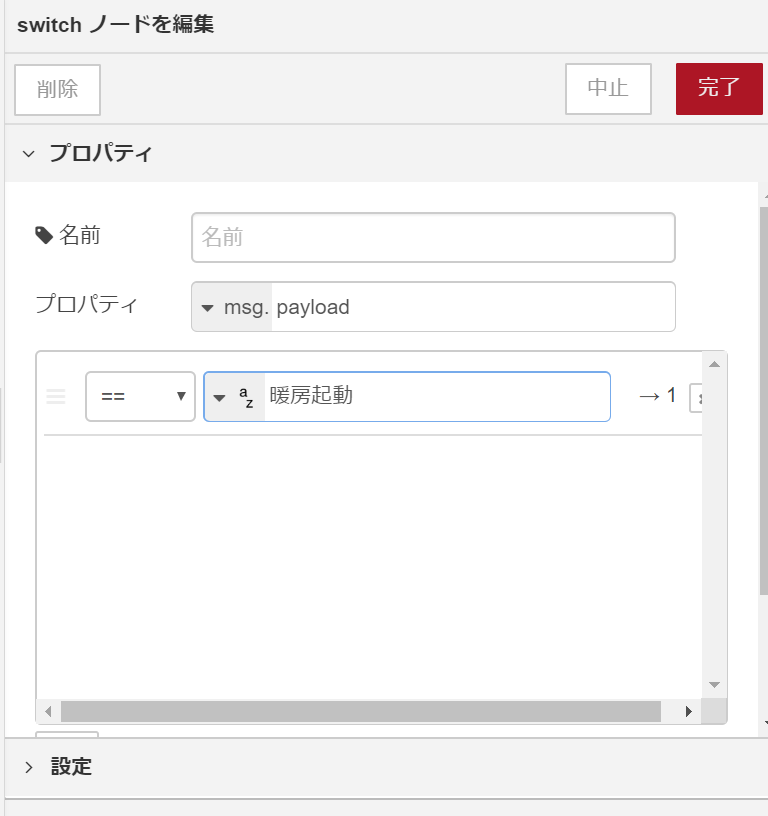
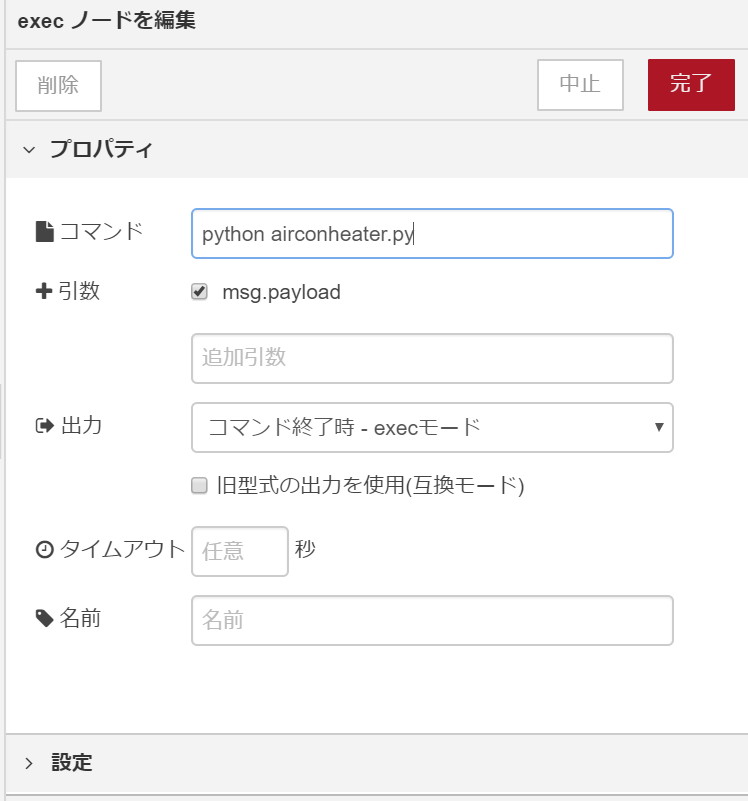
twitterノードの検索条件の欄に@xxxxxxでユーザを指定し、switchノードでツイートにフィルターをかけます。execノードにはpythonプログラムを実行するコマンドを書いておきます。エアコン停止の方も同じように設定して下さい。
起動
あとはデプロイボタンを押せば完成です。Node-REDの自動起動を設定していれば、ラズパイを起動しておくだけで使えます。
終わりに
まとめて見ると単純なものですがここに漕ぎ着けるまでめちゃくちゃ大変でした・・・。無駄な部分などあるとは思いますがとりあえず動いたのでよしとしています。初心者向けとか言っておきながら説明が少ない気もしますがもう気力が湧きません。調べることも力になるぞ!(適当)
せっかくArduinoを使ってるので今後はtwitterから室温を調べられるようにとかしてみたいですね。
参考
ArduinoとRaspberryPiでスマホから家のエアコンの暖房をつけてみた。
Raspberry Pi と Node-RED と IFTTT と Twitter で外から家電操作