はじめに
いろいろデータ可視化の可能性を探っていると、とても興味を惹かれる記事を見つけました。
VimのメトリクスをElasticsearchに投入する為にプラグインを作成されていて素直にすごいなぁと思いました。
そこに抽出できる履歴データがあれば振り返りたくなりますよね。
昨年11月くらいからデータ可視化のためにEmbulk、Elasticsearch、Kibanaを少し触ってきて、ある程度使い方が分かってきましたので、おさらいを兼ねてシェルのヒストリファイルの可視化をしてみようと思います。
必要なもの(環境)
- そこそこ溜まっている タイムスタンプ付き のシェルヒストリファイル
- Embulk 0.8.8
- Docker
- Elasticsearch 2.2.1
- Kibana 4.4.2
試した環境は Debian GNU/Linux 8.2 (jessie) です。DockerはElastic環境構築の手間を省くために使用しているので必須ではありません。
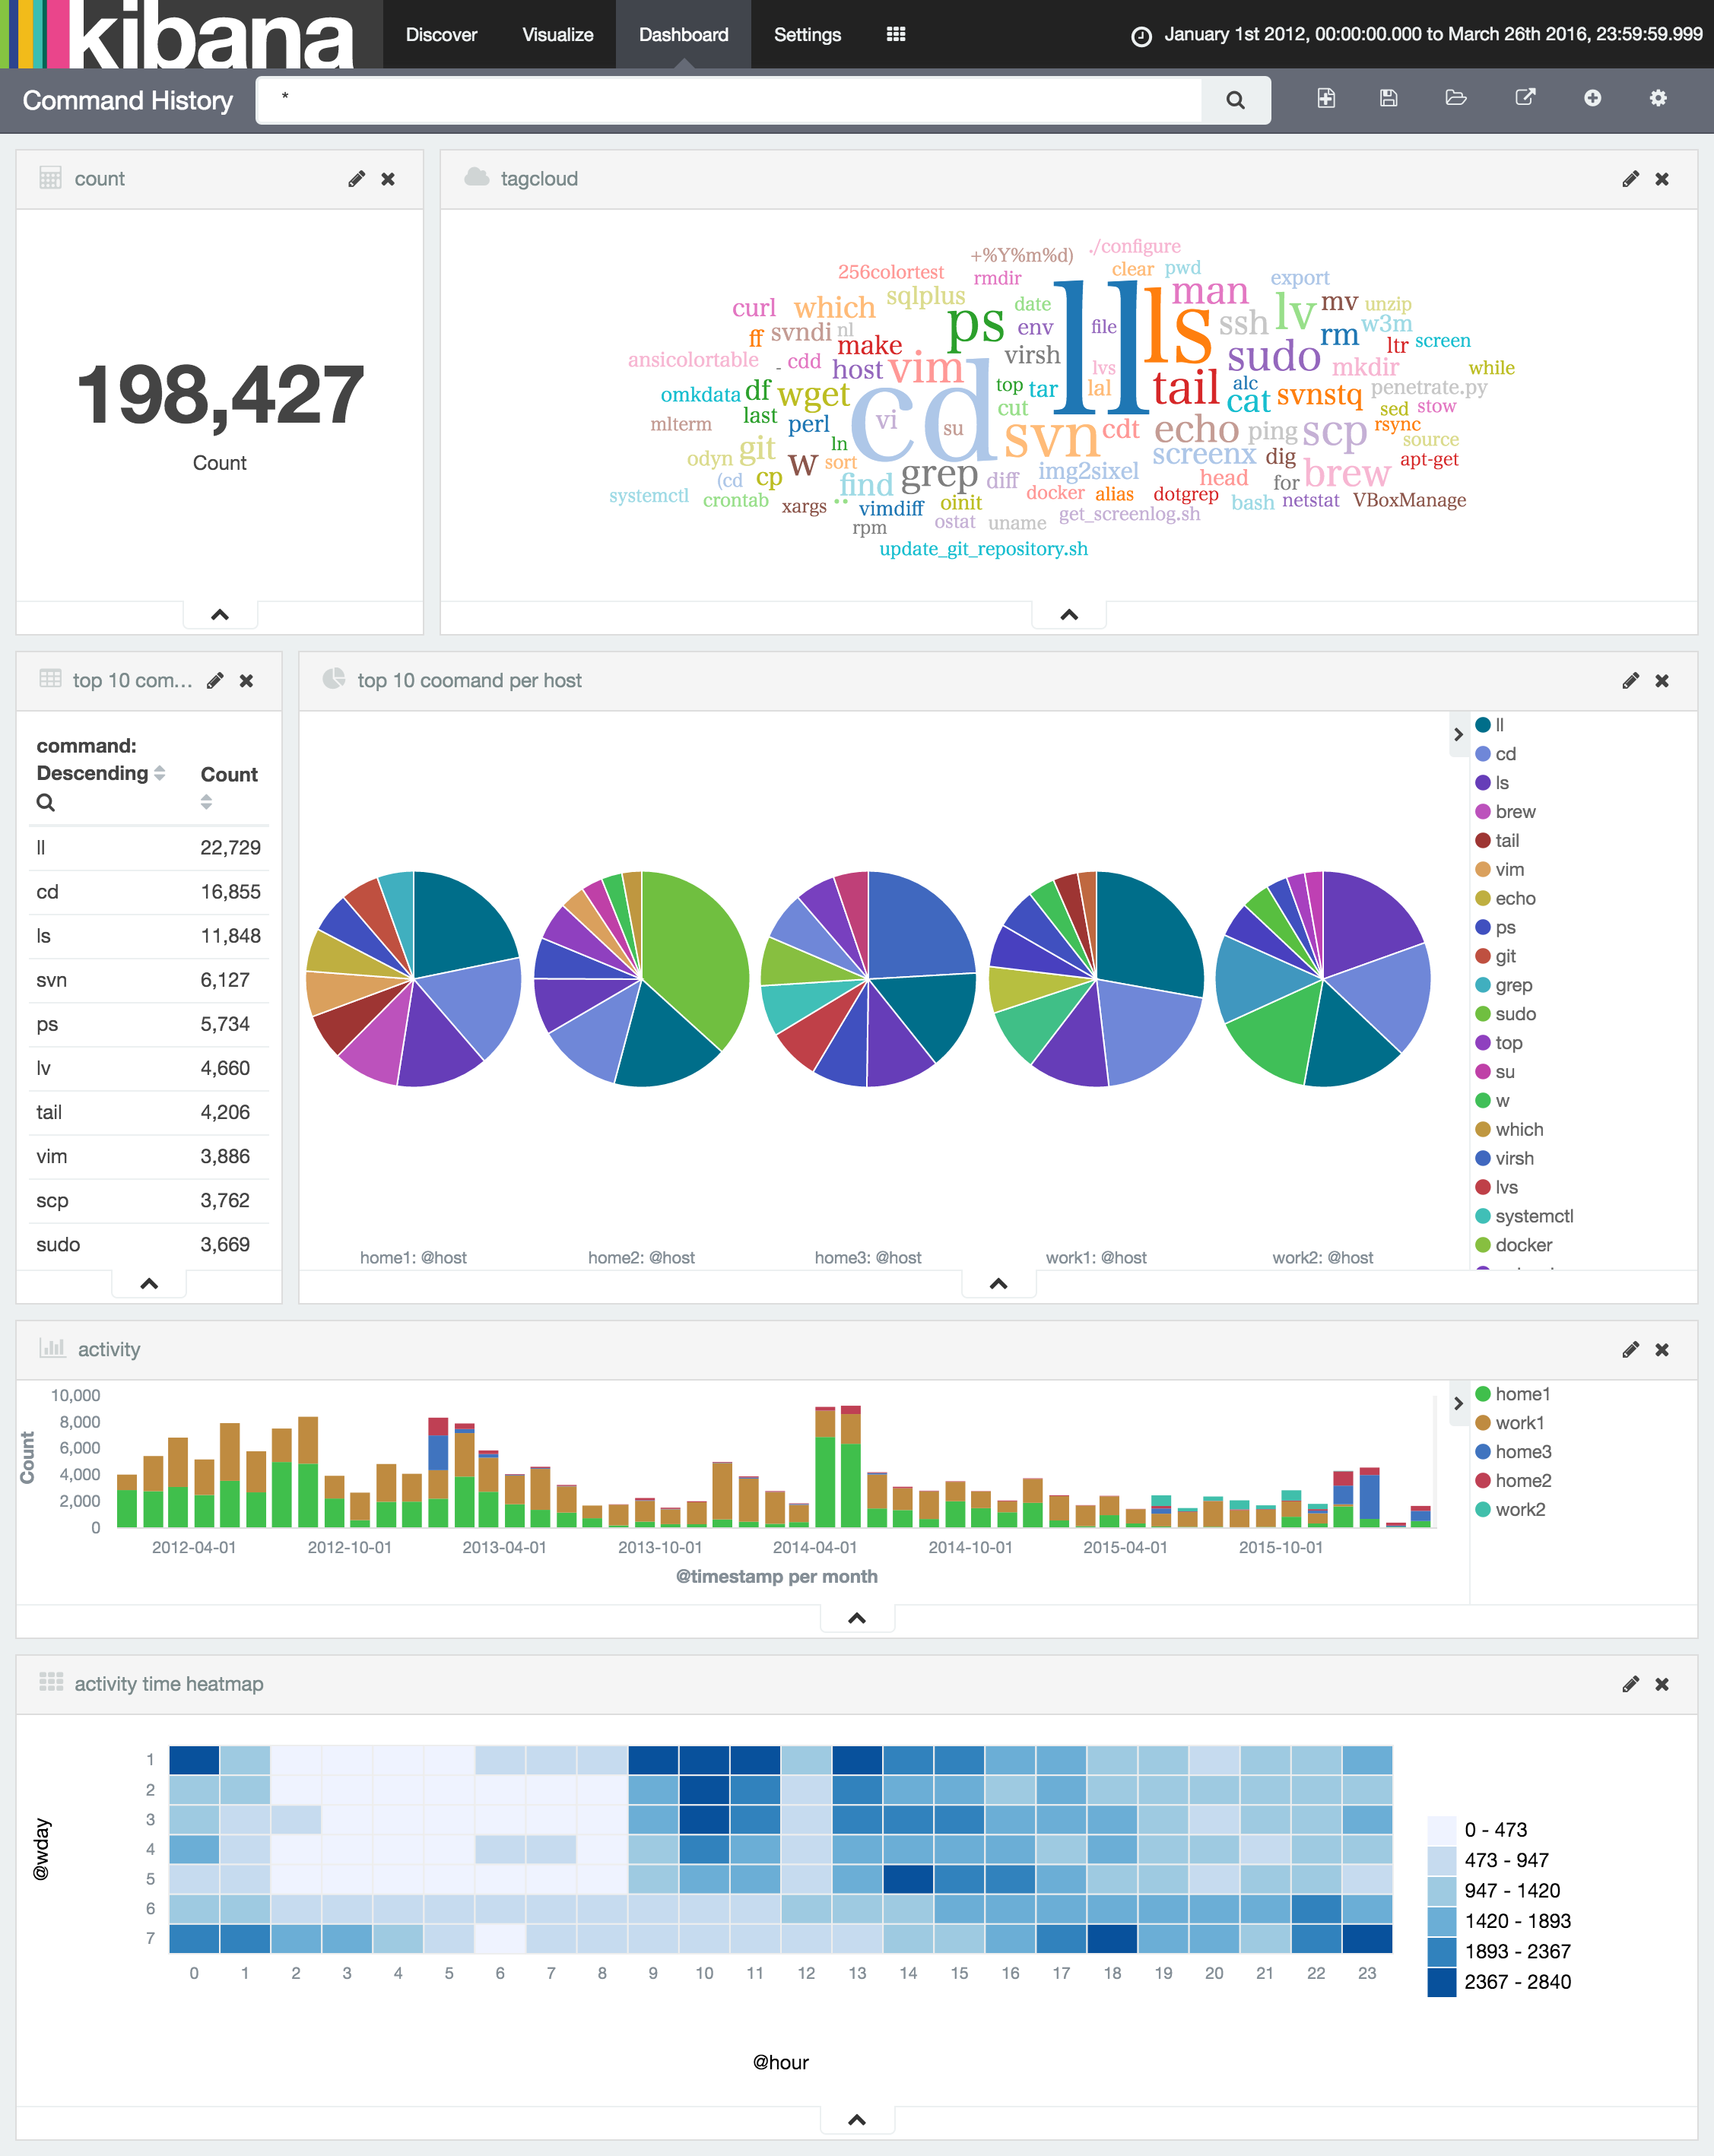
可視化結果
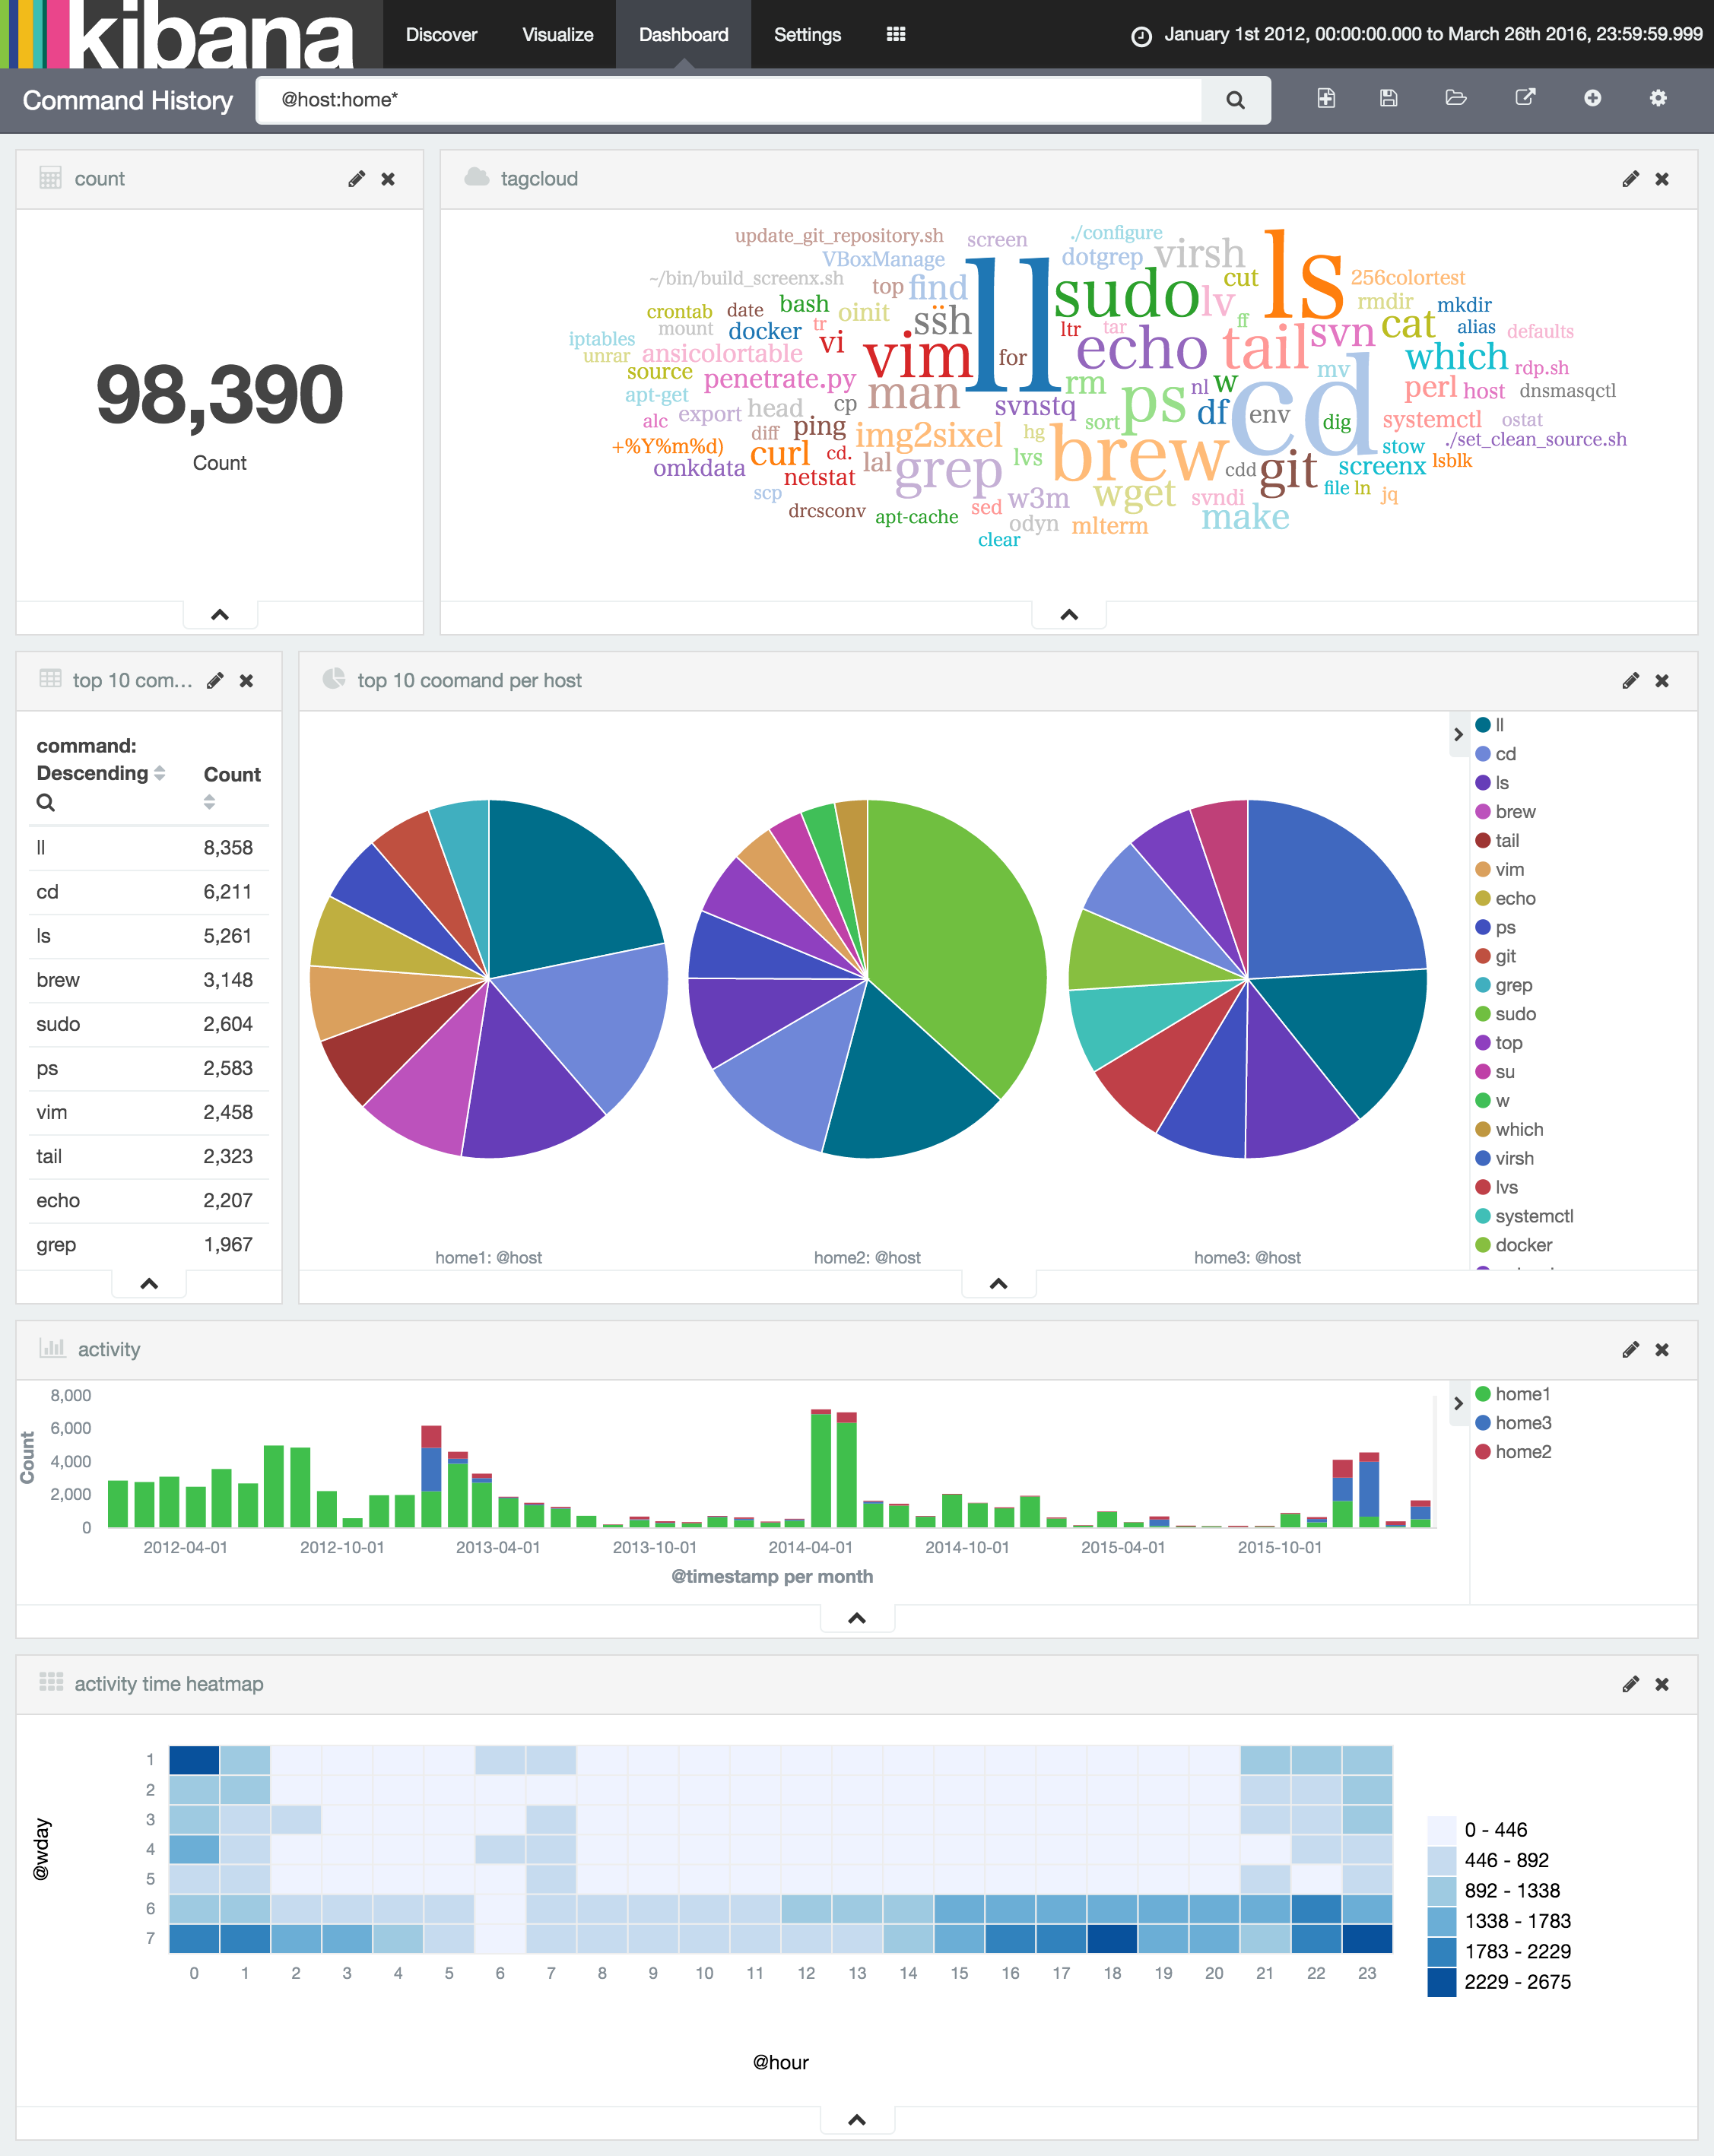
シェルのヒストリファイルなので実行頻度の高いコマンド程度しか分かりませんが、複数のヒストリファイルを読み込ませることでホスト毎や時間帯での違いが見えて面白いものです。
シェルのヒストリ設定
zsh
データ可視化にはタイムスタンプが重要なので extended_history 必須です。
これを設定するとヒストリファイルは次のように記録されます。
: 1421072025:0;ls -l

: 時刻:経過秒;コマンド
ちなみに私が使用しているzshのヒストリ関連の設定は以下の通り。ヒストリ行数多めの設定。詳しくはマニュアルを。
HISTSIZE=1000000
SAVEHIST=$HISTSIZE

setopt extended_history
setopt hist_expire_dups_first
setopt hist_ignore_dups
setopt hist_ignore_space
setopt inc_append_history
setopt share_history

alias history='history -t "%Y-%m-%d %a %H:%M:%S"'
function history-all { history 1 }
bash
HISTTIMEFORMAT を指定すると経過時間が出力されるようになります。
#1446886196
ls -l
HISTTIMEFORMAT='%Y-%m-%dT%T%z '
Elasticsearch
Javaの環境わからないのでdockerを使って楽します。
sudo docker run -p 9200:9200 -p 9300:9300 --name es -d elasticsearch
Elasticsearchプラグイン
elasticsearch-kopf
インデックスのメンテナンスはブラウザで楽をしたいのでkopfプラグインをインストールします。
sudo docker exec es /bin/bash -c '/usr/share/elasticsearch/bin/plugin install lmenezes/elasticsearch-kopf'
elasticsearch-head
好みですがheadプラグインでもよいかもです。
sudo docker exec es /bin/bash -c '/usr/share/elasticsearch/bin/plugin install mobz/elasticsearch-head'
Kibana
Nodeの環境わからないのでdockerを使って楽します。
sudo docker run -p 5601:5601 --link es:elasticsearch --name kibana -d kibana
Elasticsaerchクラスタのステータスをグリーンにするためだけに、Kibanaが使用するインデックス(.kibana)のレプリカ数を0にします。
curl -XPUT 'localhost:9200/.kibana/_settings' -d '
{
    "index" : {
        "number_of_replicas" : 0
    }
}'
Kibanaプラグイン
tagcloud
docker exec kibana /bin/bash -c '/opt/kibana/bin/kibana plugin -i tagcloud -u https://github.com/stormpython/tagcloud/archive/master.zip'
heatmap
Kibana 4.3以上向けのアルファ版ですが、試した環境では動作したのでこれを使用します。
sudo docker exec kibana /bin/bash -c '/opt/kibana/bin/kibana plugin -i heatmap -u https://github.com/stormpython/heatmap/archive/master.zip'
sense
登録したデータの確認などにブラウザで楽をしたいのでsenseを入れます。
docker exec kibana /bin/bash -c '/opt/kibana/bin/kibana plugin --install elastic/sense'
プラグインを読み込ませるためにKibanaを再起動します。
sudo docker retsart kibana
Embulk
ElasticsearchへのデータローディングツールとしてEmbulkを使います。
実行にはJavaのランタイムが必要なので今回はOpenJDKをインストールします。
sudo apt-get install openjdk-7-jdk
embulkのインストールは基本的に公式にある手順で行います。
ダウンロード先がSSLのCDNにリダイレクトされるのでcurlオプションに--insecure (-k)を付けておきます。
curl -k --create-dirs -o ~/.embulk/bin/embulk -L 'http://dl.embulk.org/embulk-latest.jar'
chmod +x ~/.embulk/bin/embulk
embulkのパスを永続化する場合は手順通りにしますが、
echo 'export PATH="$HOME/.embulk/bin:$PATH"' >> ~/.bashrc
source ~/.bashrc
今回は一時的に設定します。
export PATH=$HOME/.embulk/bin:$PATH
Embulkプラグイン
embulk-filter_add_time
タイムスタンプの型変換などを行うプラグイン。
embulk gem install embulk-filter-add_time
timestamp型をlong型に複製するために使用します。
embulk-filter-column
カラムの追加、削除を行うプラグイン。
embulk gem install embulk-filter-column
後続のフィルタ用に複数のカラムにコピーするために使用します。
embulk-filter-eval
Rubyの評価式で値を書き換えるプラグイン。
- embulk-filter-eval というフィルタープラグイン書いた - scramble cadenza
- mgi166/embulk-filter-eval
- A-AUTO 50 開発者ブログ: embulk-filter-evalでどんなデータ変換ができるのか試してみる
タイムスタンプから曜日、時間に変換したり、コマンドラインからコマンドと引数を分割するために使用します。
embulk gem install embulk-filter-eval
embulk-filter-insert
任意のカラムとして指定した値を追加するプラグイン。
ホスト名をliquidテンプレートの変数として、どのホストのヒストリファイルであるかを認識させるために使用します。
embulk gem install embulk-filter-insert
embulk-filter-row
指定した条件でデータをフィルタするプラグイン。
異常値を弾くために使用します。(grep -v代わり)
embulk gem install embulk-filter-row
embulk-filter-split
指定した条件でデータを複数要素に分割するプラグイン。
セミコロン1行にまとめて実行したコマンドやパイプで繋いで実行したコマンドを分割するために使用します。
embulk gem install embulk-filter-split
embulk-output-elasticsearch
Elasticserachへの出力プラグイン。
embulk gem install embulk-output-elasticsearch
データローディング
インデックステンプレートの登録
今回作成するインデックスの定義をインデックステンプレートとして登録します。
定義は以下の通り。
- Kibanaでの設定を手軽にするためインデックス名は
logstash-command_history - お試し環境なのでレプリカ数は0
- 全文検索は不要なので
_allフィールドは使用しない - フィールド定義
-
@timestampコマンド実行時刻。Kibanaで識別しやすいようにこの名前を使います -
@wdayコマンド実行時刻の曜日(1:月曜〜7:日曜) -
@hourコマンド実行時刻の時間 -
@hostシェル実行ホスト名 -
@shellシェル種別 -
@commandコマンドライン(Analyzeしないものを@command.raw) -
commandコマンド名 -
argsコマンド引数
curl -XPUT localhost:9200/_template/command_history_template -d'
{
  "template": "logstash-*",
  "settings": { "number_of_replicas" : 0 },
  "mappings": {
    "command_history": {
      "_all": { "enabled": false },
      "properties": {
        "@timestamp": {
          "type": "date"
        },
        "@wday": {
          "type": "byte"
        },
        "@hour": {
          "type": "byte"
        },
        "@host": {
          "index": "not_analyzed",
          "type": "string"
        },
        "@shell": {
          "index": "not_analyzed",
          "type": "string"
        },
        "@command": {
          "type": "string",
          "fields": {
            "raw": {
              "index": "not_analyzed",
              "type": "string"
            }
          }
        },
        "command": {
          "index": "not_analyzed",
          "type": "string"
        },
        "args": {
          "type": "string"
          }
        }
      }
    }
  }
}'
Embulkの設定
Embulkプラグインですべて望みのフォーマットに変換することは難しそうだったので、シェルで加工したものを標準入力として読み込ませる方針です。
- 入力はTSVを標準入力から
- 引数でホスト名とシェルを与える
- タイムスタンプが保持されていないヒストリを除くようにしています。(
13270836402012-01-21 03:20:40)
in:
  type: file
  path_prefix: /dev/stdin
  parser:
    type: csv
    delimiter: "\t"
    columns:
    - {name: '@timestamp', type: timestamp, format: '%s'}
    - {name: '@command', type: string}

filters:
  - type: row
    conditions:
      - {column: '@timestamp', operator: ">", argument: "1327083640", format: '%s' }

  - type: insert
    columns:
      - '@host': {{ env.host }}
      - '@shell': {{ env.shell }}
    at: 1

  - type: split
    delimiter: '|'
    keep_input: true
    target_key: '@command'

  - type: add_time
    to_column:
      name: '@wday'
      type: long
    from_column:
      name: '@timestamp'

  - type: column
    add_columns:
      - {name: '@hour', src: '@wday' }
      - {name: command, src: '@command' }
      - {name: args, src: '@command' }

  - type: eval
    eval_columns:
      - '@wday': Time.at(value).strftime('%u')
      - '@hour': Time.at(value).strftime('%H')
      - command: value.sub(/^\s*(?:(?:env )?[^=]+=\S+ )*(\S+).*$/, '\1')
      - args: if value.match(/^\s*\S+ (.*?)\s*$/) then
                value=$1
              else
                value=nil
              end

out:
  type: elasticsearch
  cluster_name: elasticsearch
  nodes:
    - {host: localhost, port: 9300}
  index: logstash-command_history
  index_type: command_history
ヒストリファイル(bash)のローディング
- awkで時刻文字列とコマンドラインを1行にしてタブ区切りにします
-
fileに任意の.bash_historyのパス -
hostに任意のホスト名
file=/path/to/bash_history
host=somehost

cat $file | awk '{getline ts; print substr(ts,2)"\t"$0}' |
  host=$host shell=bash embulk run ./command_history.yml.liquid
ヒストリファイル(zsh)のローディング
- sedでタブ区切りにします(複数行には対応しません)
-
fileに任意の.zsh_historyのパス -
hostに任意のホスト名
file=/path/to/bash_history
host=somehost

cat $file | cut -b 3- | sed -e 's/:0;/\t/' |
  host=$host shell=zsh embulk run ./command_history.yml.liquid
おわりに
この記事は昨年末に書き始めたのですが、いろいろあって公開が遅れているうちに embulk-output-pluginがElasticsearch 2系に正式対応したり、embulk-filter_add_timeが作成されたり、Elasticsearchへの登録が楽になりました。
また、Kibanaのheatmapプラグインがアルファ版とはいえ動くようになったので、曜日や時間帯の棒グラフを並べなくて済むことを知りました。
そして家で使っているホストに絞ると、土日の不規則な活動時間も明らかですね。。。
ビッグデータとは言わず、みなさんも手元にある履歴データをElastic環境で可視化してみると新たな発見があるかも知れません。

