はじめに
以前作成したアプリの続きをしていきます。
参考: 子供用の学習アプリケーションを作る(1)
今回は、コンテンツの選択画面にアニメーションを導入し、選択後の詳細画面を作成したので、その実装について記事にしていこうと思います。
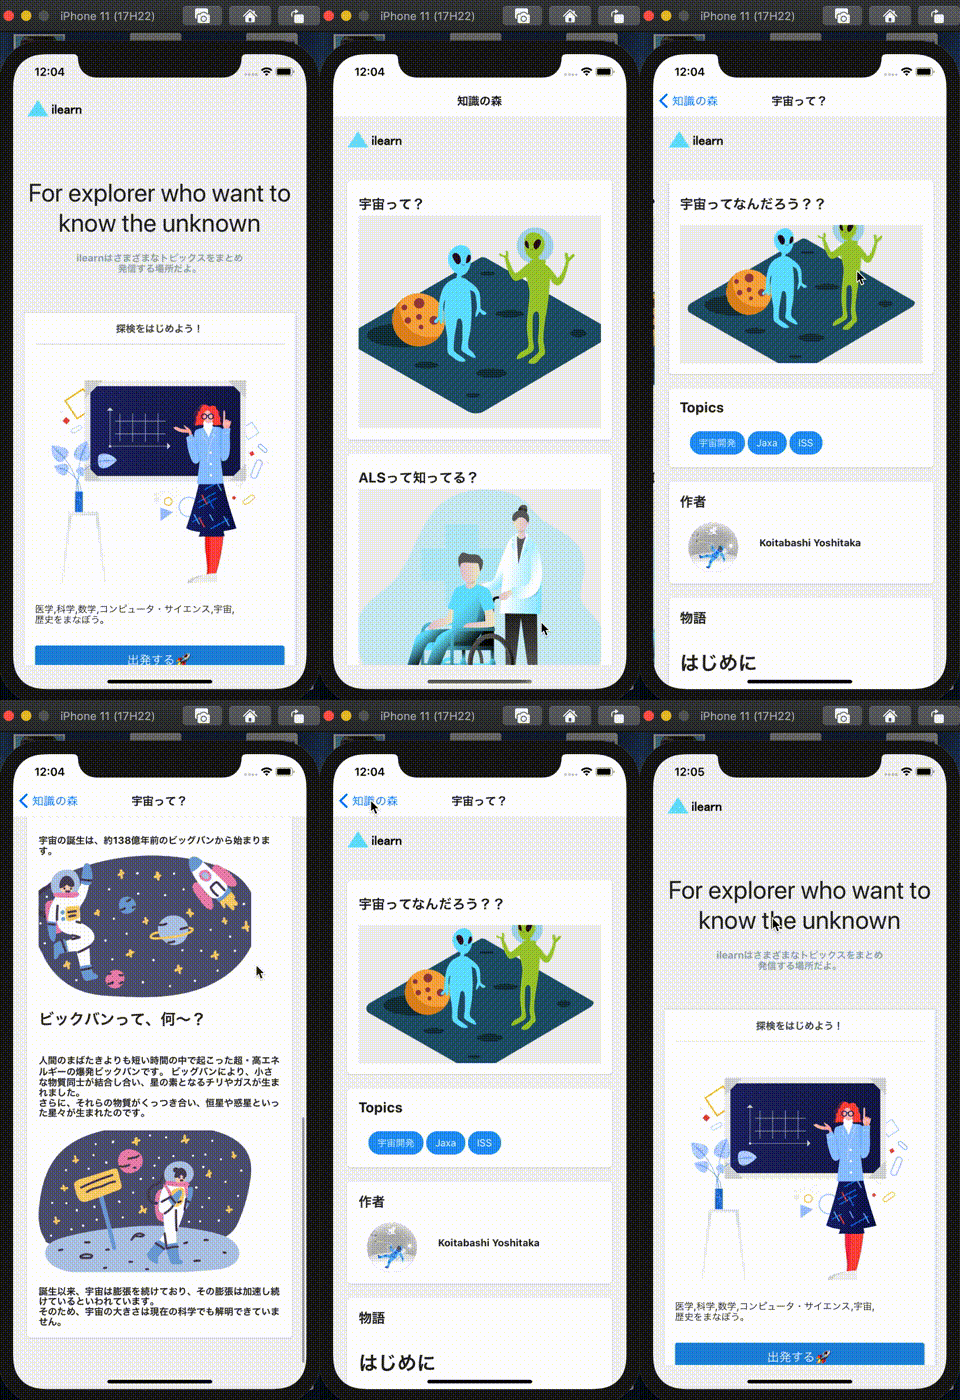
動作
まずは、動作を見ていただければと思います。
実装
構成
構成は以下のようになっています。
❯ pwd
/Users/yoshitaka.koitabashi/Desktop/iLearn/src/components

~/Desktop/iLearn/src/components
❯ tree .
.
├── alsContent.tsx
├── contentsSelect.tsx
├── falcon9Content.tsx
├── header.tsx
└── spaceContent.tsx

0 directories, 5 files
今回の実装の説明に使用するのは、こちらです。
・contentsSelect.tsx
コンテンツを選択する画面
Home画面からの遷移時に、各コンテンツがふんわり浮かび上がるアニメーションを作成しました。
参考 react-native: Animated
こちらの実装なのですが、単純で、Animatedというライブラリと副作用fookであるuseEffectを利用したパターンになります。
import 'react-native-gesture-handler';
import React, { useRef, useEffect } from 'react';
import {
  SafeAreaView, ScrollView, StyleSheet, Animated, TouchableOpacity,
} from 'react-native';
import { Card, Title } from 'react-native-paper';
import { createStackNavigator } from '@react-navigation/stack';
import AppHeader from './header';
import spaceContent from './spaceContent';
import alsContents from './alsContent';
import falcon9Contents from './falcon9Content';

const contents = ({ navigation }) => {
  const fadeSpace = useRef(new Animated.Value(0)).current;
  const fadeAls = useRef(new Animated.Value(0)).current;
  const fadeFalcon9 = useRef(new Animated.Value(0)).current;

  const spaceContentFadeIn = () => {
    Animated.timing(fadeSpace, {
      toValue: 1,
      duration: 500,
      useNativeDriver: true,
    }).start();
  };

  const alsContentsFadeIn = () => {
    Animated.timing(fadeAls, {
      toValue: 1,
      duration: 2000,
      useNativeDriver: true,
    }).start();
  };

  const falcon9ContentsFadeIn = () => {
    Animated.timing(fadeFalcon9, {
      toValue: 1,
      duration: 3000,
      useNativeDriver: true,
    }).start();
  };

  useEffect(() => {
    spaceContentFadeIn();
    alsContentsFadeIn();
    falcon9ContentsFadeIn();
  });

  return (
    <SafeAreaView style={styles.container}>
      <ScrollView
        contentContainerStyle={styles.contentContainer}
      >
        <TouchableOpacity
          onPress={() => {
            navigation.navigate('Home');
          }}
        >
          <AppHeader />
        </TouchableOpacity>
        <Animated.View style={[{ opacity: fadeSpace }]}>
          <Card
            onPress={() => navigation.navigate('宇宙って?')}
            style={styles.cardPadding}
          >
            <Card.Content>
              <Title style={styles.cardTitle}>宇宙って?</Title>
              <Card.Cover
                source={require('../../public/img/alien.png')}
                style={styles.cardImg}
              />
            </Card.Content>
          </Card>
        </Animated.View>
        <Animated.View style={[{ opacity: fadeAls }]}>
          <Card
            onPress={() => navigation.navigate('ALSって知ってる?')}
            style={styles.cardPadding}
          >
            <Card.Content>
              <Title style={styles.cardTitle}>ALSって知ってる?</Title>
              <Card.Cover
                source={require('../../public/img/health.png')}
                style={styles.cardImg}
              />
            </Card.Content>
          </Card>
        </Animated.View>
        <Animated.View style={[{ opacity: fadeFalcon9 }]}>
          <Card
            onPress={() => navigation.navigate('Falcon9がすごい')}
            style={styles.cardPadding}
          >
            <Card.Content>
              <Title style={styles.cardTitle}>Falcon 9がすごい</Title>
              <Card.Cover
                source={require('../../public/img/startup_isometric.png')}
                style={styles.cardImg}
              />
            </Card.Content>
          </Card>
        </Animated.View>
      </ScrollView>
    </SafeAreaView>
  );
};

const Stack = createStackNavigator();

const contentsSelect = () => (
  <Stack.Navigator>
    <Stack.Screen
      name="知識の森"
      component={contents}
    />
    <Stack.Screen
      name="宇宙って?"
      component={spaceContent}
    />
    <Stack.Screen
      name="ALSって知ってる?"
      component={alsContents}
    />
    <Stack.Screen
      name="Falcon9がすごい"
      component={falcon9Contents}
    />
  </Stack.Navigator>
);

const styles = StyleSheet.create({
  container: {
    flex: 1,
  },
  cardImg: {
    height: 300,
  },
  cardPadding: {
    top: 60,
    marginBottom: 20,
    borderRadius: 5,
    marginLeft: 20,
    marginRight: 20,
  },
  cardTitle: {
    fontWeight: 'bold',
  },
  contentContainer: {
    paddingBottom: 50,
  },
});

export default contentsSelect;
・spaceContent.tsx
宇宙についてのコンテンツの詳細画面
詳細画面で少し面白い箇所が、下記です。
何をしているかというと、Home画面に戻す動作をしているのですが、dispatch(StackActions.popToTop())をしないと、navigationのHistoryが消されず想定外の動作をしてしまいます。
navigation.navigate('Home');
navigation.dispatch(StackActions.popToTop());
import * as React from 'react';
import {
  ScrollView, StyleSheet, View, Image, TouchableOpacity,
} from 'react-native';
import {
  Card, Paragraph, Chip, Avatar, Title,
} from 'react-native-paper';
import { StackActions } from '@react-navigation/native';
import { Text } from 'react-native-elements';
import AppHeader from './header';

const spaceContent = ({ navigation }) => (
  <View style={styles.container}>
    <ScrollView
      contentContainerStyle={styles.contentContainer}
    >
      <TouchableOpacity
        onPress={() => {
          navigation.navigate('Home');
          navigation.dispatch(StackActions.popToTop());
        }}
      >
        <AppHeader />
      </TouchableOpacity>
      <Card
        style={styles.cardPadding}
      >
        <Card.Content>
          <Title style={styles.cardTitle}>宇宙ってなんだろう??</Title>
          <Card.Cover
            source={require('../../public/img/alien.png')}
          />
        </Card.Content>
      </Card>
      <Card
        style={styles.cardPadding}
      >
        <Card.Content>
          <Paragraph
            style={styles.nextCardMessage}
          >
            Topics
          </Paragraph>
          <View style={styles.row}>
            <Chip style={styles.chip}>
              <Text style={styles.chipText}>宇宙開発</Text>
            </Chip>

            <Chip style={styles.chip}>
              <Text style={styles.chipText}>Jaxa</Text>
            </Chip>

            <Chip style={styles.chip}>
              <Text style={styles.chipText}>ISS</Text>
            </Chip>
          </View>
        </Card.Content>
      </Card>
      <Card
        style={styles.cardPadding}
      >
        <Card.Content>
          <Paragraph
            style={styles.nextCardMessage}
          >
            作者
          </Paragraph>
          <View style={styles.row}>
            <Avatar.Image size={70} source={require('../../public/img/space-travel.png')} />
            <Text style={styles.avatarMessage}>
              Koitabashi Yoshitaka
            </Text>
          </View>
        </Card.Content>
      </Card>
      <Card
        style={styles.cardPadding}
      >
        <Card.Content>
          <Paragraph
            style={styles.nextCardMessage}
          >
            物語
          </Paragraph>
          <Text h3 style={styles.storyTitle}>
            はじめに
          </Text>
          <Text style={styles.storyBody}>
            宇宙の誕生は、約138億年前のビッグバンから始まります。
          </Text>
          <Image
            source={require('../../public/img/moon2.png')}
            style={{ width: 300, height: 200 }}
          />
          <Text h4 style={styles.storyTitle}>
            ビックバンって、何〜?
          </Text>
          <Text style={styles.storyBody}>
            人間のまばたきよりも短い時間の中で起こった超・高エネルギーの爆発ビックバンです。
            ビッグバンにより、小さな物質同士が結合し合い、星の素となるチリやガスが生まれました。
            {'\n'}
            さらに、それらの物質がくっつき合い、恒星や惑星といった星々が生まれたのです。
            {'\n'}
          </Text>
          <Image
            source={require('../../public/img/moon1.png')}
            style={{ width: 300, height: 200 }}
          />
          <Text style={styles.storyBody}>
            誕生以来、宇宙は膨張を続けており、その膨張は加速し続けているといわれています。
            {'\n'}
            そのため、宇宙の大きさは現在の科学でも解明できていません。
          </Text>
        </Card.Content>
      </Card>
    </ScrollView>
  </View>
);

const styles = StyleSheet.create({
  container: {
    flex: 1,
  },
  backButton: {
    paddingTop: 10,
    paddingBottom: 10,
  },
  cardPadding: {
    textAlign: 'center',
    top: 60,
    marginBottom: 20,
    borderRadius: 5,
    marginLeft: 20,
    marginRight: 20,
  },
  cardTitle: {
    marginBottom: 15,
    fontSize: 20,
    fontWeight: 'bold',
  },
  cardMessage: {
    marginTop: 15,
    fontSize: 20,
    fontWeight: 'bold',
  },
  nextCardMessage: {
    marginBottom: 20,
    fontSize: 20,
    fontWeight: 'bold',
  },
  row: {
    flexDirection: 'row',
    flexWrap: 'wrap',
    paddingHorizontal: 12,
  },
  chip: {
    backgroundColor: '#2096F3',
    margin: 2,
  },
  chipText: {
    color: '#ffffff',
  },
  avatarMessage: {
    marginLeft: 30,
    marginTop: 20,
    fontWeight: 'bold',
    textAlign: 'left',
  },
  storyTitle: {
    marginTop: 20,
    marginBottom: 20,
    fontWeight: 'bold',
  },
  storyBody: {
    marginTop: 20,
    fontWeight: 'bold',
  },
  contentContainer: {
    paddingBottom: 60,
  },
});

export default spaceContent;
おわり
・ 説明が雑になってきているので、だんだん追記していきます。w
・ 現在は、各コンテンツの内容をハードコーディングしているのですが、いずれ専用のAPIを作成するつもりなので、そこはとりあえず置いておきます。
・ あとは、Qittaのようにmarkdownで誰でも編集できるようにしていきたいと思ってます。
