はじめに
Navigation ComponentはAndroid Jetpackに含まれているコンポーネントです。
AndroidアプリにおけるActivityやFragment間の画面遷移をシンプルに実装することができます。
1つのActivityをホストとし、複数のFragmentを管理するように設計されています。
複数のFragmentで共通する処理をActivityに任せたくなるシーンに出会いませんか?
色々な実現方法があると思いますが、今回はSharedViewModelを用いた方法を紹介します。
言語はKotlinでバージョンは1.3.50です。
概要
Navigationを利用し、FragmentからFragmentへ値渡しをする場合、通常Safe Argsを用いた型安全の値渡しをします。
しかし、ホストしているActivityと各Fragmentで何かを共有する場合工夫が必要です。
また、ToolbarのTitleの変更や、Snackbarの表示は各Fragmentで行うと、同じような処理を複数記述することになるので、まとめたいです。
このような課題をSharedViewModelを用いて解決します。
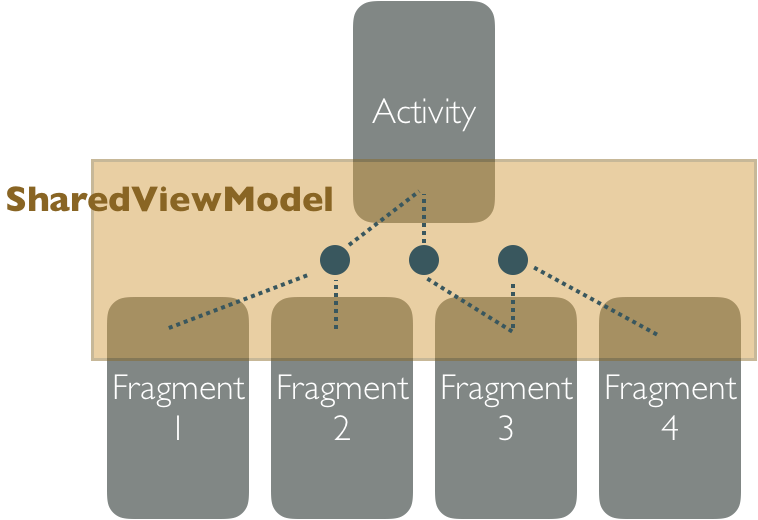
図で表すとこのようになります。

ActivityでSharedViewModelのLiveDataをobserveし、各FragmentでpostValueするだけでActivityに処理を任せられるようになります。
必要となるライブラリの導入
// ...

dependencies {

    // ...

    // Fragment
    implementation "androidx.fragment:fragment:1.2.0-rc01"

    // Lifecycle
    def arch_lifecycle_version = '2.1.0'
    implementation "androidx.lifecycle:lifecycle-runtime:$arch_lifecycle_version"
    implementation "androidx.lifecycle:lifecycle-extensions:$arch_lifecycle_version"
    implementation "androidx.lifecycle:lifecycle-reactivestreams:$arch_lifecycle_version"

    // Navigation
    def arch_navigation_version = '2.2.0-rc01'
    implementation "androidx.navigation:navigation-fragment:$arch_navigation_version"
    implementation "androidx.navigation:navigation-fragment-ktx:$arch_navigation_version"
    implementation "androidx.navigation:navigation-ui:$arch_navigation_version"
    implementation "androidx.navigation:navigation-ui-ktx:$arch_navigation_version"
}
SharedViewModelの作成
今回作成するSharedViewModelは非常にシンプルです。
どのFragmentを表示しているかを共有するためのFragmentType型のMutableLiveDataを保有しています。
class SharedViewModel : ViewModel(){
    val fragmentType = MutableLiveData<FragmentType>().apply {
        this.value = FragmentType.FIRST
    }
}
FragmentTypeをenumを用いて下記のように定義しました。
enum class FragmentType(val type: String) {
    FIRST("first"),
    SECOND("second"),
    THIRD("third"),
    FOURTH("fourth")
}
ホストとなるActivityの作成
Navigationを利用する際の各FragmentをホストするActivityを作成します。
今回はSharedViewModelのfragmentTypeが変更された時にSnackbarが表示される処理を入れています。
class MainActivity : AppCompatActivity() {

    override fun onCreate(savedInstanceState: Bundle?) {
        super.onCreate(savedInstanceState)
        val binding =
            DataBindingUtil.setContentView<ActivitySubBinding>(this, R.layout.activity_main)

        val sharedViewModel = ViewModelProviders.of(this).get(SharedViewModel::class.java)

        sharedViewModel.fragmentType.observe(this, Observer { value ->
            value?.let {
                Snackbar.make(
                    findViewById(android.R.id.content), it.type, Snackbar.LENGTH_SHORT
                ).show()
            }
        })
    }
}
SharedViewModelのfragmentTypeをobserveしています。
これにより、Fragment側でSharedViewModelのfragmentTypeをpostValueするだけで、Activity側でSnackbarを表示することができます。
また、レイアウトは下記になります。
<?xml version="1.0" encoding="utf-8"?>
<layout xmlns:android="http://schemas.android.com/apk/res/android"
    xmlns:app="http://schemas.android.com/apk/res-auto"
    xmlns:tools="http://schemas.android.com/tools">

    <androidx.constraintlayout.widget.ConstraintLayout
        android:layout_width="match_parent"
        android:layout_height="match_parent"
        tools:context=".activity.SubActivity">

        <androidx.fragment.app.FragmentContainerView
            android:id="@+id/fragment_container_view"
            android:name="androidx.navigation.fragment.NavHostFragment"
            android:layout_width="match_parent"
            android:layout_height="match_parent"
            app:defaultNavHost="true"
            app:navGraph="@navigation/activity_navigation" />

    </androidx.constraintlayout.widget.ConstraintLayout>

</layout>
FragmentContainerViewをコンテナとして利用しています。
このnavGraph属性に次に説明するnavigationレイアウトを指定します。
FragmentContainerViewについて気になる方はこちらの記事をご覧ください。
Android FragmentContainerViewとは
navigationレイアウトの作成
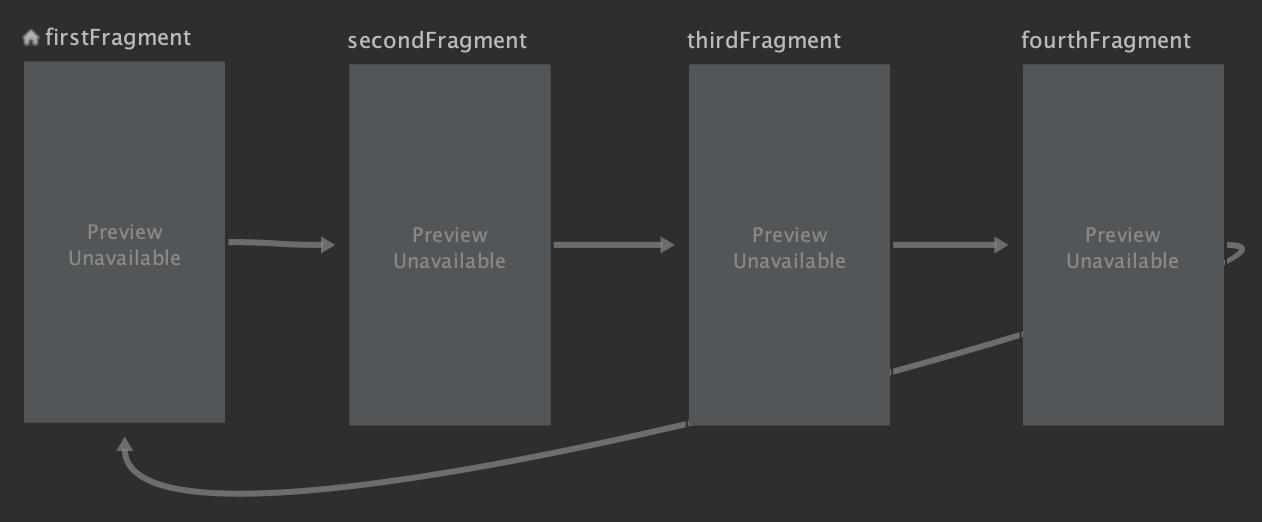
Fragmentを4つ(FirstFragment、SecondFragment、ThirdFragment、FourthFragment)用意しました。
navigation要素のstartDestination属性に最初に表示するfragment要素のidを指定しています。
今回はそれぞれのFragmentが「First→Second」「Second→Third」「Third→Fourth」「Fourth→First」という画面遷移させたかったので、action属性を下記のように記載しています。
<?xml version="1.0" encoding="utf-8"?>
<navigation xmlns:android="http://schemas.android.com/apk/res/android"
    xmlns:app="http://schemas.android.com/apk/res-auto" android:id="@+id/activity_navigation"
    app:startDestination="@id/firstFragment">

    <fragment
        android:id="@+id/firstFragment"
        android:name="e.yoppie.sample.fragment.FirstFragment"
        android:label="FirstFragment">

        <action
            android:id="@+id/action_first_to_second"
            app:destination="@id/secondFragment" />

    </fragment>

    <fragment
        android:id="@+id/secondFragment"
        android:name="e.yoppie.sample.fragment.SecondFragment"
        android:label="SecondFragment">

        <action
            android:id="@+id/action_second_to_third"
            app:destination="@id/thirdFragment" />

    </fragment>

    <fragment
        android:id="@+id/thirdFragment"
        android:name="e.yoppie.sample.fragment.ThirdFragment"
        android:label="ThirdFragment">

        <action
            android:id="@+id/action_third_to_fourth"
            app:destination="@id/fourthFragment" />

    </fragment>

    <fragment
        android:id="@+id/fourthFragment"
        android:name="e.yoppie.sample.fragment.FourthFragment"
        android:label="FourthFragment">

        <action
            android:id="@+id/action_fourth_to_first"
            app:destination="@id/firstFragment" />

    </fragment>

</navigation>
4つのFragmentの作成
前述のFragmentを作成します。
同じ処理を持つFragmentなのでFirstFragmentのみ説明します。
Fragmentには、次へボタンを押下すると、次のFragmentへ遷移し、
Snackbarボタンを押すと、SharedViewModelのfragmentTypeをpostValueし値を変更する処理を作成しました。
class FirstFragment : Fragment() {

    private lateinit var sharedViewModel: SharedViewModel

    override fun onCreate(savedInstanceState: Bundle?) {
        super.onCreate(savedInstanceState)
        sharedViewModel = ViewModelProviders.of(requireActivity()).get(SharedViewModel::class.java)
    }

    @SuppressLint("CheckResult")
    override fun onCreateView(
        inflater: LayoutInflater,
        container: ViewGroup?,
        savedInstanceState: Bundle?
    ): View? {
        super.onCreateView(inflater, container, savedInstanceState)

        val binding = DataBindingUtil.inflate<FragmentFirstBinding>(
            inflater,
            R.layout.fragment_first,
            container,
            false
        )
        binding.apply {
            lifecycleOwner = this@FirstFragment
            destinationButton.clicks().subscribe {
                findNavController().navigate(R.id.action_first_to_second)
            }
            snackbarButton.clicks().subscribe {
                sharedViewModel.fragmentType.postValue(FragmentType.FIRST)
            }
        }

        return binding.root
    }
}
Activity側でSharedViewModelのfragmentTypeをobserveしているので、Fragment側ではpostValueするだけでSnackbarが表示されます。
今回作成したアプリの一連の流れ

