何の記事?
Amazon SageMaker JumpStartを使って作成した画像分類のモデルに対して、Amazon SageMaker Model Monitorを使ってモデル品質の指標(accuracy, recallなど)を算出してみた記事です。
背景
機械学習の画像分類モデルを作る際、トレーニングに使用する画像を変えてみたり、画像に対して様々な前処理をしたり、色々条件を変えて学習モデルを複数作ると思います。複数作ったモデルは、モデル毎のaccuracy, recall, F1 scoreなどモデルの品質を示す指標を比べて、モデルの良し悪しを判断します。
このaccuracy, recall, F1 scoreなどの指標ですが、Amazon Rekognitionカスタムラベルを使って学習モデルを作成した場合、Rekognitionが算出してくれます。
一方、Amazon SageMaker JumpStartを使って学習モデルを作成した場合は、指標までは算出してくれないので、自力で算出する必要があります。
今回、Amazonから提供されているサンプルのプログラムをベースにして、Amazon SageMaker JumpStartを使って作成した画像分類モデルの指標を算出してみましたので、その手順を紹介します。
なお、本内容は、TECH PLAY 2021/4/21のイベントのセッション「クラウド活用でできるAI防災ソリューションの可能性」でご紹介した内容のうち、当日詳しくご説明できなかった部分の補足になります。
※ 以下に記載している条件や、参照しているURLなどは2021年5月時点のものになります。
前提条件
- SageMaker Studioを使います
事前準備:学習モデルの作成
今回、Amazon SageMaker JumpStart でうちの猫を見分けるモデルを作ってみた を参考にして以下の条件でモデルを作成しました。
- 選択したVision Model:
ResNet 152- Task:
Image Classification - Dataset:
ImageNet - Fine-tunable:
Yes - Source:
PyTorch Hub
- Task:
- Fine-tue Modelで使用した犬、猫の画像
- Public APIにリストアップされている CataasとDog APIを利用
- 犬100枚、猫100枚合計200枚を取得。
- Trainのパラメータはデフォルトとし、学習は約5分で完了しました
- Deployするときのパラメータもデフォルトで実行しました
事前準備の注意点 その1
Amazon SageMaker JumpStart でうちの猫を見分けるモデルを作ってみた の記事のとおり「サンプルノートブックを使って推論を実行」し、「推論用エンドポイントの削除」まで実行します。(「学習済みモデルをFine-tuneする」のところまでで終わらないこと)
- 「サンプルノートブックを使って推論を実行」した際に、AWSコンソールのSageMakerで推論>モデルのところにモデルが追加されますので、これを使ってモデル品質を算出します。
- AWSコンソール上の「トレーニングジョブ」から参照できるトレーニングジョブの「出力」欄にS3モデルアーティファクトとして、モデルのS3ファイルのパスがありますが、これを指定してもモデルの品質を算出できません。
事前準備の注意点 その2
後述の手順でモデル品質を算出しますが、その際、最低200枚の画像が必要です。
トレーニングとは別の画像セットを使ってモデル品質を算出したい場合は、別途200枚の画像を用意しておきます。
今回は以下のようにS3へアップロードしてあるものとして説明します。
s3://example_bucket/validation_dataset/

validation_dataset
    |--cat
        |--abc.jpg
        |--def.jpg
        |--   :
    |--dog
        |--ghi.jpg
        |--jkl.jpg
        |--   :
本題:モデル品質を算出する
GitHubに公開されているModelMonitorのサンプル の model_quality_churn_sdk.ipynbをベースにします。
モデル品質を出すところまでなので、Section 1~3と最後に Clean upを実行していきます。
0. 準備
上記GitHubサンプルのmodel_qualityフォルダをSageMaker Studioにアップロードします。ただし、今回は事前準備で作成した学習モデルを使うので、modelフォルダにあるファイルはアップロード不要です。
アップロードできたら以下のようなフォルダ構成になります。
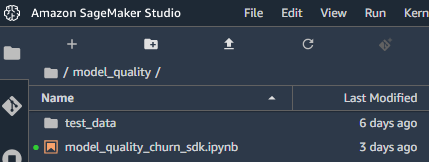
model_quality_churn_sdk.ipynbを開いて修正を入れていきます。
Section 1 - Setup
とくに変更の必要はありません。
1.2 AWS region and IAM Roleのセルを実行した時にCouldn't call 'get_role' to get Role ARN from role name <ロール名> to get Role path.というエラーが出る場合は、表示されているロールに IAMReadOnlyAccessポリシーを追加します。
Section 2 - Deploy pre-trained model with data capture enabled
2.1 Upload the pre-trained model to S3
modelフォルダ配下のファイルをS3へアップロードするコードになっていますが、今回はJumpStartで作成したモデルを使うので、アップロードは不要です。
代わりに、AWSコンソール上で、推論>モデルに表示されるモデルの一覧から事前に作ったモデルを選び、その詳細画面で「コンテナ1」>「モデルデータの場所」に表示されるS3のパスを指定します。
「イメージ」欄にあるイメージ名と環境変数も控えておきます。
~.dkr.ecr.ap-northeast-1.amazonaws.com/pytorch-inference:1.5.0-cpu-py3
環境変数に
SAGEMAKER_PROGRAM inference.pyがあります。これを次の手順で使います。
2.2 Create SageMaker Model entity
今回、PyTorchのモデルを利用するため、以下のようにコードを変更します。
from sagemaker.pytorch import PyTorchModel

model = PyTorchModel( model_data=model_url,
        role=role,
        entry_point='inference.py',
        framework_version='1.5.0',
        py_version='py3')
-
entry_pointの値は、前の手順で確認した環境変数SAGEMAKER_PROGRAMの値であるinference.pyを指定します -
framework_versionpy_versionの値は、イメージ名に情報がありましたので、それぞれ、1.5.0,py3を指定します。
2.3 Deploy the model with data capture enabled.
DataCaptureConfigを作るところとmodel.deploy()するところを以下のように修正します。
# SEE https://sagemaker.readthedocs.io/en/stable/api/inference/model_monitor.html?highlight=DataCaptureConfig#sagemaker.model_monitor.data_capture_config.DataCaptureConfig
data_capture_config = DataCaptureConfig(
                        enable_capture=True,
                        sampling_percentage=100,
                        destination_s3_uri=s3_capture_upload_path,
                        json_content_types=['application/x-image']) # 追加で指定

# serializer, decerializerはdeploy時に設定
from sagemaker.serializers import IdentitySerializer
from sagemaker.deserializers import JSONDeserializer

# 対象とするcontent_typeを指定する必要がある。デフォルトだとapplication/octet-streamになる
serializer = IdentitySerializer(content_type='application/x-image')
deserializer = JSONDeserializer()
# https://sagemaker.readthedocs.io/en/stable/frameworks/tensorflow/using_tf.html?highlight=TensorFlowModel#deploying-directly-from-model-artifacts
# deployするとpredictorが帰ってくる
predictor = model.deploy(initial_instance_count=1,
             instance_type='ml.m4.xlarge',
             endpoint_name=endpoint_name,
             data_capture_config=data_capture_config,
             serializer=serializer, # 追加で指定
             deserializer=deserializer) # 追加で指定
ポイントは、画像(コンテンツタイプがapplication/x-image)を扱えるようにするため、DataCaptureConfigではjson_content_types、model.deploy()ではserializer, deserializerのパラメータを追加で指定している部分です。
2.4 Create the SageMaker Predictor object from the endpoint to be used for invoking the model
predictorは前のステップで取得できているので、2.4のステップは不要になります。
Section 3 - Generate baseline for model quality performance
3.1 Execute predictions using the validation dataset.
# churn_cutoff = 0.8
validate_dataset = "validation_with_predictions.csv"
churn_cutoffは使わないので不要です。
次のセル(サンプルノートブックではlimit=200から始まるセル)は、検証用データセットに対して実際に推論をおこない、結果をvalidation_with_predictions.csvに書き込んでいく処理です。
ここは今回の画像分類モデルを使った推論をおこなうため、以下の処理をおこなうよう書き換えます。
- 検証用画像をS3からSageMaker Studio上へダウンロード
- 検証画像を推論し、「期待値、推論結果、確率」を"validation_with_predictions.csv"に書き込む
1. 検証用画像をS3からSageMaker Studio上へダウンロード
S3へアップロードしてあるフォルダ構成と同じ構成でダウンロードしてきます。
# 検証用データセットをアップロードしたS3バケット名
input_data_bucket="example_bucket"
# バケット配下のプレフィックス。この下にラベル名に相当するcat, dogフォルダがある
input_data_prefix="validation_dataset"

# ベースライン作成に使用する画像をダウンロードしてくる
def downloadDirectoryFroms3(bucketName, remoteDirectoryName):
    s3_resource = boto3.resource('s3')
    bucket = s3_resource.Bucket(bucketName)
    for obj in bucket.objects.filter(Prefix = remoteDirectoryName):
        if not os.path.exists(os.path.dirname(obj.key)):
            os.makedirs(os.path.dirname(obj.key))
        if obj.key.endswith('.jpg') or obj.key.endswith('.png'):
            bucket.download_file(obj.key, obj.key) # save to same path

s3_client = boto3.Session().client('s3')
total_capture_files =[]
for label in ["cat", "dog"]:
    input_data_label_prefix = '{}/{}'.format(input_data_prefix, label)
    downloadDirectoryFroms3(input_data_bucket, input_data_label_prefix)
2. 検証画像を推論し推論結果と期待値、確率を"validation_with_predictions.csv"に書き込む
def get_prediction_results(image_path):
    with open(image_path, 'rb') as image:
        f = image.read()
        payload = bytearray(f)

    response = predictor.predict(data=payload)
    print('response: ', response)
    # response:  [1.0, 5.673481895015192e-20]
    return response

def get_max_value_index(predictions):
    # predictions:  [1.0, 5.673481895015192e-20]
    # 各ラベルの確率が入っているlistの中で最も高い値のindex(=ラベル)を返す
    top1_label_id = sorted(range(len(predictions)), key=lambda index: predictions[index], reverse=True)[0]
    # print('predictions: {}, top1_label_id:{}'.format(predictions, top1_label_id))
    return top1_label_id

import pathlib
p_temp = pathlib.Path(input_data_prefix)
print(p_temp)

with open(f"test_data/{validate_dataset}", "w") as baseline_file:
    # csvファイルのヘッダを書き出す
    baseline_file.write("label,prediction,probability\n") # our header
    for index, label in enumerate(["cat", "dog"]):
        files = list(p_temp.glob('{}/*.*'.format(label)))
        print('files: ', len(files))
        for file in files:
            image_path = str(file)
            predictions = get_prediction_results(image_path)
            probability = predictions
            prediction = get_max_value_index(predictions)
            #期待値、推論値、確率を書き出す
            baseline_file.write(f"{index},{prediction},{probability}\n")
print("Done!")
ラベル名(cat, dog)とindexの対応関係(どっちが0番か)はトレーニング時に決まっており、アルファベット順となります。
JumpStartのFineTuneする画面にその説明があります。
念のため確認する際はmodel.tar.gzを展開するとclass_label_to_prediction_index.jsonがありますので、この中身をみて確認します。
{"cat": 0, "dog": 1}
結果としてtest_data/validation_with_predictions.csvは以下のような内容が出力された状態になります。
label,prediction,probability
0,0,[0.7984079718589783, 0.20159205794334412]
0,0,[0.7135699391365051, 0.28643009066581726]
0,0,[0.7554509043693542, 0.24454905092716217]
0,0,[0.8842902183532715, 0.11570972204208374]
0,0,[0.663881242275238, 0.33611878752708435]
0,1,[0.395366907119751, 0.6046331524848938]
0,0,[0.6240670084953308, 0.3759329915046692]
0,0,[0.6671647429466248, 0.33283525705337524]
0,1,[0.395366907119751, 0.6046331524848938]
0,0,[0.810299813747406, 0.1897001564502716]
<以下省略>
たとえば、上記csvの7行目、10行目は、label=0(=catフォルダ)の画像が、prediction=1(=dog)と推論されたことを表しています。
3.2 Examine the predictions from the model
変更は不要です。
3.3 Upload the predictions as a baseline dataset.
変更は不要です。
3.4 Create a baselining job with validation dataset predictions
suggest_baseline()の呼び出し部分のパラメータproblem_typeの値をMulticlassClassificationに変更します。
job = churn_model_quality_monitor.suggest_baseline(
    job_name=baseline_job_name,
    baseline_dataset=baseline_dataset_uri,
    dataset_format=DatasetFormat.csv(header=True),
    output_s3_uri = baseline_results_uri,
    problem_type='MulticlassClassification', # BinaryClassificationから変更
    inference_attribute= "prediction",
    probability_attribute= "probability",
    ground_truth_attribute= "label"
)
参考: ModelQualityMonitor.suggest_baseline
※ baseline_job_nameを変更する場合は、「ジョブ名は63文字以内」という制約があるようなので注意します。
3.5 Explore the results of the baselining job
変更不要です。
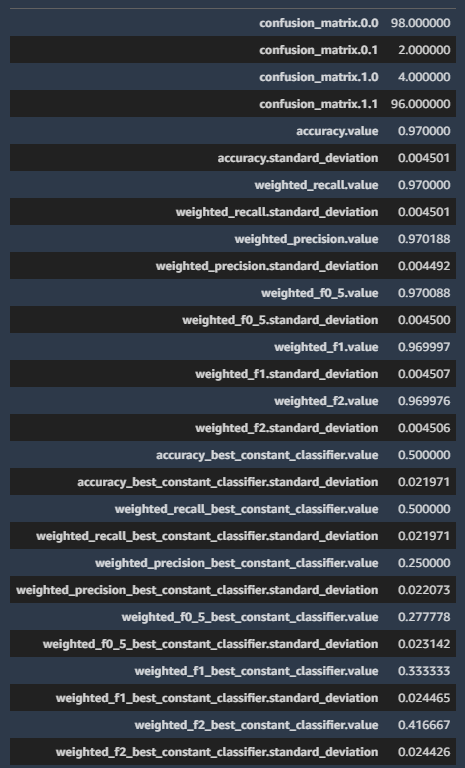
3.5.1 View the metrics generated
画像分類の結果を取得するため、"binary_classification_metrics" を "multiclass_classification_metrics" に変更します。
変更後のコード
multiclass_classification_metrics = baseline_job.baseline_statistics().body_dict["multiclass_classification_metrics"]
pd.json_normalize(multiclass_classification_metrics).T
これを実行すると、以下のような結果が表示されます。
3.5.2 View the constraints generated
画像分類の結果を取得するため、"binary_classification_constraints"を "multiclass_classification_constraints"に変更します。
pd.DataFrame(baseline_job.suggested_constraints().body_dict["multiclass_classification_constraints"]).T
これを実行すると、以下のような結果が表示されます。
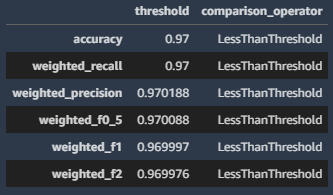
accuracy, recall, precisionなどのモデルの品質指標を取得することができました!
Clean up
ノートブックの最後にエンドポイント等を削除するコードがあります。
エンドポイントを立ち上げっぱなしだと料金がかかるので忘れずに削除します。
ただし今回Section 4, 5を実行していないので、delete_monitoring_schedule()の実行は不要です。
delete_model()で以下のようなエラーがでますが、実際にはモデルもエンドポイント設定も削除されていました。
念のためAWSコンソールからご確認ください。
ClientError: An error occurred (ValidationException) when calling the DescribeEndpointConfig operation: Could not find endpoint configuration "arn:aws:sagemaker:ap-northeast-1:XXXXXXXX:endpoint-config/<小文字のエンドポイント名>".
補足:TensorFlowモデル
今回、PyTorchのResNet 152を使いましたが、TensorFlowのモデルを使った場合、上記コードと異なる部分が2か所ありました。
- 2.2 Create SageMaker Model entityでのモデルの作り方
- 推論結果の取得部分
この2点について補足します。
2.2 Create SageMaker Model entityでのモデルの作り方
モデルのインスタンスを作る部分です。本当はもう少しスマートなやり方があるのかもしれませんが、Deploy TensorFlow Serving models を参考に色々試して、以下で動作しました。
from sagemaker.tensorflow import TensorFlowModel
from sagemaker.predictor import Predictor

model = TensorFlowModel(model_data=model_url,
        role=role,
        image_uri="~.dkr.ecr.ap-northeast-1.amazonaws.com/tensorflow-inference:2.3-cpu",
        predictor_cls=Predictor,
        env={"MODEL_CACHE_ROOT": "/opt/ml/model", "SAGEMAKER_ENV": "1", "SAGEMAKER_MODEL_SERVER_TIMEOUT":"3600", "MODEL_SERVER_WORKERS": "1"},
    )
image_uri, envの値は、AWSコンソールでSageMakerを開いて、「推論>モデル」から該当のモデルの詳細画面を開いて、「コンテナ1」の欄に記載の情報をもとに指定しています。
推論結果の取得部分
PyTorchの場合、predict()の戻り値として、クラス毎の確立のarrayが直で返ってきます。一方、TensorFlowの場合は、
predictionsという要素の値として入っているので、そこから取り出してあげる必要がありました。
def get_prediction_results(image_path):
    with open(image_path, 'rb') as image:
        f = image.read()
        payload = bytearray(f)

    response = predictor.predict(data=payload)
    # print('response: ', response)
    #        response:  {'predictions': [[173.154083, -46.4106941]]}
    return response['predictions']