はじめに
AWS CDKのキャッチアップがてら、基本的なWeb3層アーキテクチャをaws-cdkで実装してみました。
備忘がてら記録に残します!
ここでは、CDKの基本的な事項についての説明は避けます。
CDKに初めて触れる人にとっては、以下の記事がよくまとまっているのでおすすめです。
開発環境
IDEはVSCodeで、これなしではもう生きていけないGithub Copilotをゴリゴリ使用して実装していきました。
- CDK : 2.72.1 (build ddbfac7)
- TypeScript : typescript@4.9.5
- Github copilot
構成図
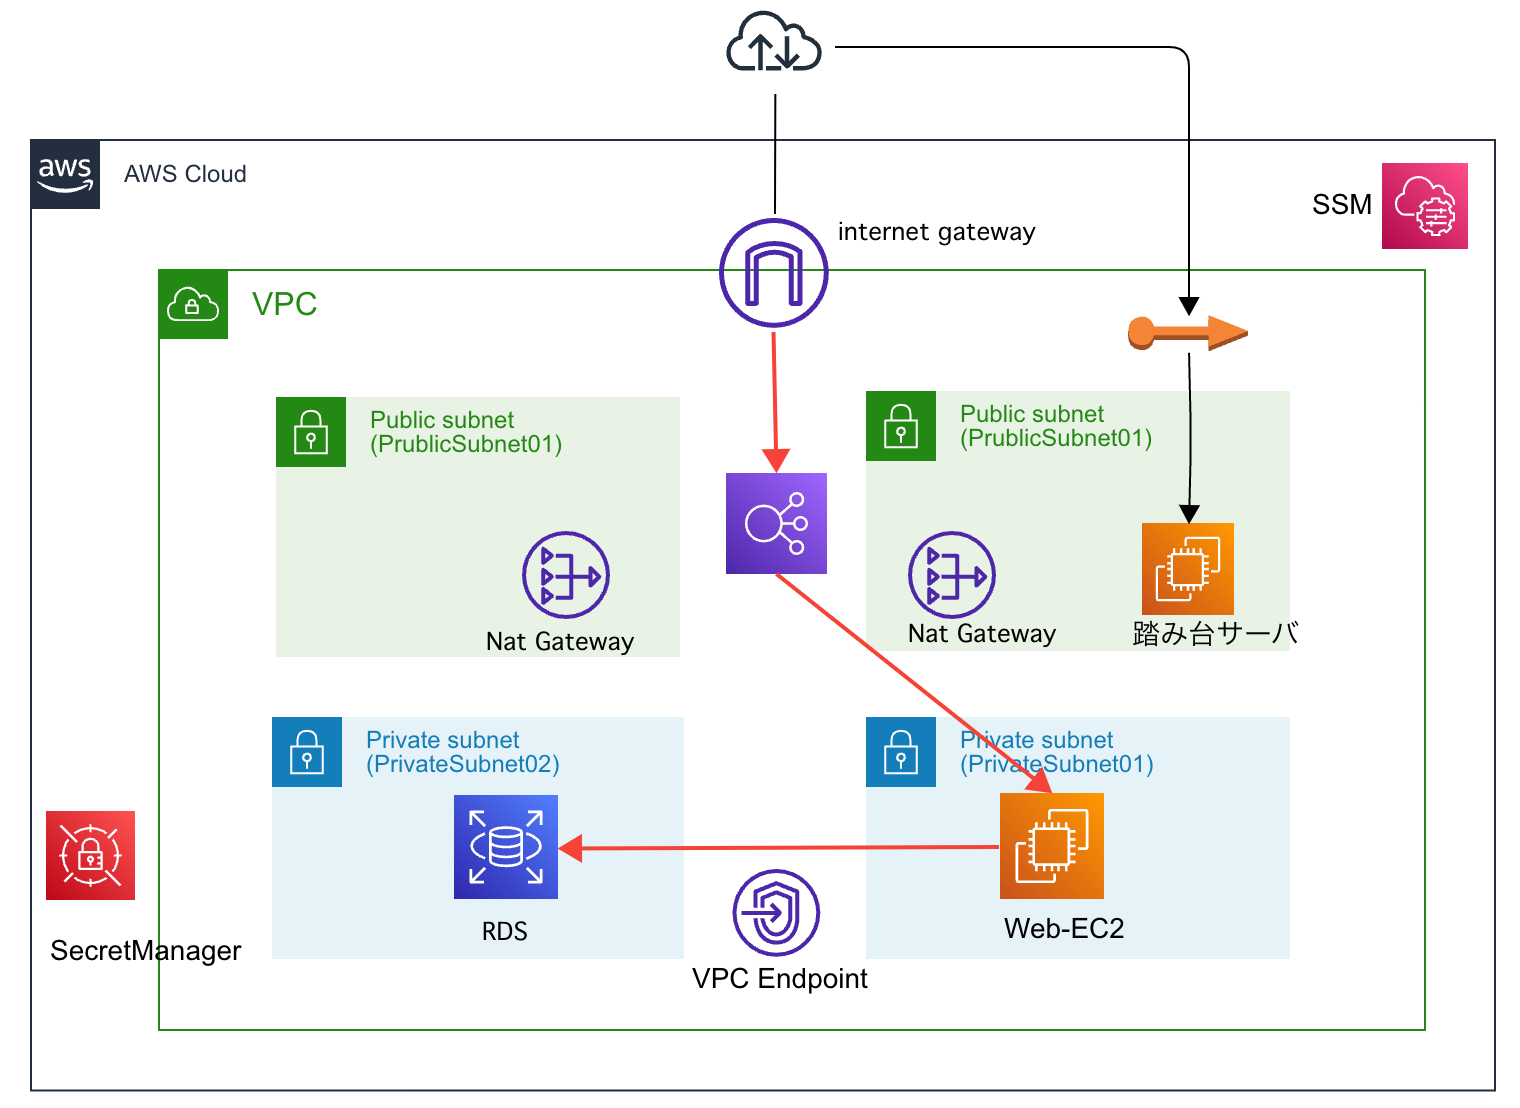
【ざっくり要件】
- 踏み台サーバーを設置(SSHとSGの設定練習)
- Web-EC2へはSSMを使用してログイン
- RDSのuser, passwordはsecret managerに登録
-
EC2→RDSへのアクセスにはVPC Interface Endpointを使用- EC2→インターネットへの疎通確認
- EC2→MySQL for RDSへの疎通確認
- 上記ができればOKとする
手順
cdk init
mkdir ec2-cdk && cd ec2-cdk
cdk init app --language typescript

# 使用するlibのinstallは各自必要なものを行ってください
# ↓のような形式で複数指定
npm i @aws-cdk/aws-ec2 @aws-cdk/aws-iam
完成したStack
先に完成物を載せます。
githubのリポジトリにも上がっているのでご参照ください。
【githubリポジトリ】
https://github.com/parupappa/web-app-cdk-stack.git
lib/ec2-cdk-stack.ts
import * as cdk from '@aws-cdk/core';
import * as ec2 from "@aws-cdk/aws-ec2"; // Allows working with EC2 and VPC resources
import * as iam from "@aws-cdk/aws-iam"; // Allows working with IAM resources
import * as rds from "@aws-cdk/aws-rds"; // Allows working with RDS resources
import * as elbv2 from "@aws-cdk/aws-elasticloadbalancingv2"; // Allows working with ALB resources
import * as elbv2tg from "@aws-cdk/aws-elasticloadbalancingv2-targets"; // Allows working with ALB target groups

export class Ec2CdkStack extends cdk.Stack {
  constructor(scope: cdk.Construct, id: string, props?: cdk.StackProps) {
    super(scope, id, props);
    // VPC
    const vpc = new ec2.Vpc(this, "Web-VPC", {
      cidr: "10.0.0.0/16",
    });
    // VPC Endpoint
    new ec2.InterfaceVpcEndpoint(this, "ssm_endpoint", {
      vpc: vpc,
      service: new ec2.InterfaceVpcEndpointAwsService("ssm")
    });
    new ec2.InterfaceVpcEndpoint(this, "ssmmessage_endpoint", {
      vpc: vpc,
      service: new ec2.InterfaceVpcEndpointAwsService("ssmmessages")
    });

    // Create a key pair to be used with this EC2 Instance
    const key = new ec2.CfnKeyPair(this, "CfnKeyPair", {
      keyName: 'ec2-key-pair',
    });
    // Delete the key pair when the stack is deleted
    key.applyRemovalPolicy(cdk.RemovalPolicy.DESTROY);
    // Output the command to get the private key
    new cdk.CfnOutput(this, 'GetSSHKeyCommand', {
      value: `aws ssm get-parameter --name /ec2/keypair/${key.getAtt('KeyPairId')} --region ${this.region} --with-decryption --query Parameter.Value --output text`,
    })

    // Security group for the EC2 instance
    const securityGroup = new ec2.SecurityGroup(this, "SecurityGroup", {
      vpc,
      description: "Allow SSH (TCP port 22) and HTTP (TCP port 80) in",
      allowAllOutbound: true,
    });

    // Allow SSH access on port tcp/22
    securityGroup.addIngressRule(ec2.Peer.anyIpv4(), ec2.Port.tcp(22), "Allow SSH Access");
    // Allow HTTP access on port tcp/80
    securityGroup.addIngressRule(ec2.Peer.anyIpv4(), ec2.Port.tcp(80), "Allow HTTP Access");

    // IAM role to allow access to other AWS services
    const role = new iam.Role(this, "ec2Role", { assumedBy: new iam.ServicePrincipal("ec2.amazonaws.com"), });
    // IAM policy attachment to allow access to
    role.addManagedPolicy( iam.ManagedPolicy.fromAwsManagedPolicyName("AmazonSSMManagedInstanceCore"));

    // Look up the AMI Id for the Amazon Linux 2 Image with CPU Type X86_64
    const ami = new ec2.AmazonLinuxImage({
      generation: ec2.AmazonLinuxGeneration.AMAZON_LINUX_2,
      cpuType: ec2.AmazonLinuxCpuType.X86_64,
    });

    // Create the EC2 instance using the Security Group, AMI, and KeyPair defined.
    const bation_ec2 = new ec2.Instance(this, "BationEC2", {
      vpc,
      vpcSubnets: { subnetType: ec2.SubnetType.PUBLIC },
      instanceType: ec2.InstanceType.of(
        ec2.InstanceClass.T2,
        ec2.InstanceSize.MICRO
      ),
      machineImage: ami,
      securityGroup: securityGroup,
      keyName: key.keyName,
      role: role,
    });

    // Elasitc IP for the EC2 instance
    const eip = new ec2.CfnEIP(this, "EIP")
    // Attach the Elastic IP to the EC2 instance
    new ec2.CfnEIPAssociation(this, "EIPAssociation", {
      allocationId: eip.attrAllocationId,
      instanceId: bation_ec2.instanceId,
    });

    //////////////////////////////////////////////////////////////////
    // ALB to EC2 to RDS Connection
    //////////////////////////////////////////////////////////////////

    // set instance profile to use ssm
    const instanceProfile = new iam.Role(this, "ec2_profile", {
      assumedBy: new iam.ServicePrincipal("ec2.amazonaws.com"),
      description: "for instance profile",
      managedPolicies: [
          iam.ManagedPolicy.fromAwsManagedPolicyName("CloudWatchAgentServerPolicy"),
          iam.ManagedPolicy.fromAwsManagedPolicyName("AmazonSSMManagedInstanceCore"),
      ],
    });

    // create EC2 instance
    const web_ec2 = new ec2.Instance(this, "Web-EC2", {
      vpc: vpc,
      vpcSubnets: { subnetType: ec2.SubnetType.PRIVATE_WITH_NAT },
      instanceType: ec2.InstanceType.of(
        ec2.InstanceClass.T2,
        ec2.InstanceSize.MICRO
      ),
      machineImage: ami,
      keyName: key.keyName,
      role: instanceProfile,
    });

    // create RDS instance
    const rdsInstance = new rds.DatabaseInstance(this, "RDS", {
      engine: rds.DatabaseInstanceEngine.mysql({ version: rds.MysqlEngineVersion.VER_8_0_28, }),
      vpc: vpc,
      // rds instance type
      instanceType: ec2.InstanceType.of(ec2.InstanceClass.T2, ec2.InstanceSize.MICRO),
    });

    // create ALB
    const alb = new elbv2.ApplicationLoadBalancer(this, "ALB", {
      vpc: vpc,
      internetFacing: true,
    });
    // listener rule
    const listener = alb.addListener("listener", { port: 80 });
    listener.addTargets('target', {
        port: 80,
        targets: [new elbv2tg.InstanceIdTarget(web_ec2.instanceId)],
        healthCheck: { path: "/index.html" }
    });

    // Define Connections
    web_ec2.connections.allowFrom(alb, ec2.Port.tcp(80));
    rdsInstance.connections.allowFrom(web_ec2, ec2.Port.tcp(3306));
  }
}
基本的にはL2コンストラクタを使用しました。
L2コンストラクタで記述すると、必要なリソースをcdkが自動的に判断してくれるので、コードの記述量が大幅に削減できます。
もちろん、細かい指定も可能なので、API Referenceを参照して設定を追加していきます。
cdk deploy
# tsをjsにビルド
cdk build
# または
# ファイルの変更を監視し、自動的に再コンパイル。別ターミナルで常時実行。
npm run watch

# CFnテンプレートを作成
cdk synth
# デプロイ前のセットをいろいろ展開
cdk bootstrap
# deploy
cdk deploy
感想
AWS基礎コンポーネントをcdkを使用することでIaCとして管理できるだけでなく、展開の速さも感じることができました。
(Github Copilotが優秀すぎることもあり)
cdkを実運用に載せるには、チーム内で検討すべき事項がたくさんあると思います。
- CI/CDにどう載せるか
- コーディング規約どうするか
- App > Stack > Constructをどのように定義するか
- etc...
そういった部分を考えるのもSREとしての楽しさ・やりがいなのではないかと思っています。
どこかで自分の理解を深める意味でも体系的にまとめたい...
実装していて一番感じことは、なによりcdkが楽しい!!
参考