
PythonSCADコミュニティ・開発者に感謝申し上げます。ありがとうございます。
本プログラムのシーン構成および曲線の方程式は、以下の素晴らしい作品・解説を
参考に(インスパイアされて)PythonSCADコードとして新たに再構築したものです。
素敵な知見を共有してくださった作者様に深く感謝いたします。
Pov-Rayを変換したサンプル例
- Pov-Rayの紹介
01. 正四面体
頂点の座標の宣言のために配列を使いました.

# declare V=array[4];
# declare V[0]=<1,1,1>;
# declare V[1]=<1,-1,-1>;
# declare V[2]=<-1,1,-1>;
# declare V[3]=<-1,-1,1>;
頂点の配置


sphere{V[0],0.05 pigment{rgb<1,1,0>}}
sphere{V[1],0.05 pigment{rgb<1,1,0>}}
sphere{V[2],0.05 pigment{rgb<1,1,0>}}
sphere{V[3],0.05 pigment{rgb<1,1,0>}}
辺の配置

cylinder{V[0],V[1],0.05 pigment{rgb<1,1,0>}}
cylinder{V[0],V[2],0.05 pigment{rgb<1,1,0>}}
cylinder{V[0],V[3],0.05 pigment{rgb<1,1,0>}}
cylinder{V[1],V[2],0.05 pigment{rgb<1,1,0>}}
cylinder{V[2],V[3],0.05 pigment{rgb<1,1,0>}}
cylinder{V[3],V[1],0.05 pigment{rgb<1,1,0>}}

pov-rayを変換してください。
1. 完成コード(PythonSCAD)
# ==========================================
# 正四面体(POV-Rayの頂点配列&辺をPythonSCADへ変換)
# 作成日: 2026/08/20
# ==========================================

from pythonscad import *
from math import pi, sin, cos, sqrt, atan2, degrees

# --- パラメータ設定 (単位: mm) ---
scale_mm     = 30.0   # POV-Rayの座標(±1)を何mmにスケールするか
vtx_r        = 1.2    # 頂点の球の半径
edge_r       = 0.9    # 辺(円柱)の半径
fn_val       = 60     # 球・円柱の分割数
color_name   = "yellow"

# --- 座標変換(POV-Ray: Y-up → PythonSCAD: Z-up)---
# ここでは「YをZへ」「ZをYへ」入れ替えます(必要最小限の変換)。
def pov_to_scad(p, s):
    """p = [x,y,z] (POV-Ray) -> [x,z,y] (PythonSCAD) にして、mmへスケール"""
    return [p[0] * s, p[2] * s, p[1] * s]

# --- 円柱を2点間に配置するヘルパー ---
def cylinder_between(p1, p2, r, fn):
    """
    Z軸方向の円柱を、p1->p2 を結ぶ方向へ回転させて配置する
    p1, p2: [x,y,z]
    """
    vx = p2[0] - p1[0]
    vy = p2[1] - p1[1]
    vz = p2[2] - p1[2]
    L  = sqrt(vx * vx + vy * vy + vz * vz)

    # 念のため(同一点なら円柱を作らない)
    if L == 0:
        return sphere(r=r, fn=fn)

    mx = (p1[0] + p2[0]) / 2.0
    my = (p1[1] + p2[1]) / 2.0
    mz = (p1[2] + p2[2]) / 2.0

    # Z軸→ベクトル(v) への回転を「yaw(Z回転)→pitch(Y回転)」で作る
    yaw_deg   = degrees(atan2(vy, vx))                # XY平面での向き
    pitch_deg = degrees(atan2(sqrt(vx*vx + vy*vy), vz))  # Zからの傾き

    cyl = cylinder(h=L, r=r, center=True, fn=fn)
    cyl = rotate(cyl, [0, pitch_deg, yaw_deg])
    cyl = translate(cyl, [mx, my, mz])
    return cyl

# --- 頂点データ(POV-Rayの配列 V[0]..V[3] をPythonのリストに)---
V_pov = [
    [ 1,  1,  1],   # V[0]
    [ 1, -1, -1],   # V[1]
    [-1,  1, -1],   # V[2]
    [-1, -1,  1],   # V[3]
]
V = [pov_to_scad(p, scale_mm) for p in V_pov]

# --- 頂点(球)---
verts = None
for p in V:
    s = translate(sphere(r=vtx_r, fn=fn_val), p)
    verts = s if verts is None else (verts + s)

# --- 辺(円柱)---
edges_idx = [
    (0, 1), (0, 2), (0, 3),
    (1, 2), (2, 3), (3, 1),
]
edges = None
for i, j in edges_idx:
    c = cylinder_between(V[i], V[j], r=edge_r, fn=fn_val)
    edges = c if edges is None else (edges + c)

result = color(verts + edges, color_name)

show(result)
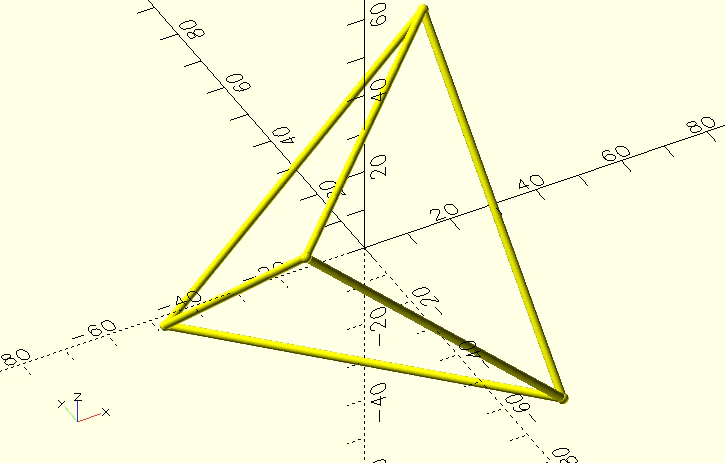
2. 変換のポイント(短く)
- POV-Ray の
array[4]は、PythonではV = [[...], [...], ...]の「リスト」で表せます - POV-Ray は Y-up、PythonSCAD は Z-up なので、基本は座標を
([x,y,z] → [x,z,y])のように入れ替えてから使います(必要なら符号反転も検討) - PythonSCAD の
cylinder()は基本的に Z軸方向に立つので、辺を作るには「2点を結ぶ方向」に回転させる関数(cylinder_between)を用意するのが安全です
02. 立方体
立方体
正四面体と同様にやっていきます.

座標

# declare V=array[8];
# declare V[0]=<1,1,1>;
# declare V[1]=<1,1,-1>;
# declare V[2]=<1,-1,1>;
# declare V[3]=<1,-1,-1>;
# declare V[4]=<-1,1,1>;
# declare V[5]=<-1,1,-1>;
# declare V[6]=<-1,-1,1>;
# declare V[7]=<-1,-1,-1>;
頂点

sphere{V[0],0.05 pigment{rgb<1,0,1>}}
sphere{V[1],0.05 pigment{rgb<1,0,1>}}
sphere{V[2],0.05 pigment{rgb<1,0,1>}}
sphere{V[3],0.05 pigment{rgb<1,0,1>}}
sphere{V[4],0.05 pigment{rgb<1,0,1>}}
sphere{V[5],0.05 pigment{rgb<1,0,1>}}
sphere{V[6],0.05 pigment{rgb<1,0,1>}}
sphere{V[7],0.05 pigment{rgb<1,0,1>}}
辺


cylinder{V[0],V[1],0.05 pigment{rgb<1,0,1>}}
cylinder{V[0],V[2],0.05 pigment{rgb<1,0,1>}}
cylinder{V[3],V[1],0.05 pigment{rgb<1,0,1>}}
cylinder{V[3],V[2],0.05 pigment{rgb<1,0,1>}}
cylinder{V[4],V[5],0.05 pigment{rgb<1,0,1>}}
cylinder{V[4],V[6],0.05 pigment{rgb<1,0,1>}}
cylinder{V[7],V[5],0.05 pigment{rgb<1,0,1>}}
cylinder{V[7],V[6],0.05 pigment{rgb<1,0,1>}}
cylinder{V[0],V[4],0.05 pigment{rgb<1,0,1>}}
cylinder{V[1],V[5],0.05 pigment{rgb<1,0,1>}}
cylinder{V[2],V[6],0.05 pigment{rgb<1,0,1>}}
cylinder{V[3],V[7],0.05 pigment{rgb<1,0,1>}}

pov-rayを変換してください
1. 完成コード(PythonSCAD)※POV-Ray(Y-up) → PythonSCAD(Z-up) 変換込み
# ==========================================
# 立方体(頂点・辺) POV-Ray → PythonSCAD 変換
# 作成日: 2026/08/20
# ==========================================

from pythonscad import *
from math import pi, sin, cos, atan2, sqrt, degrees

# --- パラメータ設定 (単位: mm) ---
half_size = 20.0   # POV-Rayの座標 ±1 を、±half_size(mm) にスケール
v_r       = 1.0    # 頂点の球の半径
e_r       = 1.0    # 辺の円柱半径
fn_val    = 60     # 球・円柱の分割数

# --- 座標変換(POV-RayはY-up → PythonSCADはZ-up)---
def pov_to_scad(p):
    """
    POV-Rayの <x,y,z> を PythonSCADの [x,y,z] へ変換
    代表的なY-up→Z-up変換として、X軸回りに +90°回転:
        (x, y, z) -> (x, -z, y)
    """
    x, y, z = p
    return [x * half_size, -z * half_size, y * half_size]

def addv(a, b):
    return [a[0] + b[0], a[1] + b[1], a[2] + b[2]]

def subv(a, b):
    return [a[0] - b[0], a[1] - b[1], a[2] - b[2]]

def muls(v, s):
    return [v[0] * s, v[1] * s, v[2] * s]

def norm(v):
    return sqrt(v[0] * v[0] + v[1] * v[1] + v[2] * v[2])

def make_vertex(pos, r, fn):
    """頂点(球)"""
    return translate(sphere(r=r, fn=fn), pos)

def make_edge(p1, p2, r, fn):
    """
    2点p1, p2を結ぶ円柱(辺)
    cylinderはZ方向が軸なので、ベクトル方向へ回転して配置する
    """
    d = subv(p2, p1)
    L = norm(d)
    mid = muls(addv(p1, p2), 0.5)

    # Z軸→ベクトルdへ向ける回転(Euler近似)
    yaw = degrees(atan2(d[1], d[0]))                 # Z回り(XY平面の向き)
    r_xy = sqrt(d[0] * d[0] + d[1] * d[1])
    pitch = degrees(atan2(r_xy, d[2]))               # Y回り(Zから倒す角)

    cyl = cylinder(h=L, r=r, center=True, fn=fn)
    cyl = rotate(cyl, [0, pitch, yaw])
    return translate(cyl, mid)

# --- POV-Rayの頂点定義(そのまま写経) ---
V_pov = [
    [ 1,  1,  1],
    [ 1,  1, -1],
    [ 1, -1,  1],
    [ 1, -1, -1],
    [-1,  1,  1],
    [-1,  1, -1],
    [-1, -1,  1],
    [-1, -1, -1],
]

# --- PythonSCAD(Z-up)へ変換した頂点 ---
V = [pov_to_scad(p) for p in V_pov]

# --- 頂点(8個) ---
verts = None
for i in range(8):
    s = make_vertex(V[i], v_r, fn_val)
    verts = s if verts is None else (verts + s)

# --- 辺(12本): POV-Rayのcylinder列と同じ組み合わせ ---
edge_pairs = [
    (0, 1), (0, 2), (3, 1), (3, 2),
    (4, 5), (4, 6), (7, 5), (7, 6),
    (0, 4), (1, 5), (2, 6), (3, 7),
]

edges = None
for a, b in edge_pairs:
    c = make_edge(V[a], V[b], e_r, fn_val)
    edges = c if edges is None else (edges + c)

result = color(verts + edges, "magenta")
show(result)
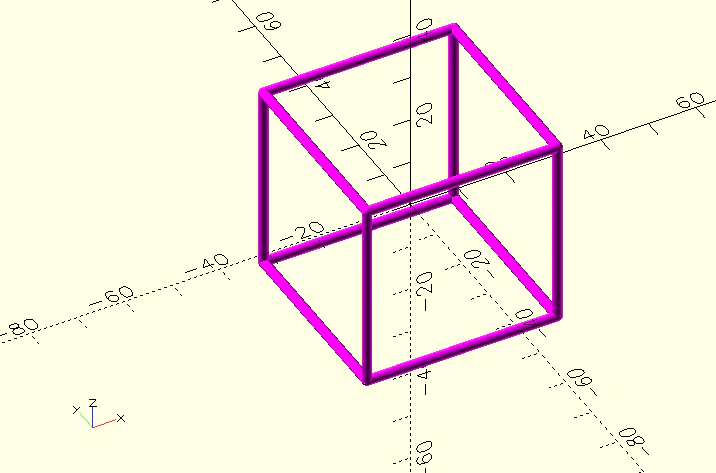
2. 変換のポイント(超重要)
- POV-Ray は Y-up座標系、PythonSCAD は Z-up座標系です
- そこで、代表的な変換として X軸回りに +90°回転を入れています:
$$
(x, y, z) \rightarrow (x, -z, y)
$$
03. 正八面体
座標

# declare V=array[6];
# declare V[0]=<1,0,0>;
# declare V[1]=<-1,0,0>;
# declare V[2]=<0,1,0>;
# declare V[3]=<0,-1,0>;
# declare V[4]=<0,0,1>;
# declare V[5]=<0,0,-1>;
頂点

sphere{V[0],0.05 pigment{rgb<0,1,1>}}
sphere{V[1],0.05 pigment{rgb<0,1,1>}}
sphere{V[2],0.05 pigment{rgb<0,1,1>}}
sphere{V[3],0.05 pigment{rgb<0,1,1>}}
sphere{V[4],0.05 pigment{rgb<0,1,1>}}
sphere{V[5],0.05 pigment{rgb<0,1,1>}}
辺


cylinder{V[0],V[2],0.05 pigment{rgb<0,1,1>}}
cylinder{V[1],V[2],0.05 pigment{rgb<0,1,1>}}
cylinder{V[0],V[3],0.05 pigment{rgb<0,1,1>}}
cylinder{V[1],V[3],0.05 pigment{rgb<0,1,1>}}
cylinder{V[2],V[4],0.05 pigment{rgb<0,1,1>}}
cylinder{V[3],V[4],0.05 pigment{rgb<0,1,1>}}
cylinder{V[2],V[5],0.05 pigment{rgb<0,1,1>}}
cylinder{V[3],V[5],0.05 pigment{rgb<0,1,1>}}
cylinder{V[4],V[0],0.05 pigment{rgb<0,1,1>}}
cylinder{V[5],V[0],0.05 pigment{rgb<0,1,1>}}
cylinder{V[4],V[1],0.05 pigment{rgb<0,1,1>}}
cylinder{V[5],V[1],0.05 pigment{rgb<0,1,1>}}

pov-rayを変換してください
1. 完成コード(PythonSCAD)
# ==========================================
# 正八面体(頂点+辺のワイヤーフレーム)POV-Ray -> PythonSCAD 変換
# 作成日: 2026/08/20
# ==========================================

from pythonscad import *
from math import pi, sqrt, acos, atan2

# --- パラメータ設定 (単位: mm) ---
scale_mm   = 30.0   # POV-Rayの座標(±1)を何mmにするか(全体サイズ倍率)
vtx_r      = 1.5    # 頂点の球 半径
edge_r     = 1.0    # 辺の円柱 半径
fn_val     = 60     # 分割数(球・円柱)
eps        = 0.01   # 微小値(計算安定用)

# POV-Rayは「Y-up」座標系なので、PythonSCADの「Z-up」へ変換
# (x, y, z)_pov -> (x, z, y)_scad
def pov_to_scad(p):
    return [p[0] * scale_mm, p[2] * scale_mm, p[1] * scale_mm]

def deg(rad):
    return rad * 180.0 / pi

# 2点 p1, p2 を結ぶ「端点指定の円柱」を作る(Z軸円柱を回転・移動して作成)
def cylinder_between(p1, p2, r, fn):
    dx = p2[0] - p1[0]
    dy = p2[1] - p1[1]
    dz = p2[2] - p1[2]
    length = sqrt(dx*dx + dy*dy + dz*dz)

    # 退避(同一点対策)
    if length < eps:
        return sphere(r=r, fn=fn)

    # Z軸方向の円柱を、ベクトル(p1->p2)へ向ける
    # theta: +Zからの傾き角, phi: XY平面での方位角
    theta = acos(dz / length)
    phi   = atan2(dy, dx)

    mid = [(p1[0] + p2[0]) / 2.0, (p1[1] + p2[1]) / 2.0, (p1[2] + p2[2]) / 2.0]

    cyl = cylinder(h=length, r=r, center=True, fn=fn)
    cyl = rotate(cyl, [0.0, deg(theta), deg(phi)])
    cyl = translate(cyl, mid)
    return cyl

def vertex_at(p, r, fn):
    return translate(sphere(r=r, fn=fn), p)

# --- POV-Rayの頂点定義(そのまま) ---
V_pov = [
    [ 1,  0,  0],
    [-1,  0,  0],
    [ 0,  1,  0],
    [ 0, -1,  0],
    [ 0,  0,  1],
    [ 0,  0, -1],
]

# --- PythonSCAD(Z-up)へ変換した頂点 ---
V = [pov_to_scad(p) for p in V_pov]

# --- 辺(POV-Rayの cylinder 指定を、頂点インデックスのペアにしたもの)---
edges = [
    (0, 2), (1, 2), (0, 3), (1, 3),
    (2, 4), (3, 4), (2, 5), (3, 5),
    (4, 0), (5, 0), (4, 1), (5, 1),
]

# --- メイン処理:頂点+辺を「+」で結合 ---
verts_obj = None
for p in V:
    part = vertex_at(p, vtx_r, fn_val)
    verts_obj = part if verts_obj is None else (verts_obj + part)

edges_obj = None
for (i, j) in edges:
    part = cylinder_between(V[i], V[j], edge_r, fn_val)
    edges_obj = part if edges_obj is None else (edges_obj + part)

result = color(verts_obj + edges_obj, "cyan")

show(result)
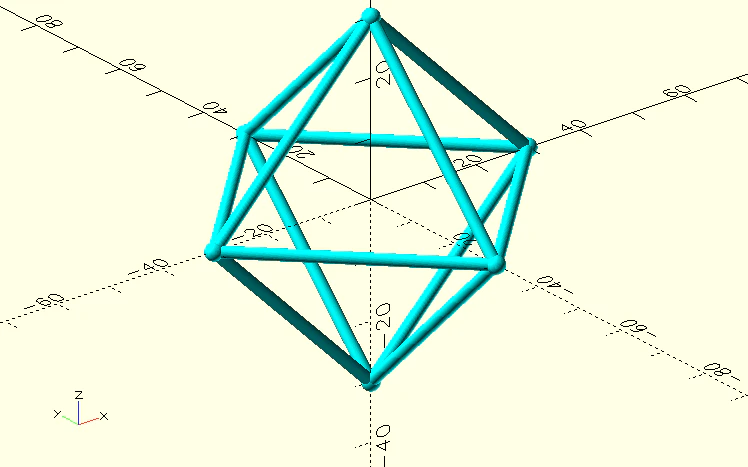
補足(座標系の変換):
- POV-Rayは Y-up、PythonSCADは Z-up なので、
(x, y, z)を(x, z, y)に入れ替えてから使っています。
この正八面体は対称なので見た目は大きく変わりませんが、他モデルでは重要になります。
04. 立方体
# declare i=-1;
# while(i<2)
	#declare j=-1;
	#while(j<2)
		#declare k=-1;
		#while(k<2)
			sphere{<i,j,k>,0.05 pigment{rgb<1,0,1>}}
			#declare k=k+2;
		#end
		#declare l=0;
		#while (l<3)
			cylinder{Rotate(<i,j,1>,l),Rotate(<i,j,-1>,l),0.05 pigment{rgb<1,0,1>}}
			#declare l=l+1;
		#end
		#declare j=j+2;
	#end
	#declare i=i+2;
# end

変換してください。
1. 完成コード(PythonSCAD)
# ==========================================
# POV-Ray ループ(sphere/cylinder)→ PythonSCAD 変換
# 作成日: 2026/08/20
# ==========================================

from pythonscad import *

# --- パラメータ設定 (単位: mm) ---
frame_half   = 1.0    # 座標が -1~+1 なので「半サイズ=1」
rod_r        = 0.05   # sphere/cylinder の半径
fn_val       = 48     # 円柱・球の滑らかさ
eps          = 0.02   # くり抜きではないが、端面の同一面対策の微小値

col_name     = "magenta"

# --- 関数定義 ---

def corner_spheres(half, r, fn):
    """8個のコーナー球(i,j,k = ±half)"""
    s = None
    for x in (-half, half):
        for y in (-half, half):
            for z in (-half, half):
                p = translate(sphere(r=r, fn=fn), [x, y, z])
                s = p if s is None else (s + p)
    return s

def edge_cylinders(half, r, fn, eps):
    """
    立方体の12本のエッジを円柱で作る。
    - X方向エッジ: y,z = ±half
    - Y方向エッジ: x,z = ±half
    - Z方向エッジ: x,y = ±half
    """
    length = 2 * half + 2 * eps  # 端面の重なり・欠けを避けるため少し長く

    edges = None

    # Z方向(縦): cylinder は元々Z軸方向
    for x in (-half, half):
        for y in (-half, half):
            c = cylinder(h=length, r=r, center=True, fn=fn)
            c = translate(c, [x, y, 0])
            edges = c if edges is None else (edges + c)

    # X方向: Z円柱をY回転でX向きへ
    for y in (-half, half):
        for z in (-half, half):
            c = cylinder(h=length, r=r, center=True, fn=fn)
            c = rotate(c, [0, 90, 0])       # Z軸 → X軸
            c = translate(c, [0, y, z])
            edges = c if edges is None else (edges + c)

    # Y方向: Z円柱をX回転でY向きへ
    for x in (-half, half):
        for z in (-half, half):
            c = cylinder(h=length, r=r, center=True, fn=fn)
            c = rotate(c, [90, 0, 0])       # Z軸 → Y軸
            c = translate(c, [x, 0, z])
            edges = c if edges is None else (edges + c)

    return edges

# --- メイン処理 ---

spheres = corner_spheres(frame_half, rod_r, fn_val)
edges   = edge_cylinders(frame_half, rod_r, fn_val, eps)

result = spheres + edges
result = color(result, col_name)

show(result)
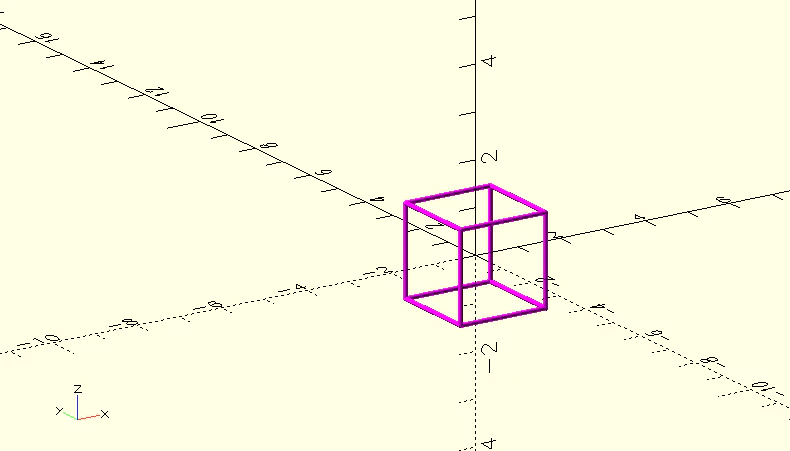
変換内容の対応関係
- POV-Ray の
i,j,k = -1, +1→ PythonSCADでも座標(-1, +1)の8頂点に球 - POV-Ray の
Rotate(<i,j,±1>, l)で作っていた3方向の円柱 → PythonSCADでは「Z向き円柱」を回転して X向き・Y向き・Z向き の12エッジを作成
05. 正八面体
# declare i=-1;
# while(i<2)
	#declare l=0;
	#while(l<3)
        sphere{Rotate(<i,0,0>,l),0.05 pigment{rgb<0,1,1>}}
		#declare j=-1;
		#while (j<2)
			cylinder{Rotate(<i,0,0>,l),Rotate(<0,j,0>,l),0.05 pigment{rgb<0,1,1>}}
			#declare j=j+2;
		#end
		#declare l=l+1;
	#end
	#declare i=i+2;
# end

変換してください。
1. 完成コード(PythonSCAD)— 正八面体(頂点=球、辺=円柱)
# ==========================================
# 正八面体(ワイヤーフレーム)
# 作成日: 2026/08/20
# ==========================================

from pythonscad import *
from math import pi, atan2, sqrt

# --- パラメータ設定 (単位: mm) ---
vertex_dist = 20.0   # 原点から各頂点までの距離(±X, ±Y, ±Z)
node_r      = 1.2    # 頂点の球 半径
edge_r      = 0.8    # 辺(円柱)の半径
fn_val      = 60     # 円・球の分割数
eps         = 0.05   # 念のため(今回は大きな差分演算なし)

# --- ヘルパー関数 ---

def pov_to_zup(v):
    """
    座標変換(POV-Ray: Y-up)→(PythonSCAD: Z-up)
    ここでは (x, y, z)_pov → (x, z, y)_zup として入れ替えます。
    """
    return [v[0], v[2], v[1]]

def rotate_macro(v, l):
    """
    質問文の Rotate(<...>, l) を「軸の巡回置換」として再現。
    l=0: [x,y,z]
    l=1: [y,z,x]
    l=2: [z,x,y]
    """
    x, y, z = v[0], v[1], v[2]
    if l == 0:
        return [x, y, z]
    elif l == 1:
        return [y, z, x]
    else:
        return [z, x, y]

def cylinder_between(p1, p2, r, fn):
    """
    p1 から p2 を結ぶ円柱を作成(中心=中点、向きは計算して回転)。
    cylinder は Z軸方向がデフォルトなので、Z→(p2-p1) へ向ける。
    """
    vx = p2[0] - p1[0]
    vy = p2[1] - p1[1]
    vz = p2[2] - p1[2]
    L = sqrt(vx * vx + vy * vy + vz * vz)

    # 退避(同一点防止)
    if L < 1e-9:
        return sphere(r=r, fn=fn)

    # Z軸の円柱を、(vx,vy,vz) 方向に向ける
    yaw   = atan2(vy, vx)                    # Z回転(方位)
    pitch = atan2(sqrt(vx * vx + vy * vy), vz)  # Y回転(仰角側)

    yaw_deg = yaw * 180.0 / pi
    pitch_deg = pitch * 180.0 / pi

    mid = [(p1[0] + p2[0]) / 2.0,
           (p1[1] + p2[1]) / 2.0,
           (p1[2] + p2[2]) / 2.0]

    cyl = cylinder(h=L, r=r, center=True, fn=fn)
    cyl = rotate(cyl, [0.0, pitch_deg, yaw_deg])
    cyl = translate(cyl, mid)
    return cyl

# --- メイン処理(POV-Rayのループ構造をPythonで再現) ---

nodes = None
edges = None

for i in [-1, 1]:
    for l in [0, 1, 2]:
        # POV-Ray側の座標(まず±1の世界で作り、最後にスケール)
        vp_pov = rotate_macro([i, 0, 0], l)

        # PythonSCAD(Z-up)へ変換 + mmスケール
        vp = pov_to_zup([vp_pov[0] * vertex_dist,
                         vp_pov[1] * vertex_dist,
                         vp_pov[2] * vertex_dist])

        n = sphere(r=node_r, fn=fn_val)
        n = translate(n, vp)

        nodes = n if nodes is None else (nodes + n)

        for j in [-1, 1]:
            vq_pov = rotate_macro([0, j, 0], l)
            vq = pov_to_zup([vq_pov[0] * vertex_dist,
                             vq_pov[1] * vertex_dist,
                             vq_pov[2] * vertex_dist])

            e = cylinder_between(vp, vq, edge_r, fn_val)
            edges = e if edges is None else (edges + e)

result = nodes + edges
result = color(result, "cyan")

show(result)
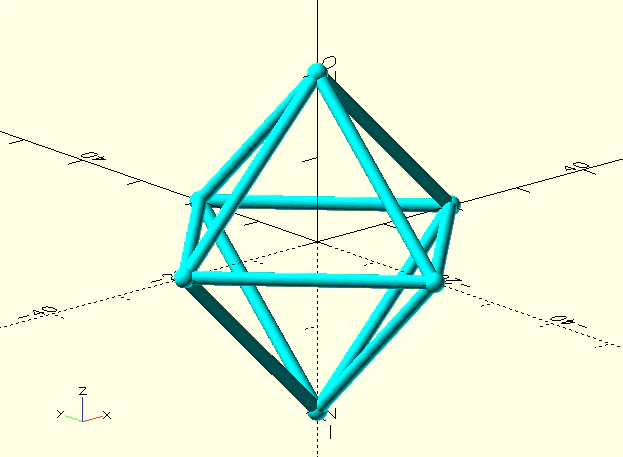
2. 何を変換したか(超要点)
- 質問文の
Rotate(<...>, l)は、X/Y/Z成分を巡回入れ替えするマクロだと解釈してrotate_macro()で再現しました。これで頂点が (±X,0,0),(0,±Y,0),(0,0,±Z) に揃い、正八面体の6頂点になります - POV-Ray は Y-up、PythonSCAD は Z-up なので、座標を
pov_to_zup(x,y,z)=(x,z,y)に変換しました - POV-Ray の
cylinder{p1,p2,r}に相当するものを、PythonSCADでは 「円柱を回転して2点を結ぶ」 関数cylinder_between()で作っています
06. 正十二面体
# declare phi=(1+sqrt(5))/2;

# declare i=-1;
# while(i<2)
	#declare j=-1;
	#while(j<2)
		#declare k=-1;
		#while(k<2)
			sphere{<i,j,k>,0.05 pigment{rgb<1,0,0>}}
			#declare k=k+2;
		#end
        #declare l=0;
		#while (l<3)
            sphere{Rotate(<i*phi,j/phi,0>,l),0.05 pigment{rgb<1,0,0>}}
            cylinder{Rotate(<i*phi,0,0>,l),Rotate(<i*phi,j/phi,0>,l),0.05 pigment{rgb<1,0,0>}}
            cylinder{Rotate(<i,j,1>,l),Rotate(<i*phi,j/phi,0>,l),0.05 pigment{rgb<1,0,0>}}
            cylinder{Rotate(<i,j,-1>,l),Rotate(<i*phi,j/phi,0>,l),0.05 pigment{rgb<1,0,0>}}
            #declare l=l+1;
		#end
		#declare j=j+2;
	#end
	#declare i=i+2;
# end

変換してください。
1. 完成コード(PythonSCAD)
# ==========================================
# 正十二面体(POV-RayのワイヤーフレームをPythonSCADへ変換)
# 作成日: 2026/08/20
# ==========================================

from pythonscad import *
from math import pi, sin, cos, sqrt, atan2, acos, degrees

# --- パラメータ設定 (単位: mm) ---
scale_mm  = 20.0   # POV-Ray座標(おおむね±1〜±phi) を mm に拡大する倍率
vertex_r  = 1.2    # 頂点の球 半径
edge_r    = 0.8    # 辺の円柱 半径
fn_val    = 48     # 円・球の分割数
eps       = 1e-9   # ゼロ割など回避用

# --- 幾何定数 ---
phi = (1 + sqrt(5)) / 2.0

# --- 関数(モジュール)定義 ---
def pov_to_scad(p):
    """
    POV-Rayは Y-up、PythonSCADは Z-up なので座標変換する。
    (x, y, z)_pov -> (x, z, y)_scad
    さらに scale_mm 倍して mm にする。
    """
    return [scale_mm * p[0], scale_mm * p[2], scale_mm * p[1]]

def rotate_perm(v, l):
    """
    元コードの Rotate(<...>, l) を「座標の巡回置換」と解釈して再現する。
    l=0: (x,y,z)
    l=1: (z,x,y)
    l=2: (y,z,x)
    これで正十二面体の頂点セット
      (±phi, ±1/phi, 0), (0, ±phi, ±1/phi), (±1/phi, 0, ±phi)
    を作れる。
    """
    x, y, z = v[0], v[1], v[2]
    m = l % 3
    if m == 0:
        return [x, y, z]
    elif m == 1:
        return [z, x, y]
    else:
        return [y, z, x]

def cylinder_between(p1, p2, r, fn):
    """
    2点 p1, p2 を結ぶ円柱(ワイヤーフレームの辺)を作る。
    cylinder はZ軸方向がデフォルトなので、ベクトル方向へ回転させて配置する。
    """
    x1, y1, z1 = p1
    x2, y2, z2 = p2
    dx, dy, dz = x2 - x1, y2 - y1, z2 - z1
    L = sqrt(dx * dx + dy * dy + dz * dz)
    if L < eps:
        return sphere(r=r, fn=fn)

    # Z軸(0,0,1) を (dx,dy,dz) に向ける回転
    # theta: Y回り(倒し角)、phi_z: Z回り(方位角)
    theta = degrees(acos(dz / L))
    phi_z = degrees(atan2(dy, dx))

    mid = [(x1 + x2) / 2.0, (y1 + y2) / 2.0, (z1 + z2) / 2.0]

    cyl = cylinder(h=L, r=r, center=True, fn=fn)
    cyl = rotate(cyl, [0, theta, 0])
    cyl = rotate(cyl, [0, 0, phi_z])
    cyl = translate(cyl, mid)
    return cyl

def add_all(objs):
    """+ 演算子でまとめて結合(union関数は使わない)"""
    if len(objs) == 0:
        return cube([0.1, 0.1, 0.1], center=True)  # 空回避
    out = objs[0]
    for o in objs[1:]:
        out = out + o
    return out

# --- メイン処理(POV-Rayコードのループ構造をPythonで再現) ---
parts = []

for i in (-1, 1):
    for j in (-1, 1):
        # k in {-1,1} の頂点(±1,±1,±1)
        for k in (-1, 1):
            v = pov_to_scad([i, j, k])
            parts.append(translate(sphere(r=vertex_r, fn=fn_val), v))

        # l=0..2 の巡回置換で頂点と辺を生成
        for l in (0, 1, 2):
            v_main_pov = rotate_perm([i * phi, j / phi, 0.0], l)
            v_main = pov_to_scad(v_main_pov)

            parts.append(translate(sphere(r=vertex_r, fn=fn_val), v_main))

            a1 = pov_to_scad(rotate_perm([i * phi, 0.0, 0.0], l))
            b1 = v_main
            parts.append(cylinder_between(a1, b1, r=edge_r, fn=fn_val))

            a2 = pov_to_scad(rotate_perm([i, j, 1.0], l))
            parts.append(cylinder_between(a2, v_main, r=edge_r, fn=fn_val))

            a3 = pov_to_scad(rotate_perm([i, j, -1.0], l))
            parts.append(cylinder_between(a3, v_main, r=edge_r, fn=fn_val))

wire = add_all(parts)
result = color(wire, "red")

show(result)
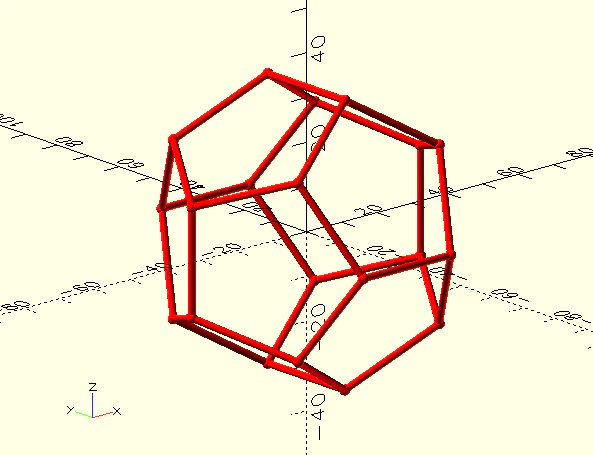
2. 変換のポイント(短く)
- POV-Ray は Y-up、PythonSCAD は Z-up なので、座標を (x, y, z) → (x, z, y) に変換しています
- 元コードの
Rotate(<...>, l)は、正十二面体の頂点セットを作るための「3通りの並べ替え(巡回置換)」と解釈して再現しています - POV-Ray の
cylinder{A,B,r}は、PythonSCADでは「任意方向円柱」が直接ないので、2点間のベクトルを計算して回転・平行移動して作っています
07. 正十二面体
# declare phi=(1+sqrt(5))/2;

# declare i=-1;
# while(i<2)
	#declare j=-1;
	#while(j<2)
		#declare k=-1;
		#while(k<2)
			sphere{<i,j,k>,0.05 pigment{rgb<1,0,0>}}
			#declare k=k+2;
		#end
        #declare l=0;
		#while (l<3)
            sphere{Rotate(<i*phi,j/phi,0>,l),0.05 pigment{rgb<1,0,0>}}
            cylinder{Rotate(<i*phi,0,0>,l),Rotate(<i*phi,j/phi,0>,l),0.05 pigment{rgb<1,0,0>}}
            cylinder{Rotate(<i,j,1>,l),Rotate(<i*phi,j/phi,0>,l),0.05 pigment{rgb<1,0,0>}}
            cylinder{Rotate(<i,j,-1>,l),Rotate(<i*phi,j/phi,0>,l),0.05 pigment{rgb<1,0,0>}}
            #declare l=l+1;
		#end
		#declare j=j+2;
	#end
	#declare i=i+2;
# end

変換してください。
1. 完成コード(PythonSCAD)— 正十二面体(頂点=球、辺=円柱のワイヤーフレーム)
# ==========================================
# 正十二面体(ワイヤーフレーム表示)
# 作成日: 2026/08/20
# ==========================================

from pythonscad import *
from math import sqrt, atan2, degrees

# --- パラメータ設定 (単位: mm) ---
scale_mm = 25.0     # 座標全体の拡大率(見やすさ用)
node_r   = 1.2      # 頂点の球の半径
edge_r   = 0.6      # 辺(円柱)の半径
fn_val   = 48       # 円・球の分割数
eps      = 1e-6     # 計算用の微小値(距離比較など)

# POV-Ray は Y-up、PythonSCAD は Z-up なので y と z を入れ替える
def pov_to_zup(p):
    """POV-Ray座標(x,y,z) -> PythonSCAD座標(x,y,z) へ変換(Y-up -> Z-up)"""
    return [p[0] * scale_mm, p[2] * scale_mm, p[1] * scale_mm]

def v_sub(a, b):
    return [a[0] - b[0], a[1] - b[1], a[2] - b[2]]

def v_add(a, b):
    return [a[0] + b[0], a[1] + b[1], a[2] + b[2]]

def v_mul(a, s):
    return [a[0] * s, a[1] * s, a[2] * s]

def v_len(v):
    return sqrt(v[0] * v[0] + v[1] * v[1] + v[2] * v[2])

def cylinder_between(p1, p2, r, fn):
    """
    2点 p1, p2 を結ぶ円柱を作る。
    cylinder は Z軸方向なので、回転(pitch, yaw)で方向合わせしてから中心へ平行移動。
    """
    d = v_sub(p2, p1)
    L = v_len(d)

    # ほぼ同一点は避ける
    if L < 1e-9:
        return sphere(r=r, fn=fn)

    # yaw: XY平面での角度、pitch: Zからの倒し角
    yaw_deg = degrees(atan2(d[1], d[0]))
    xy = sqrt(d[0] * d[0] + d[1] * d[1])
    pitch_deg = degrees(atan2(xy, d[2]))

    cyl = cylinder(h=L, r=r, center=True, fn=fn)
    cyl = rotate(cyl, [0, pitch_deg, yaw_deg])

    mid = v_mul(v_add(p1, p2), 0.5)
    return translate(cyl, mid)

def combine(objs):
    """+ 演算子でまとめる(union()は禁止ルール対応)"""
    acc = objs[0]
    for o in objs[1:]:
        acc = acc + o
    return acc

# --- 正十二面体の頂点(POV-Rayの代表的な座標セット) ---
# 正十二面体 20頂点:
# (±1,±1,±1) の8点 と、
# (0, ±1/phi, ±phi), (±1/phi, ±phi, 0), (±phi, 0, ±1/phi) の12点
phi = (1.0 + sqrt(5.0)) / 2.0
inv_phi = 1.0 / phi

verts_pov = []

# 8 vertices: (±1, ±1, ±1)
for sx in [-1.0, 1.0]:
    for sy in [-1.0, 1.0]:
        for sz in [-1.0, 1.0]:
            verts_pov.append([sx, sy, sz])

# 12 vertices:
# (0, ±1/phi, ±phi)
for sy in [-inv_phi, inv_phi]:
    for sz in [-phi, phi]:
        verts_pov.append([0.0, sy, sz])

# (±1/phi, ±phi, 0)
for sx in [-inv_phi, inv_phi]:
    for sy in [-phi, phi]:
        verts_pov.append([sx, sy, 0.0])

# (±phi, 0, ±1/phi)
for sx in [-phi, phi]:
    for sz in [-inv_phi, inv_phi]:
        verts_pov.append([sx, 0.0, sz])

# Z-upへ変換 & mmスケール
verts = [pov_to_zup(p) for p in verts_pov]

# --- 辺の自動検出(距離が最小の組を「辺」とみなす) ---
# まず最小の非ゼロ距離を探して、それを edge_len とする
min_d = None
n = len(verts)
for i in range(n):
    for j in range(i + 1, n):
        d = v_len(v_sub(verts[i], verts[j]))
        if d > 1e-9:
            if (min_d is None) or (d < min_d):
                min_d = d

edge_len = min_d
tol = edge_len * 0.03  # 誤差許容(3%)

edge_pairs = []
for i in range(n):
    for j in range(i + 1, n):
        d = v_len(v_sub(verts[i], verts[j]))
        if abs(d - edge_len) <= tol:
            edge_pairs.append([i, j])

# --- 形状生成(球+円柱) ---
node_objs = []
for p in verts:
    s = sphere(r=node_r, fn=fn_val)
    s = translate(s, p)
    node_objs.append(s)

edge_objs = []
for ij in edge_pairs:
    p1 = verts[ij[0]]
    p2 = verts[ij[1]]
    e = cylinder_between(p1, p2, r=edge_r, fn=fn_val)
    edge_objs.append(e)

nodes = combine(node_objs)
edges = combine(edge_objs)

# 色(ルール: color(obj, "name") 形式)
nodes = color(nodes, "red")
edges = color(edges, "tomato")

result = edges + nodes

show(result)
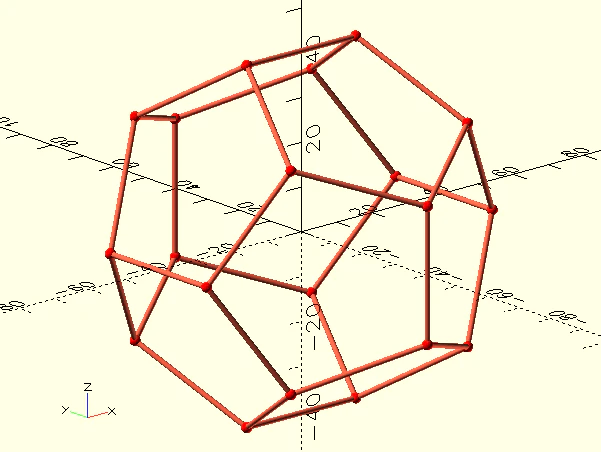
2. 変換の考え方
-
POV-Ray は Y-up、PythonSCAD は Z-up なので、座標を (x, y, z) → (x, z, y) に入れ替えています(
pov_to_zup()) - あなたの POV-Ray コード中の
Rotate(..., l)が何をするマクロか提示が無かったので、「正十二面体として正しい頂点集合」から再構成し、辺は 頂点同士の距離が最短の組=辺として自動抽出しています。
→ これで「正十二面体」になり、さらに rotate マクロの詳細に依存しません
08. 正二十面体(頂点=黄金比、頂点球+エッジ円柱)
正二十面体

各頂点座標が黄金比で書けます.

# declare i=-1;
# while(i<2)
	#declare j=-1;
	#while(j<2)
        #declare l=0;
		#while (l<3)
            sphere{Rotate(<i,j*phi,0>,l),0.05 pigment{rgb<0,0,1>}}
            cylinder{Rotate(<0,j*phi,0>,l),Rotate(<i,j*phi,0>,l),0.05 pigment{rgb<0,0,1>}}
            #declare k=-1;
            #while(k<2)
                cylinder{Rotate(<1,1*phi,0>,l)*<i,j,k>,Rotate(<1,1*phi,0>,l+1)*<i,j,k>,0.05 pigment{rgb<0,0,1>}}
    			#declare k=k+2;
    		#end
            #declare l=l+1;
		#end
		#declare j=j+2;
	#end
	#declare i=i+2;
# end

変換してください。
1. 完成コード(PythonSCAD)※POV-Ray(Y-up) → PythonSCAD(Z-up) 変換つき
# ==========================================
# 正二十面体(頂点=黄金比、頂点球+エッジ円柱)
# 作成日: 2026/08/20
# ==========================================

from pythonscad import *
from math import sqrt, atan2, degrees

# --- パラメータ設定 (単位: mm) ---
scale_mm   = 50.0   # 全体スケール(POV-Rayの座標値に掛ける倍率)
phi        = (1.0 + sqrt(5.0)) / 2.0  # 黄金比
fn_val     = 60

vtx_r      = 1.2    # 頂点の球半径
edge_r     = 0.7    # エッジの円柱半径

# --- 座標・ベクトル用ヘルパー ---

def rot_cycle(v, l):
    """
    POV-Ray側の Rotate(<x,y,z>, l) を「座標成分の巡回置換」と解釈して再現。
    l=0: (x,y,z), l=1: (y,z,x), l=2: (z,x,y)
    """
    x, y, z = v
    m = l % 3
    if m == 0:
        return [x, y, z]
    if m == 1:
        return [y, z, x]
    return [z, x, y]

def y_up_to_z_up(v):
    """
    POV-Rayは Y-up、PythonSCADは Z-up なので軸変換する。
    (x, y, z) -> (x, z, y)
    """
    return [v[0], v[2], v[1]]

def v_add(a, b):
    return [a[0] + b[0], a[1] + b[1], a[2] + b[2]]

def v_sub(a, b):
    return [a[0] - b[0], a[1] - b[1], a[2] - b[2]]

def v_mul_scalar(v, s):
    return [v[0] * s, v[1] * s, v[2] * s]

def v_len(v):
    return sqrt(v[0] * v[0] + v[1] * v[1] + v[2] * v[2])

def cylinder_between(p1, p2, r, fn):
    """
    2点 p1->p2 を結ぶ円柱を作る(cylinderはZ軸方向がデフォルトなので回転で合わせる)
    """
    d = v_sub(p2, p1)
    L = v_len(d)
    if L == 0:
        # 念のため(同一点なら球だけ返す)
        return translate(sphere(r=r, fn=fn), p1)

    dx, dy, dz = d[0], d[1], d[2]

    # Z軸方向の円柱を、ベクトルd方向へ向けるEuler角
    # rz: XY平面での向き、ry: Zからの倒し角
    rz = degrees(atan2(dy, dx))
    xy = sqrt(dx * dx + dy * dy)
    ry = degrees(atan2(xy, dz))

    cyl = cylinder(h=L, r=r, center=False, fn=fn)      # 原点から+Zへ伸びる
    cyl = rotate(cyl, [0.0, ry, rz])                   # 方向合わせ
    cyl = translate(cyl, p1)                           # 始点へ移動
    return cyl

# --- メイン処理(POV-Rayのループ構造をそのまま移植) ---

parts = []

for i in [-1, 1]:
    for j in [-1, 1]:
        for l in [0, 1, 2]:

            # sphere{Rotate(<i, j*phi, 0>, l), ...}
            v = rot_cycle([float(i), float(j) * phi, 0.0], l)
            v = y_up_to_z_up(v)
            v = v_mul_scalar(v, scale_mm)
            parts.append(translate(sphere(r=vtx_r, fn=fn_val), v))

            # cylinder{Rotate(<0, j*phi, 0>, l), Rotate(<i, j*phi, 0>, l), ...}
            a = rot_cycle([0.0, float(j) * phi, 0.0], l)
            b = rot_cycle([float(i), float(j) * phi, 0.0], l)
            a = v_mul_scalar(y_up_to_z_up(a), scale_mm)
            b = v_mul_scalar(y_up_to_z_up(b), scale_mm)
            parts.append(cylinder_between(a, b, r=edge_r, fn=fn_val))

            # cylinder{Rotate(<1,phi,0>,l)*<i,j,k>, Rotate(<1,phi,0>,l+1)*<i,j,k>, ...}
            for k in [-1, 1]:
                base1 = rot_cycle([1.0, phi, 0.0], l)
                base2 = rot_cycle([1.0, phi, 0.0], l + 1)

                # POV-Rayの「*<i,j,k>」は成分ごとの符号反転(component-wise multiply)と解釈
                p1 = [base1[0] * i, base1[1] * j, base1[2] * k]
                p2 = [base2[0] * i, base2[1] * j, base2[2] * k]

                p1 = v_mul_scalar(y_up_to_z_up(p1), scale_mm)
                p2 = v_mul_scalar(y_up_to_z_up(p2), scale_mm)

                parts.append(cylinder_between(p1, p2, r=edge_r, fn=fn_val))

# まとめて結合(union()は使わず + 演算子)
result = parts[0]
for obj in parts[1:]:
    result = result + obj

result = color(result, "blue")

show(result)
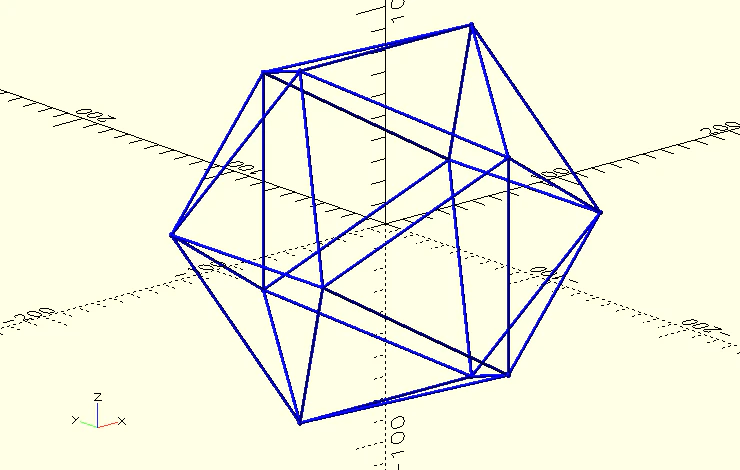
2. 補足
-
POV-RayはY-up、PythonSCADはZ-upなので、座標を (x,y,z)→(x,z,y) に入れ替えています(
y_up_to_z_up) -
Rotate(<...>, l)は、形状から見て 「XYZ成分の巡回置換」(l=0/1/2で座標の並び替え)として再現しました
09. 8点の球
# declare i=-1;
# while(i<2)
	#declare j=-1;
	#while(j<2)
		#declare k=-1;
		#while(k<2)
			sphere{<i,j,k>,0.05 pigment{rgb<1,0,1>}}
			#declare k=k+2;
		#end
		#declare j=j+2;
	#end
	#declare i=i+2;
# end
変換してください。
1. 完成コード(PythonSCAD)
# ==========================================
# POV-Ray 3重ループ(8点の球)→ PythonSCAD 変換
# 作成日: 2026/08/20
# ==========================================

from pythonscad import *

# --- パラメータ設定 (単位: mm) ---
pos_vals = [-1.0, 1.0]   # POV-Ray: i, j, k が -1 と +1 になる
r_sphere = 0.05          # 球の半径
fn_val   = 60            # 球の分割数(滑らかさ)

# --- 座標系変換(重要) ---
# POV-Rayは「Y-up」系の入力として扱い、PythonSCAD(Z-up)へ変換します。
# POV: <x, y, z>  →  PythonSCAD: [X, Y, Z]
# ここでは: X=前後, Y=左右, Z=上下 に合わせて
#   X = z_pov, Y = x_pov, Z = y_pov
def pov_to_pythonscad_xyz(x_pov, y_pov, z_pov):
    return [z_pov, x_pov, y_pov]

# --- メイン処理 ---
dots = None

for i in pos_vals:
    for j in pos_vals:
        for k in pos_vals:
            p = pov_to_pythonscad_xyz(i, j, k)
            s = translate(sphere(r=r_sphere, fn=fn_val), p)
            dots = s if dots is None else (dots + s)

result = color(dots, "magenta")
show(result)
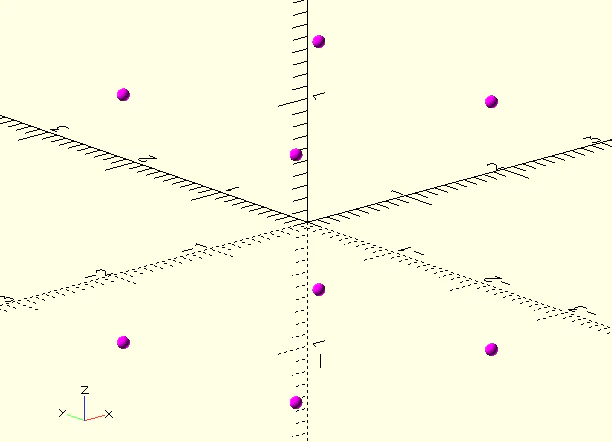
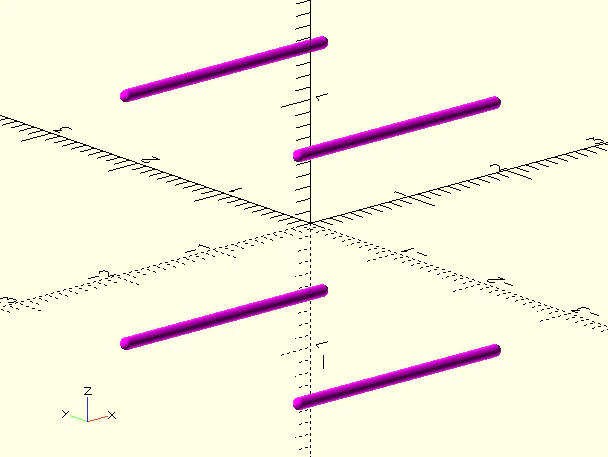
10. sphere + cylinder 配置
cylinderを加えています。
# declare i=-1;
# while(i<2)
	#declare j=-1;
	#while(j<2)
		#declare k=-1;
		#while(k<2)
			sphere{<i,j,k>,0.05 pigment{rgb<1,0,1>}}
			#declare k=k+2;
		#end
		cylinder{<i,j,1>,<i,j,-1>,0.05 pigment{rgb<1,0,1>}}
		#declare j=j+2;
	#end
	#declare i=i+2;
# end
変換してください。
1. 完成コード(PythonSCAD)
# ==========================================
# POV-Ray スニペット変換(sphere + cylinder 配置)
# 作成日: 2026/08/20
# ==========================================

from pythonscad import *

# --- パラメータ設定 (単位: mm) ---
grid    = 1.0     # POVの i,j,k = ±1 に相当
rod_len = 2.0     # cylinder の端点が ±1 なので長さは 2
r_mark  = 0.05    # sphere/cylinder の半径
fn_val  = 48

# --- 座標系変換(POV-Ray: Y-up → PythonSCAD: Z-up) ---
# POV <x, y, z> を PythonSCAD [X, Y, Z] に合わせて
#   X(前後) = z
#   Y(左右) = x
#   Z(上下) = y
def pov_to_scad(p):
    x, y, z = p
    return [z, x, y]

# --- 形状生成 ---
def create_spheres():
    """POVの sphere{<i,j,k>, r} を8点生成"""
    pts = [-grid, grid]
    s_all = None
    for i in pts:
        for j in pts:
            for k in pts:
                p_scad = pov_to_scad([i, j, k])
                s = translate(sphere(r=r_mark, fn=fn_val), p_scad)
                s_all = s if s_all is None else (s_all + s)
    return s_all

def create_rods():
    """POVの cylinder{<i,j,1>, <i,j,-1>, r} を4本生成(POVのz方向=PythonSCADのX方向)"""
    pts = [-grid, grid]

    # X軸方向の円柱:Z軸円柱をY回りに90度倒す
    base_rod = rotate(cylinder(h=rod_len, r=r_mark, center=True, fn=fn_val), [0, 90, 0])

    c_all = None
    for i in pts:
        for j in pts:
            # 端点がX=±1になるよう、中心はX=0。位置は (Y=i, Z=j)
            center_scad = [0.0, i, j]
            c = translate(base_rod, center_scad)
            c_all = c if c_all is None else (c_all + c)
    return c_all

# --- メイン処理 ---
spheres_part = create_spheres()
rods_part    = create_rods()

result = spheres_part + rods_part
result = color(result, "magenta")

show(result)
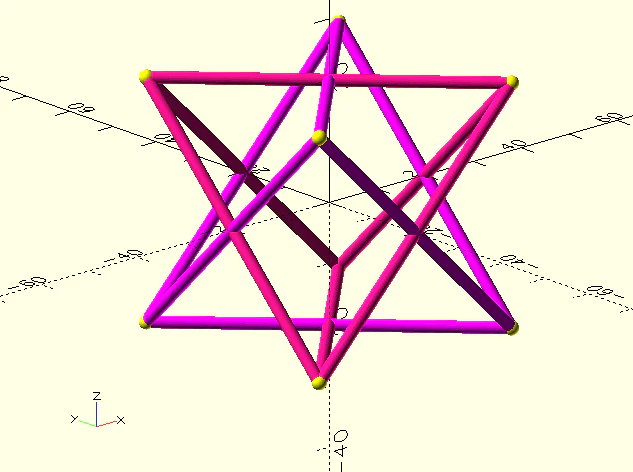
11. 立方体の頂点から作る「正四面体 × 2」(対称性 + if分岐)
正四面体
対称性を利用して、条件分岐ifも使い、
立方体の頂点を元に正四面体を2つ作ります.

# declare i=-1;
# while(i<2)
	#declare j=-1;
	#while(j<2)
		#declare k=-1;
		#while(k<2)
			sphere{<i,j,k>,0.05 pigment{rgb<1,1,0>}}
			#declare k=k+2;
		#end
        #declare l=0;
		#while (l<3)
            cylinder{Rotate(<i,j,1>,l),Rotate(<i,-j,-1>,l),0.05 pigment{rgb<1,0,1>}}
			#declare l=l+1;
		#end
		#declare j=j+2;
	#end
	#declare i=i+2;
# end

変換してください。
1. 完成コード(PythonSCAD)
# ==========================================
# 立方体の頂点から作る「正四面体 × 2」(対称性 + if分岐)
# 作成日: 2026/08/20
# ==========================================

from pythonscad import *
from math import pi, sin, cos, atan2, sqrt  # 幾何計算に必要

# --- パラメータ設定 (単位: mm) ---
unit      = 20.0   # 立方体の頂点座標を ±unit とする(サイズの基準)
vtx_r     = 1.2    # 頂点の球(見やすさ用)
rod_r     = 1.0    # 辺(円柱)の太さ
fn_val    = 60     # 円・球の分割数

# --- 関数定義 ---

def deg(rad):
    """ラジアン -> 度"""
    return rad * 180.0 / pi

def rod_between(p1, p2, r, fn):
    """
    2点 p1, p2 を結ぶ円柱(Z軸円柱を回転して作る)
    - cylinder はZ方向がデフォルトなので、方向ベクトルに合わせて回転させる。
    """
    dx = p2[0] - p1[0]
    dy = p2[1] - p1[1]
    dz = p2[2] - p1[2]
    L = sqrt(dx * dx + dy * dy + dz * dz)

    # yaw: Z回り(XY平面の向き)
    yaw = atan2(dy, dx)

    # pitch: Y回り(Z軸からどれだけ倒すか)
    # atan2(水平成分, 垂直成分) にしておくと安定
    horiz = sqrt(dx * dx + dy * dy)
    pitch = atan2(horiz, dz)

    cyl = cylinder(r=r, h=L, center=True, fn=fn)
    cyl = rotate(cyl, [0, deg(pitch), deg(yaw)])

    mid = [(p1[0] + p2[0]) / 2.0, (p1[1] + p2[1]) / 2.0, (p1[2] + p2[2]) / 2.0]
    return translate(cyl, mid)

def edges_of_tetra(points, r, fn):
    """4頂点 points から、6本の辺(円柱)を全部作って足し合わせる"""
    e = None
    for a in range(4):
        for b in range(a + 1, 4):
            seg = rod_between(points[a], points[b], r=r, fn=fn)
            e = seg if e is None else (e + seg)
    return e

# --- メイン処理 ---

# 立方体の8頂点を走査しながら、if分岐で「2つの正四面体」に分類する
tetra_pos = []  # i*j*k > 0 側(符号のマルチプライが +)
tetra_neg = []  # i*j*k < 0 側(符号のマルチプライが -)

vtx_marks = None
for i in [-1, 1]:
    for j in [-1, 1]:
        for k in [-1, 1]:
            p = [i * unit, j * unit, k * unit]

            # 頂点マーカー(黄色)
            s = translate(sphere(r=vtx_r, fn=fn_val), p)
            vtx_marks = s if vtx_marks is None else (vtx_marks + s)

            # ここが「条件分岐 if」で2つの四面体に分けるポイント
            if i * j * k > 0:
                tetra_pos.append(p)
            else:
                tetra_neg.append(p)

# それぞれの正四面体の辺を作る(マゼンタ系で色分け)
edges_pos = edges_of_tetra(tetra_pos, r=rod_r, fn=fn_val)
edges_neg = edges_of_tetra(tetra_neg, r=rod_r, fn=fn_val)

edges_pos = color(edges_pos, "magenta")
edges_neg = color(edges_neg, "deeppink")
vtx_marks = color(vtx_marks, "yellow")

result = vtx_marks + edges_pos + edges_neg

show(result)
2. 変換のポイント(POV-Ray → PythonSCAD)
- POV-Ray の
#declare i=-1; #while(i<2) ... i=i+2は、Python ではfor i in [-1, 1]が同じ意味です(対称性をそのまま活かせます) - 「立方体8頂点 → 2つの正四面体」は、頂点
(i, j, k)の 符号の積i*j*kが +か-かで自動分類できます(ifが効く)-
i*j*k > 0の4点とi*j*k < 0の4点が、それぞれ正四面体になります
-
- POV-Ray の
cylinder{A,B,r}は「2点を結ぶ円柱」ですが、PythonSCAD は基本が「Z方向円柱」なので、rod_between()のように 回転+移動で作ります
📄 ライセンスと「オープンソース」の文化について
本記事のソースコードは、すべて MIT ライセンス で公開しています。
- 高校生のみなさんへ 🚀
プログラミングの世界には、「自分が作った便利な仕組みをみんなに共有し、お互いに助け合って技術を発展させる(オープンソース)」という素晴らしい文化があります。このコードも、作者の名前(クレジット)さえ残してもらえれば、改造して学校の課題に使ったり、自分のアプリに組み込んだりして自由に無料で使ってOKです!
ぜひこのコードをベースに、自分だけの新しいプログラムを作って挑戦してみてください。 - 免責事項 ⚠️
本記事およびコードは個人の研究・検証に基づくものであり、所属する組織の公式見解ではありません。自由に使っていただけますが、利用に伴ういかなる損害についても執筆者は責任を負いかねますので、すべて「自己責任(無保証)」の範囲内で楽しく学んでくださいね。
参考資料