※本記事は,[ESP32]LINEbotからロボットアームを動かす/LINEbot編 と合わせて御覧ください.
概要
ざっくりいうと,家の外からLINE botで指示を送信すると,自宅など別のネットワーク下にあるロボットアームが指示に応じて動いてリモコンを押す,というものを@fauntleroy 氏と共同で開発した.
私がロボットアーム側(クライアント)を担当し,@fauntleroy 氏がLINE bot側(サーバーサイド)を担当した.
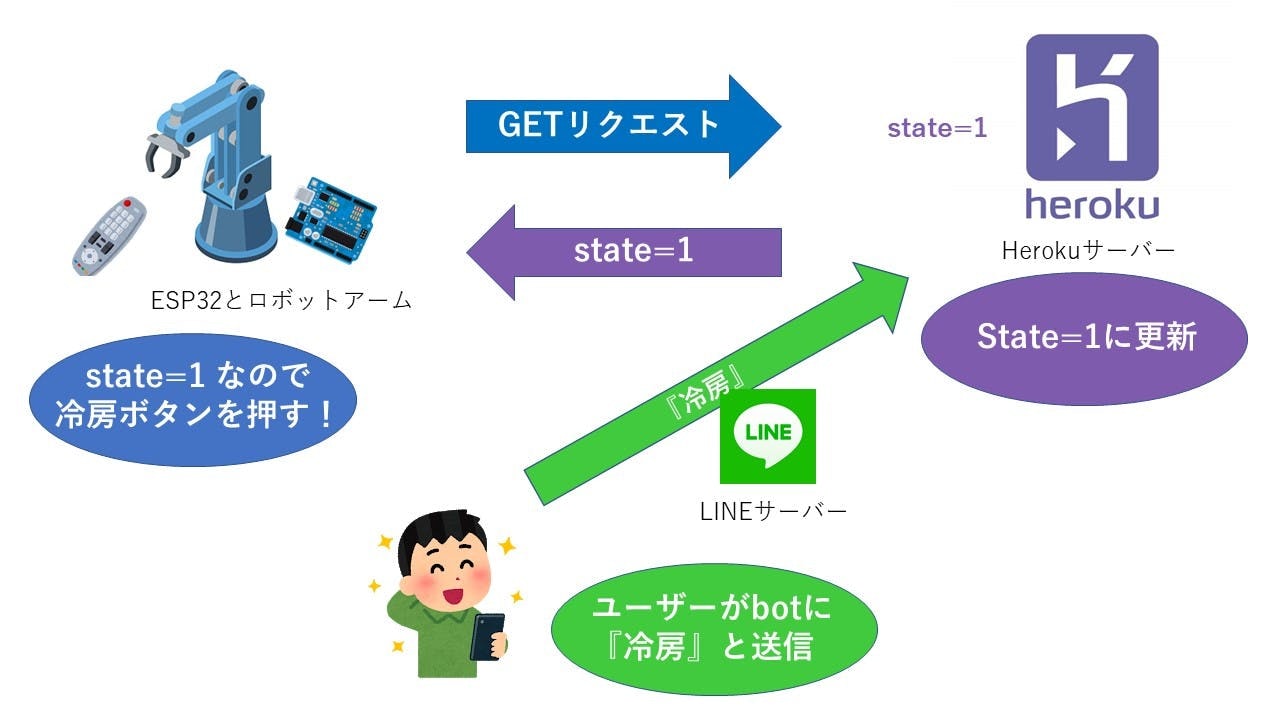
イメージとしては,下記図の通り.

常にロボットアームからサーバーにGETリクエストを投げておき,LINE botから指示が投げられたときにstate = 1など指示内容をロボットアーム側に受け渡している.
LINE側はこちらの@fauntleroy 氏の記事を御覧ください.
[ESP32]LINEbotからロボットアームを動かす/ロボットアーム編
(上記画像は@fauntleroy 氏より拝借しました.)
使用したもの
- [ESP32] (https://www.amazon.co.jp/gp/product/B06XWP81GP/ref=ppx_yo_dt_b_asin_title_o01_s01?ie=UTF8&psc=1)
- ロボットアーム
- LINE Messaging API
- heroku
環境設定
ESP32をMacのArduino用IDEで認識させるためには,通常のボードマネージャだけでなく,追加でドライバが必要.
このあたりのサイトを参照
MacでESP32のLチカ(Arduino IDE版)
※なお,私の環境では非常に上記ドライバが不安定で,macでESP32が認識されない問題があった.対応策としては,都度少し古いバージョンのドライバを入れ直すことだが,明確な解決方法は見つかっていない.
実装方法
諸々初期化
サーバー通信用と,ロボットアームの制御用で分けて初期化用のコードを書いた.
# include <ESP32Servo.h>
# include <WiFi.h>
# include <string>

//ロボット用宣言
Servo servo1,servo2,servo3;

int servo3Pin = 25;
int servo2Pin = 2;
int servo1Pin = 15;

int minUs = 500;
int maxUs = 2400;
int pos = 0;

//server用宣言
WiFiClient client;
//wifiの設定
const char* ssid     = "ここにSSIDをかく";
const char* password = "ここにWIFIのパスワードを書く";

//接続先サーバー
const char* server     = "hogehoge.com";
//ポート番号は適宜.今回は80番だった.
const int httpPort = 80;

int fsr_array[10];
int count = 0;
void setup()
void setup()はコードが実行されるときにはじめに一度だけ読まれる部分である.
本来初期化をここに書くことが多い.
void setup() {

  Serial.begin(9600);
  delay(5000);

  //サーボポート等初期化
  servo1.attach(servo1Pin, minUs, maxUs);
  servo2.attach(servo2Pin, minUs, maxUs);
  servo3.attach(servo3Pin, minUs, maxUs);
  //向き固定
  servo1.write(0);
  servo2.write(45);
  servo3.write(180);


  Serial.println("===ロボット設定完了===");

  //wifi接続
  Serial.println();
  Serial.println();
  Serial.print("Connecting to ");
  Serial.println(ssid);

  WiFi.begin(ssid, password);

  while (WiFi.status() != WL_CONNECTED) {
    delay(500);
    Serial.print(".");
  }

  Serial.println("");
  Serial.println("WiFi connected");
  Serial.println("IP address: ");
  Serial.println(WiFi.localIP());


  //サーバー接続
  if (client.connect(server,httpPort)) {
    Serial.println("Client Connected");
  } else {
    Serial.println("No Connection desu");
  }

}
void loop()
setup()が呼び出された後は,基本的にこちらが呼ばれる.
まず,loop内で使用する関数の定義.今回は,指示を受けたら,ボタンを押すのに適切な速さでロボットアームを動かす関数を実装した.
void ButtunPush(Servo servo2){

   //リモコンにロボットアームを近づける
   for (pos = 45; pos >= 30; pos -= 1) { //45度から30度まで1度ずつ減らす
    servo2.write(pos);
    delay(50);  //1度減らすごとに0.5秒待つ.
  }

   //リモコンのボタンを押す
   for (pos = 30; pos >= 0; pos -= 1) { //30度から0度まで1度ずつ減らす
    servo2.write(pos);
    delay(15);             //1度減らすごとに0.15秒待つ.
  }

  //リモコンを初期位置に戻す
  for (pos = 0; pos <= 45; pos += 1) { //0度から45度まで増やす.
    servo2.write(pos);
    delay(50);
  }
}
最後に,loop内を実装.
void loop() {

  if (client.connect(server,httpPort)) {
    Serial.println("Client Connected on loop"+(String)count+"回目のループ");
  } else {
    Serial.println("No Connection on loop");
  }
  count++;

  // リクエスト用URIを作成
  // GETリクエストを投げたい場所をかくところ.
  String url = "/ToI";

  Serial.print("Requesting URL: ");
  Serial.println(url);

  // ここでサーバーにリクエストを送信
  client.print(String("GET ") + url + " HTTP/1.1\r\n" +
               "Host: " + server + "\r\n" +
               "Connection: close\r\n\r\n");
  //一秒ごとに
   delay(1000);

  Serial.println("Respond:");
  int i = 0;
  String line;
  while(client.available()){
    line = client.readStringUntil('\r');//シリアルバッファから
  }

    line.toCharArray(number,line.length()+1);
    Serial.println("motion_numberは");
    Serial.println(number[1]);

    motion_number = number[1];

  Serial.println();
  Serial.println("closing connection");

  //受け取った値次第で変更
  //1が除湿,2が冷房
  if  (motion_number.equals("2")) {
      for (pos = 0; pos <= 5; pos += 1) {
          servo1.write(pos);
          delay(50);
  }
  ButtunPush(servo2);

   }else if (motion_number.equals("1")) { //除湿
          for (pos = 5; pos >= 0; pos -= 1) {degrees
        // in steps of 1 degree
        servo1.write(pos);
        delay(50);
      }
      ButtunPush(servo2);
   }else {
    for (pos = 0; pos <= 5; pos += 1) {
          servo1.write(pos);
          delay(50);
      }
    }
}
コード
最終的にまとめると,ロボットアーム側のコードは以下のようになる.
# include <ESP32Servo.h>
# include <WiFi.h>
# include <string>


//ロボット用宣言
Servo servo1,servo2,servo3;

int servo3Pin = 25;
int servo2Pin = 2;
int servo1Pin = 15;

int minUs = 500;
int maxUs = 2400;
int pos = 0;

//server用宣言
WiFiClient client;
const char* ssid     = "ここにSSIDをかく";
const char* password = "ここにWIFIのパスワードを書く";
const char* server     = "hogehoge.com";
//ポート番号は適宜.今回は80番だった.
const int httpPort = 80;

int fsr_array[10];
int count = 0;
String motion_number;
char number[1000];
char buff[256];
unsigned char a='A';


void setup() {

  Serial.begin(9600);
  delay(5000);

  //サーボポート等初期化
  servo1.attach(servo1Pin, minUs, maxUs);
  servo2.attach(servo2Pin, minUs, maxUs);
  servo3.attach(servo3Pin, minUs, maxUs);
  //向き固定
  servo1.write(0);
  servo2.write(45);
  servo3.write(180);


  Serial.println("===ロボット設定完了===");

  //wifi接続
  Serial.println();
  Serial.println();
  Serial.print("Connecting to ");
  Serial.println(ssid);

  WiFi.begin(ssid, password);

  while (WiFi.status() != WL_CONNECTED) {
    delay(500);
    Serial.print(".");
  }

  Serial.println("");
  Serial.println("WiFi connected");
  Serial.println("IP address: ");
  Serial.println(WiFi.localIP());


  //サーバー接続
  if (client.connect(server,httpPort)) {
    Serial.println("Client Connected");
  } else {
    Serial.println("No Connection desu");
  }

}


void ButtunPush(Servo servo2){

   //リモコンにロボットアームを近づける
   for (pos = 45; pos >= 30; pos -= 1) { //45度から30度まで1度ずつ減らす
    servo2.write(pos);
    delay(50);  //1度減らすごとに0.5秒待つ.
  }

   //リモコンのボタンを押す
   for (pos = 30; pos >= 0; pos -= 1) { //30度から0度まで1度ずつ減らす
    servo2.write(pos);
    delay(15);             //1度減らすごとに0.15秒待つ.
  }

  //リモコンを初期位置に戻す
  for (pos = 0; pos <= 45; pos += 1) { //0度から45度まで増やす.
    servo2.write(pos);
    delay(50);
  }
}


void loop() {

  if (client.connect(server,httpPort)) {
    Serial.println("Client Connected on loop"+(String)count+"回目のループ");
  } else {
    Serial.println("No Connection on loop");
  }
  count++;

  // リクエスト用URIを作成
  String url = "/ToI";

  Serial.print("Requesting URL: ");
  Serial.println(url);

  // サーバーにリクエストを送信
  client.print(String("GET ") + url + " HTTP/1.1\r\n" +
               "Host: " + server + "\r\n" +
               "Connection: close\r\n\r\n");
  //一秒ごとに
   delay(1000);

  Serial.println("Respond:");
  int i = 0;
  String line;
  while(client.available()){
    line = client.readStringUntil('\r');//シリアルバッファから
  }

    line.toCharArray(number,line.length()+1);
    Serial.println("motion_numberは");
    Serial.println(number[1]);

    motion_number = number[1];

  Serial.println();
  Serial.println("closing connection");

  //受け取った値次第で変更
  //1が除湿,2が冷房
  if  (motion_number.equals("2")) {
      for (pos = 0; pos <= 5; pos += 1) {
          servo1.write(pos);
          delay(50);
  }
  ButtunPush(servo2);

   }else if (motion_number.equals("1")) { //除湿
          for (pos = 5; pos >= 0; pos -= 1) {
        servo1.write(pos);
        delay(50);
      }
      ButtunPush(servo2);
   }else {
    for (pos = 0; pos <= 5; pos += 1) {
          servo1.write(pos);
          delay(50);
      }
    }
}