MySQL8.0をCentOS8.1にインストールしたのでその手順を紹介します。
MySQLの公式ページを参考にインストールしたので、マニュアルを要約、かつ実際の実行結果を載せた形となります。
環境
- OS:CentOS Linux release 8.1.1911
インストール手順
1. MySQL Yumリポジトリの追加
MySQL Yumリポジトリのダウンロードページからインストールするファイル名を確認します。
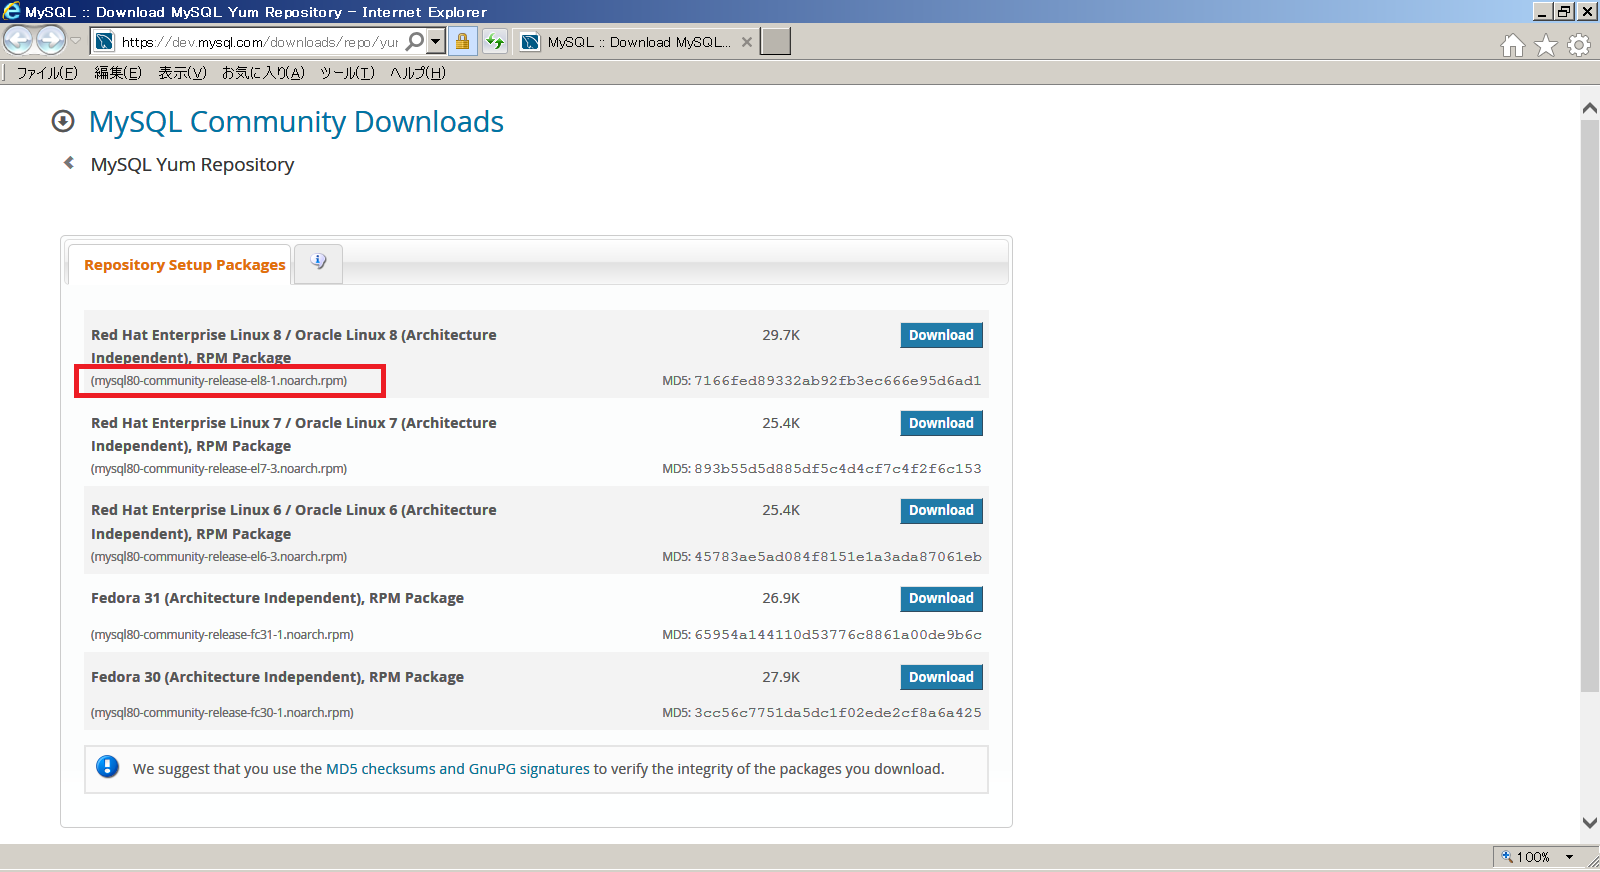
ここではCentOS8.1にインストールするのでmysql80-community-release-el8-1.noarch.rpmとなります。
https://dev.mysql.com/get/と繋げて、以下のコマンドでインストールします。
dnf localinstall https://dev.mysql.com/get/mysql80-community-release-el8-1.noarch.rpm
[root@centos8 ~]# dnf localinstall https://dev.mysql.com/get/mysql80-community-release-el8-1.noarch.rpm
CentOS-8 - AppStream                            5.3 kB/s | 4.3 kB     00:00
CentOS-8 - Base                                 5.7 kB/s | 3.8 kB     00:00
CentOS-8 - Extras                               2.2 kB/s | 1.5 kB     00:00
mysql80-community-release-el8-1.noarch.rpm       22 kB/s |  30 kB     00:01
依存関係が解決しました。
================================================================================
 パッケージ                     Arch        バージョン  リポジトリー      サイズ
================================================================================
インストール:
 mysql80-community-release      noarch      el8-1       @commandline       30 k

トランザクションの概要
================================================================================
インストール  1 パッケージ

合計サイズ: 30 k
インストール済みのサイズ: 29 k
これでよろしいですか? [y/N]: y
パッケージのダウンロード:
トランザクションの確認を実行中
トランザクションの確認に成功しました。
トランザクションのテストを実行中
トランザクションのテストに成功しました。
トランザクションを実行中
  準備             :                                                        1/1
  インストール中   : mysql80-community-release-el8-1.noarch                 1/1
  検証             : mysql80-community-release-el8-1.noarch                 1/1

インストール済み:
  mysql80-community-release-el8-1.noarch

完了しました!
[root@centos8 ~]#
/etc/yum.repos.d配下を参照し、リポジトリが追加されたことを確認します。
[root@centos8 ~]# cd /etc/yum.repos.d
[root@centos8 yum.repos.d]# ls -l
合計 60
-rw-r--r--. 1 root root  731  3月 13 04:15 CentOS-AppStream.repo
-rw-r--r--. 1 root root  712  3月 13 04:15 CentOS-Base.repo
-rw-r--r--. 1 root root 1043  3月 13 04:15 CentOS-CR.repo
-rw-r--r--. 1 root root  668  3月 13 04:15 CentOS-Debuginfo.repo
-rw-r--r--  1 root root  743  3月 13 04:15 CentOS-Devel.repo
-rw-r--r--. 1 root root  756  3月 13 04:15 CentOS-Extras.repo
-rw-r--r--. 1 root root  738  3月 13 04:15 CentOS-HA.repo
-rw-r--r--. 1 root root  928  3月 13 04:15 CentOS-Media.repo
-rw-r--r--. 1 root root  736  3月 13 04:15 CentOS-PowerTools.repo
-rw-r--r--. 1 root root 1382  3月 13 04:15 CentOS-Sources.repo
-rw-r--r--. 1 root root   74  3月 13 04:15 CentOS-Vault.repo
-rw-r--r--. 1 root root  798  3月 13 04:15 CentOS-centosplus.repo
-rw-r--r--. 1 root root  338  3月 13 04:15 CentOS-fasttrack.repo
-rw-r--r--  1 root root 1050 10月  4  2019 mysql-community-source.repo
-rw-r--r--  1 root root  995 10月  4  2019 mysql-community.repo
[root@centos8 yum.repos.d]#
mysql-community-source.repoとmysql-community.repoが追加されました。
以下のコマンドでMySQLのリポジトリが有効になっていることを確認します。
dnf repolist enabled | grep "mysql.*-community.*"
[root@centos8 ~]# dnf repolist enabled | grep "mysql.*-community.*"
メタデータの期限切れの最終確認: 0:11:26 時間前の 2020年04月21日 21時24分21秒 に 実施しました。
mysql-connectors-community           MySQL Connectors Community               4
mysql-tools-community                MySQL Tools Community                    1
mysql80-community                    MySQL 8.0 Community Server               3
[root@centos8 ~]#
2. デフォルトのMySQLモジュールの無効化
以下のコマンドでデフォルトデフォルトのMySQLモジュールを無効化します。
dnf module disable mysql
[root@centos8 ~]# dnf module disable mysql
メタデータの期限切れの最終確認: 0:15:51 時間前の 2020年04月21日 21時24分21秒 に 実施しました。
依存関係が解決しました。
================================================================================
 パッケージ        アーキテクチャー バージョン          リポジトリー      サイズ
================================================================================
モジュールの無効化:
 mysql

トランザクションの概要
================================================================================

これでよろしいですか? [y/N]: y
完了しました!
[root@centos8 ~]#
3. MySQLのインストール
以下のコマンドでリポジトリからインストールするパッケージを確認します。
dnf info mysql-community-server
[root@centos8 ~]# dnf info mysql-community-server
メタデータの期限切れの最終確認: 0:21:54 時間前の 2020年04月21日 21時24分21秒 に 実施しました。
利用可能なパッケージ
名前         : mysql-community-server
バージョン   : 8.0.19
リリース     : 1.el8
Arch         : x86_64
サイズ       : 53 M
ソース       : mysql-community-8.0.19-1.el8.src.rpm
リポジトリー : mysql80-community
概要         : A very fast and reliable SQL database server
URL          : http://www.mysql.com/
ライセンス   : Copyright (c) 2000, 2019, Oracle and/or its affiliates. All
             : rights reserved. Under GPLv2 license as shown in the Description
             : field.
説明         : The MySQL(TM) software delivers a very fast, multi-threaded,
             : multi-user, and robust SQL (Structured Query Language) database
             : server. MySQL Server is intended for mission-critical, heavy-load
             : production systems as well as for embedding into mass-deployed
             : software. MySQL is a trademark of Oracle and/or its affiliates
             :
             : The MySQL software has Dual Licensing, which means you can use
             : the MySQL software free of charge under the GNU General Public
             : License (http://www.gnu.org/licenses/). You can also purchase
             : commercial MySQL licenses from Oracle and/or its affiliates if
             : you do not wish to be bound by the terms of the GPL. See the
             : chapter "Licensing and Support" in the manual for further info.
             :
             : The MySQL web site (http://www.mysql.com/) provides the latest
             : news and information about the MySQL software.  Also please see
             : the documentation and the manual for more information.
             :
             : This package includes the MySQL server binary as well as related
             : utilities to run and administer a MySQL server.

[root@centos8 ~]#
確認できたので、以下のコマンドでインストールします。
dnf install mysql-community-server
[root@centos8 ~]# dnf install mysql-community-server
メタデータの期限切れの最終確認: 0:23:16 時間前の 2020年04月21日 21時24分21秒 に 実施しました。
依存関係が解決しました。
================================================================================
 パッケージ                Arch      バージョン      リポジトリー         サイズ
================================================================================
インストール:
 mysql-community-server    x86_64    8.0.19-1.el8    mysql80-community     53 M
依存関係のインストール:
 mysql-community-client    x86_64    8.0.19-1.el8    mysql80-community     12 M
 mysql-community-common    x86_64    8.0.19-1.el8    mysql80-community    609 k
 mysql-community-libs      x86_64    8.0.19-1.el8    mysql80-community    1.4 M

トランザクションの概要
================================================================================
インストール  4 パッケージ

ダウンロードサイズの合計: 67 M
インストール済みのサイズ: 383 M
これでよろしいですか? [y/N]: y
パッケージのダウンロード:
(1/4): mysql-community-common-8.0.19-1.el8.x86_  90 kB/s | 609 kB     00:06
(2/4): mysql-community-libs-8.0.19-1.el8.x86_64  88 kB/s | 1.4 MB     00:16
(3/4): mysql-community-client-8.0.19-1.el8.x86_ 130 kB/s |  12 MB     01:35
(4/4): mysql-community-server-8.0.19-1.el8.x86_ 230 kB/s |  53 MB     03:56
--------------------------------------------------------------------------------
合計                                            284 kB/s |  67 MB     04:02
警告: /var/cache/dnf/mysql80-community-b1f1ed5ba88ce0f8/packages/mysql-community-client-8.0.19-1.el8.x86_64.rpm: ヘッダー V3 DSA/SHA1 Signature、鍵 ID 5072e1f5: NOKEY
MySQL 8.0 Community Server                       27 MB/s |  27 kB     00:00
GPG 鍵 0x5072E1F5 をインポート中:
 Userid     : "MySQL Release Engineering <mysql-build@oss.oracle.com>"
 Fingerprint: A4A9 4068 76FC BD3C 4567 70C8 8C71 8D3B 5072 E1F5
 From       : /etc/pki/rpm-gpg/RPM-GPG-KEY-mysql
これでよろしいですか? [y/N]: y
鍵のインポートに成功しました
トランザクションの確認を実行中
トランザクションの確認に成功しました。
トランザクションのテストを実行中
トランザクションのテストに成功しました。
トランザクションを実行中
  準備             :                                                        1/1
  インストール中   : mysql-community-common-8.0.19-1.el8.x86_64             1/4
  インストール中   : mysql-community-libs-8.0.19-1.el8.x86_64               2/4
  scriptletの実行中: mysql-community-libs-8.0.19-1.el8.x86_64               2/4
  インストール中   : mysql-community-client-8.0.19-1.el8.x86_64             3/4
  scriptletの実行中: mysql-community-server-8.0.19-1.el8.x86_64             4/4
  インストール中   : mysql-community-server-8.0.19-1.el8.x86_64             4/4
  scriptletの実行中: mysql-community-server-8.0.19-1.el8.x86_64             4/4
  検証             : mysql-community-client-8.0.19-1.el8.x86_64             1/4
  検証             : mysql-community-common-8.0.19-1.el8.x86_64             2/4
  検証             : mysql-community-libs-8.0.19-1.el8.x86_64               3/4
  検証             : mysql-community-server-8.0.19-1.el8.x86_64             4/4

インストール済み:
  mysql-community-server-8.0.19-1.el8.x86_64
  mysql-community-client-8.0.19-1.el8.x86_64
  mysql-community-common-8.0.19-1.el8.x86_64
  mysql-community-libs-8.0.19-1.el8.x86_64

完了しました!
[root@centos8 ~]#
以下のコマンドでMySQLがインストールされていることを確認します。
mysqld --version
[root@centos8 ~]# mysqld --version
/usr/sbin/mysqld  Ver 8.0.19 for Linux on x86_64 (MySQL Community Server - GPL)
[root@centos8 ~]#
4. MySQLの起動
以下のコマンドでMySQLを起動します。
systemctl start mysqld
[root@centos8 ~]# systemctl start mysqld
[root@centos8 ~]#
5. 接続確認
mysqld.logファイルから初期パスワードを検索します。
grep 'temporary password' /var/log/mysqld.log
[root@centos8 ~]# grep 'temporary password' /var/log/mysqld.log
2020-04-21T13:18:30.707097Z 5 [Note] [MY-010454] [Server] A temporary password is generated for root@localhost: T9sqNDtMTr.O
[root@centos8 ~]#
root@localhostの初期パスワードはT9sqNDtMTr.Oとなります。
以下のコマンドでMySQLに接続します。
mysql -uroot -p[パスワード]
[root@centos8 ~]# mysql -uroot -pT9sqNDtMTr.O
mysql: [Warning] Using a password on the command line interface can be insecure.
Welcome to the MySQL monitor.  Commands end with ; or \g.
Your MySQL connection id is 9
Server version: 8.0.19

Copyright (c) 2000, 2020, Oracle and/or its affiliates. All rights reserved.

Oracle is a registered trademark of Oracle Corporation and/or its
affiliates. Other names may be trademarks of their respective
owners.

Type 'help;' or '\h' for help. Type '\c' to clear the current input statement.

mysql>
6. mysql_secure_installationの実行
mysql_secure_installationを実行するとセキュリティの工場として以下を実行することができます。
- rootアカウントの パスワードを設定
- 匿名ユーザーアカウントを削除
- リモートからのrootユーザーのログインを禁止
- testデータベースの削除
[root@centos8 ~]# mysql_secure_installation

Securing the MySQL server deployment.

Enter password for user root:
The 'validate_password' component is installed on the server.
The subsequent steps will run with the existing configuration
of the component.
Using existing password for root.

Estimated strength of the password: 100
Change the password for root ? ((Press y|Y for Yes, any other key for No) : y

New password:

Re-enter new password:

Estimated strength of the password: 100
Do you wish to continue with the password provided?(Press y|Y for Yes, any other key for No) : y
By default, a MySQL installation has an anonymous user,
allowing anyone to log into MySQL without having to have
a user account created for them. This is intended only for
testing, and to make the installation go a bit smoother.
You should remove them before moving into a production
environment.

Remove anonymous users? (Press y|Y for Yes, any other key for No) : y
Success.


Normally, root should only be allowed to connect from
'localhost'. This ensures that someone cannot guess at
the root password from the network.

Disallow root login remotely? (Press y|Y for Yes, any other key for No) : y
Success.

By default, MySQL comes with a database named 'test' that
anyone can access. This is also intended only for testing,
and should be removed before moving into a production
environment.


Remove test database and access to it? (Press y|Y for Yes, any other key for No) : y
 - Dropping test database...
Success.

 - Removing privileges on test database...
Success.

Reloading the privilege tables will ensure that all changes
made so far will take effect immediately.

Reload privilege tables now? (Press y|Y for Yes, any other key for No) : y
Success.

All done!
[root@centos8 ~]#
以下のコマンドで変更したパスワードで接続確認します。
mysql -uroot -p[変更後パスワード]
[root@centos8 ~]# mysql -uroot -pPassword01!
mysql: [Warning] Using a password on the command line interface can be insecure.
Welcome to the MySQL monitor.  Commands end with ; or \g.
Your MySQL connection id is 15
Server version: 8.0.19 MySQL Community Server - GPL

Copyright (c) 2000, 2020, Oracle and/or its affiliates. All rights reserved.

Oracle is a registered trademark of Oracle Corporation and/or its
affiliates. Other names may be trademarks of their respective
owners.

Type 'help;' or '\h' for help. Type '\c' to clear the current input statement.

mysql> show databases;
+--------------------+
| Database           |
+--------------------+
| information_schema |
| mysql              |
| performance_schema |
| sys                |
+--------------------+
4 rows in set (0.01 sec)

mysql> exit
Bye
[root@centos8 ~]#
7. 認証方式の設定
MySQL 8.0以降では認証方式のデフォルトはmysql_native_passwordではなく、caching_sha2_passwordに変更されています。
認証方式としてmysql_native_passwordを使用する場合、設定ファイル/etc/my.cnfの[mysqld]の
# default-authentication-plugin=mysql_native_password
のコメントを外します。
# For advice on how to change settings please see
# http://dev.mysql.com/doc/refman/8.0/en/server-configuration-defaults.html

[mysqld]
#
# Remove leading # and set to the amount of RAM for the most important data
# cache in MySQL. Start at 70% of total RAM for dedicated server, else 10%.
# innodb_buffer_pool_size = 128M
#
# Remove the leading "# " to disable binary logging
# Binary logging captures changes between backups and is enabled by
# default. It's default setting is log_bin=binlog
# disable_log_bin
#
# Remove leading # to set options mainly useful for reporting servers.
# The server defaults are faster for transactions and fast SELECTs.
# Adjust sizes as needed, experiment to find the optimal values.
# join_buffer_size = 128M
# sort_buffer_size = 2M
# read_rnd_buffer_size = 2M
#
# Remove leading # to revert to previous value for default_authentication_plugin,
# this will increase compatibility with older clients. For background, see:
# https://dev.mysql.com/doc/refman/8.0/en/server-system-variables.html#sysvar_default_authentication_plugin
default-authentication-plugin=mysql_native_password

datadir=/var/lib/mysql
socket=/var/lib/mysql/mysql.sock

log-error=/var/log/mysqld.log
pid-file=/var/run/mysqld/mysqld.pid
参考
公式ページ「2.5.1 Installing MySQL on Linux Using the MySQL Yum Repository」
公式ページ「2.5.4 Installing MySQL on Linux Using RPM Packages from Oracle」
公式ページ「4.4.2 mysql_secure_installation — Improve MySQL Installation Security」
以上