はじめに
Flutterで設定画面を実装することになり自前で作ろうかと思っていた矢先、
ググったら良さげなパッケージがあったので、使ってみたら設定画面が楽に実装できました。
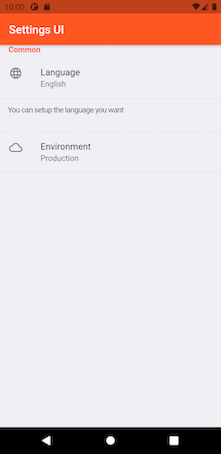
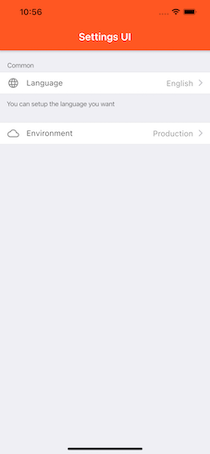
本記事で実際にできる画面がこちら。
Android、iOSでUIがよしなに変わってくれるのも嬉しいところ。
| Android | iOS |
|---|---|
 |
 |
では、早速実装していきます。
設定画面実装
pubspec.yamlにsettings_uiを追加
dependencies:
  settings_ui: ^1.0.0
利用できるWidgetについては以下の4つで、これらを組み合わせて設定画面を作っていきます。
- SettingsList
- SettingsSection
- SettingsTile
- CustomSection
まずは、ScaffoldのbodyにSettingsListを配置します。
  @override
  Widget build(BuildContext context) {
    return Scaffold(
      appBar: AppBar(title: Text('Settings UI')),
      body: SettingsList(
        sections: [
          // SettingsSectionを並べていく。
        ],
      )
    );
  }
次に、SettingsListのsectionsに、以下3つのwidgetを配置していきます。
- SettingsSection → 設定の種別ごとに配置、tilesにSettingsTileかCustomSectionを配置
- SettingsTile → 設定項目
- CustomSection → 説明文が必要な場合や、スライダーなどを実装したい際に配置
        sections: [
          SettingsSection(
            title: 'Common',
            tiles: [
              SettingsTile(
                title: 'Language',
                subtitle: 'English',
                leading: Icon(Icons.language),
                onPressed: (context) {
                  Navigator.of(context).push(MaterialPageRoute(
                    builder: (_) => LanguagesScreen(),
                  ));
                },
              ),
              CustomTile(
                child: Container(
                  color: Color(0xFFEFEFF4),
                  padding: EdgeInsetsDirectional.only(
                    start: 14,
                    top: 12,
                    bottom: 30,
                    end: 14,
                  ),
                  child: Text(
                    'You can setup the language you want',
                    style: TextStyle(
                      color: Colors.grey.shade700,
                      fontWeight: FontWeight.w400,
                      fontSize: 13.5,
                      letterSpacing: -0.5,
                    ),
                  ),
                ),
              ),
            ],
          ),
        ],
      )
SettingsTileのonPressedで次の画面へ遷移し、
LanguageであればEnglish、Japaneseなどを言語を選択するLanguage選択画面を実装します。
Language選択画面は、同じようにSettingsList > SettingsSection > SettingsTileを順に配置し、
SettingsTileのonPressedで、SharedPreferencesを使って選択された値を保存するだけです。
これで設定画面のUIと機能が実装できました。
採用に関して
弊社では、現在、エンジニアを募集しております。
物流に興味・関心がある方はもちろん、
Flutterやモバイル開発に強みがある方、心よりお待ちしております!