はじめに
FPGAのコード開発においては,HDLレベルでの機能検証は避けて通れない.無料で簡単な環境を構築したい場合には,
を用いるのがよい.Mac(OS10.14.6)とwindows10でそれぞれセットアップを試して,動作確認した(2020.8.14)ので,その環境を書き留めておく.Vivado や ModelSim などでも可能ではあるんですが,無料で軽量で簡単にやりたい場合の話です.
Macへのインストール
現在@2020.11.28、頂いたコメント(tchisakaさんに感謝)によるとbrewで簡単にインストールできるようです。まずはそちらをお試しください。
gtkwave
基本的に,GHDL on OS X の通りであるが、brew では今はインストールできない(は過去の話の可能性あり).
https://sourceforge.net/projects/gtkwave/files/
から,gtkwave-3.3.103-osx-app などのバイナリをダウンロードすればOK.
GHDL
これもソースコードがあるようだが,https://github.com/ghdl/ghdl/releases にある ghdl-0.37-macosx-mcode.tgz をダウンロードすると,bin 以下にバイナリがあって,それを叩くだけである(これも過去の話で、brewでいける可能性あり).
環境変数の設定
bashユーザーの場合であるが,
#GHDL
export PATH=/Users/syamada/work/software/ghdl-0.37-macosx-mcode/bin:$PATH

#GTkwave didn't work..
#export PATH=/Applications/gtkwave.app/Contents/MacOS:$PATH
#This should work!!
alias gtkwave='open -a "gtkwave"'
のように自分の環境に合わせて,実行ファイルがある場所にPATHを通せばよいのであるが,なぜかgtkwaveの方はダブルクリックしたいと動かない.~/.bashrc って何?という人は、.bash_profile と .bashrc は何が違うの?使い分けを覚える を一読ください。
GHDLの動作試験
まずは,
https://ghdl.readthedocs.io/en/latest/quick_start/adder/README.html のサンプルを動作してみよう.
entity adder is
  -- `i0`, `i1`, and the carry-in `ci` are inputs of the adder.
  -- `s` is the sum output, `co` is the carry-out.
  port (i0, i1 : in bit; ci : in bit; s : out bit; co : out bit);
end adder;

architecture rtl of adder is
begin
  --  This full-adder architecture contains two concurrent assignments.
  --  Compute the sum.
  s <= i0 xor i1 xor ci;
  --  Compute the carry.
  co <= (i0 and i1) or (i0 and ci) or (i1 and ci);
end rtl;
--  A testbench has no ports.
entity adder_tb is
end adder_tb;

architecture behav of adder_tb is
  --  Declaration of the component that will be instantiated.
  component adder
    port (i0, i1 : in bit; ci : in bit; s : out bit; co : out bit);
  end component;

  --  Specifies which entity is bound with the component.
  for adder_0: adder use entity work.adder;
  signal i0, i1, ci, s, co : bit;
begin
  --  Component instantiation.
  adder_0: adder port map (i0 => i0, i1 => i1, ci => ci, s => s, co => co);

  --  This process does the real job.
  process
    type pattern_type is record
      --  The inputs of the adder.
      i0, i1, ci : bit;
      --  The expected outputs of the adder.
      s, co : bit;
    end record;
    --  The patterns to apply.
    type pattern_array is array (natural range <>) of pattern_type;
    constant patterns : pattern_array :=
      (('0', '0', '0', '0', '0'),
       ('0', '0', '1', '1', '0'),
       ('0', '1', '0', '1', '0'),
       ('0', '1', '1', '0', '1'),
       ('1', '0', '0', '1', '0'),
       ('1', '0', '1', '0', '1'),
       ('1', '1', '0', '0', '1'),
       ('1', '1', '1', '1', '1'));
  begin
    --  Check each pattern.
    for i in patterns'range loop
      --  Set the inputs.
      i0 <= patterns(i).i0;
      i1 <= patterns(i).i1;
      ci <= patterns(i).ci;
      --  Wait for the results.
      wait for 1 ns;
      --  Check the outputs.
      assert s = patterns(i).s
        report "bad sum value" severity error;
      assert co = patterns(i).co
        report "bad carry out value" severity error;
    end loop;
    assert false report "end of test" severity note;
    --  Wait forever; this will finish the simulation.
    wait;
  end process;

end behav;
を用意して,ghdl が実行できる場所で,
ghdl -a --ieee=synopsys adder.vhdl
ghdl -a --ieee=synopsys adder_tb.vhdl
ghdl -e --ieee=synopsys adder_tb
ghdl -r --ieee=synopsys adder_tb --vcd=adder.vcd
を実行する.最後,VCDファイル のオプションをつける.VCDファイルに書き出さないと,gtkwaveで波形を見ることができない.
基本的なghdlのコンパイル方法を整理すると,
- -a は,ファイル名を指定してコンパイルを実行する.
- -e は,テストベンチのエンティティである adder_tb を指定する.
- -r も同様にテストベンチのエンティティを指定する.オプションで --vcd とすると,gtkwave でみられる波形データを出力してくる.
となる.
シミュレーションを意図する時間で強制的に止めるためには,ghdl -r の箇所で,--stop-time=60ns などをつければよい.A simulation environment for the synchronous counterを参照されたい.
gtkwaveの動作試験
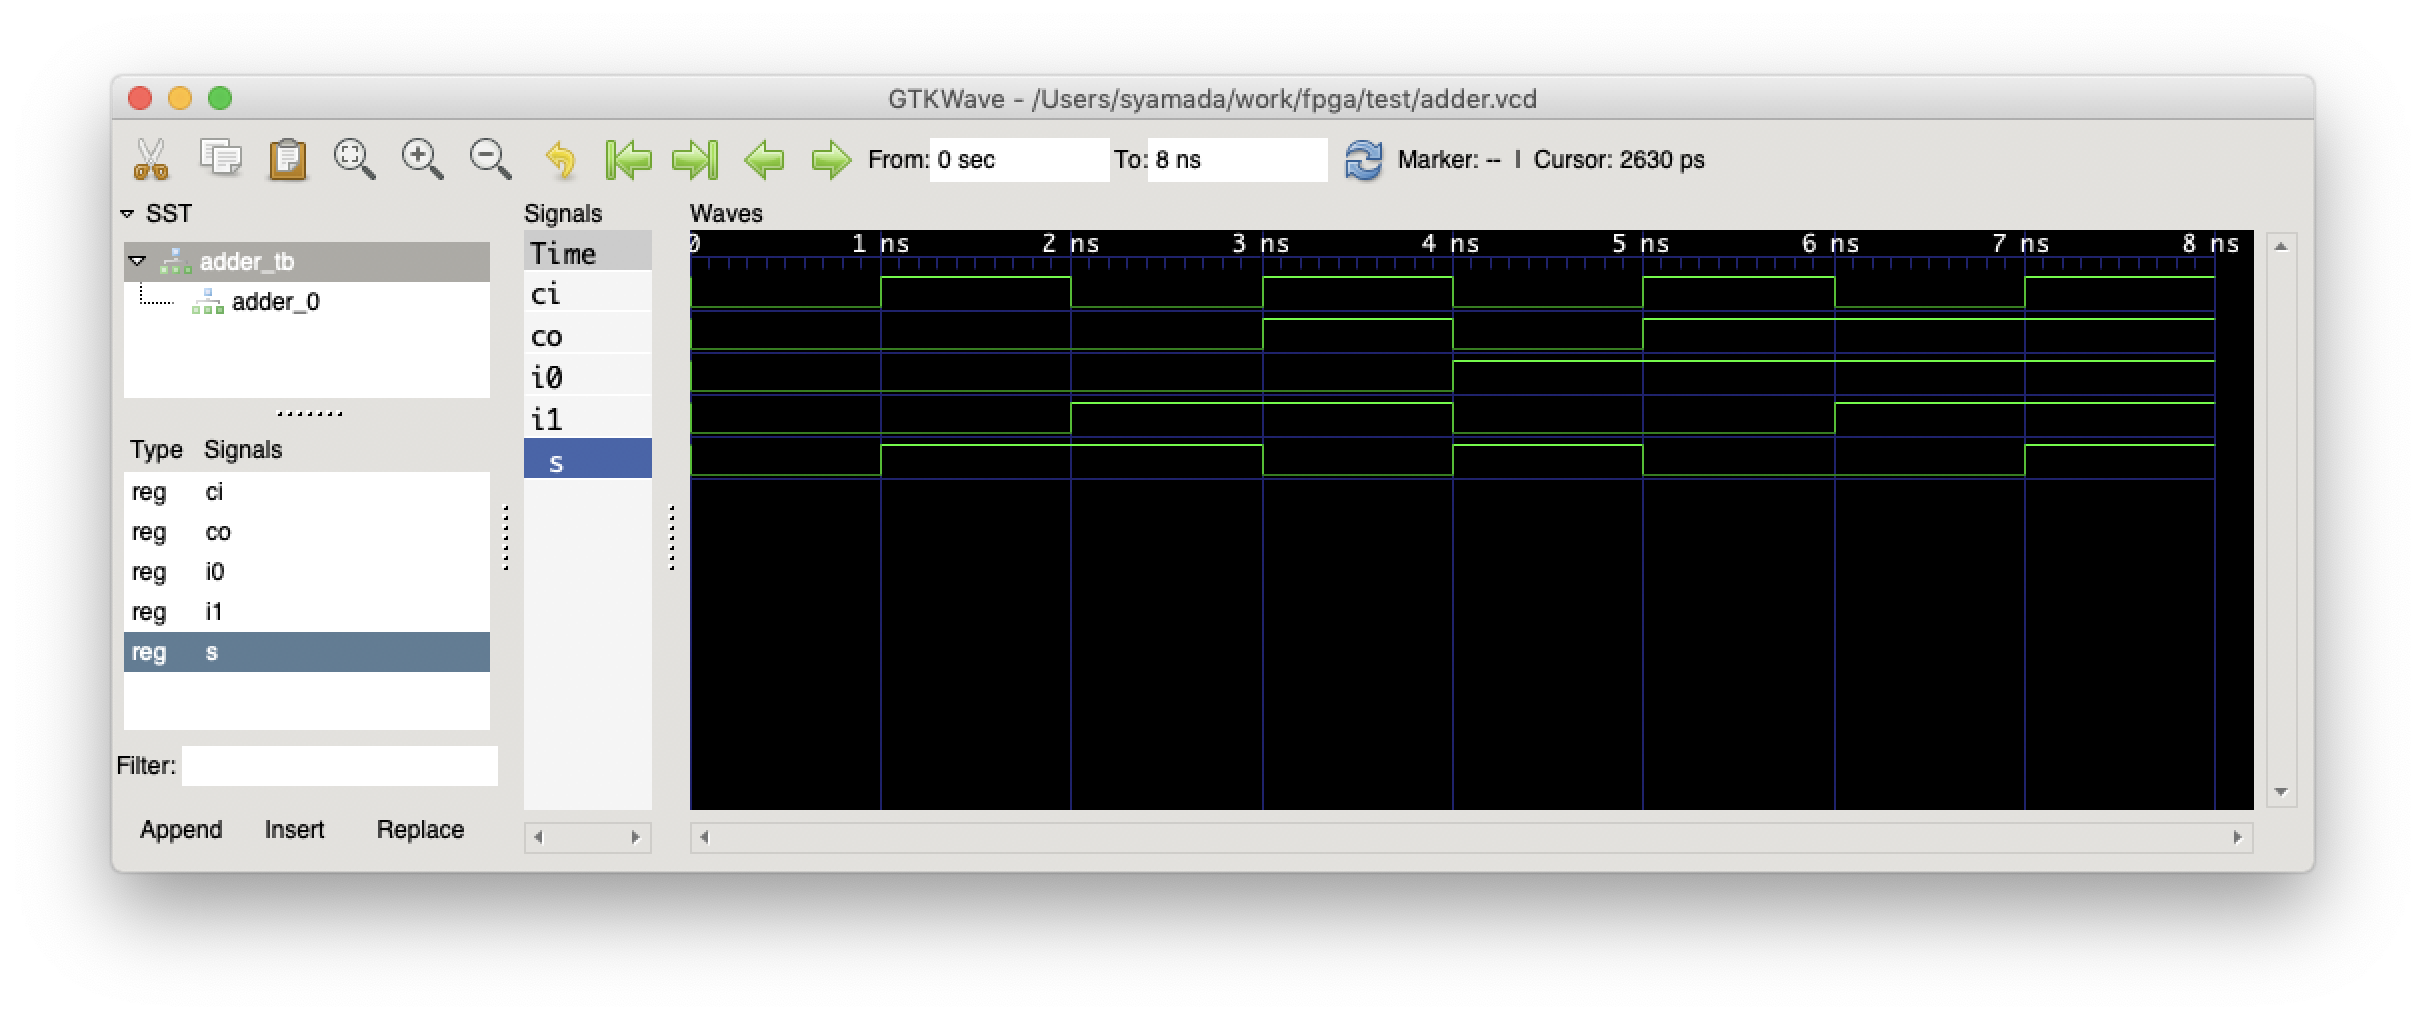
vcdファイルを開くと,はじめは何も見えない.時間軸の範囲がフェミト秒のように超小さいためである.そこで,虫眼鏡のマイナスを連打して,このような画像が見えればOK.
Windows10へのインストール
gtkwave
https://sourceforge.net/projects/gtkwave/files/
から,gtkwave-3.3.100-bin-win64 などのバイナリをダウントードすれば基本的にはOKである.
ただし,gtkwave.exeのファイルがあるディレクトリを環境変数が自分で追加する必要がある.
環境変数の設定は,Windows10でTempやPathなどの環境変数を設定する方法 などを参照してほしい.
GHDL
http://ghdl.free.fr/download.html の,installer から実行ファイルをダウンロードする.
環境変数の設定
どちらも,自分で環境変数を設定した方がよさそう.
GHDLの方が環境変数を自動でつけてくれるようだが,なぜか自分の環境では呼び出されない.インストールの場所にもよると思うが,自分の権限の及ぶ場所にインストールした方がよいかも.
コマンドプロンプト で,echo %path% を用いて,環境変数が正しく登録されていることを確認しよう.コマンドプロンプトが見つからない場合はcmdで検索すると出てくる.
GHDLの動作試験
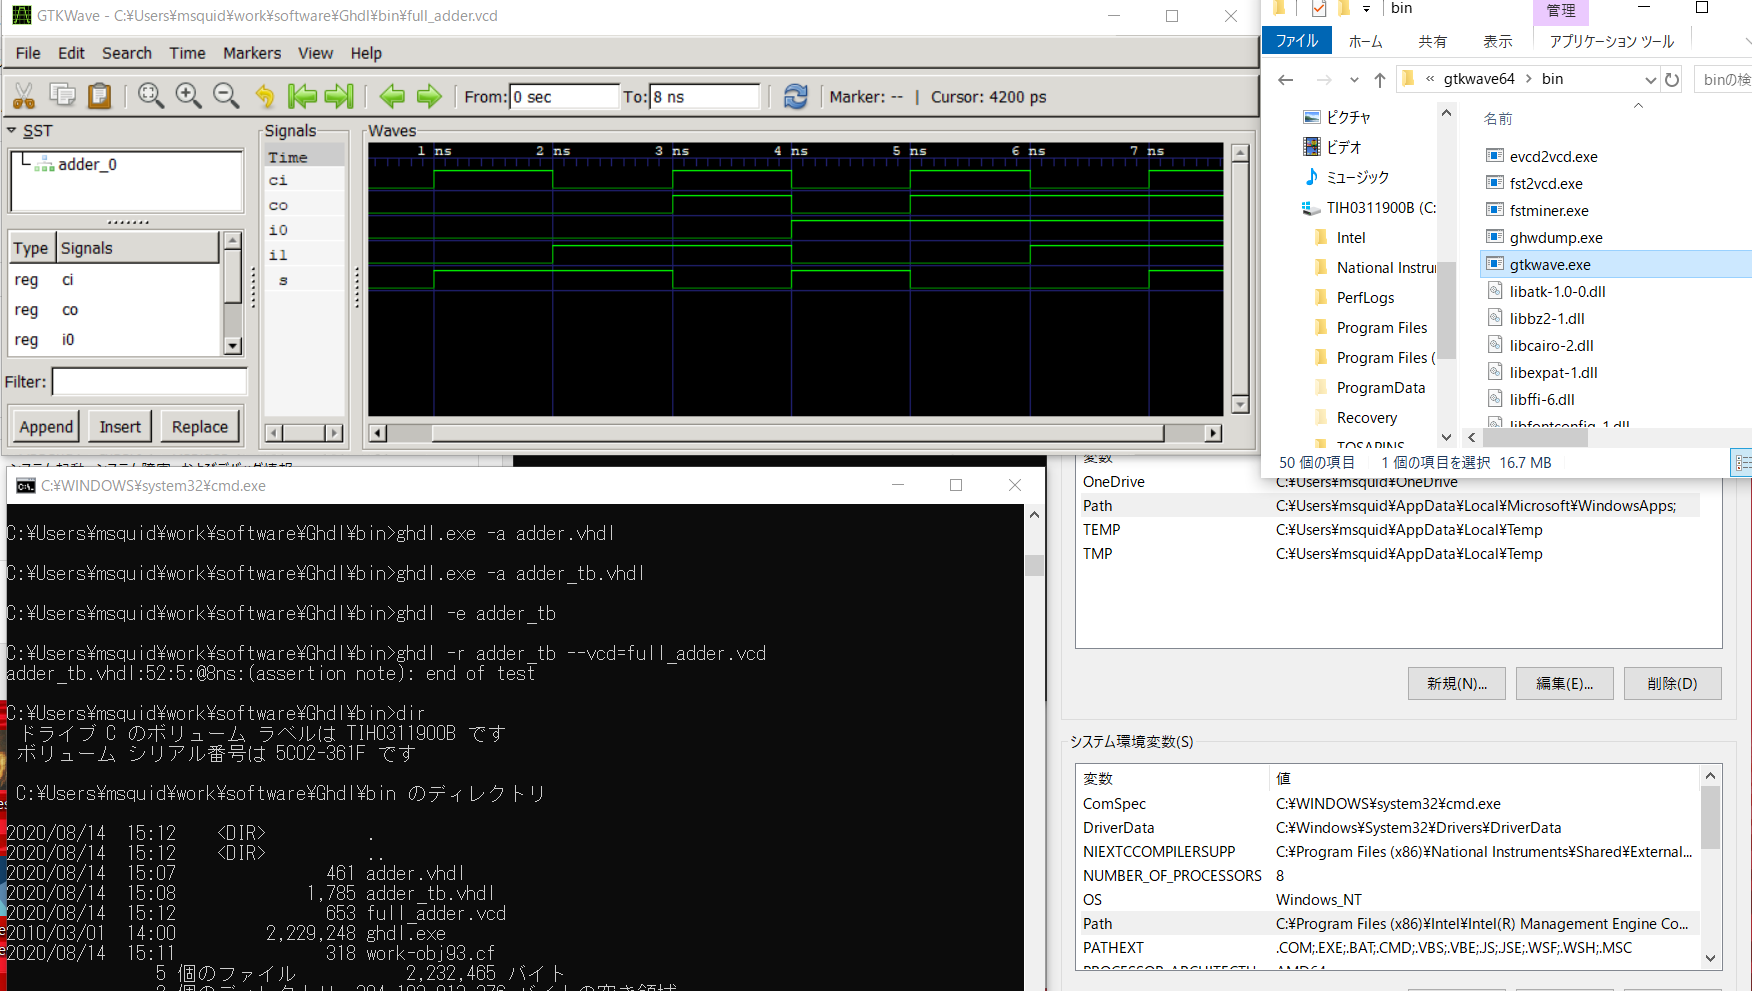
macと同様に,full_adder_tb.vhdとfull_adder.vhd の2つのファイルをメモ帳などでよいから作成し,bashスクリプトはコマンドプロンプトでは動かないので,下記を手打ちでコマンドプロンプトから実行しよう.
ghdl.eve -a --ieee=synopsys full_adder.vhd
ghdl.eve -a --ieee=synopsys full_adder_tb.vhd
ghdl.eve -e --ieee=synopsys full_adder_tb
ghdl.eve -r --ieee=synopsys full_adder_tb --vcd=full_adder.vcd
gtkwaveの動作試験
同様に,full_adder.vcd ファイルを,gtkwave から読み込めばよい.mac だとダブルクリックでポートが追加されたが,windows10版だとappendボタンを押さないとダメみたい.
ここでは,ghdl.exe のある場所にファイルを置いて試験的に実行してみた.環境変数を通して,ghdl.exe をどこからでも呼び出せるようにしておけば,ファイルはどこに置いても動くはず.

