2020/07/26(Sun): ConstraintLayout入門その2の作成に伴い、リンクの追加、および若干の説明の追記を行いました。
ConstraintLayoutを使う理由
2016年からAndroidサポートライブラリによって提供されているConstraintLayoutは、非常に細かい制約の記述を用いた複雑なレイアウトを可能にします。FrameLayoutやLinearLayoutとの違いは、子Viewに対して親Layoutとの関係だけでなく、複数の子View同士の関係を記述することで細かく位置取りを制御できる点です。
しかし、そのようなレイアウトなら昔からRelativeLayoutで提供されています。にもかかわらずConstraintLayoutが新たに開発された理由はいくつかありますが、まずはConstraintLayout入門の手始めに、RelativeLayoutではサポートされていなかったレイアウトXMLの書き方を端的に示す例を紹介します。本稿を読んだ後、ConstraintLayoutは複雑すぎて敬遠していたけど使う気になった、という開発者が1人でも増えれば幸いです。
表示結果
今回はRelativeLayoutとConstraintLayoutの違いを示すために、両者を上下に並べて表示するアプリを作ります。以下のように表示されます。
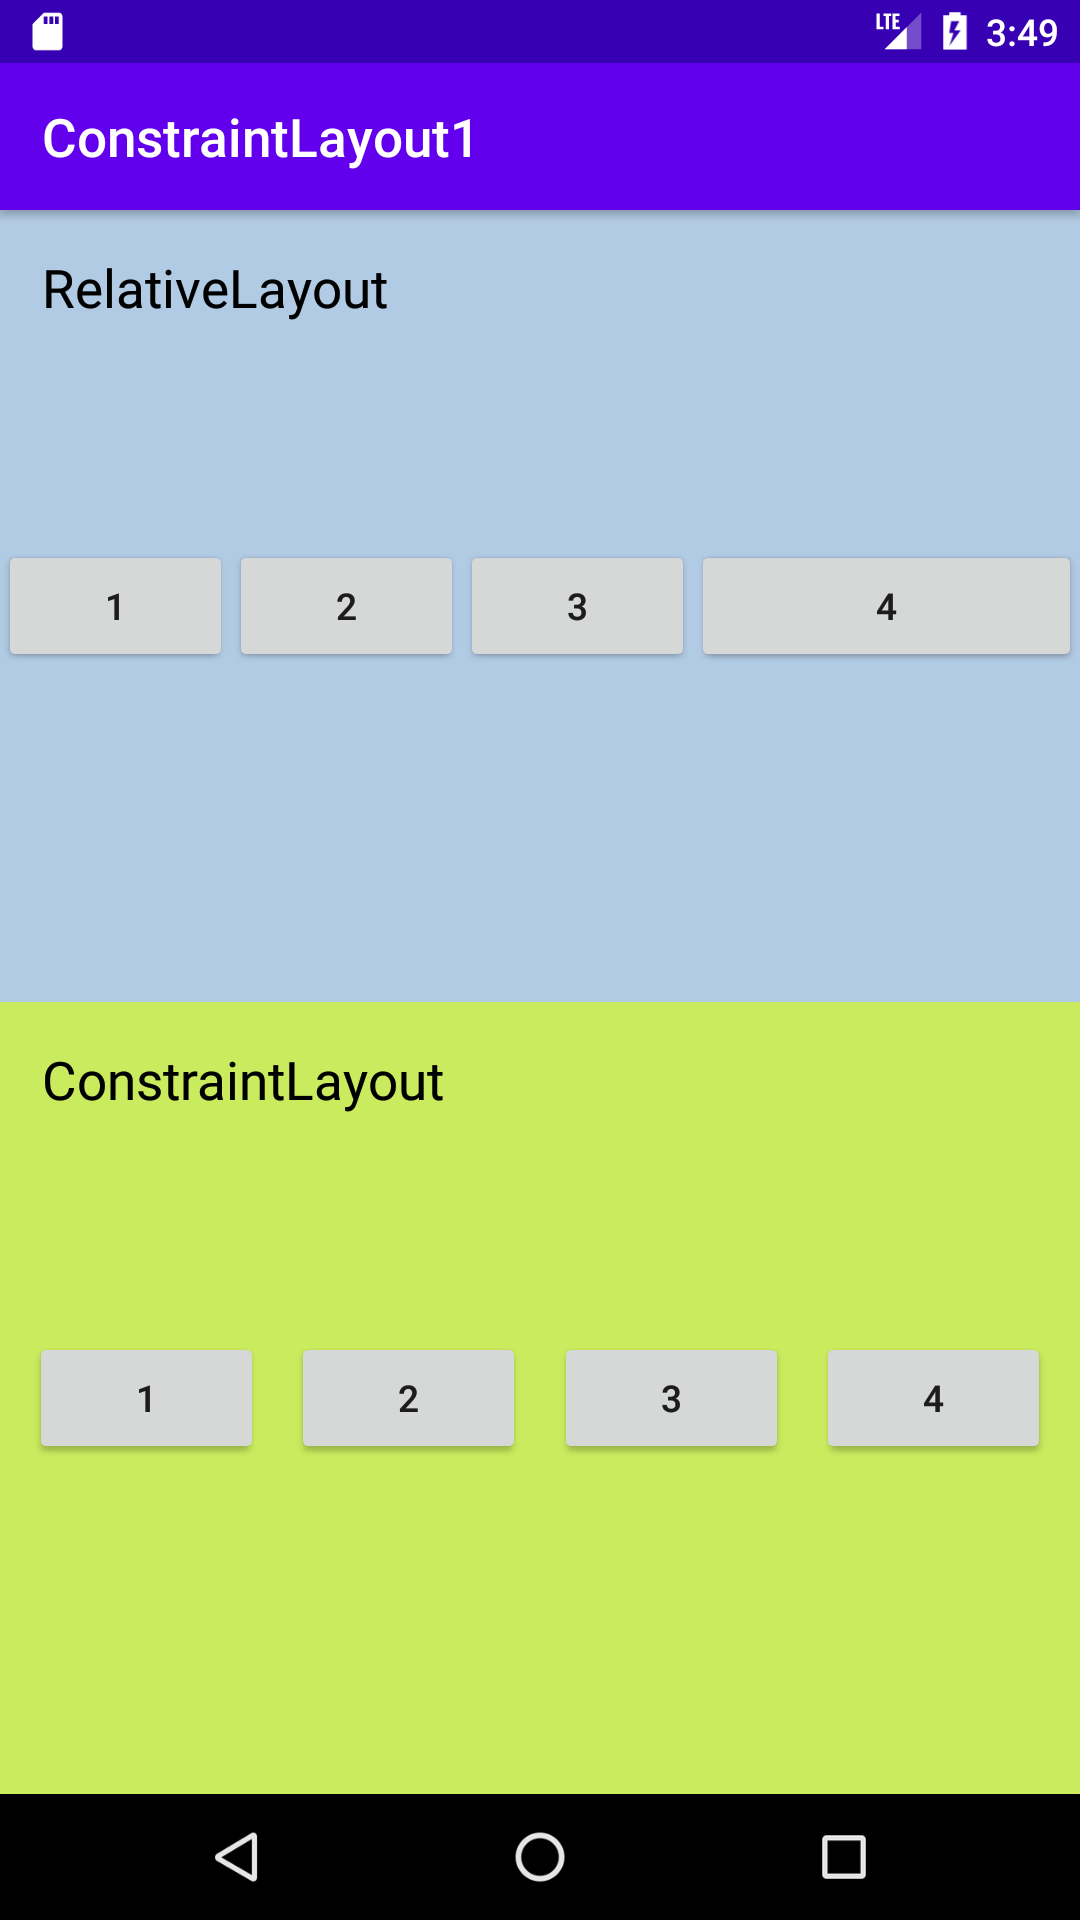
ともにボタン4つを横幅いっぱいに並べていますが、上はボタン4だけが横に伸びているのに対して、下はボタン1〜4が均等に並んでいます。上のように表示したいこともありますが、下のように均等に配列するレイアウトは使える場面が多そうです。本稿では、ConstraintLayoutをどのように使ってこの配列を実現しているかを解説します。
ConstraintLayoutを使うための設定
開発にはAndroid Studio 3.0 以降を使用します。
現在はAndroidXライブラリでConstraintLayoutが用意されていますので、これを使いましょう。まず build.gradle に以下の記述を追加します。
...
repositories {
    google()
    ...
}
...
app/build.gradle には以下の記述を追加しましょう。MotionLayoutなどをサポートしたconstraintlayoutバージョン2.0は本稿執筆時点でまだベータ版ですので、ここでは1.1安定版を使います。
...
dependencies {
    ...
    implementation 'androidx.constraintlayout:constraintlayout:1.1.3'
    ...
}
レイアウトXML
以下のようにRelativeLayoutとConstraintLayoutを並べています(便宜上、LinearLayoutを使用)。
<?xml version="1.0" encoding="utf-8"?>
<LinearLayout xmlns:android="http://schemas.android.com/apk/res/android"
    xmlns:tools="http://schemas.android.com/tools"
    android:layout_width="match_parent"
    android:layout_height="match_parent"
    android:orientation="vertical"
    tools:context=".MainActivity">

    <include layout="@layout/layout_relative" />

    <include layout="@layout/layout_constraint" />

</LinearLayout>
RelativeLayoutの記述は以下の通りです。
<?xml version="1.0" encoding="utf-8"?>
<RelativeLayout xmlns:android="http://schemas.android.com/apk/res/android"
    xmlns:tools="http://schemas.android.com/tools"
    android:layout_width="match_parent"
    android:layout_height="0dp"
    android:layout_weight="1"
    android:background="#B2CBE4"
    tools:showIn="@layout/activity_main">

    <TextView
        android:layout_width="wrap_content"
        android:layout_height="wrap_content"
        android:layout_margin="16dp"
        android:layout_alignParentTop="true"
        android:layout_alignParentStart="true"
        android:textColor="@android:color/black"
        android:textSize="20sp"
        android:text="RelativeLayout" />

    <Button
        android:id="@+id/btnR1"
        android:layout_width="wrap_content"
        android:layout_height="wrap_content"
        android:layout_centerVertical="true"
        android:layout_alignParentStart="true"
        android:text="1" />

    <Button
        android:id="@+id/btnR2"
        android:layout_width="wrap_content"
        android:layout_height="wrap_content"
        android:layout_centerVertical="true"
        android:layout_toEndOf="@id/btnR1"
        android:text="2" />

    <Button
        android:id="@+id/btnR3"
        android:layout_width="wrap_content"
        android:layout_height="wrap_content"
        android:layout_centerVertical="true"
        android:layout_toEndOf="@id/btnR2"
        android:text="3" />

    <Button
        android:id="@+id/btnR4"
        android:layout_width="wrap_content"
        android:layout_height="wrap_content"
        android:layout_centerVertical="true"
        android:layout_toEndOf="@id/btnR3"
        android:layout_alignParentEnd="true"
        android:text="4" />

</RelativeLayout>
ここで、ボタン1〜3は android:layout_alignParentStart および android:layout_toEndOf によって左端の位置を決めています。一方ボタン4は android:layout_toEndOf と android:layout_alignParentEnd で左右両端の位置を決めています。
ConstraintLayoutの記述は以下の通りです。
<?xml version="1.0" encoding="utf-8"?>

<androidx.constraintlayout.widget.ConstraintLayout xmlns:app="http://schemas.android.com/apk/res-auto"
    xmlns:android="http://schemas.android.com/apk/res/android"
    xmlns:tools="http://schemas.android.com/tools"
    android:layout_width="match_parent"
    android:layout_height="0dp"
    android:layout_weight="1"
    android:background="#CAEB5E"
    tools:showIn="@layout/activity_main">

    <TextView
        android:layout_width="wrap_content"
        android:layout_height="wrap_content"
        android:layout_margin="16dp"
        app:layout_constraintTop_toTopOf="parent"
        app:layout_constraintStart_toStartOf="parent"
        android:layout_alignParentStart="true"
        android:textColor="@android:color/black"
        android:textSize="20sp"
        android:text="ConstraintLayout" />

    <Button
        android:id="@+id/btnC1"
        android:layout_width="wrap_content"
        android:layout_height="wrap_content"
        app:layout_constraintTop_toTopOf="parent"
        app:layout_constraintBottom_toBottomOf="parent"
        app:layout_constraintStart_toStartOf="parent"
        app:layout_constraintEnd_toStartOf="@id/btnC2"
        android:text="1" />

    <Button
        android:id="@+id/btnC2"
        android:layout_width="wrap_content"
        android:layout_height="wrap_content"
        app:layout_constraintTop_toTopOf="parent"
        app:layout_constraintBottom_toBottomOf="parent"
        app:layout_constraintStart_toEndOf="@id/btnC1"
        app:layout_constraintEnd_toStartOf="@id/btnC3"
        android:text="2" />

    <Button
        android:id="@+id/btnC3"
        android:layout_width="wrap_content"
        android:layout_height="wrap_content"
        app:layout_constraintTop_toTopOf="parent"
        app:layout_constraintBottom_toBottomOf="parent"
        app:layout_constraintStart_toEndOf="@id/btnC2"
        app:layout_constraintEnd_toStartOf="@id/btnC4"
        android:text="3" />

    <Button
        android:id="@+id/btnC4"
        android:layout_width="wrap_content"
        android:layout_height="wrap_content"
        app:layout_constraintTop_toTopOf="parent"
        app:layout_constraintBottom_toBottomOf="parent"
        app:layout_constraintStart_toEndOf="@id/btnC3"
        app:layout_constraintEnd_toEndOf="parent"
        android:text="4" />

</androidx.constraintlayout.widget.ConstraintLayout>
ここでは、ボタン1〜4のそれぞれに app:layout_constraintStart_toStartOf, app:layout_constraintStart_toEndOf, app:layout_constraintStart_toEndOf, app:layout_constraintEnd_toEndOf のうち2つを使って、左右両端の位置を決めています。
また、コード (Kotlin) は以下の通りです。
package com.example.constraintlayout1

import androidx.appcompat.app.AppCompatActivity
import android.os.Bundle

class MainActivity : AppCompatActivity() {
    override fun onCreate(savedInstanceState: Bundle?) {
        super.onCreate(savedInstanceState)
        setContentView(R.layout.activity_main)
    }
}
循環依存??
RelativeLayoutでは3つのボタンで左端の位置しか設定していないため、左側のViewの位置が決まった後で右側のViewの位置が決まる、といった主と従の関係が発生することになり、不均等な配置になります。一方ConstraintLayoutでは4つのボタンすべてで左右両端の位置を設定しているので、均等な配置になります。したがって表示結果が異なるのは当然といえば当然なのでした。では、以下のようにXMLファイルを変更して、RelativeLayoutの方でもすべてのボタンの左右の位置を決めることにしてはどうでしょうか?
    ...
    <Button
        android:id="@+id/btnR1"
        android:layout_width="wrap_content"
        android:layout_height="wrap_content"
        android:layout_centerVertical="true"
        android:layout_alignParentStart="true"
        android:layout_toStartOf="@id/btnR2"
        android:text="1" />

    <Button
        android:id="@+id/btnR2"
        android:layout_width="wrap_content"
        android:layout_height="wrap_content"
        android:layout_centerVertical="true"
        android:layout_toEndOf="@id/btnR1"
        android:layout_toStartOf="@id/btnR3"
        android:text="2" />

    <Button
        android:id="@+id/btnR3"
        android:layout_width="wrap_content"
        android:layout_height="wrap_content"
        android:layout_centerVertical="true"
        android:layout_toEndOf="@id/btnR2"
        android:layout_toStartOf="@id/btnR4"
        android:text="3" />
    ...
変更後、実行すると、
com.example.constraintlayout1 E/AndroidRuntime: FATAL EXCEPTION: main
    Process: com.example.constraintlayout1, PID: 4174
    java.lang.IllegalStateException: Circular dependencies cannot exist in RelativeLayout
...
ビルドはできたものの、アプリは起動後すぐクラッシュしてしまいます。上記のLogCatを見ると「RelativeLayoutの中に循環的な依存性があってはいけない」といったエラーメッセージが書かれています。
そう言われてみると、ボタン1の右端はボタン2の左端の位置にある、ボタン2の左端はボタン1の右端にある、…等々と書いているので、ボタン2の位置が決まらないとボタン1の位置が決まらない、ボタン1の位置が決まらないとボタン2の位置が決まらない、…という堂々巡りになっていつまでも位置が決められない、エラーだ、という言い分はごもっとものように思えます。
ConstraintLayoutなら、循環制約を書いてもOK
ConstraintLayoutがRelativeLayoutと大きく異なる点は、このように循環的な制約の記述があってもエラーとせず解決できることにあります。そのことによって、ここではボタン1〜4がすべて平等に左右両端の制約を持つことにより、ボタン同士が相互に制約し合うことでレイアウト全体の位置を決定させることができます。
このように双方向の制約関係のあるViewの一団を、ConstraintLayoutではChain(チェーン、鎖)と呼び、いくつかパラメータを設定することによってさらに細かい調整ができるようになっています。が、ひとまずここでは「Viewがお互い平等につっぱり合うことで均等な配列が可能になる」という知識だけを持ち帰っていただければ充分です。より詳しい解説は、次の機会に譲ります。多機能かつ複雑なConstraintLayoutは、一気に全貌をマスターしなくても、簡単な機能から少しずつ習得していくことをお勧めします。
今回はViewの水平方向の制約にのみ注目しましたが、 layout_constraint.xml における各ボタンの垂直方向の制約は
<Button
    app:layout_constraintTop_toTopOf="parent"
    app:layout_constraintBottom_toBottomOf="parent"
    />
の記述によってConstraintLayoutの中段に配置しています。このセンタリングの要領については、次の記事をご覧ください。
サンプルコード
今回のサンプルコードは以下のリポジトリにあります。
https://github.com/csayamada/ConstraintLayout1
参考文献
Constraintlayout | Android デベロッパー | Android Developers
ConstraintLayout | Android Developers
RelativeLayout | Android Developers