ConstraintLayoutを使用するための設定については、前回記事をご覧ください。
ConstraintLayoutのセンタリング
FrameLayoutの子Viewを親Viewの中央に置くときは android:layout_gravity に center_horizontal, center_vertical などの値を設定します。RelativeLayoutの子Viewを親Viewの中央に置くときは android:layout_centerHorizontal, android:layout_centerVertical などの値を "true" に設定します。
これらに対し、ConstraintLayoutでのセンタリングは、「Viewの上下端もしくは左右端を同時に制約する」、という、いささか手間のかかる方式を用います。
<androidx.constraintlayout.widget.ConstraintLayout xmlns:android="http://schemas.android.com/apk/res/android"
    xmlns:app="http://schemas.android.com/apk/res-auto"
    xmlns:tools="http://schemas.android.com/tools"
    android:layout_width="match_parent"
    android:layout_height="match_parent"
    tools:context=".MainActivity">

    <ImageView
        android:id="@+id/viewControlled"
        android:layout_width="wrap_content"
        android:layout_height="wrap_content"
        app:layout_constraintTop_toTopOf="parent"
        app:layout_constraintBottom_toBottomOf="parent"
        app:layout_constraintVertical_bias="0.15"
        app:layout_constraintStart_toStartOf="parent"
        app:layout_constraintEnd_toEndOf="parent"
        app:layout_constraintHorizontal_bias="0.6"
        android:background="@color/colorAccent"
        android:src="@drawable/ic_launcher_foreground" />

    ...

</androidx.constraintlayout.widget.ConstraintLayout>
表示結果
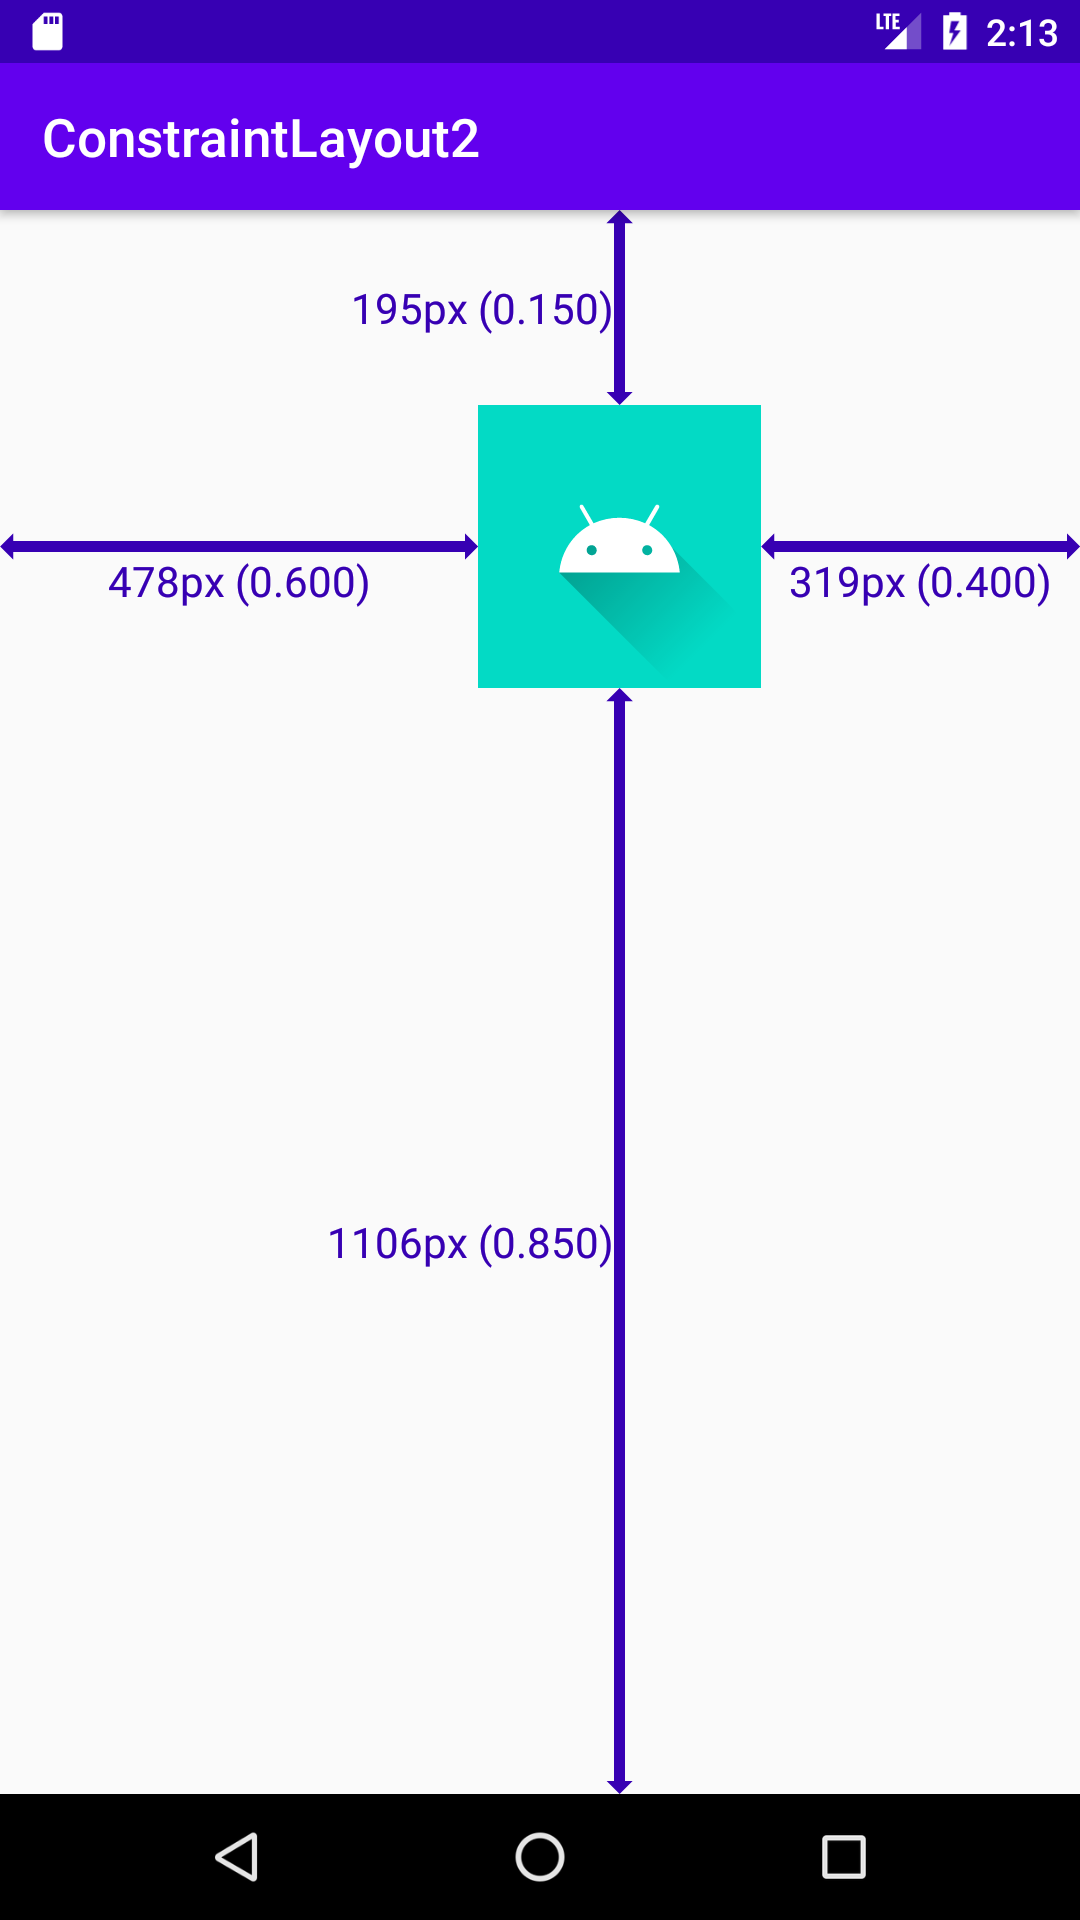
上記XMLは以下のように表示されます。

app:layout_constraintTop_toTopOf, app:layout_constraintBottom_toBottomOf に "parent" を設定し、上下端が親Viewに制約されるようにします。これは素直に読むと、子Viewが親Viewと同じ高さに引き伸ばされそうにも思えますが、ここでは android:layout_height が "wrap_content" となっていることから、ImageViewは伸びません。伸びない代わりに、ImageViewは上からも下からも引っ張られ、バランスの取れた位置に設定されます。このバランスを決定するのが app:layout_constraintVertical_bias の値です。
bias
app:layout_constraintVertical_bias には0から1までの値を小数で設定できます。省略することもでき、省略されたときのデフォルト値は0.5となります。0.5に設定した場合、垂直方向の位置はちょうど中央に設定され、FrameLayoutやRelativeLayoutで行うセンタリングと同じ結果になります。
ConstraintLayoutでは、biasの設定を加えることにより、FrameLayoutやRelativeLayoutよりも柔軟な位置取りを可能にしています。 app:layout_constraintVertical_bias が0のときは上端の制約に張りつきます(下端の制約を省略したのと同じ結果になります)。app:layout_constraintVertical_bias が1のときは下端の制約に張りつきます(上端の制約を省略したのと同じ結果になります)。
0と1の間の値を設定すれば、これらの中間の位置取りを行えます。
ほぼ同様に、水平方向の位置取りは app:layout_constraintHorizontal_bias で設定し、省略ないし0.5を設定すれば水平方向のセンタリングが行えます。 app:layout_constraintHorizontal_bias が0のときは 'Left' もしくは 'Start' に設定した制約に張りつき、1のときは 'Right' もしくは 'End' に設定した制約に張りつきます。0と1の間の値を設定すれば、中間の位置取りを行えます。
right to leftレイアウト
activity_main.xml のConstraintLayoutで android:layoutDirection="rtl" の設定を加えると、right to leftレイアウトに変わって左右が反転しますが、上下左右の空白部分については今回のコードは対応が甘いので少し表示が崩れます。
サンプルコード
biasの仕様にあまり興味がない開発者には、ひとまずConstraintLayoutでセンタリングを行う要領をつかんでいただければ充分です。ConstraintLayoutは多機能かつ複雑ですので、一気に使い方をマスターしようとするよりも、少しずつ習得して使える場面を徐々に増やしていくことをお勧めします。
今回のサンプルコードは以下のリポジトリにあります。
https://github.com/csayamada/ConstraintLayout2
サンプルコードでは、 activity_main.xml にて app:layout_constraintVertical_bias, app:layout_constraintHorizontal_bias の値を変更してビルドしアプリを実行すると、表示結果の上下左右の空白のスケールと比率が自動的に表示されるようになっています。表示結果から、biasの値が上と下の空白の比率、および左と右の空白の比率を決定していることがわかります。
柔軟性
上下端、左右端の制約には "parent" のほかに他の子ViewのIDを指定することができ、従来の親View内のセンタリング以上の表現、たとえば複数の子Viewと位置を合わせたり、biasの設定との組み合わせるなどといった、RelativeLayoutなどよりも柔軟な位置取りが行えます。
制約にはapp:layout_constraintTop_toBottomOf, app:layout_constraintStart_toEndOf などを使うこともでき、LinearLayoutのネストなどを行わずに子Viewを整列させたりできます。
参考文献
Constraintlayout | Android デベロッパー | Android Developers
ConstraintLayout | Android Developers
Understanding VectorDrawable pathData commands in Android