前回、自分のデータセットで品と不良品の判別をやってみました。
前回は『PythonとKerasによるディープラーニング』のサンプルに忠実に2クラス分類でやりましたが、今回は出力に「良品」と「不良品」の2つを独立して設定し、どうなるのか試してみました。
実装上の違いは
- モデルの最終層のカテゴリ数が1 → 2
- モデルの最終層の活性化関数がsigmoid → softmax
- 損失関数がbinary_crossentropy → categorical_crossentropy
- ImageDataGeneratorのオプションclass_modeがbinary → categorical
です。
使用するデータセットは前回と同じで、モデル構成やハイパーパラメータも極力同じにしました。
モデル定義
モデル定義の部分は下記のように変更しました。
# モデルの定義
model = models.Sequential()
model.add(layers.Conv2D(16, (3, 3), activation='relu', input_shape=(120, 40, 1)))
model.add(layers.Conv2D(16, (3, 3), activation='relu'))
model.add(layers.MaxPooling2D((2, 2)))
model.add(layers.Conv2D(32, (3, 3), activation='relu'))
model.add(layers.MaxPooling2D((2, 2)))
model.add(layers.Flatten())
model.add(layers.Dense(512, activation='relu'))
model.add(layers.Dense(256, activation='relu'))
#model.add(layers.Dense(1, activation='sigmoid'))        # ひとまず犬猫と同じ2クラス分類で
model.add(layers.Dense(2, activation='softmax'))         # 今回は多クラス分類で

# モデルのコンパイル
#model.compile(loss='binary_crossentropy',
model.compile(loss='categorical_crossentropy',
              optimizer=optimizers.RMSprop(lr=1e-4),
              metrics=['acc'])
model.summary()で確認すると次のようになります。
_________________________________________________________________
Layer (type)                 Output Shape              Param #
=================================================================
conv2d_1 (Conv2D)            (None, 118, 38, 16)       160
_________________________________________________________________
conv2d_2 (Conv2D)            (None, 116, 36, 16)       2320
_________________________________________________________________
max_pooling2d_1 (MaxPooling2 (None, 58, 18, 16)        0
_________________________________________________________________
conv2d_3 (Conv2D)            (None, 56, 16, 32)        4640
_________________________________________________________________
max_pooling2d_2 (MaxPooling2 (None, 28, 8, 32)         0
_________________________________________________________________
flatten_1 (Flatten)          (None, 7168)              0
_________________________________________________________________
dense_1 (Dense)              (None, 512)               3670528
_________________________________________________________________
dense_2 (Dense)              (None, 256)               131328
_________________________________________________________________
dense_3 (Dense)              (None, 2)                 514
=================================================================
Total params: 3,809,490
Trainable params: 3,809,490
Non-trainable params: 0
_________________________________________________________________
前回と比較すると、最終層のパラメータが増えていることが確認できます。
ImageDataGeneratorの準備
多クラス分類では正解ラベルの与え方も変わるので変更が必要です。
# すべての画像を1/255でスケーリング
train_datagen = ImageDataGenerator(rescale=1./255)
test_datagen = ImageDataGenerator(rescale=1./255)

# ImageDataGeneratorを使ってディレクトリから画像を読み込む(リスト5-7)
train_generator = train_datagen.flow_from_directory(
    train_dir,                      # ターゲットディレクトリ
    target_size=(120, 40),          # すべての画像サイズを120*40に変更
    color_mode='grayscale',
    batch_size=20,                  # バッチサイズ
#   class_mode='binary')            # binary_crossentropyを使用するため2値のラベルが必要
    class_mode='categorical')       # categoricalに変更
validation_generator = test_datagen.flow_from_directory(
    validation_dir,
    target_size=(120, 40),
    color_mode='grayscale',
    batch_size=20,
    class_mode='categorical')
モデルの学習
前回からの変更点は以上です。
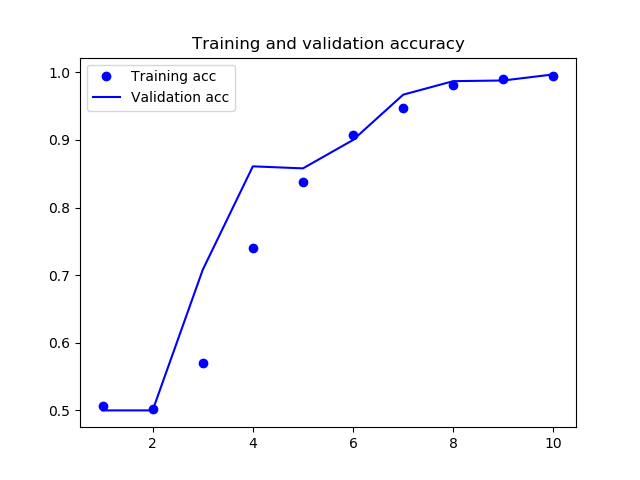
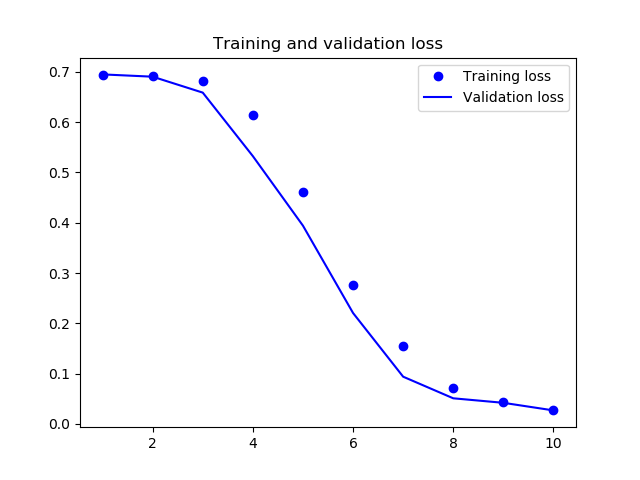
これで学習を実行したところ、次のような結果となりました。
前回同様、今回も高い精度が出て、うまくいったようです。
 88/100 [=========================>....] - ETA: 0s - loss: 0.0222 - acc: 0.9966
 90/100 [==========================>...] - ETA: 0s - loss: 0.0219 - acc: 0.9967
 92/100 [==========================>...] - ETA: 0s - loss: 0.0235 - acc: 0.9962
 94/100 [===========================>..] - ETA: 0s - loss: 0.0266 - acc: 0.9952
 96/100 [===========================>..] - ETA: 0s - loss: 0.0262 - acc: 0.9953
 98/100 [============================>.] - ETA: 0s - loss: 0.0259 - acc: 0.9954
100/100 [==============================] - 4s 43ms/step - loss: 0.0271 - acc: 0.9950 - val_loss: 0.0270 - val_acc: 0.9970

