はじめに
『PythonとKerasによるディープラーニング』の5章のサンプルをお手本に、自分のデータセットでCNNによる良品と不良品の判別をやってみたので、本のサンプルからの変更点を中心にメモしておきます。
使用するデータセットについて
- 写真のサイズは(h, w) = (475, 161)で、グレイ画像。
- データセットの写真は全部で18000枚。内訳は、
- train: 良品、不良品それぞれ8000枚
- validation: 良品、不良品それぞれ500枚
- test: 良品、不良品それぞれ500枚
- 不良品画像は良品画像の9000枚に、人工的に作ったキズの画像をランダムな位置、貼り付け角度で張り付けたもの。(実際の不良品写真は使用していない)
実際の不良品画像を使用しないのは、写真のサイズを縮小しても不良箇所がわかるようにするためです。また、簡単に精度が出るように不良箇所をやや強調しています。
今回は実験なので、縮小画像を読み込むことでモデルを小さくして、学習時間も短くなるようにしています。
写真の保存先を設定しておきます。
import os

# データセットを格納するディレクトリへのパス
base_dir = 'c:/temp/images'

# 訓練データセット、検証データセット、テストデータセットを配置するディレクトリ
train_dir = os.path.join(base_dir, 'train')
validation_dir = os.path.join(base_dir, 'validation')
test_dir = os.path.join(base_dir, 'test')
モデルの定義
モデルの構成は犬猫判別の例を参考に次のように設定しました。
良品と不良品を見分ける2クラス分類なので、モデルの最終出力は1つで、活性化関数にはsigmoidを使っています。(犬猫の例と同じ)
犬猫判別の例との違いは層構成と入力画像サイズだけです。
from tensorflow.python.keras import layers
from tensorflow.python.keras import models
from tensorflow.python.keras import optimizers

# モデルの定義
model = models.Sequential()
model.add(layers.Conv2D(16, (3, 3), activation='relu', input_shape=(120, 40, 1)))
model.add(layers.Conv2D(16, (3, 3), activation='relu'))
model.add(layers.MaxPooling2D((2, 2)))
model.add(layers.Conv2D(32, (3, 3), activation='relu'))
model.add(layers.MaxPooling2D((2, 2)))
model.add(layers.Flatten())
model.add(layers.Dense(512, activation='relu'))
model.add(layers.Dense(256, activation='relu'))
model.add(layers.Dense(1, activation='sigmoid'))        # 犬猫と同じ2クラス分類で

# モデルのコンパイル
model.compile(loss='binary_crossentropy',
              optimizer=optimizers.RMSprop(lr=1e-4),
              metrics=['acc'])
model.summary()で確認すると次のようになります。
学習可能なパラメータ数は約380万と、犬猫判別の例と同等にできました。
_________________________________________________________________
Layer (type)                 Output Shape              Param #
=================================================================
conv2d_1 (Conv2D)            (None, 118, 38, 16)       160
_________________________________________________________________
conv2d_2 (Conv2D)            (None, 116, 36, 16)       2320
_________________________________________________________________
max_pooling2d_1 (MaxPooling2 (None, 58, 18, 16)        0
_________________________________________________________________
conv2d_3 (Conv2D)            (None, 56, 16, 32)        4640
_________________________________________________________________
max_pooling2d_2 (MaxPooling2 (None, 28, 8, 32)         0
_________________________________________________________________
flatten_1 (Flatten)          (None, 7168)              0
_________________________________________________________________
dense_1 (Dense)              (None, 512)               3670528
_________________________________________________________________
dense_2 (Dense)              (None, 256)               131328
_________________________________________________________________
dense_3 (Dense)              (None, 1)                 257
=================================================================
Total params: 3,809,233
Trainable params: 3,809,233
Non-trainable params: 0
_________________________________________________________________
ImageDataGeneratorの準備
犬猫判別の例と同じように、ImageDataGeneratorを使ってモデルに画像を供給します。
例との違いはcolor_mode='grayscale'を追加したことです。
画像の縮小もここで設定しています。
from tensorflow.python.keras.preprocessing.image import ImageDataGenerator

# すべての画像を1/255でスケーリング
train_datagen = ImageDataGenerator(rescale=1./255)
test_datagen = ImageDataGenerator(rescale=1./255)

# ImageDataGeneratorを使ってディレクトリから画像を読み込む
train_generator = train_datagen.flow_from_directory(
    train_dir,                      # ターゲットディレクトリ
    target_size=(120, 40),          # すべての画像サイズを120*40に変更
    color_mode='grayscale',     # ここを追加
    batch_size=20,                  # バッチサイズ
    class_mode='binary')            # binary_crossentropyを使用するため2値のラベルが必要
validation_generator = test_datagen.flow_from_directory(
    validation_dir,
    target_size=(120, 40),
    color_mode='grayscale',
    batch_size=20,
    class_mode='binary')
モデルの学習と保存
犬猫判別の例との違いはエポック数を10に減らした点のみです。
# モデルの訓練
history = model.fit_generator(train_generator,
                              steps_per_epoch=100,
                              epochs=10,
                              validation_data=validation_generator,
                              validation_steps=50)

# モデルの保存
model.save('c:/temp/models/model_01_2class.h5')
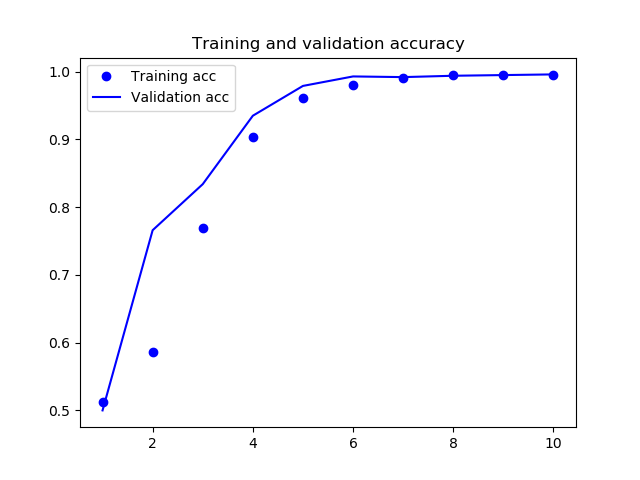
学習の軌跡の表示
犬猫判別の例と同じように学習の軌跡を表示します。
acc = history.history['acc']
val_acc = history.history['val_acc']
loss = history.history['loss']
val_loss = history.history['val_loss']

epochs = range(1, len(acc) + 1)

plt.plot(epochs, acc, 'bo', label='Training acc')
plt.plot(epochs, val_acc, 'b', label='Validation acc')
plt.title('Training and validation accuracy')
plt.legend()
plt.figure()

plt.plot(epochs, loss, 'bo', label='Training loss')
plt.plot(epochs, val_loss, 'b', label='Validation loss')
plt.title('Training and validation loss')
plt.legend()

plt.show()
学習の結果、精度は次のようになりました。
過学習も見られず、精度も99%超と高い水準で張り付いており、うまくいっているようです。
 89/100 [=========================>....] - ETA: 0s - loss: 0.0159 - acc: 0.9949
 91/100 [==========================>...] - ETA: 0s - loss: 0.0157 - acc: 0.9951
 93/100 [==========================>...] - ETA: 0s - loss: 0.0155 - acc: 0.9952
 95/100 [===========================>..] - ETA: 0s - loss: 0.0154 - acc: 0.9953
 97/100 [============================>.] - ETA: 0s - loss: 0.0151 - acc: 0.9954
 99/100 [============================>.] - ETA: 0s - loss: 0.0149 - acc: 0.9955
100/100 [==============================] - 4s 45ms/step - loss: 0.0150 - acc: 0.9955 - val_loss: 0.0203 - val_acc: 0.9960

