はじめに
Django + Nginx + uWSGI + SSLのネタは三番煎じかもしれませんが、実際にトライしてみるとつまずく箇所がいくつかあったので、その備忘録として本記事を書きました(なので、特に問題の起きなかったOCIとDjangoのセットアップの説明は割愛しています)。
今回使用するサーバー(Oracle Cloud Infrastructure)、ドメイン、証明書の発行はすべて無料です。
環境
環境はOracle Cloud Infrastructure(OCI)の仮想マシンの無料枠で作成しました。イメージはOracle-Linux-7.9-2021.10.20-0、シェイプはVM.Standard.E2.1.Microです。
$ cat /etc/oracle-release
Oracle Linux Server release 7.9
システムの構成
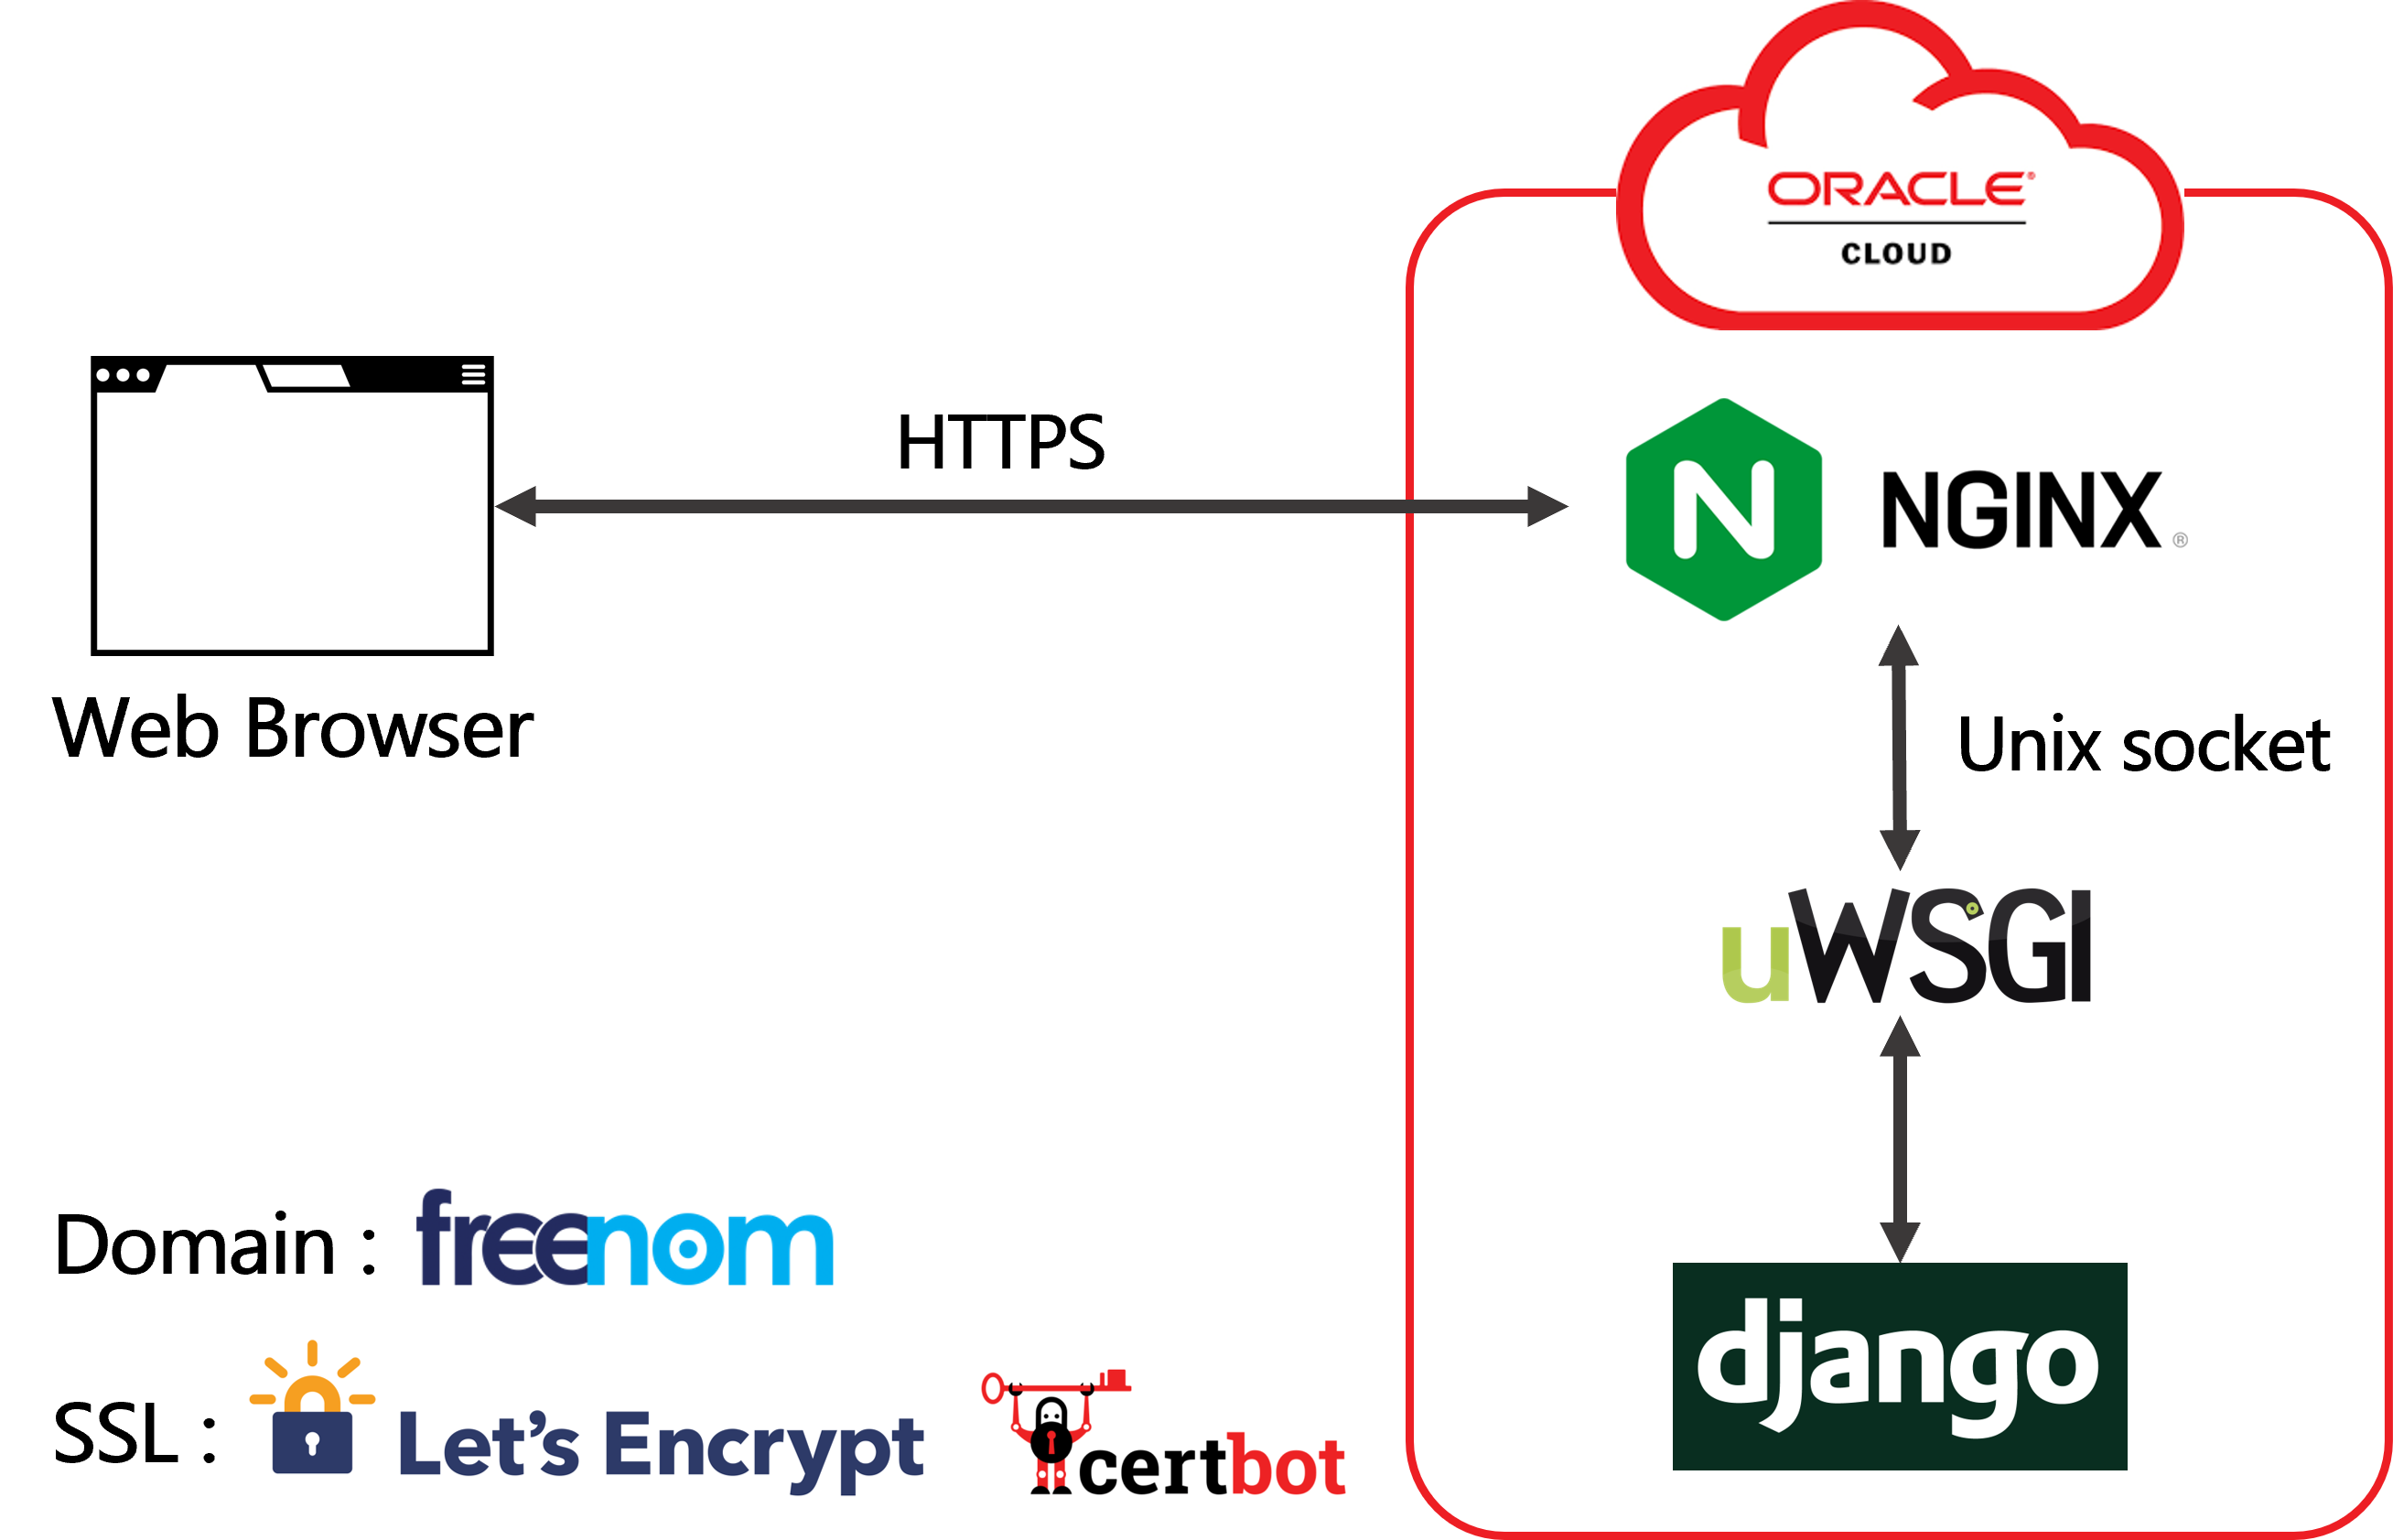
- NginxはフリーかつオープンソースなWebサーバで、サーバー上の静的コンテンツを配信します。
- DjangoはPythonで実装されたWebアプリケーションフレームワークです。
- uWSGIとはPythonでWebサービスを動かすためのアプリケーションサーバです。PythonのWebアプリケーションとWebサーバー間とのやり取りの規約であるWSGI (Web Server Gateway Interface)に準拠したアプリケーション(Djangoなど)であれば使うことができます。DjangoのアプリケーションとNginx(Webサーバー)は直接対話できないので、uWSGIがその間を取り持ちます。
無料のドメインの取得

最終的にSSL化まで行うため、はじめにドメインを取得しておきます。Freenomから5種類のドメイン(.tk/.ml/.ga/.cf/.gq)が無料で取得できます。2021/11/13現在、ドメインの有効期限は取得日から三か月でした。以降、example.tkというドメインを取得した前提で話を進めます。
Nginxのインストール

Yumのリポジトリファイルを作成します。
[nginx-stable]
name=nginx stable repo
baseurl=http://nginx.org/packages/centos/7/$basearch/
gpgcheck=1
enabled=1
gpgkey=https://nginx.org/keys/nginx_signing.key
module_hotfixes=true

[nginx-mainline]
name=nginx mainline repo
baseurl=http://nginx.org/packages/mainline/centos/7/$basearch/
gpgcheck=1
enabled=0
gpgkey=https://nginx.org/keys/nginx_signing.key
module_hotfixes=true
インストールします。
sudo yum install -y nginx
バージョンを確認します。
$ nginx -v
nginx version: nginx/1.20.1
Firewallの設定
外部からサーバーのポートにアクセスするためにfirewall-cmdで必要なポートを登録しておきます。今回登録するのはhttpとhttpsと8000/tcp(uWSGIの検証用)です。OCIの方でもセキュリティリストからポートを開放しておく必要があります。
sudo firewall-cmd --zone=public --add-service=http --permanent
sudo firewall-cmd --zone=public --add-service=https --permanent
sudo firewall-cmd --permanent --add-port=8000/tcp
sudo firewall-cmd --reload
uWSGIでDjangoのアプリケーションを起動
今回はdjango_projectという名前のDjangoプロジェクトがあらかじめ作成されていることとします。
はじめに、Djangoのアプリケーションが正しく起動するか検証します。runserverを使って、8000番ポートで起動してみます。
python manage.py runserver 0.0.0.0:8000
ここで以下のようなSQLiteのエラーが出たら
django.core.exceptions.ImproperlyConfigured: SQLite 3.9.0 or later is required (found 3.7.17).
「Django2.2で開発サーバー起動時にSQLite3のエラーが出た場合の対応」の記事を参考にして、解決してください。最終的にhttp://example.tk:8000からDjangoのアプリケーションにアクセスできれば成功です。
続いて、uWSGIでDjangoのアプリケーションを起動します。
pipでuWSGIをインストールします。
pip install uwsgi
Djangoのプロジェクト下のuwsgi_paramsを作成します。
https://github.com/nginx/nginx/blob/master/conf/uwsgi_params
uwsgi_param  QUERY_STRING       $query_string;
uwsgi_param  REQUEST_METHOD     $request_method;
uwsgi_param  CONTENT_TYPE       $content_type;
uwsgi_param  CONTENT_LENGTH     $content_length;

uwsgi_param  REQUEST_URI        $request_uri;
uwsgi_param  PATH_INFO          $document_uri;
uwsgi_param  DOCUMENT_ROOT      $document_root;
uwsgi_param  SERVER_PROTOCOL    $server_protocol;
uwsgi_param  REQUEST_SCHEME     $scheme;
uwsgi_param  HTTPS              $https if_not_empty;

uwsgi_param  REMOTE_ADDR        $remote_addr;
uwsgi_param  REMOTE_PORT        $remote_port;
uwsgi_param  SERVER_PORT        $server_port;
uwsgi_param  SERVER_NAME        $server_name;
以下のコマンドで起動します。ここではブラウザなどを通じてデバッグするために--httpを使っていますが、Nginxと通信するときはUnix socket(--socket)を使用します。
uwsgi --http :8000 --module /path/to/your/django_project.wsgi
certbotを用いた証明書の取得

今回はLet's Encryptという認証局に証明書を発行してもらいます。その際にLet's Encryptとのやりとりや検証用ファイルの用意をしてくれるのがCertbotです。
普通であれば、はじめにcertbotをインストールするのに必要なEPELリポジトリを準備します。しかし、Oracle Linux 7用のol7_developer_EPELは限りなくオリジナルのEPELに近いため、ほとんどの場合EPELの追加インストールは不要とのことです。そこでol7_developer_EPELが有効になっているか確認します。
$ sudo yum repolist all | grep -i epel
ol7_developer_EPEL/x86_64               Oracle Linux 7Server EPE disabled
無効になっていなければ、有効にします。
sudo yum-config-manager --enable ol7_developer_EPEL
再び有効になっているか確認します。
$ sudo yum repolist all | grep -i epel
ol7_developer_EPEL/x86_64               Oracle Linux 7Server EPE enabled: 40,406
EPELの準備ができたら、certbotとpython2-certbot-nginx(Nginx向けの追加機能)のインストールを行います。
$ sudo yum -y install certbot python2-certbot-nginx
はじめに、Nginxの設定ファイルである/etc/nginx/conf.d/default.conf内のドメイン名をlocalhostからexample.tkに変更しておきます。
sudo sed -i 's/localhost/example.tk/g' /etc/nginx/conf.d/default.conf
以下のコマンドを実行すると対話形式で証明書の発行が行えます。さらに、--nginxオプションをつけることで/etc/nginx/conf.d/default.confがよしなに自動編集されます。
sudo certbot --nginx -d example.tk
uWSGIとNginxを連携
はじめに、Djangoの静的ファイルを準備します。
静的ファイルを収集するディレクトリをdjango_project/static/に指定する設定をsetttings.pyに記述します。
STATIC_ROOT = os.path.join(BASE_DIR, "static/")
静的ファイルをstaticディレクトリに集めます。
python manage.py collectstatic
次にNginxの設定を行います。
念のため、default.confを編集する前にオリジナルの設定ファイルのバックアップを作っておきます。
sudo cp /etc/nginx/conf.d/default.conf /etc/nginx/conf.d/default.conf.copy
/etc/nginx/conf.d/default.confを編集します。
server {
    server_name  example.tk;

    #access_log  /var/log/nginx/host.access.log  main;

    location / {
        root   /usr/share/nginx/html;
        index  index.html index.htm;
    }

    #error_page  404              /404.html;

    # redirect server error pages to the static page /50x.html
    #
    error_page   500 502 503 504  /50x.html;
    location = /50x.html {
        root   /usr/share/nginx/html;
    }

    # proxy the PHP scripts to Apache listening on 127.0.0.1:80
    #
    #location ~ \.php$ {
    #    proxy_pass   http://127.0.0.1;
    #}

    # pass the PHP scripts to FastCGI server listening on 127.0.0.1:9000
    #
    #location ~ \.php$ {
    #    root           html;
    #    fastcgi_pass   127.0.0.1:9000;
    #    fastcgi_index  index.php;
    #    fastcgi_param  SCRIPT_FILENAME  /scripts$fastcgi_script_name;
    #    include        fastcgi_params;
    #}

    # deny access to .htaccess files, if Apache's document root
    # concurs with nginx's one
    #
    #location ~ /\.ht {
    #    deny  all;
    #}

    listen 443 ssl; # managed by Certbot
    ssl_certificate /etc/letsencrypt/live/example.tk/fullchain.pem; # managed by Certbot
    ssl_certificate_key /etc/letsencrypt/live/example.tk/privkey.pem; # managed by Certbot
    include /etc/letsencrypt/options-ssl-nginx.conf; # managed by Certbot
    ssl_dhparam /etc/letsencrypt/ssl-dhparams.pem; # managed by Certbot

}

server {
    if ($host = example.tk) {
        return 301 https://$host$request_uri;
    } # managed by Certbot


    listen       80;
    server_name  example.tk;
    return 404; # managed by Certbot


}
主な変更点は以下の通りです。
- uWSGIとUnix socketを用いて通信する設定を追記
- Djangoのstaticパスを指定
-
location /をDjangoのプロジェクトに変更
/path/to/your/とexample.tkとdjang_projectは自分の環境に合わせて変更してください。
upstream django {
    server unix:///path/to/your/django_project.sock; # for a file socket
}

# configuration of the server
server {
    server_name example.tk; # substitute your machine's IP address or FQDN
    charset     utf-8;

    error_page   500 502 503 504  /50x.html;
    location = /50x.html {
        root   /usr/share/nginx/html;
    }

    # Django media
    location /media  {
        alias /path/to/your/media;  # your Django project's media files - amend as required
    }

    location /static {
        alias /path/to/your/static; # your Django project's static files - amend as required
    }

    # Finally, send all non-media requests to the Django server.
    location / {
        uwsgi_pass  django;
        include     /path/to/your/uwsgi_params; # the uwsgi_params file you installed
    }

    listen      443 ssl;
    ssl_certificate /etc/letsencrypt/live/example.tk/fullchain.pem; # managed by Certbot
    ssl_certificate_key /etc/letsencrypt/live/example.tk/privkey.pem; # managed by Certbot
    include /etc/letsencrypt/options-ssl-nginx.conf; # managed by Certbot
    ssl_dhparam /etc/letsencrypt/ssl-dhparams.pem; # managed by Certbot
}

server {
    if ($host = example.tk) {
        return 301 https://$host$request_uri;
    } # managed by Certbot


    listen       80;
    server_name  example.tk;
    return 404; # managed by Certbot

}
/etc/nginx/conf.d/default.confを/etc/nginx/nginx.conf内でインクルードするように設定します。
http {
...
    include /etc/nginx/conf.d/default.conf;
...
}
Nginxを(再)起動します。
sudo systemctl start nginx
uWSGIでDjangoのアプリケーションを起動します。
uwsgi --socket django_project.sock --module django_project.wsgi --chmod-socket=664
https://example.tkからDjangoのアプリケーションにアクセスできたら成功です。
iniファイルから起動する場合は、以下の通りです。
[uwsgi]

# Django-related settings
# the base directory (full path)
chdir           = /path/to/your/django_project
# Django's wsgi file
module          = django_project.wsgi

# process-related settings
# master
master          = true
# maximum number of worker processes
processes       = 10
# the socket (use the full path to be safe
socket          = /path/to/your/django_project/django_project.sock
# ... with appropriate permissions - may be needed
chmod-socket    = 664
# clear environment on exit
# vacuum          = true
uwsgi --ini uwsgi.ini