はじめに
今さらながら、初めてSwiftUIで新規アプリを開発する機会があり、
縦向きと横向きでレイアウトを変える必要があったのでその方法について書きます(`・ω・´)
サイズクラスについて
画面サイズは、高さと幅(height and width)とサイズ(regular and compact)の組み合わせで定義されます。
ざっくりと以下のような感じです。
| width | height | デバイスの種類と向き |
|---|---|---|
| regular | regular | iPadの縦向き・横向き |
| compact | regular | iPhoneの縦向き |
| regular | compact | 大きいiPhone(Plus / Max / XR and 11など)の横向き |
| compact | compact | iPhoneの横向き |
ここでは詳細は割愛しますが、HIGのAdaptivity and Layout の「Size Classes」のところに詳細書いてあります( ̄・ω・ ̄)
SwiftUIのhorizontalSizeClass, verticalSizeClassの定義について
以下のようにEnvironmentValuesにあらかじめ定義されている
horizontalSizeClass, verticalSizeClassを使用することでサイズクラスを取得できます。
@available(iOS 13.0, *)
@available(macOS, unavailable)
@available(tvOS, unavailable)
@available(watchOS, unavailable)
extension EnvironmentValues {

    /// The horizontal size class of this environment.
    @available(macOS, unavailable)
    @available(tvOS, unavailable)
    @available(watchOS, unavailable)
    public var horizontalSizeClass: UserInterfaceSizeClass?

    /// The vertical size class of this environment.
    @available(macOS, unavailable)
    @available(tvOS, unavailable)
    @available(watchOS, unavailable)
    public var verticalSizeClass: UserInterfaceSizeClass?
}
↑ UserInterfaceSizeClassは、compactとregularのケースを持つenumです。
SwiftUIのViewでサイズクラスを考慮してレイアウトを変更する
ここからが本題です( ̄ω ̄)
サイズクラスを取得して、iPhoneで横向きの場合はレイアウトを変えてみます。
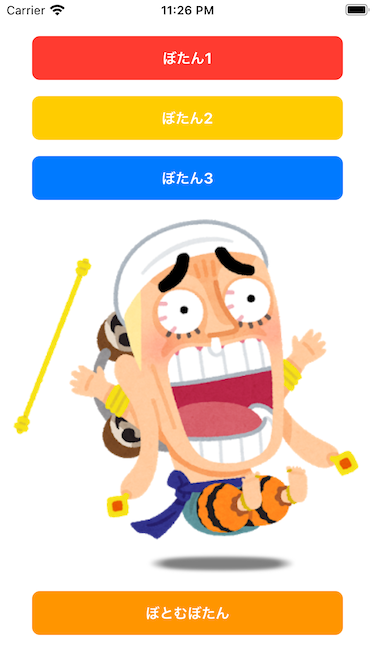
まずは、何も考慮しない場合の画面
ボタン3つとイメージ1つ、その下にまたボタンが1つある以下にもサンプルな画面です。
(いらすとやにONE PIECEのイラストが追加されていて驚きました...!)
import SwiftUI

struct ContentView: View {

    var body: some View {
        VStack {
            VStack(alignment: .center, spacing: 16.0, content: {
                self.roundedButton(title: "ぼたん1", backgroundColor: .red) {
                    print("ぼたん1タップ!")
                }
                self.roundedButton(title: "ぼたん2", backgroundColor: .yellow) {
                    print("ぼたん2タップ!")
                }
                self.roundedButton(title: "ぼたん3", backgroundColor: .blue) {
                    print("ぼたん3タップ!")
                }
            })
            .padding([.top], 16.0)
            .padding([.leading, .trailing], 32.0)

            Spacer()

            Image("enel")
                .resizable()
                .frame(minWidth: 200, minHeight: 200)
                .aspectRatio(contentMode: .fit)

            Spacer()

            self.roundedButton(title: "ぼとむぼたん", backgroundColor: .orange) {
                print("ぼとむぼたんタップ!")
            }
            .padding([.top], 0)
            .padding([.leading, .bottom, .trailing], 32.0)
        }
    }
}

private extension ContentView {

    /// 角丸のボタン
    func roundedButton(title: String, textColor: Color = .white, backgroundColor: Color,  action: @escaping() -> Void) -> some View {
        Button(action: {
            action()
        }, label: {
            Text(title)
                .frame(maxWidth: 440.0, minHeight: 44.0)
                .font(Font.subheadline.weight(.bold))
                .foregroundColor(textColor)
                .background(backgroundColor)
                .cornerRadius(8.0)
        })
    }
}
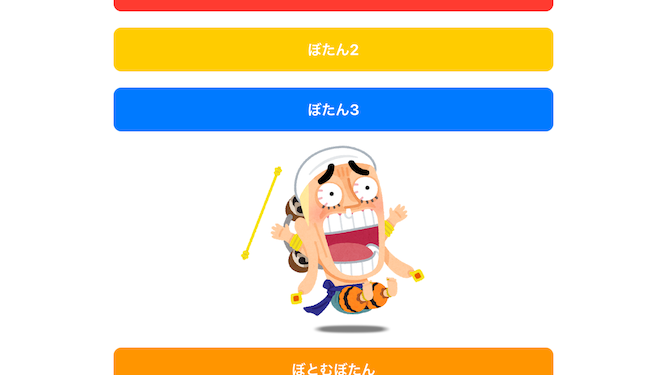
| 縦向き | 横向き |
|---|---|
 |
 |
エネルのイメージの最低サイズが決まっているので、上下のボタンが見切れてしまいました(´・ω・`)
サイズクラスを考慮して、横向きの画面のレイアウトを変更する
horizontalSizeClass, verticalSizeClassを取得するために、SwiftUIのViewにEnvironmentを追加します。
import SwiftUI

struct ContentView: View {

    @Environment(\.horizontalSizeClass) var hSizeClass // 追加1
    @Environment(\.verticalSizeClass) var vSizeClass   // 追加2

    var body: some View {
        // ...
    }
}
毎回if文を作るのはしんどそうなので、horizontalSizeClassとverticalSizeClassでイニシャライズするenumを定義します
import SwiftUI

enum DeviceTraitStatus {
    case wRhR
    case wChR
    case wRhC
    case wChC

    init(hSizeClass: UserInterfaceSizeClass?, vSizeClass: UserInterfaceSizeClass?) {

        switch (hSizeClass, vSizeClass) {
        case (.regular, .regular):
            self = .wRhR
        case (.compact, .regular):
            self = .wChR
        case (.regular, .compact):
            self = .wRhC
        case (.compact, .compact):
            self = .wChC
        default:
            self = .wChR
        }
    }
}
先ほどの画面を修正していきます。
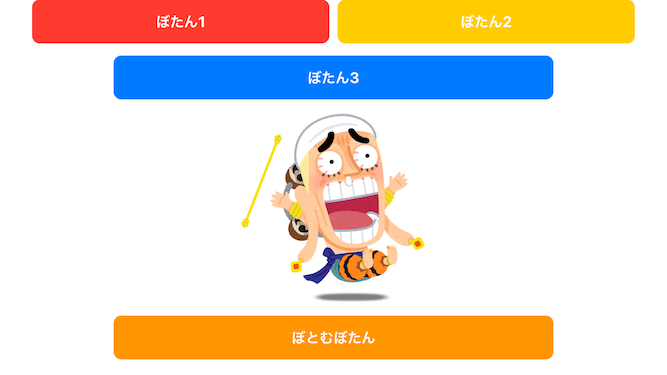
横向きの場合は、赤いボタンと黄色いボタンを横並びにして画面に収まるようにしてみます!
import SwiftUI

struct ContentView: View {

    @Environment(\.horizontalSizeClass) var hSizeClass
    @Environment(\.verticalSizeClass) var vSizeClass

    var body: some View {
        VStack {
            let deviceTraitStatus = DeviceTraitStatus(hSizeClass: self.hSizeClass, vSizeClass: self.vSizeClass)
            switch deviceTraitStatus {
            case .wRhR, .wChR:
                self.buttonsOnPortrait
            case .wRhC, .wChC:
                self.buttonsOnLandscape
            }

            // ...
        }
    }
}

private extension ContentView {

    var button1: some View {
        self.roundedButton(title: "ぼたん1", backgroundColor: .red) {
            print("ぼたん1タップ!")
        }
    }

    var button2: some View {
        self.roundedButton(title: "ぼたん2", backgroundColor: .yellow) {
            print("ぼたん2タップ!")
        }
    }

    var button3: some View {
        self.roundedButton(title: "ぼたん3", backgroundColor: .blue) {
            print("ぼたん3タップ!")
        }
    }

    /// iPhoneの縦表示またはiPadの場合のボタン3つのレイアウト
    ///
    /// - Note: iPadの場合は、縦横ともに画面に収まるのでレイアウト変えない。
    var buttonsOnPortrait: some View {
        VStack(alignment: .center, spacing: 16.0, content: {
            self.button1
            self.button2
            self.button3
        })
        .padding([.top], 16.0)
        .padding([.leading, .trailing], 32.0)
    }

    /// iPhoneの横表示の場合のボタン3つのレイアウト
    var buttonsOnLandscape: some View {
        VStack {
            HStack {
                self.button1
                Spacer()
                self.button2

            }
            .padding([.leading, .trailing], 32.0)
            .padding([.bottom], 4.0)

            self.button3
        }
        .padding([.top], 16.0)
    }

    /// 角丸のボタン
    func roundedButton(title: String, textColor: Color = .white, backgroundColor: Color,  action: @escaping() -> Void) -> some View {
        // ...
    }
}
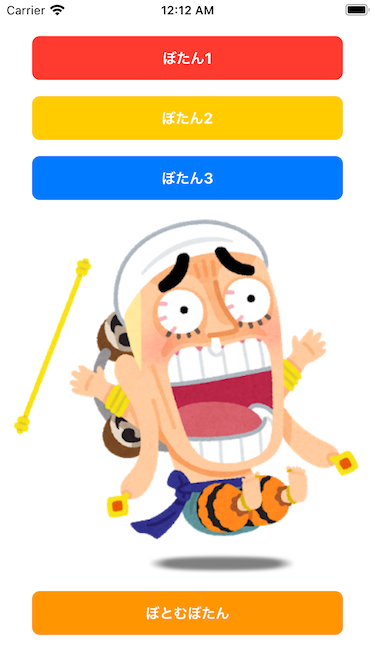
| 修正後の縦向き | 修正後の横向き |
|---|---|
 |
 |
画面回転したら、レイアウトが変更されるようになりました\(。・ω・。)/
さいごに
SwiftUIはまだまだ勉強中なので、もっと良いやり方などあればコメントをお願いしますm(_ _)m
ソースコードは、GitHubにリポジトリを作ってpushしました。