この記事について
Amazon Bedrock AgentCore を触る機会はこれまでも何度かありましたが、
コンソール操作や SDK 経由でリソースを作成することがほとんどでした。
一方で IaC(Infrastructure as Code)として構築するケースについては、あまり知見がなかったため、
Terraform 入門も兼ねて、AWS から公開されている以下のサンプルを使い、
マルチエージェントをTerraform で構築し、AgentCore上にデプロイしてみました。
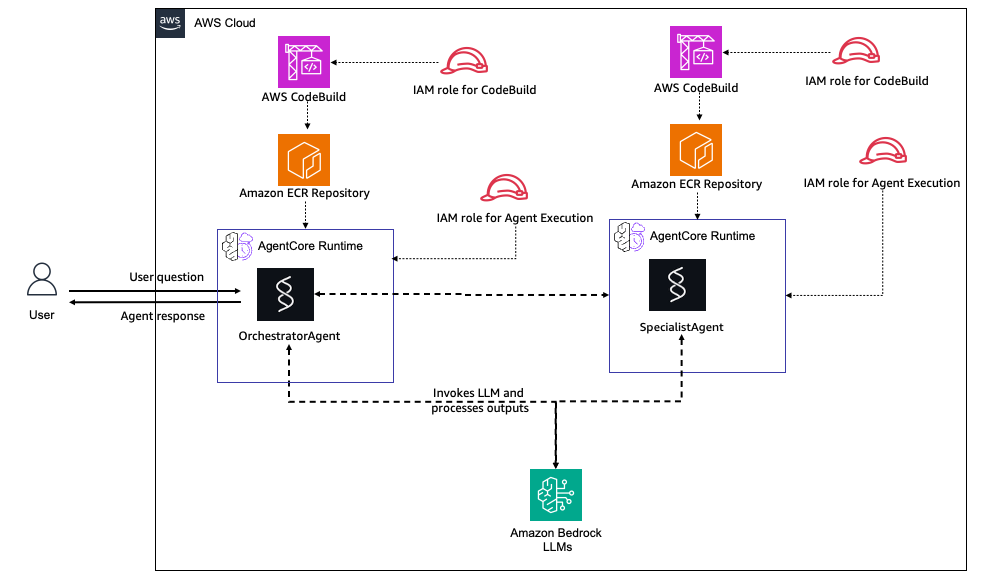
本サンプルは
OrchestratorAgent SpecialistAgentという二つのエージェントを構築するサンプルのようでした。
OrchestratorAgent はユーザーからのリクエストを受け取り、
内容に応じて自分で回答するか、SpecialistAgent に処理を委譲します。
SpecialistAgent は特定の専門領域に特化したエージェントとして動作します。
事前準備
今回、Terraform を使うのは初めてだったため、まずは必要なツールの準備から行います。
terraformのインストール
brew tap hashicorp/tap→brew install hashicorp/tap/terraform
$ brew tap hashicorp/tap
==> Tapping hashicorp/tap
Cloning into '/opt/homebrew/Library/Taps/hashicorp/homebrew-tap'...
remote: Enumerating objects: 6209, done.
remote: Counting objects: 100% (1068/1068), done.
remote: Compressing objects: 100% (333/333), done.
remote: Total 6209 (delta 916), reused 748 (delta 735), pack-reused 5141 (from 3)
Receiving objects: 100% (6209/6209), 1.09 MiB | 14.92 MiB/s, done.
Resolving deltas: 100% (4428/4428), done.
Tapped 2 casks and 32 formulae (99 files, 1.5MB).


$ brew install hashicorp/tap/terraform
==> Fetching hashicorp/tap/terraform
==> Downloading https://releases.hashicorp.com/terraform/1.14.3/terraform_1.14.3_darwin_arm64.zip
############################################################################################################################################################################################################### 100.0%
==> Installing terraform from hashicorp/tap
🍺  /opt/homebrew/Cellar/terraform/1.14.3: 5 files, 91.2MB, built in 1 second
==> Running `brew cleanup terraform`...
Disable this behaviour by setting HOMEBREW_NO_INSTALL_CLEANUP.
Hide these hints with HOMEBREW_NO_ENV_HINTS (see `man brew`).
==> `brew cleanup` has not been run in the last 30 days, running now...
Disable this behaviour by setting HOMEBREW_NO_INSTALL_CLEANUP.
Hide these hints with HOMEBREW_NO_ENV_HINTS (see `man brew`).
Removing: /Users/maeno/Library/Caches/Homebrew/nodebrew_bottle_manifest--1.2.0-1... (1.8KB)
Removing: /Users/maeno/Library/Caches/Homebrew/nodebrew--1.2.0... (11.3KB)
Removing: /Users/maeno/Library/Logs/Homebrew/localstack-cli... (125B)
Removing: /Users/maeno/Library/Logs/Homebrew/python@3.12... (2 files, 2KB)
tfenvのインストール
Terraform のバージョン管理のため、tfenv をインストールします。
しかし、以下のエラーが発生しました。
$ brew install tfenv
Error: Cannot install tfenv because conflicting formulae are installed.
  terraform: because tfenv symlinks terraform binaries

Please `brew unlink terraform` before continuing.

Unlinking removes a formula's symlinks from /opt/homebrew. You can
link the formula again after the install finishes. You can --force this
install, but the build may fail or cause obscure side effects in the
resulting software.
これは、すでに Terraform が Homebrew 経由でインストールされている場合に起こる既知のエラーで、
以下の記事で紹介されている内容と同じものでした。
そのため、一度 Terraform を unlink してから tfenv をインストールします。
$ brew unlink terraform
Unlinking /opt/homebrew/Cellar/terraform/1.14.3... 1 symlinks removed.
$ brew install tfenv
==> Downloading https://ghcr.io/v2/homebrew/core/tfenv/manifests/3.0.0-1
Already downloaded: /Users/maeno/Library/Caches/Homebrew/downloads/679e0938b5083d596c60486c563a0e1aa051894d4a55978188aa90579b772fd4--tfenv-3.0.0-1.bottle_manifest.json
==> Fetching dependencies for tfenv: grep
==> Downloading https://ghcr.io/v2/homebrew/core/grep/manifests/3.11-2
Already downloaded: /Users/maeno/Library/Caches/Homebrew/downloads/ad81f65102ec61a6dacd2d8927cd680d905e10addb8c5e955ffd454b1910d8e0--grep-3.11-2.bottle_manifest.json
==> Fetching grep
==> Downloading https://ghcr.io/v2/homebrew/core/grep/blobs/sha256:b2b59b800b2017f64aa518d30dd83bb009486b67bab2b9fd2f5b96383741ccf3
Already downloaded: /Users/maeno/Library/Caches/Homebrew/downloads/49e0237a613befd74f452bb8e575ffa39bc8bf32aa6771cf8b6cd86b8e981e3e--grep--3.11.arm64_sequoia.bottle.2.tar.gz
==> Fetching tfenv
==> Downloading https://ghcr.io/v2/homebrew/core/tfenv/blobs/sha256:c66a9c7c90b14b63c471b56405ec064b081474cc85528b324bd1bcc1c1af248d
Already downloaded: /Users/maeno/Library/Caches/Homebrew/downloads/b79a701205c0e5eab542e55540c1deef1ecc32406aed8d7328b24e0421d1e0c6--tfenv--3.0.0.all.bottle.1.tar.gz
==> Installing dependencies for tfenv: grep
==> Installing tfenv dependency: grep
==> Downloading https://ghcr.io/v2/homebrew/core/grep/manifests/3.11-2
Already downloaded: /Users/maeno/Library/Caches/Homebrew/downloads/ad81f65102ec61a6dacd2d8927cd680d905e10addb8c5e955ffd454b1910d8e0--grep-3.11-2.bottle_manifest.json
==> Pouring grep--3.11.arm64_sequoia.bottle.2.tar.gz
🍺  /opt/homebrew/Cellar/grep/3.11: 18 files, 1MB
==> Installing tfenv
==> Pouring tfenv--3.0.0.all.bottle.1.tar.gz
🍺  /opt/homebrew/Cellar/tfenv/3.0.0: 29 files, 103.6KB
==> Running `brew cleanup tfenv`...
Disable this behaviour by setting HOMEBREW_NO_INSTALL_CLEANUP.
Hide these hints with HOMEBREW_NO_ENV_HINTS (see `man brew`).
terraform init
サンプルリポジトリ内の multi-agent-runtime ディレクトリに移動し、terraform init を実行します。
この時点では Terraform のバージョン不整合によりエラーが発生しました。
README に記載されている以下の手順に従い、Terraform 1.6.0 を使用することで解消しました。
$ terraform init
cat: /opt/homebrew/Cellar/tfenv/3.0.0/version: No such file or directory
Version could not be resolved (set by /opt/homebrew/Cellar/tfenv/3.0.0/version or tfenv use <version>)
$ tfenv install 1.6.0
Installing Terraform v1.6.0
Downloading release tarball from https://releases.hashicorp.com/terraform/1.6.0/terraform_1.6.0_darwin_arm64.zip
############################################################################################################################################################################################################### 100.0%
Downloading SHA hash file from https://releases.hashicorp.com/terraform/1.6.0/terraform_1.6.0_SHA256SUMS
Not instructed to use Local PGP (/opt/homebrew/Cellar/tfenv/3.0.0/use-{gpgv,gnupg}) & No keybase install found, skipping OpenPGP signature verification
Archive:  /var/folders/vz/82z7nw656ln8bc_qnqn0bwt40000gn/T/tfenv_download.XXXXXX.TxqBQkOfse/terraform_1.6.0_darwin_arm64.zip
  inflating: /opt/homebrew/Cellar/tfenv/3.0.0/versions/1.6.0/terraform
Installation of terraform v1.6.0 successful. To make this your default version, run 'tfenv use 1.6.0'
$ tfenv use 1.6.0
Switching default version to v1.6.0
Default version (when not overridden by .terraform-version or TFENV_TERRAFORM_VERSION) is now: 1.6.0
tfvarsの編集
terraform.tfvars.exampleをterraform.tfvarsにコピーし、設定値を編集します。
AWS CloudFormation でいうところの、Parametersセクションに設定する値でしょうか。
今回は特にデフォルトから設定値を変えず進めます。
$ cp terraform.tfvars.example terraform.tfvars
# ============================================================================
# Multi-Agent Runtime - Example Configuration
# ============================================================================
# Copy this file to terraform.tfvars and customize
# Example: cp terraform.tfvars.example terraform.tfvars

# Agent Configuration
orchestrator_name = "OrchestratorAgent"
specialist_name   = "SpecialistAgent"
stack_name        = "agentcore-multi-agent"

# Network Configuration
network_mode = "PUBLIC" # PUBLIC or PRIVATE

# Container Configuration
ecr_repository_name = "multi-agent"
image_tag           = "latest"

# AWS Configuration
aws_region  = "us-west-2"
environment = "dev"

# Optional: Environment Variables (if needed for custom configurations)
# environment_variables = {
#   LOG_LEVEL = "INFO"
# }

# Notes:
# - Orchestrator Agent: Receives user requests and delegates to Specialist
# - Specialist Agent: Provides specialized data processing capabilities
# - Orchestrator code in agent-orchestrator-code/ directory (includes A2A invocation logic)
# - Specialist code in agent-specialist-code/ directory (independent specialist)
# - A2A communication: Orchestrator can invoke Specialist via call_specialist_agent tool
# - Sequential deployment: Specialist builds first, then Orchestrator
# - Test with: python test_multi_agent.py
tfvars の準備ができたので、改めて terraform init を実行します。
$ terraform init

Initializing the backend...

Initializing provider plugins...
- Finding hashicorp/aws versions matching "~> 6.21"...
- Finding latest version of hashicorp/archive...
- Finding hashicorp/null versions matching "~> 3.0"...
- Finding hashicorp/time versions matching "~> 0.9"...
- Installing hashicorp/time v0.13.1...
- Installed hashicorp/time v0.13.1 (signed by HashiCorp)
- Installing hashicorp/aws v6.27.0...
- Installed hashicorp/aws v6.27.0 (signed by HashiCorp)
- Installing hashicorp/archive v2.7.1...
- Installed hashicorp/archive v2.7.1 (signed by HashiCorp)
- Installing hashicorp/null v3.2.4...
- Installed hashicorp/null v3.2.4 (signed by HashiCorp)

Terraform has created a lock file .terraform.lock.hcl to record the provider
selections it made above. Include this file in your version control repository
so that Terraform can guarantee to make the same selections by default when
you run "terraform init" in the future.

Terraform has been successfully initialized!

You may now begin working with Terraform. Try running "terraform plan" to see
any changes that are required for your infrastructure. All Terraform commands
should now work.

If you ever set or change modules or backend configuration for Terraform,
rerun this command to reinitialize your working directory. If you forget, other
commands will detect it and remind you to do so if necessary.
デプロイ
デプロイスクリプト(deploy.sh)を使用する場合
デプロイスクリプトが準備されているため、実行します。
スクリプトが実行されると、
Terraform validate Terraform fmt Terraform planまで行い、対話型で確認を求めた上でterraform applyを実行し、必要なAgentCoreリソースをデプロイしてくれるスクリプトのようです。
$ chmod +x deploy.sh

$ ./deploy.sh
[INFO] Starting Multi-Agent Runtime Deployment...

[SUCCESS] Terraform version:
[SUCCESS] AWS CLI is installed
[SUCCESS] AWS Account: XXXXXXX
[SUCCESS] AWS Region: us-east-1

[INFO] Checking configuration files...
[SUCCESS] Configuration file found: terraform.tfvars

[INFO] Initializing Terraform...

Initializing the backend...

Initializing provider plugins...
- Reusing previous version of hashicorp/archive from the dependency lock file
- Reusing previous version of hashicorp/aws from the dependency lock file
- Reusing previous version of hashicorp/null from the dependency lock file
- Reusing previous version of hashicorp/time from the dependency lock file
......
中略

Saved the plan to: tfplan

To perform exactly these actions, run the following command to apply:
    terraform apply "tfplan"
[SUCCESS] Terraform plan created successfully

[WARNING] ========================================
[WARNING] DEPLOYMENT CONFIRMATION
[WARNING] ========================================
[INFO] This will deploy the following resources:
[INFO]   - 2x S3 Buckets (Orchestrator & Specialist source code storage)
[INFO]   - 2x ECR Repositories (Orchestrator & Specialist)
[INFO]   - 2x CodeBuild Projects (Orchestrator & Specialist)
[INFO]   - IAM Roles and Policies (with A2A permissions)
[INFO]   - Specialist Runtime (Independent)
[INFO]   - Orchestrator Runtime (Depends on Specialist)

[INFO] The deployment includes:
[INFO]   - Building ARM64 Docker images for both agents
[INFO]   - Creating AWS resources with proper dependencies
[INFO]   - Setting up Agent-to-Agent (A2A) communication

Do you want to proceed with deployment? (yes/no):
Do you want to proceed with deployment? (yes/no):
と聞かれるので、yesを選択します。
Do you want to proceed with deployment? (yes/no): yes

[INFO] Starting deployment...

aws_iam_role.orchestrator_execution: Creating...
aws_ecr_repository.specialist: Creating...
aws_iam_role.specialist_execution: Creating...
aws_iam_role.codebuild: Creating...
aws_ecr_repository.orchestrator: Creating...
aws_s3_bucket.orchestrator_source: Creating...
aws_s3_bucket.specialist_source: Creating...
aws_ecr_repository.orchestrator: Creation complete after 1s [id=agentcore-multi-agent-multi-agent-orchestrator]
aws_ecr_lifecycle_policy.orchestrator: Creating...
....中略
[SUCCESS] Deployment completed successfully!

[SUCCESS] ========================================
[SUCCESS] DEPLOYMENT COMPLETED
[SUCCESS] ========================================

[INFO] Retrieving deployment outputs...

[SUCCESS] Orchestrator Runtime ID: agentcore_multi_agent_OrchestratorAgent-1F2ysc7XD4
[SUCCESS] Orchestrator Runtime ARN: arn:aws:bedrock-agentcore:us-west-2:<aws-account-id>:runtime/agentcore_multi_agent_OrchestratorAgent-1F2ysc7XD4

[SUCCESS] Specialist Runtime ID: agentcore_multi_agent_SpecialistAgent-mc9AV42tSu
[SUCCESS] Specialist Runtime ARN: arn:aws:bedrock-agentcore:us-west-2:<aws-account-id>:runtime/agentcore_multi_agent_SpecialistAgent-mc9AV42tSu

[INFO] Next Steps:
[INFO] 1. Test the multi-agent system:
[INFO]    python test_multi_agent.py

[INFO] 2. View all outputs (includes test commands):
[INFO]    terraform output

[INFO] 3. Monitor in AWS Console:
[INFO]    https://console.aws.amazon.com/bedrock/home?region=us-east-1#/agentcore

[SUCCESS] Deployment completed successfully!
デプロイが完了したことを確認できました。
コンソールからも、作成されたエージェント(2つ)がデプロイされていることがわかります。

なお、
$ terraform output
で出力結果を見ることができます。AWS CloudFormationでいうところのOutputセクションのイメージでしょうか。
$ terraform output
orchestrator_codebuild_project_name = "agentcore-multi-agent-orchestrator-build"
orchestrator_ecr_repository_url = "<aws-account-id>.dkr.ecr.us-west-2.amazonaws.com/agentcore-multi-agent-multi-agent-orchestrator"
orchestrator_execution_role_arn = "arn:aws:iam::<aws-account-id>:role/agentcore-multi-agent-orchestrator-execution-role"
orchestrator_runtime_arn = "arn:aws:bedrock-agentcore:us-west-2:<aws-account-id>:runtime/agentcore_multi_agent_OrchestratorAgent-1F2ysc7XD4"
orchestrator_runtime_id = "agentcore_multi_agent_OrchestratorAgent-1F2ysc7XD4"
orchestrator_runtime_version = "1"
orchestrator_source_bucket_name = "acma-orch-src-20251221005316474000000001"
orchestrator_source_code_md5 = "d099f978b60f1523211952f5d87272d3"
specialist_codebuild_project_name = "agentcore-multi-agent-specialist-build"
specialist_ecr_repository_url = "<aws-account-id>.dkr.ecr.us-west-2.amazonaws.com/agentcore-multi-agent-multi-agent-specialist"
specialist_execution_role_arn = "arn:aws:iam::<aws-account-id>:role/agentcore-multi-agent-specialist-execution-role"
specialist_runtime_arn = "arn:aws:bedrock-agentcore:us-west-2:<aws-account-id>:runtime/agentcore_multi_agent_SpecialistAgent-mc9AV42tSu"
specialist_runtime_id = "agentcore_multi_agent_SpecialistAgent-mc9AV42tSu"
specialist_runtime_version = "1"
specialist_source_bucket_name = "acma-spec-src-20251221005316474700000002"
specialist_source_code_md5 = "6d41b9d29eeb2af1d810c9253aa5f5db"
test_orchestrator_command = "aws bedrock-agentcore invoke-agent-runtime --agent-runtime-id agentcore_multi_agent_OrchestratorAgent-1F2ysc7XD4 --qualifier DEFAULT --payload '{\"prompt\": \"Hello, how are you?\"}' --region us-west-2 response.json"
test_script_command = "python test_multi_agent.py arn:aws:bedrock-agentcore:us-west-2:<aws-account-id>:runtime/agentcore_multi_agent_OrchestratorAgent-1F2ysc7XD4"
test_specialist_command = "aws bedrock-agentcore invoke-agent-runtime --agent-runtime-id agentcore_multi_agent_SpecialistAgent-mc9AV42tSu --qualifier DEFAULT --payload '{\"prompt\": \"Explain cloud computing\"}' --region us-west-2 response.json"
テストコマンドが用意されているので、マルチエージェントが正常に動くかテストしてみます。
python test_multi_agent.py arn:aws:bedrock-agentcore:us-west-2:aws-account-id:runtime/agentcore_multi_agent_OrchestratorAgent-1F2ysc7XD4

================================================================================
MULTI-AGENT SYSTEM TEST
================================================================================

Orchestrator Agent ARN: arn:aws:bedrock-agentcore:us-west-2:aws-account-id:runtime/agentcore_multi_agent_OrchestratorAgent-1F2ysc7XD4
Specialist Agent: Not provided (will test Orchestrator only)
Region: us-west-2

================================================================================
TEST 1: Simple Query (Orchestrator)
================================================================================

Prompt: 'Hello! Can you introduce yourself and your capabilities?'
--------------------------------------------------------------------------------
Status: 200
Content Type: application/json

✅ Response:
Hello! I'm an orchestrator agent designed to help you with a wide range of tasks and questions. Here's what I can do:

## My Capabilities:

**Direct Assistance:**
- Handle simple queries, greetings, and basic questions
- Provide general information and explanations
- Help with straightforward tasks and conversations

**Expert Analysis:**
- For complex analytical tasks, I can delegate to a specialist agent who provides detailed, expert-level analysis
- The specialist can handle intricate topics t...

[Response truncated for display]

================================================================================
TEST 2: Complex Query with A2A Communication
================================================================================

Prompt: 'I need expert analysis. Please coordinate with the specialist agent to provide a comprehensive explanation of cloud computing architectures and best practices.'
--------------------------------------------------------------------------------
Status: 200
Content Type: application/json

✅ Response:
Based on my coordination with the specialist agent, I've obtained a comprehensive analysis of cloud computing architectures and best practices. Here's the expert analysis covering all the essential aspects:

## Key Highlights from the Specialist Analysis:

**🏗️ Architectural Patterns Covered:**
- Monolithic, Microservices, Serverless, Container-based, and Event-driven architectures
- Each with specific use cases, benefits, and implementation considerations

**☁️ Deployment Models:**
- Public, Pr...

[Response truncated for display]

================================================================================
TEST SUMMARY
================================================================================
✅ PASSED - Simple Query
✅ PASSED - A2A Communication Test

================================================================================
✅ ALL TESTS PASSED
================================================================================
実行結果では、
-
単純な質問には Orchestrator が直接応答
-
専門的な質問では Specialist に委譲した体で応答
という挙動が確認でき、マルチエージェント構成が想定どおり動作していることを確認できました。
テストコマンドを実行する前に、以下を実施しておく必要があります。
$ uv venv
Using CPython 3.12.9
Creating virtual environment at: .venv
Activate with: source .venv/bin/activate
$ uv pip install boto3
Resolved 7 packages in 95ms
Installed 7 packages in 63ms
 + boto3==1.42.14
 + botocore==1.42.14
 + jmespath==1.0.1
 + python-dateutil==2.9.0.post0
 + s3transfer==0.16.0
 + six==1.17.0
 + urllib3==2.6.2
エージェントを編集する場合
agent-orchestrator-code/agent.py agent-specialist-code/agent.pyを編集したのち、
$ terraform apply
を行えば更新されたエージェントがデプロイできます。
例えば、エージェントの出力を日本語にさせるためのプロンプトを足してみます。試しに、エージェントのシステムプロンプトを弄り、The answers should be in Japanese.を足してみます。
変更箇所
出力例
$ terraform apply
data.archive_file.specialist_source: Reading...
data.archive_file.orchestrator_source: Reading...

....中略

Terraform used the selected providers to generate the following execution plan. Resource actions are indicated with the following symbols:
  ~ update in-place
-/+ destroy and then create replacement

Terraform will perform the following actions:

  # aws_s3_object.specialist_source must be replaced

....中略

null_resource.trigger_build_orchestrator (local-exec): [✓] Build and verification completed successfully!
null_resource.trigger_build_orchestrator: Creation complete after 1m26s [id=2035119313646659154]

Apply complete! Resources: 3 added, 1 changed, 3 destroyed.
デプロイ後、エージェントをテストしてみると以下のように日本語で回答を行ってくれていることから、エージェントが更新されていることが分かりました。

まとめ
AWS CloudFormation や AWS CDK を使って AgentCore のリソースをデプロイするイメージは持っていましたが、
Terraform でも AgentCore のリソースを構築できると知り、興味を持って今回試してみました。
今回、Terraform を初めて触ったのですが、
これまで AWS SAM や AWS CloudFormation で YAML ファイルを使ったリソース定義の経験があったこともあり、
Terraform の HCL についても「何を定義しているか」は直感的に理解しやすかった印象です。
まだ Terraform で AgentCore を構築してみた、という事例はあまり多くないように感じているため、今後も色々と検証していければと思っています。
サクッと試してみた内容ではありますが、
Terraform で AgentCore を触ってみたい方の入門として、どなたかのお役に立てましたら幸いです。