OpenldapでLDAP環境を構築した際のディレクトリ構成とACLの設定について記載します。
今までの記事でひとまずLDAP環境を構築することができました。
1.Openldapの仕組み
2.LDAPサーバ構築手順
3.LDAPクライアント設定手順
しかし各自の環境に合ったディレクトリを構成し、ACL(アクセス制御)の設定をすることが運用面で大事になります。
ディレクトリ構成とACL設定の例を紹介します。
LDAPディレクトリの構成例
※1.Openldapの仕組み で紹介したものです。
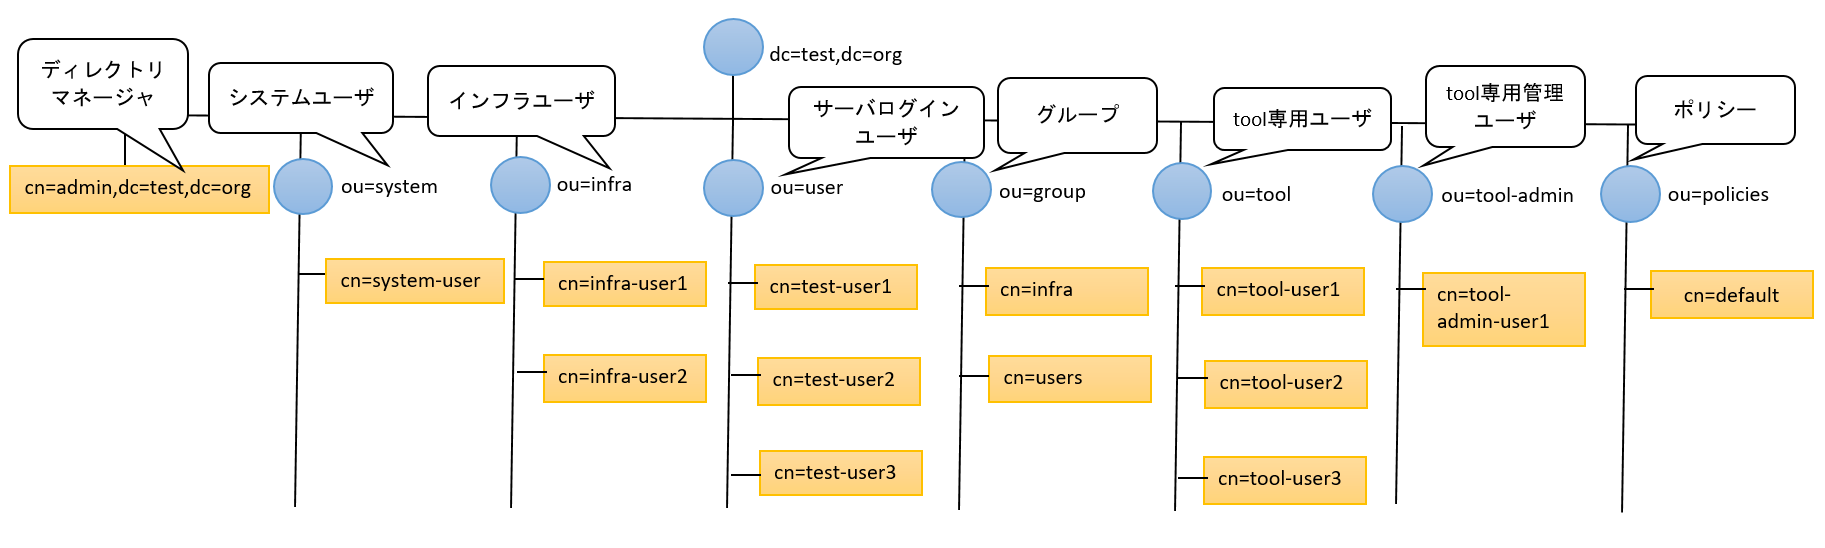
例えば「"サーバにログインさせたいけどsudo権は与えたくない"というユーザはuserというou名の中に登録しよう。」といった形で管理します。ouとは組織単位のことです(グループみたいなもので、そのouの中にユーザを登録していくイメージ)。
また上のツリーを例にした場合、各ouに対し以下のように役割を決めてディレクトリツリーを作成し、アクセス制限を設定していくのが一般的です。
| OU名 | 説明 |
|---|---|
| system | サーバにログインできるシステムユーザのエントリ |
| infra | 全環境でsudo権が付与された管理者用ユーザ(LDAP管理、サーバ管理者用) |
| user | サーバ内でsudoできない、または環境を制限してsudoが付与されるユーザ |
| group | グループのエントリを追加 |
| tool | Gitや監視ツールなど他のツールもLDAP連携したい場合に備えたツール用ユーザ |
| tool-admin | OU=toolのエントリを追加・削除・編集できるツールユーザの管理者 |
| policies | ポリシーを定めたエントリ |
そしてCentOS7でOpenldap構築 - 2.LDAPサーバ構築手順でインストールしたLAM(Ldap Account Manager)で、上図の構成になるよう変更していきます。
※LAMログイン後画面上にある"ツリービュー"から同じ構成にしました。
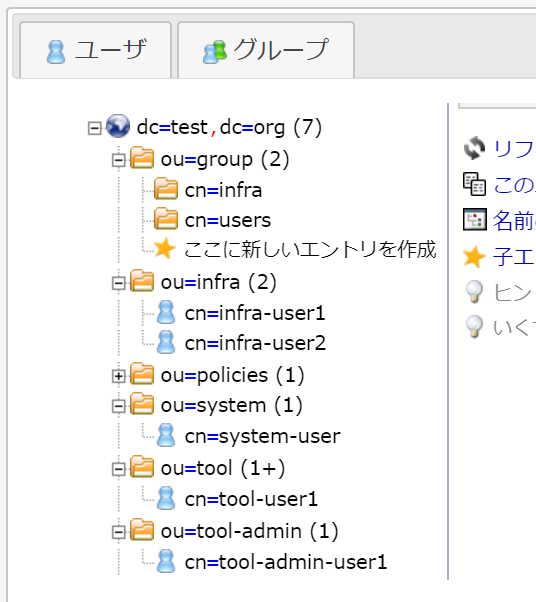
ユーザを追加するときはuidNumberやホームディレクトリが他のユーザと被らないよう修正します。被ってしまうとログイン時に不具合が起きます。またユーザにパスワードを設定したい場合は、userPasswordという属性を追加します。
そしてLDAPサーバ内で、以下まるまる記載したldifファイルを作成し、
ldapmodify -x -W -D cn=admin,cn=config -f [ファイルパス] でACLの設定変更をします。
ACLの内容は上記表のouごとの役割を反映させたものです。
dn: olcDatabase={2}hdb,cn=config
changetype: modify
replace: olcAccess
olcAccess: {0}to dn.children="ou=tool,dc=test,dc=org" attrs=userPassword,shadowLastChange
  by self write
  by anonymous auth
  by dn.children="ou=infra,dc=test,dc=org" write
  by dn.children="ou=tool-admin,dc=test,dc=org" write
  by dn.children="ou=system,dc=test,dc=org" read
  by users none
olcAccess: {1}to dn.children="ou=tool,dc=test,dc=org"
  by self read
  by anonymous read
  by dn.children="ou=infra,dc=test,dc=org" write
  by dn.children="ou=tool-admin,dc=test,dc=org" read
  by dn.children="ou=system,dc=test,dc=org" read
  by users none
olcAccess: {2}to dn.children="ou=tool-admin,dc=test,dc=org" attrs=userPassword,shadowLastChange
  by self write
  by anonymous auth
  by dn.children="ou=infra,dc=test,dc=org" write
  by dn.children="ou=system,dc=test,dc=org" read
  by users none
olcAccess: {3}to dn.children="ou=user,dc=test,dc=org" attrs=userPassword,shadowLastChange
  by self write
  by anonymous auth
  by dn.children="ou=infra,dc=test,dc=org" write
  by dn.children="ou=system,dc=test,dc=org" read
  by users none
olcAccess: {4}to dn.children="ou=user,dc=test,dc=org"
  by self read
  by anonymous read
  by dn.children="ou=infra,dc=test,dc=org" write
  by dn.children="ou=system,dc=test,dc=org" read
  by users none
olcAccess: {5}to dn.children="ou=system,dc=test,dc=org"
  by self read
  by anonymous read
  by dn.children="ou=infra,dc=test,dc=org" write
  by dn.children="ou=system,dc=test,dc=org" read
  by users none
olcAccess: {6}to dn.children="ou=infra,dc=test,dc=org"
  by self write
  by anonymous read
  by dn.children="ou=infra,dc=test,dc=org" write
  by dn.children="ou=system,dc=test,dc=org" read
  by users none
olcAccess: {7}to dn.sub="ou=group,dc=test,dc=org"
  by anonymous read
  by dn.children="ou=infra,dc=test,dc=org" write
  by users read
olcAccess: {8}to dn.sub="ou=policies,dc=test,dc=org"
  by dn.children="ou=infra,dc=test,dc=org" write
  by users read
olcAccess: {9}to *
  by dn.children="ou=infra,dc=test,dc=org" write
  by * read
olcAccessという属性でアクセス制御の設定をします。
上記はolcAccess: {0}から{9}まで10個の設定があります。
例えば先頭の↓の場合、
olcAccess: {0}to dn.children="ou=tool,dc=test,dc=org" attrs=userPassword,shadowLastChange
  by self write
  by anonymous auth
  by dn.children="ou=infra,dc=test,dc=org" write
  by dn.children="ou=tool-admin,dc=test,dc=org" write
  by dn.children="ou=system,dc=test,dc=org" read
  by users none
これを簡単に翻訳すると、、、
0番目のアクセス制御: dnがou=tool,dc=test,dc=org配下のパスワードに関する属性について、
自身は編集可能
匿名ユーザからの参照許可
dnがou=infra,dc=test,dc=org配下の人はは編集可能
dnがou=tool-admin,dc=test,dc=org配下の人は編集可能
dnがou=system,dc=test,dc=org配下の人は読み取り可能
users はアクセスなし
という制御になります。
↓は英語ですが詳しく記載しています。
https://www.openldap.org/doc/admin24/access-control.html
こちらの設定ひとつひとつを説明するのは、正直しんどいのですが他にも参考になる記事があると思います。
最後に
ディレクトリやACLが少し複雑に見えるかもしれないですが、ここまでの構成にしてれば後々困らないのではという例でした。
次回はバックアップ、リストアテストをします。
・CentOS7でOpenldap構築 - 5.バックアップリストアテスト
関連記事
・CentOS7でOpenldap構築 - 1.Openldapの仕組み
・CentOS7でOpenldap構築 - 2.LDAPサーバ構築手順
・CentOS7でOpenldap構築 - 3.LDAPクライアント設定手順
・CentOS7でOpenldap構築 - 4.LDAPディレクトリ構成例とACLの設定
・CentOS7でOpenldap構築 - 5.バックアップリストアテスト
・CentOS7でOpenldap構築 - 6.パスワード有効期限切れ通知スクリプト