■できるようになる事
- AWS-ConsoleからECS-Fargate使って特定処理を定期実行出来る(=GUI)
- Rubyのaws-sdkのgemを使ってコードからECSのスケジュールタスクを作成出来る(=CUI)
■経緯
実機端末上でcron使って実行していたRubyのバッチ処理をAWS上で定期実行出来るようにしたかった。
■前提知識とか
ECS(=ElasticContainerService)って?
○とりあえずコンテナ管理系
EKSってのもあったりしますが...
私はk8sとか触ってないのでその辺は他の人の記事を参考にして下さい。
○概念とか仕組みとか
実はクラスターの上ではServiceだけではなくて、タスクを直接動作させることもできます。
バッチジョブなどがこれに該当するでしょう。
今回は特定のバッチ処理(=今回は、HelloWorldを出力)を、GUIとaws-sdkのgemを使った2つのアプローチから構築して実行出来るようにしたいと思います。
■お金について
ECRは容量に対して、ECSは動かすマシンスペック×稼働時間でお金がかかります。個人的にデフォのスペックで1ヶ月ガッツリ動かしてもそこまで跳ね上がらなかった印象ですが、スペック上げすぎたりずっと動かしっぱなしだと跳ね上がる恐れもあるので気を付けてください。
■内容
1. GUI(AWS-Console)で定期実行できるようにする
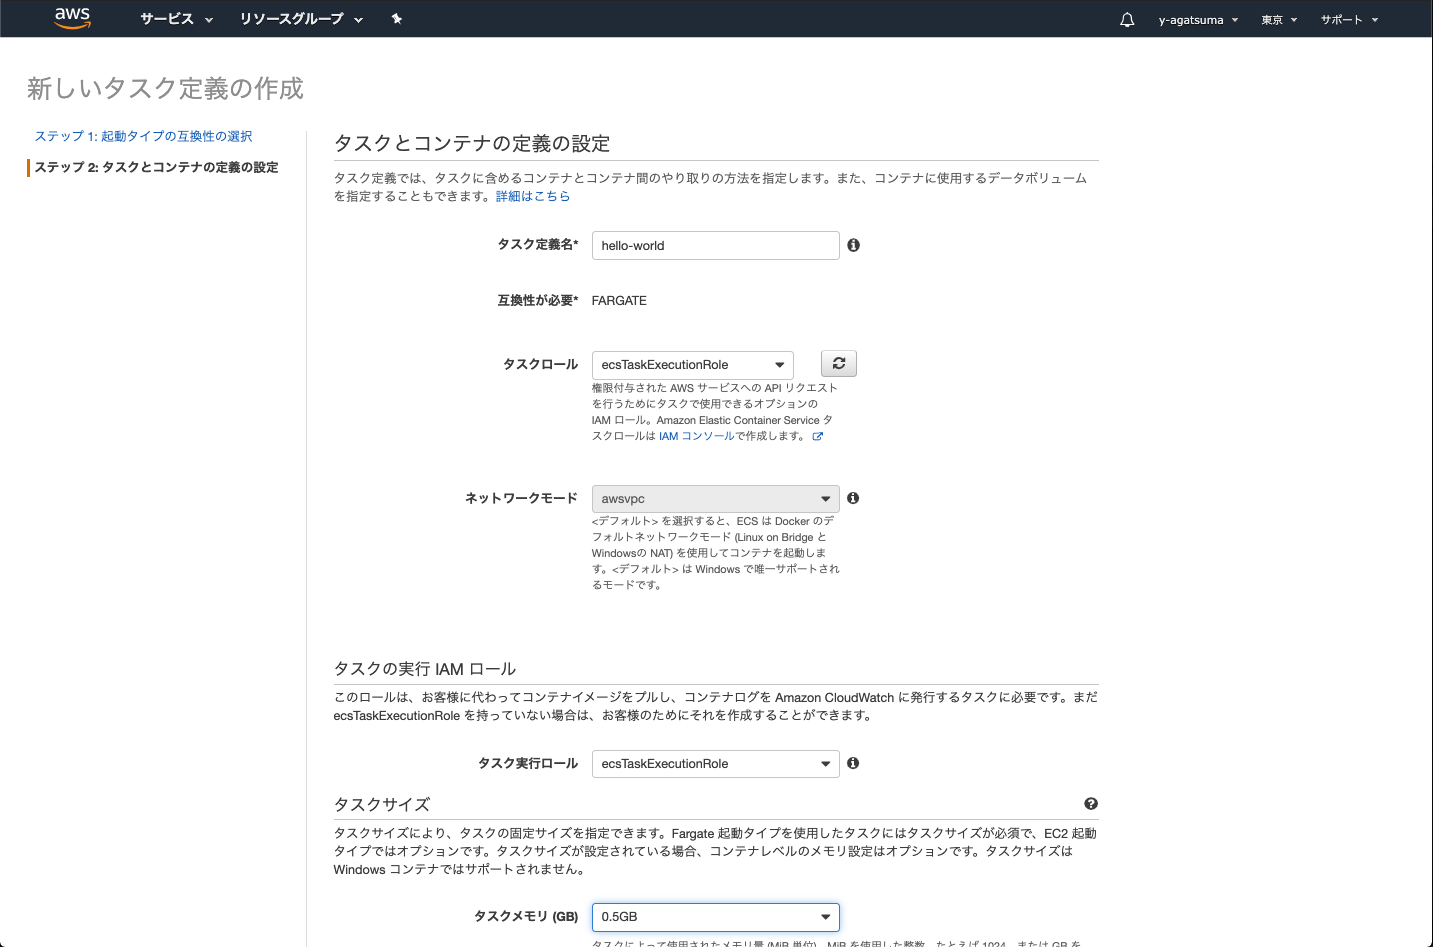
作成する環境のリソース(メモリとかCPU)はデフォルトのままで作成しています。
そこは適宜変更して下さい。
1-1. バッチ処理のイメージを用意する(ECR)
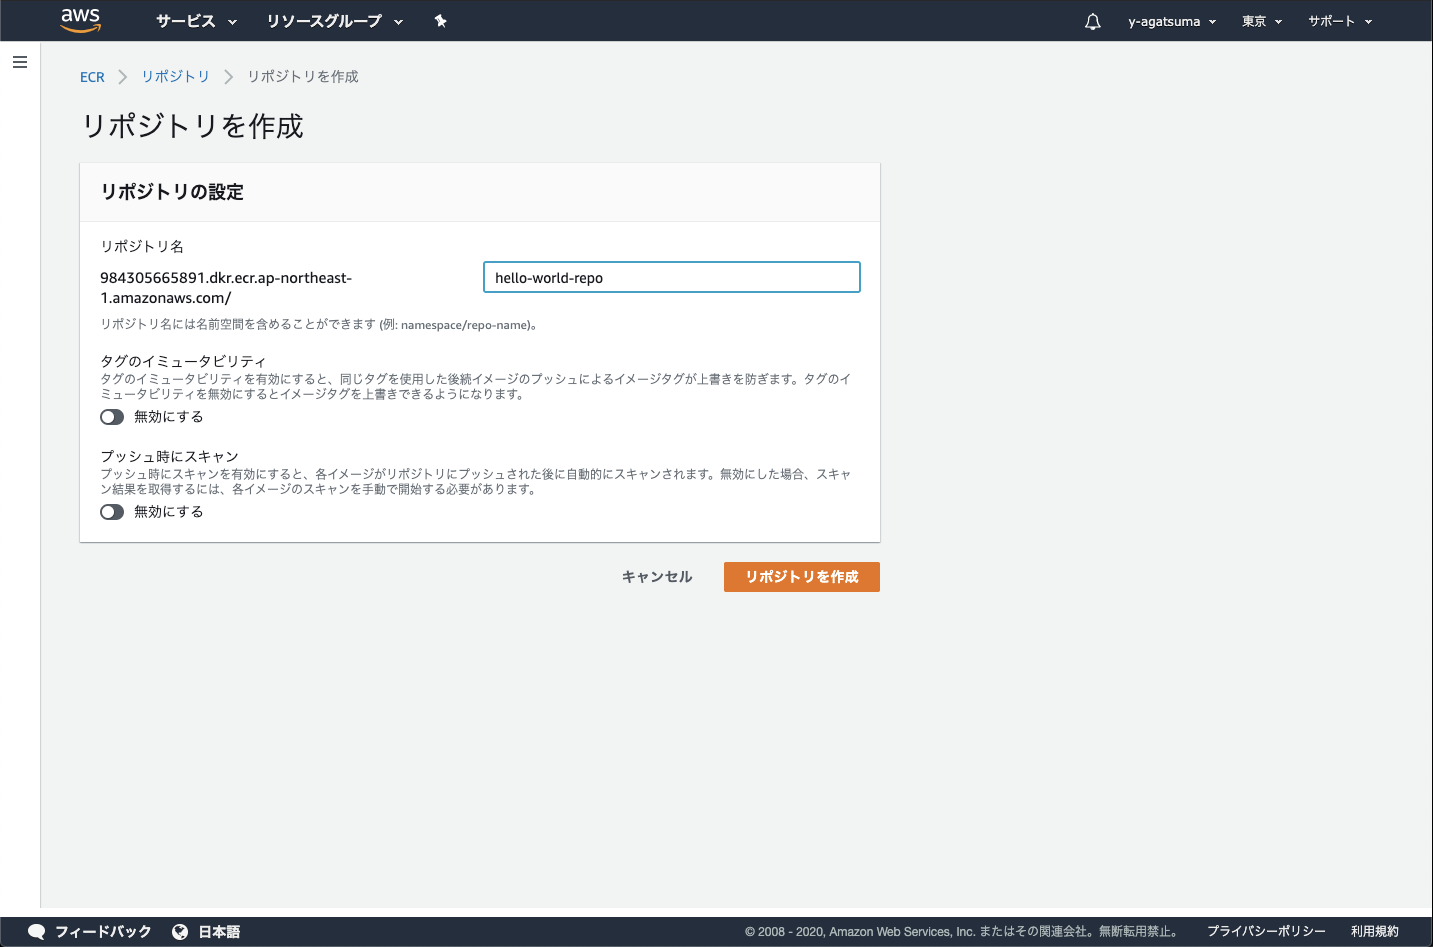
1-1-1. ECRにレポジトリを作成する

1-1-2. バッチ処理のイメージをECRにプッシュする
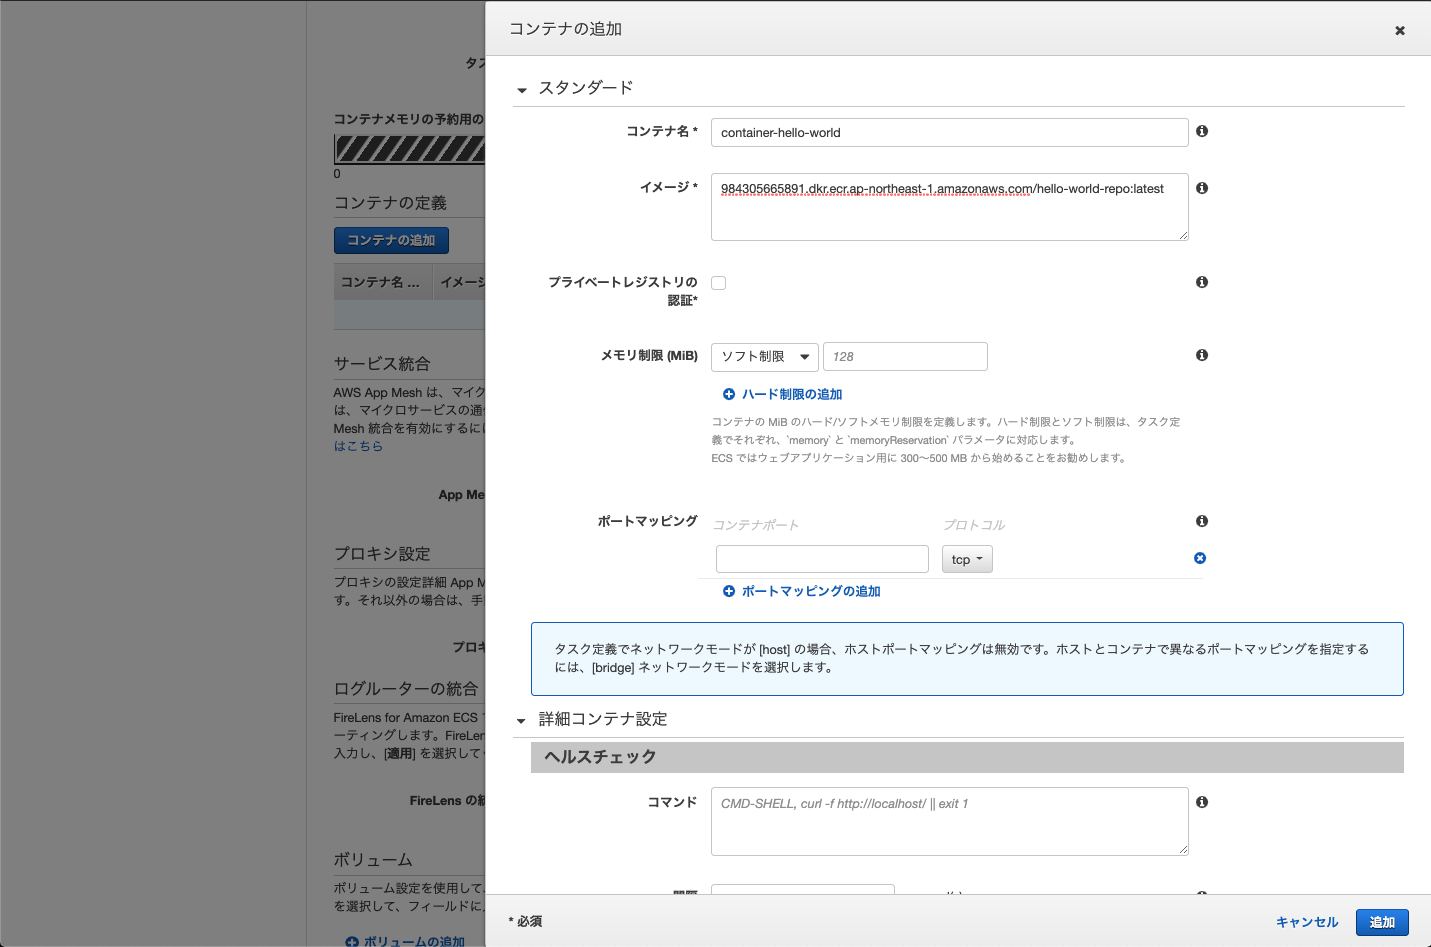
今回実行するバッチ処理は、単純にコンテナ上で「Hello World!!」するタスクにします。
FROM alpine:3.7
CMD ["echo", "Hello World!!"]
$ docker build -t hello-world .
$ docker tag hello-world 984305665891.dkr.ecr.ap-northeast-1.amazonaws.com/hello-world-repo
$ docker images
984305665891.dkr.ecr.ap-northeast-1.amazonaws.com/hello-world-repo  latest  77356bbb285c  13 months ago  4.21MB
hello-world                                                         latest  77356bbb285c  13 months ago  4.21MB

# AWSのcredentials設定 = aws-cliを使用
# 自分の場合はprofileを複数作って切り替えてます。
# 参考: https://qiita.com/reflet/items/e4225435fe692663b705
# ※今回は既に作成済みの管理者権限付きのユーザーに切り替えるだけにします。
$ export AWS_PROFILE=admin-user
$ aws ecr get-login --no-include-email
# ↓xxxxxxの部分は結構長めのトークンになっているかと思います
$ docker login -u AWS -p xxxxxxxxxxxxxxxxx
$ docker push 984305665891.dkr.ecr.ap-northeast-1.amazonaws.com/hello-world-repo
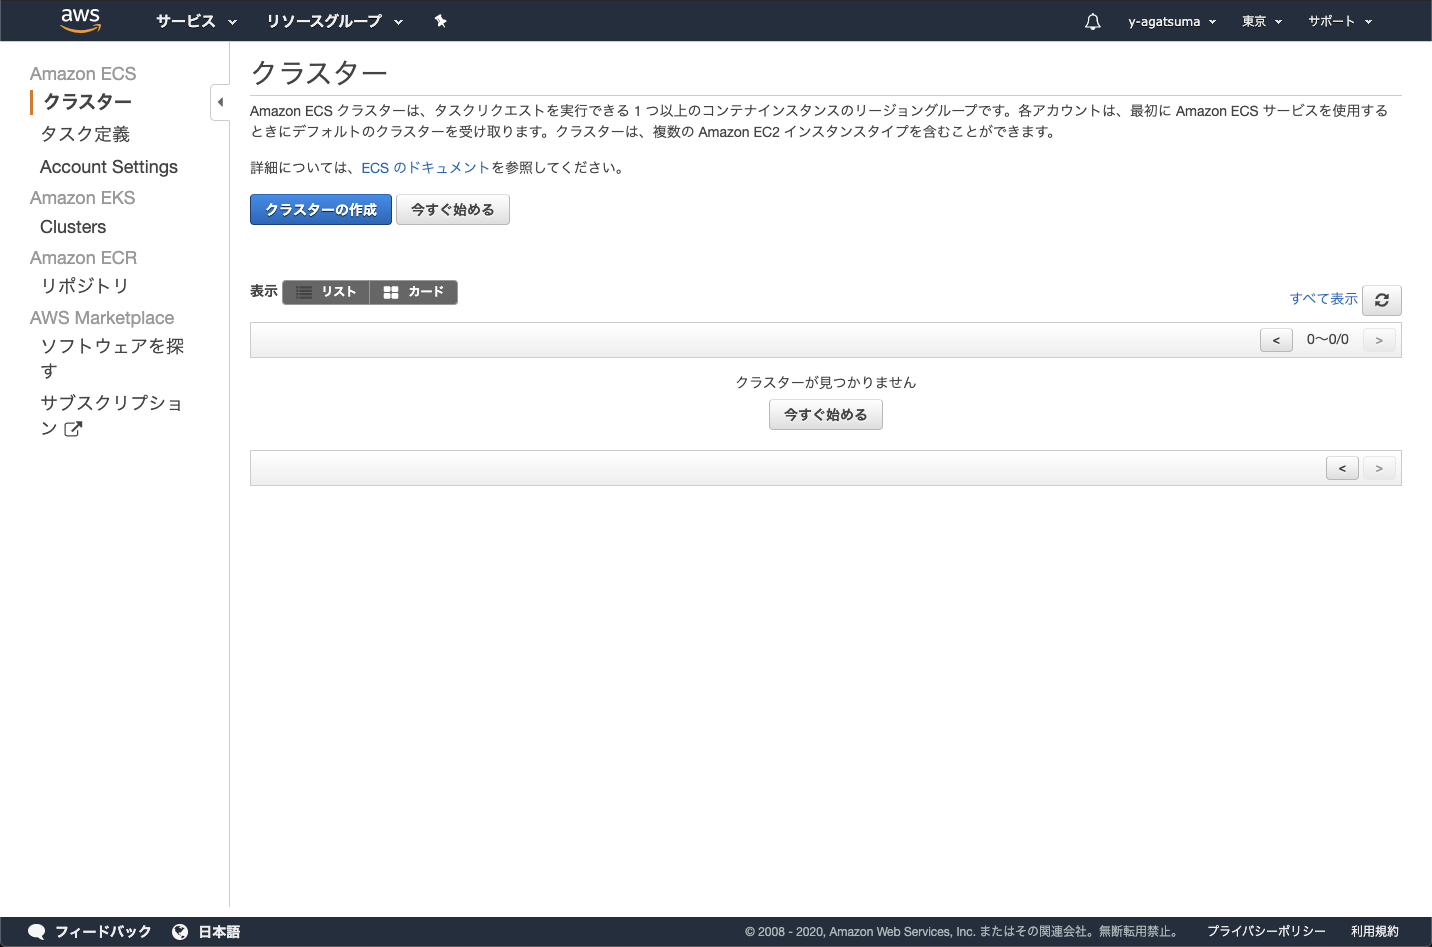
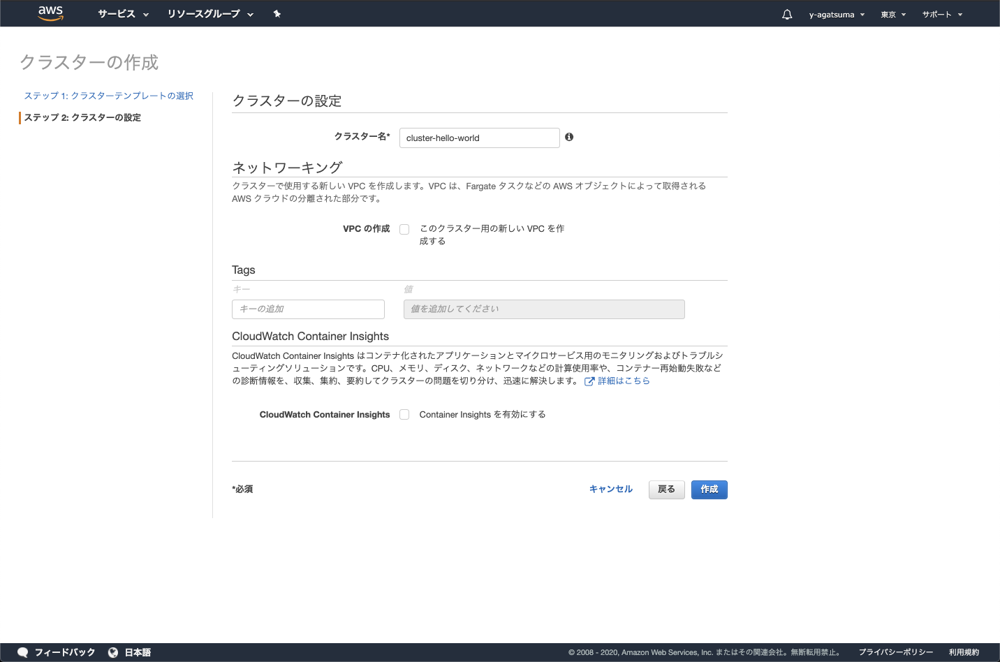
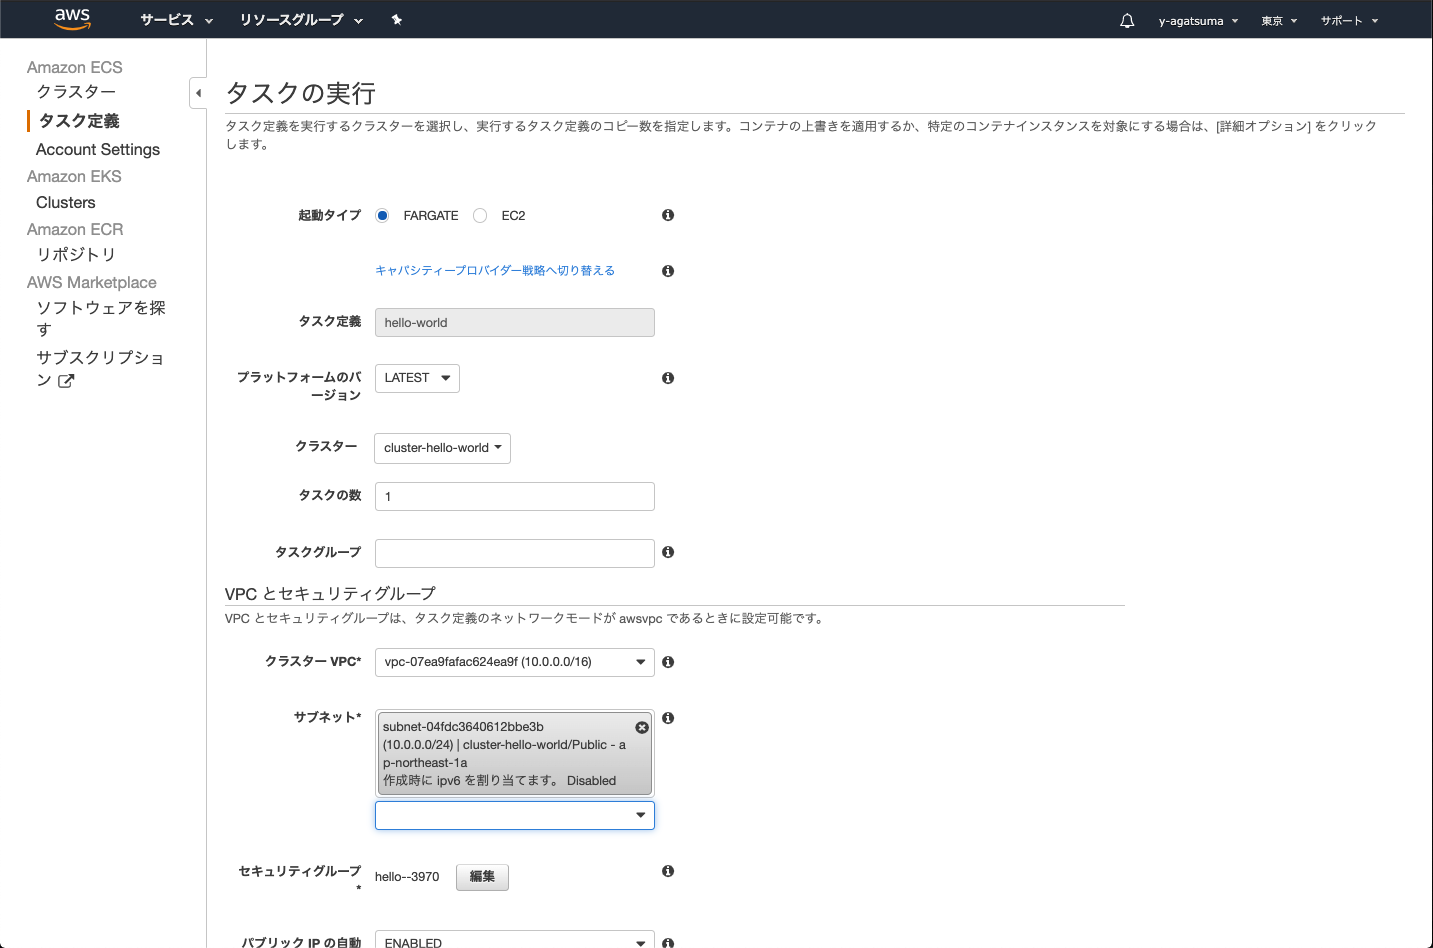
1-2. ECSのクラスターを作成する


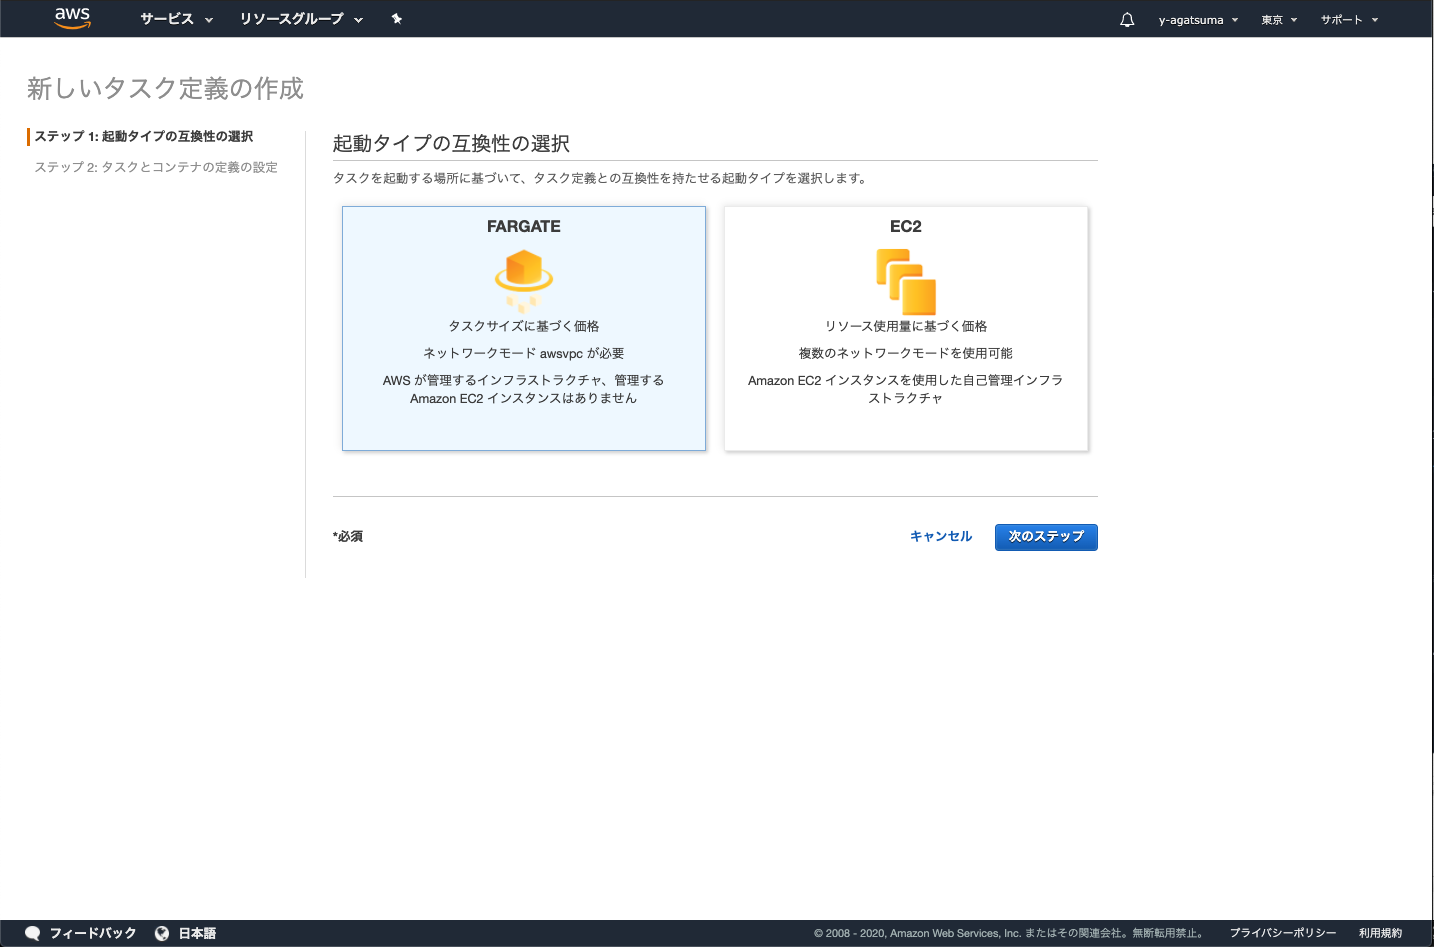
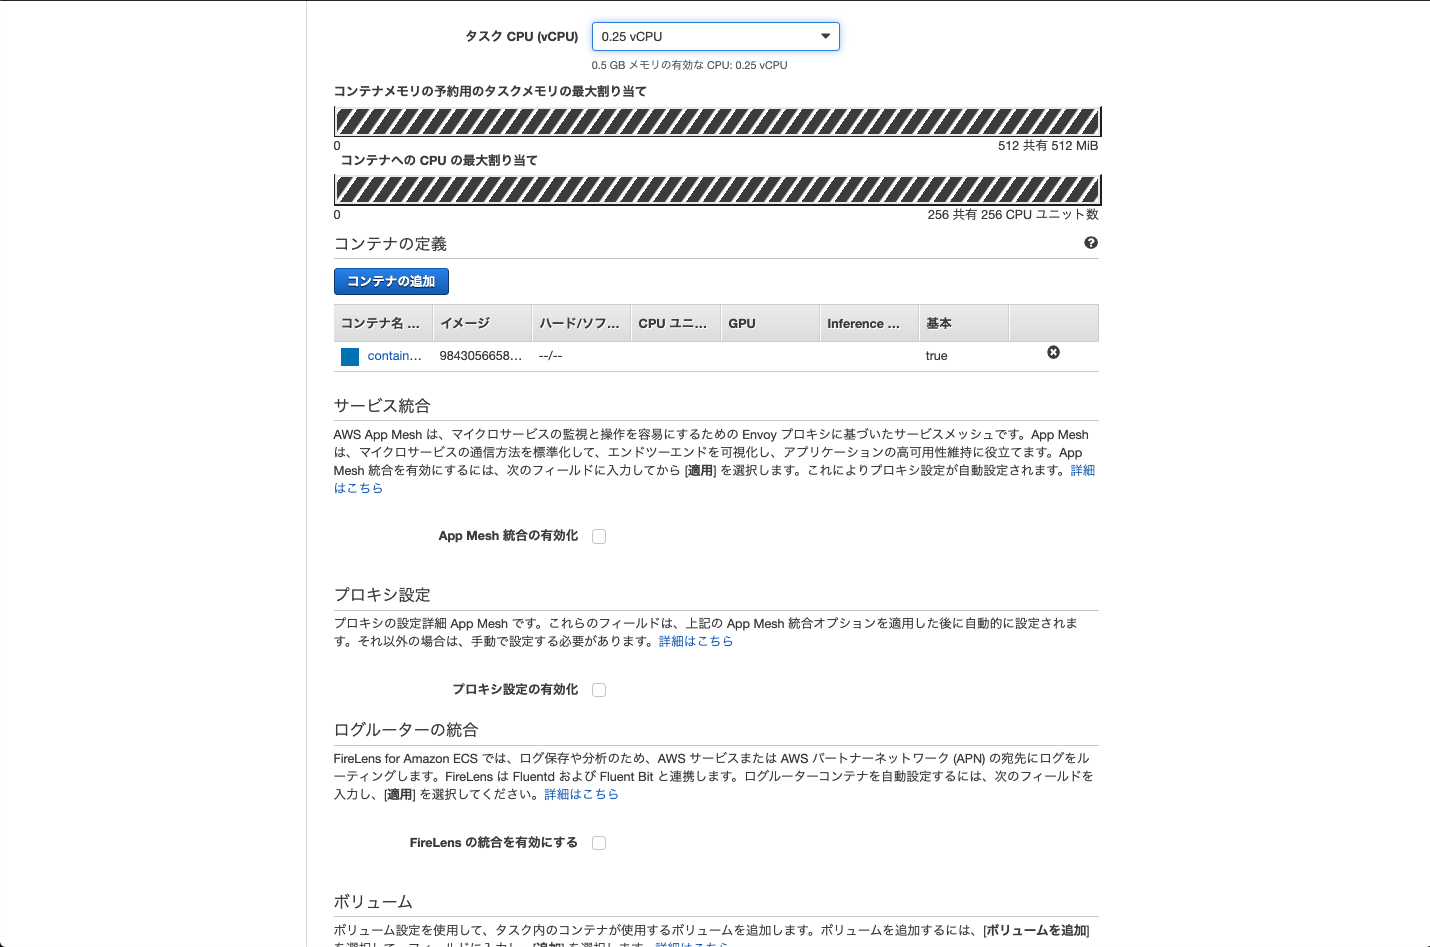
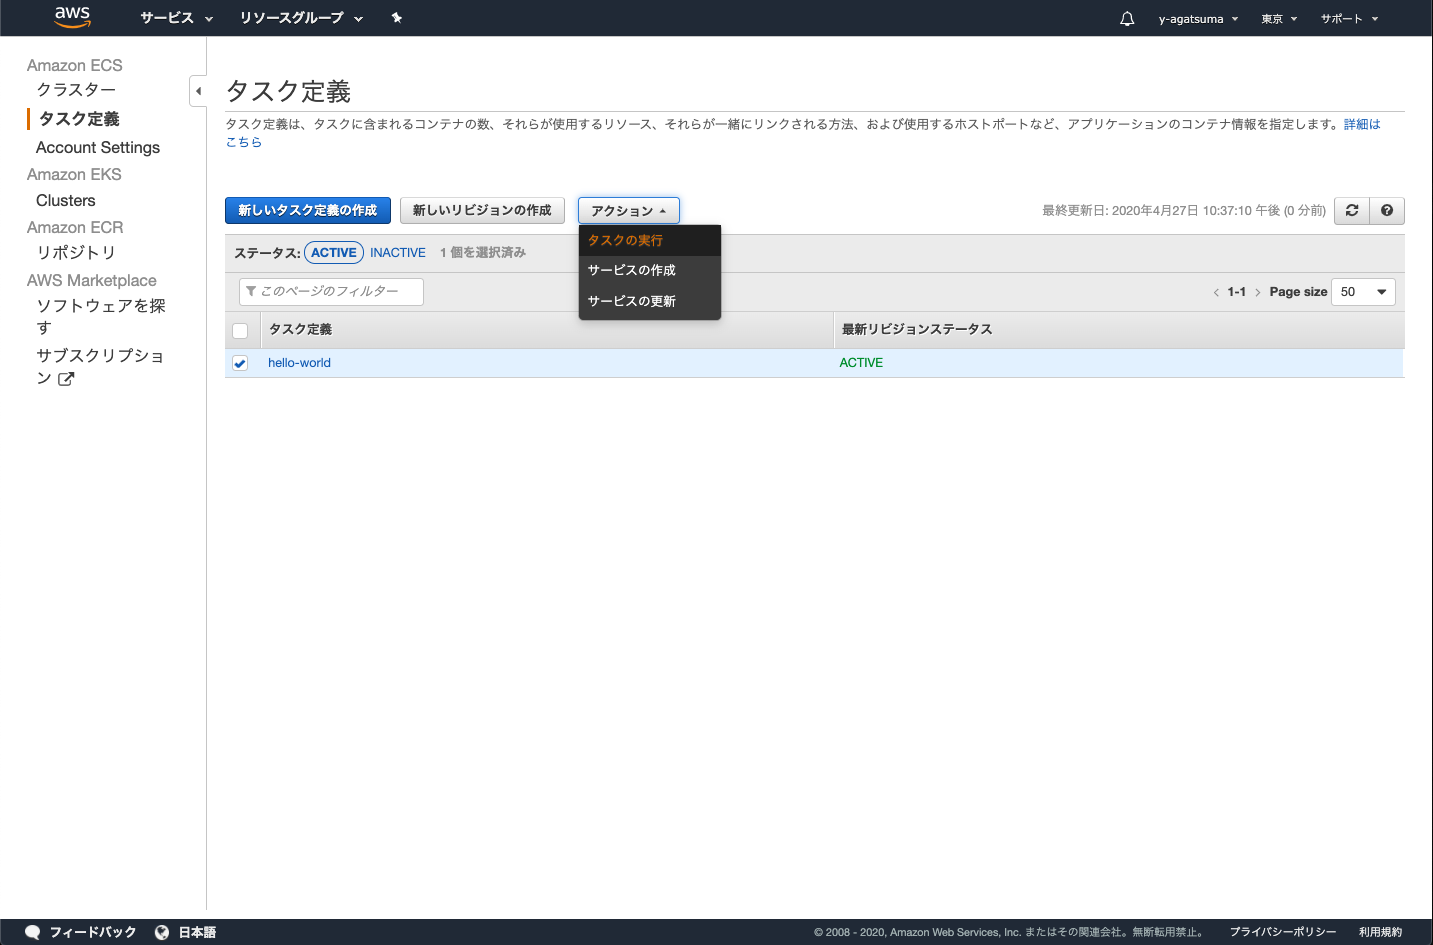
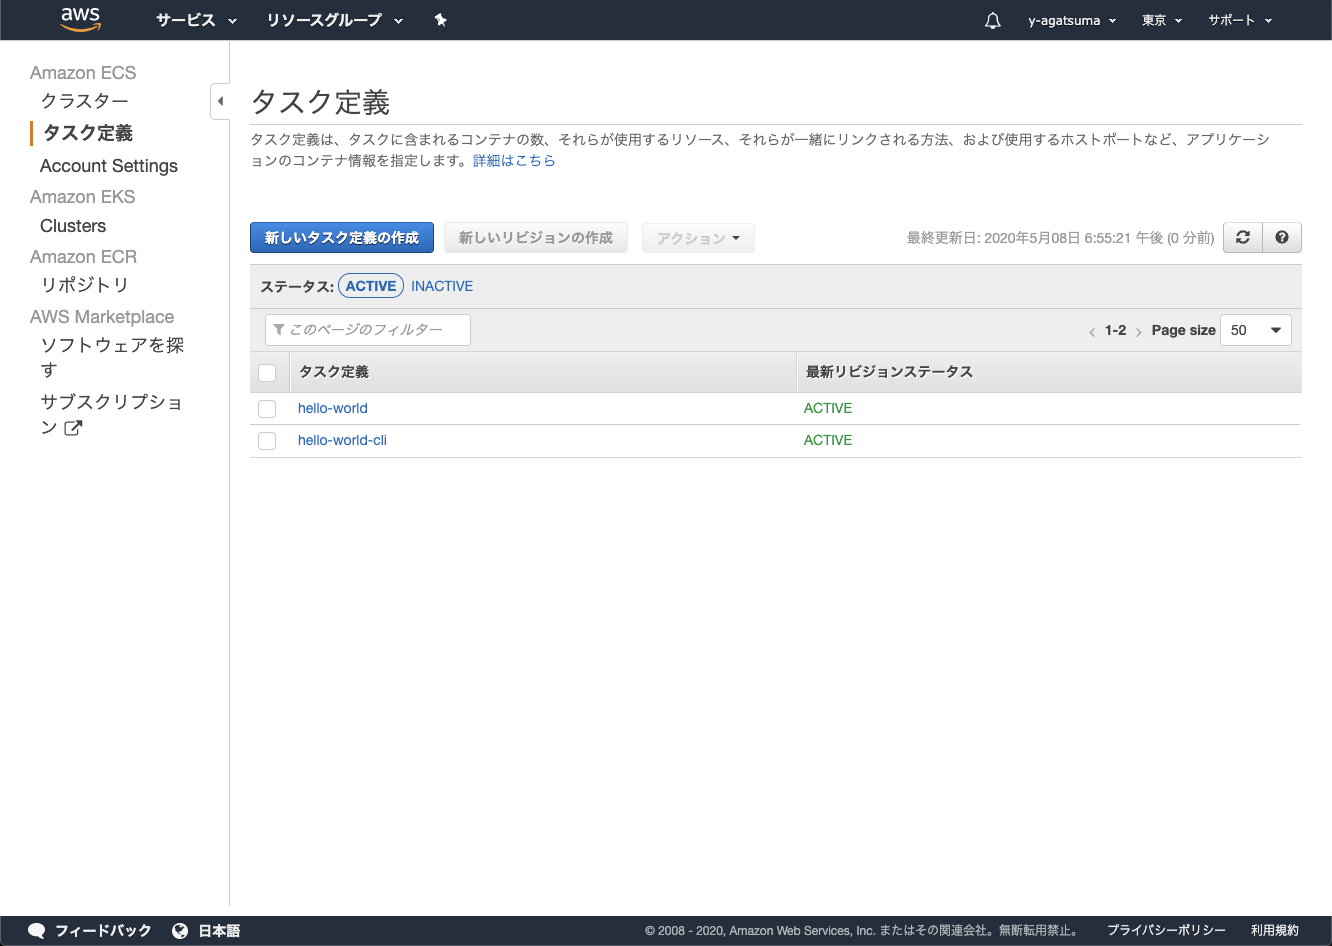
1-3. タスク定義を作成する
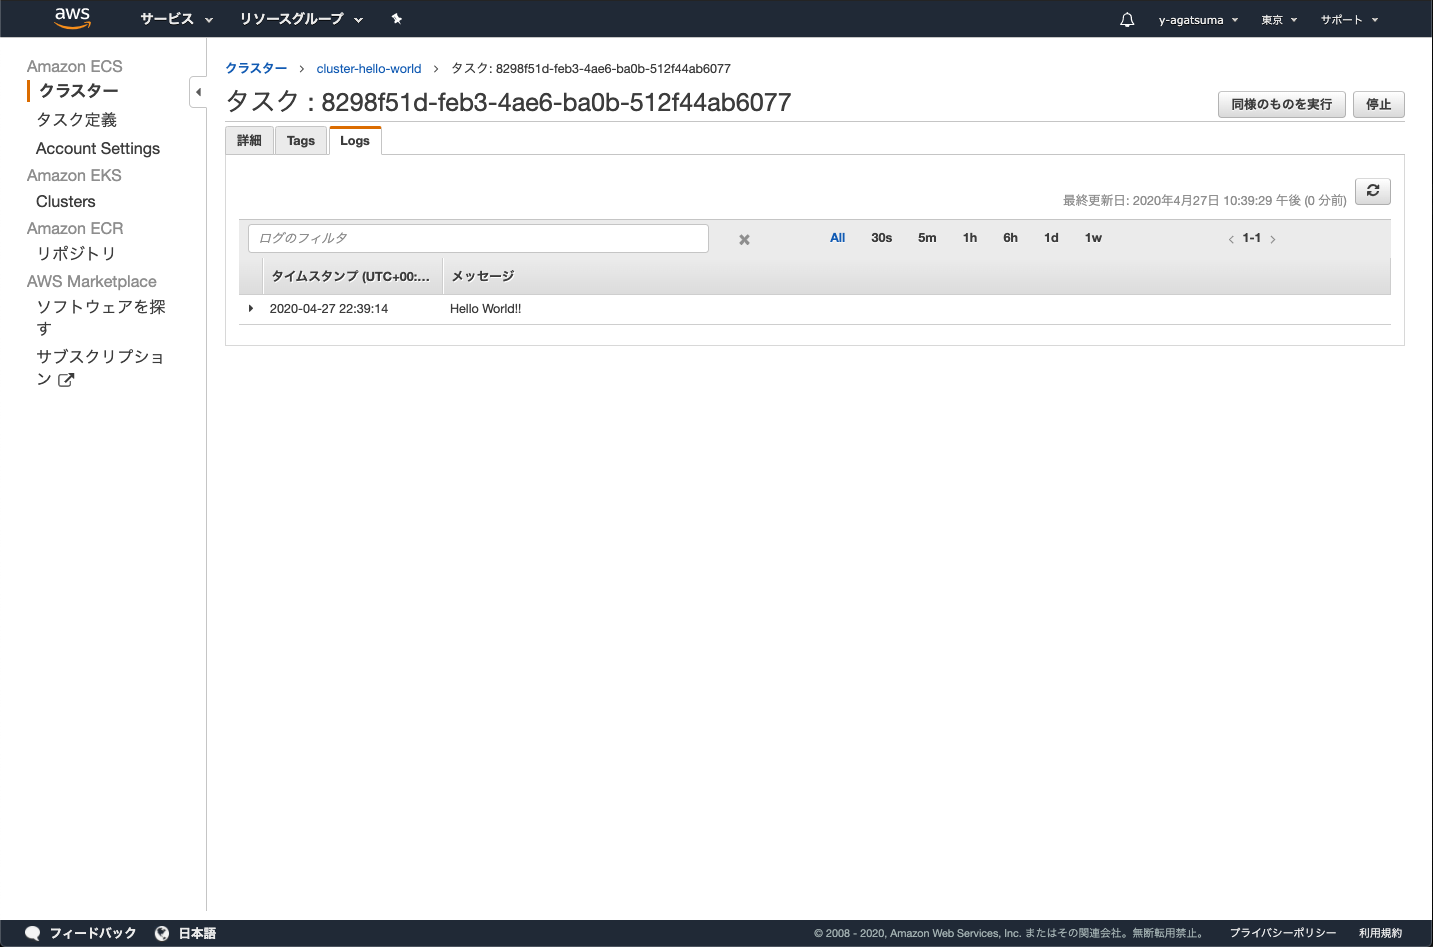
1-4. 作成したタスク定義を実行してみる

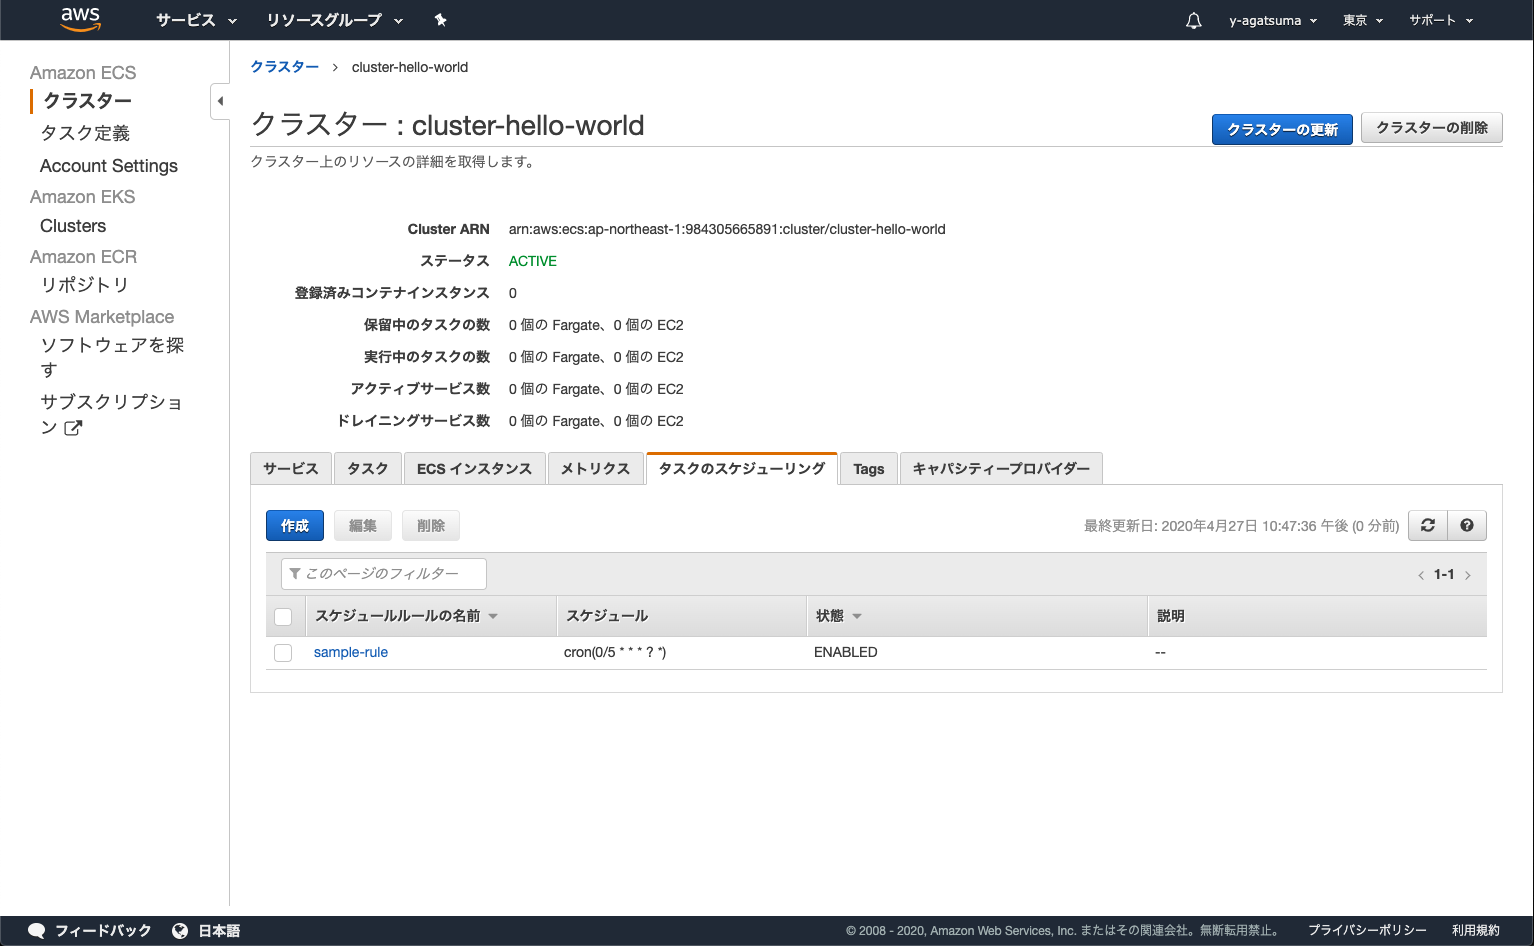
1-5. 作成したクラスター上でタスクをスケジューリングする
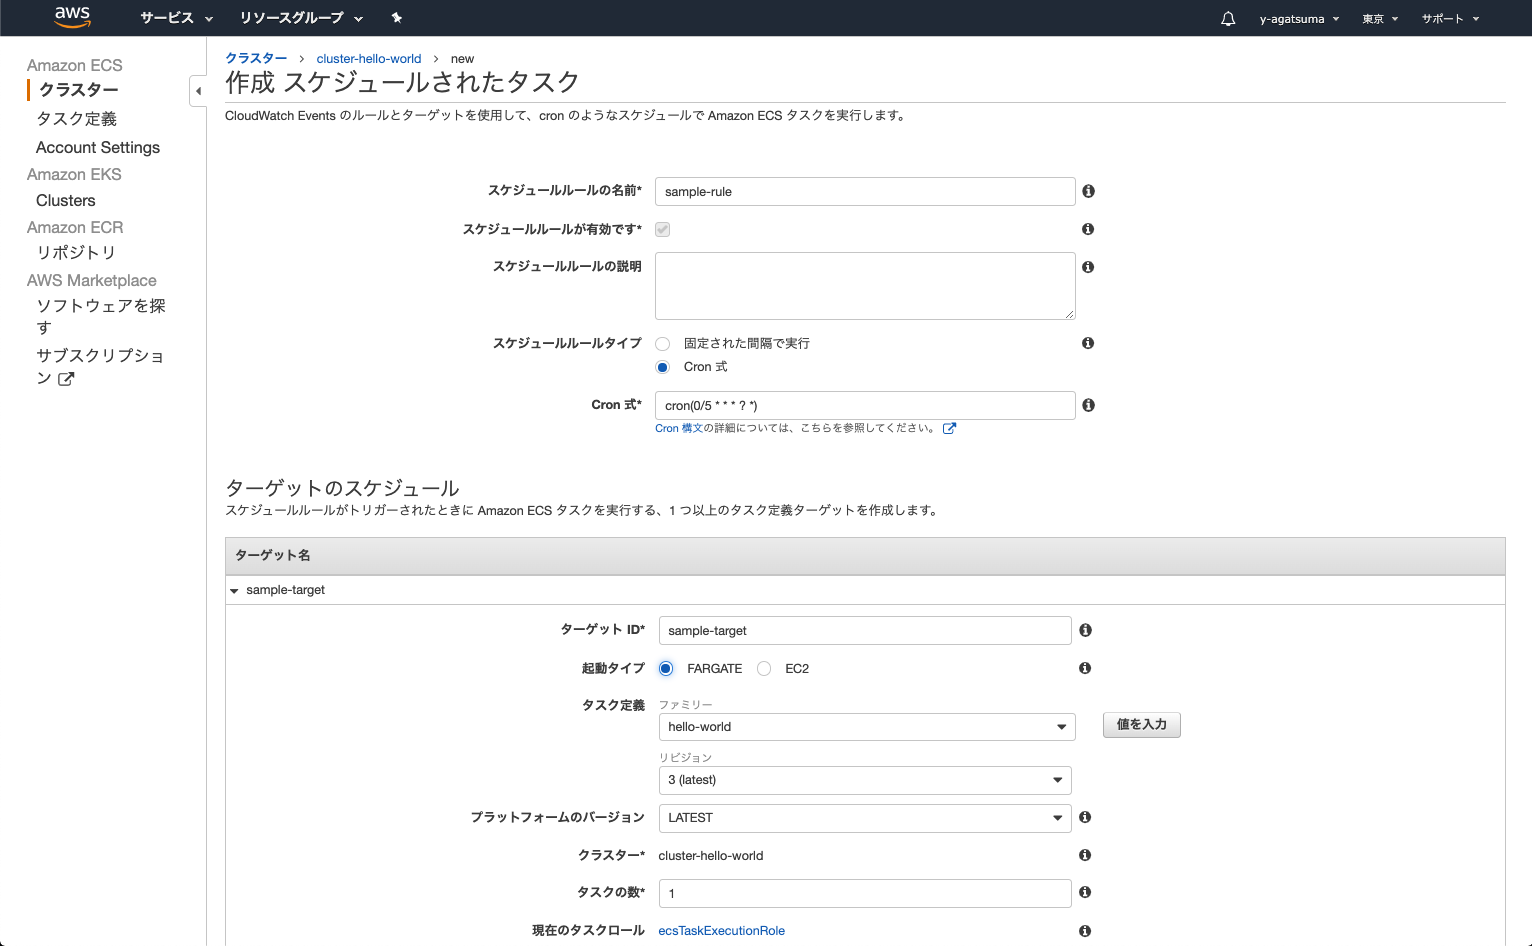

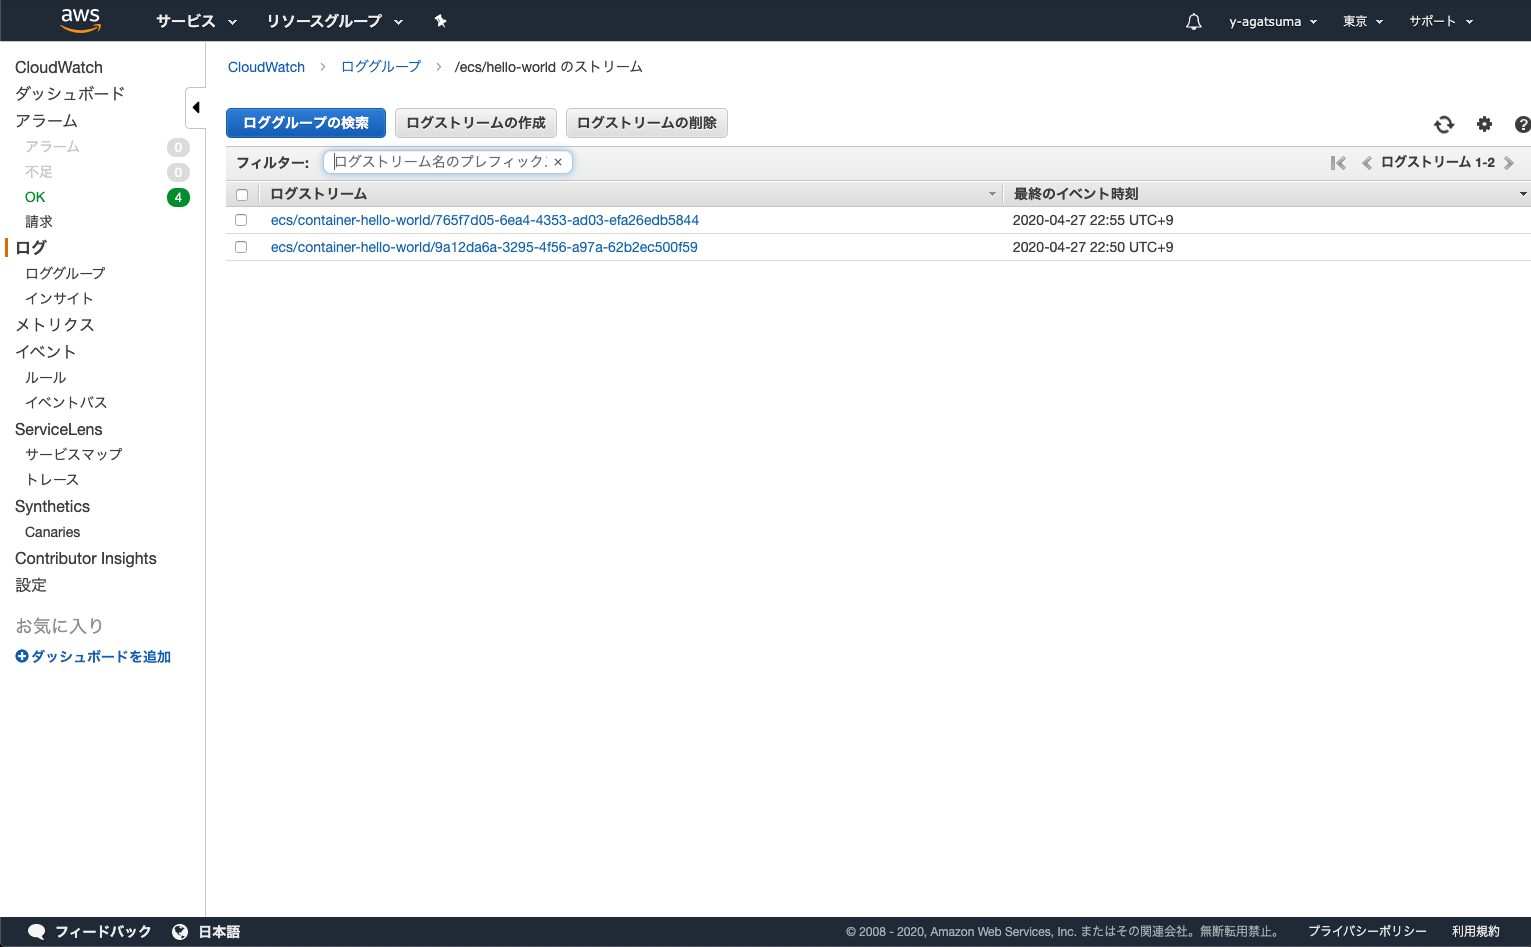
↓こんな感じで5分ごとに実行されていることが確認できました。
2. gemを使って定期実行出来るようにする
DockerのRubyイメージを使って実行できるようにしていきます。
2-0. 環境
$ docker -v
Docker version 19.03.8, build afacb8b
$ ruby -v
ruby 2.7.0p0 (2019-12-25 revision 647ee6f091) [x86_64-darwin19]

# -----Gem-----
# ○直接入れる場合
$ gem install aws-sdk-ecs -v '1.60.0'
$ gem install aws-sdk-cloudwatchevents -v '1.27.0'
# ○Gemfile使う場合
gem 'aws-sdk-ecs', '~> 1.60'
gem 'aws-sdk-cloudwatchevents', '~> 1.27'
# ↓
# 最終的には以下状態になっていればok
$ gem list
aws-sdk-cloudwatchevents (1.27.0)
aws-sdk-core (3.92.0)
aws-sdk-ecs (1.60.0)
aws-sigv4 (1.1.1)
2-1. 準備
$ mkdir aws-ruby-sample
$ cd aws-ruby-sample
$ echo FROM ruby:2.7.0-alpine >> Dockerfile
$ echo COPY sample.rb / >> Dockerfile
$ echo "p 'Hello World!!'" > sample.rb
$ docker build -t aws-ruby-sample .
$ docker images
ruby             2.7.0-alpine  77bdcf1a09b8  4 weeks ago 51.5MB
aws-ruby-sample  latest        716066f7a6bd  4 weeks ago 51.5MB
$ docker run --rm -it aws-ruby-sample /bin/sh
[コンテナ内]
$ ruby sample.rb
"Hello World"
# Dockerfile
FROM ruby:2.7.0-alpine
COPY sample.rb /
# sample.rb
p 'Hello World'
2-2. Gemを追加する
- aws-sdk-ecs
- aws-sdk-cloudwatchevents
2-2-1. Dockerfileを編集してビルド
FROM ruby:2.7.0-alpine
COPY sample.rb /

# NEW
RUN gem update --system && \
    gem install --no-document aws-sdk-ecs -v '1.60.0' && \
    gem install --no-document aws-sdk-cloudwatchevents -v '1.27.0'
2-2-2. コンテナ内でgemを確認
$ docker build -t aws-ruby-sample .
$ docker run --rm -it aws-ruby-sample /bin/sh
$ gem list | grep aws
aws-eventstream (1.1.0)
aws-partitions (1.303.0)
aws-sdk-cloudwatchevents (1.27.0)
aws-sdk-core (3.94.0)
aws-sdk-ecs (1.60.0)
aws-sigv4 (1.1.2)
2-3. sdkを使う
2-3-1. credential設定
credentialsに関しては、こちらに記載の通り:credentialsの記載がない場合は環境変数だとか設定ファイルだとか見に行くようです。今回はわかりやすくプログラム内で設定します。
# sample.rb
require 'aws-sdk-ecs'
require 'aws-sdk-cloudwatchevents'

region = 'ap-northeast-1'.freeze
access_key = '【YOUR_AWS_ACCESS_KEY】'.freeze
secret_key = '【YOUR_AWS_SECRET_KEY】'.freeze
credentials = Aws::Credentials.new(access_key, secret_key)
ecs_client = Aws::ECS::Client.new(region: region, credentials: credentials)
cloudwatchevents_client = Aws::CloudWatchEvents::Client.new(region: region, credentials: credentials)

p "credentials: #{credentials}"
p "ecs_client: #{ecs_client}"
p "cloudwatchevents_client: #{cloudwatchevents_client}"
$ docker build -t aws-ruby-sample .
$ docker run --rm -it aws-ruby-sample ruby sample.rb
"credentials: #<Aws::Credentials:0x0000562d5951ac48>"
"ecs_client: #<Aws::ECS::Client:0x0000562d5951a2e8>"
"cloudwatchevents_client: #<Aws::CloudWatchEvents::Client:0x0000562d5978c850>"
2-3-2. 取得形処理
色々APIありますが、今回は以下の3つの処理を使ってみます。
※GUIで各種作成済みの場合の結果になります。
1. ecs_client.list_task_definitions()
- タスク定義一覧取得
p ecs_client.list_task_definitions()

# 実行結果
# <struct Aws::ECS::Types::ListTaskDefinitionsResponse task_definition_arns=["arn:aws:ecs:ap-northeast-1:984305665891:task-definition/hello-world:3"], next_token=nil>
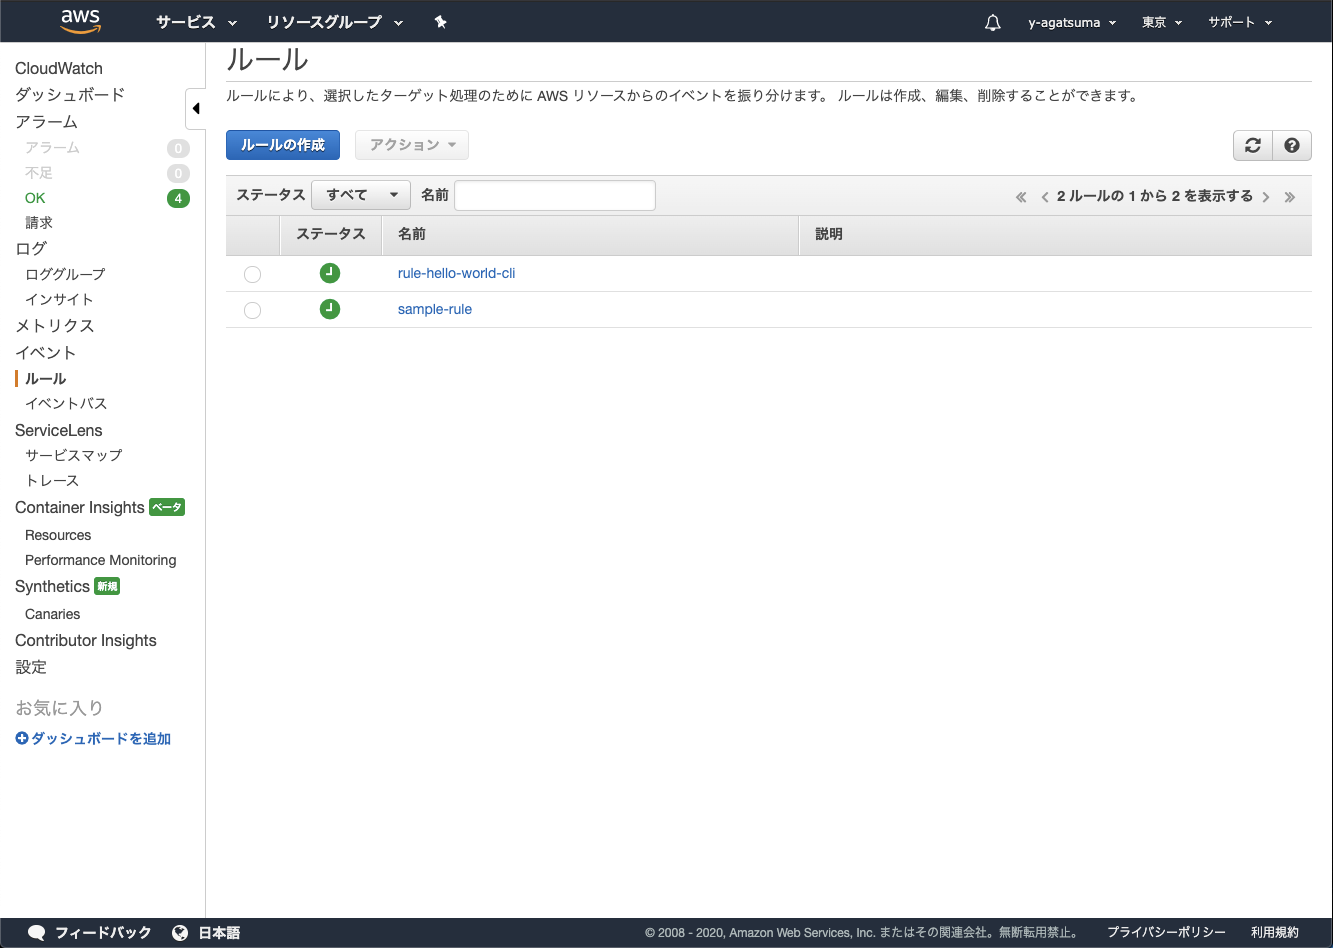
2. cloudwatchevent_client.list_rules()
- CloudWatchEvents一覧の取得
p cloudwatchevents_client.list_rules()

# 実行結果
# <struct Aws::CloudWatchEvents::Types::ListRulesResponse rules=[#<struct Aws::CloudWatchEvents::Types::Rule name="sample-rule", arn="arn:aws:events:ap-northeast-1:984305665891:rule/sample-rule", event_pattern=nil, state="ENABLED", description=nil, schedule_expression="cron(0/5 * * * ? *)", role_arn=nil, managed_by=nil, event_bus_name="default">, #<struct Aws::CloudWatchEvents::Types::Rule name="sample-schedule", arn="arn:aws:events:ap-northeast-1:984305665891:rule/sample-schedule", event_pattern=nil, state="DISABLED", description=nil, schedule_expression="rate(5 minutes)", role_arn=nil, managed_by=nil, event_bus_name="default">], next_token=nil>
3. cloudwatchevent_client.list_targets_by_rule()
- 特定のCloudWatchEventに設定しているターゲット一覧の取得
- 必須項目
- rule = 対象ルール名
rules = cloudwatchevents_client.list_rules()
if rules.size == 1
  rule = rules.first
  p cloudwatchevents_client.list_targets_by_rule({rule: rule.name})
end

# 実行結果
# <struct Aws::CloudWatchEvents::Types::ListRulesResponse rules=[#<struct Aws::CloudWatchEvents::Types::Rule name="sample-rule", arn="arn:aws:events:ap-northeast-1:984305665891:rule/sample-rule", event_pattern=nil, state="ENABLED", description=nil, schedule_expression="cron(0/5 * * * ? *)", role_arn=nil, managed_by=nil, event_bus_name="default">, #<struct Aws::CloudWatchEvents::Types::Rule name="sample-schedule", arn="arn:aws:events:ap-northeast-1:984305665891:rule/sample-schedule", event_pattern=nil, state="DISABLED", description=nil, schedule_expression="rate(5 minutes)", role_arn=nil, managed_by=nil, event_bus_name="default">], next_token=nil>
2-3-3. 作成系処理
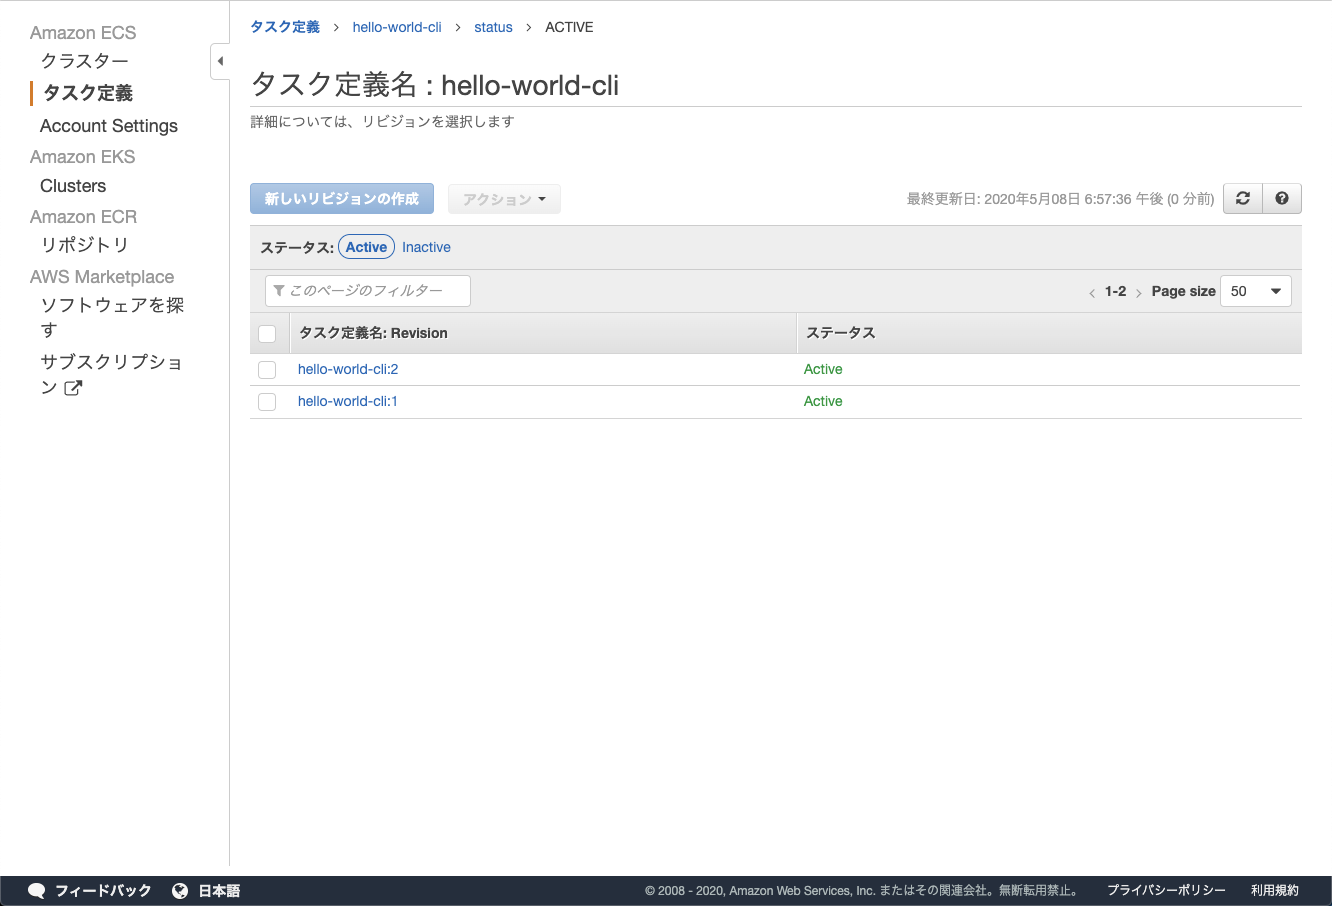
1. ecs_client.register_task_definition()
- タスク定義を作成
- 必須項目
- family = タスク定義名
- container_definitions = コンテナ定義
ecs_client.register_task_definition(
  {
    family: 'hello-world-cli',
    task_role_arn: "arn:aws:iam::984305665891:role/ecsTaskExecutionRole",
    execution_role_arn: "arn:aws:iam::984305665891:role/ecsTaskExecutionRole",
    network_mode: "awsvpc",
    placement_constraints: [],
    requires_compatibilities: ["FARGATE"],
    cpu: "1024",
    memory: "3072",
    inference_accelerators: [],
    container_definitions: [
      {
        name: "container-hello-world",
        image: "984305665891.dkr.ecr.ap-northeast-1.amazonaws.com/hello-world-repo:latest",
        cpu: 0,
        port_mappings: [],
        essential: true,
        environment: [],
        mount_points: [],
        volumes_from: [],
        log_configuration: {
          log_driver: "awslogs",
          options: {
            "awslogs-group": 'lg-hello-world-cli',
            "awslogs-region": "ap-northeast-1",
            "awslogs-create-group": "true",
            "awslogs-stream-prefix": "ecs"
          },
        },
      },
    ],
  }
)
p ecs_client.list_task_definitions()

# 実行結果
# <struct Aws::ECS::Types::ListTaskDefinitionsResponse task_definition_arns=["arn:aws:ecs:ap-northeast-1:984305665891:task-definition/hello-world-cli:1", "arn:aws:ecs:ap-northeast-1:984305665891:task-definition/hello-world:3"], next_token=nil>
↓ちなみに、同じ状態で上記のコードを再度実行すると、リビジョンが増えていく形になります。
2. cloudwatchevent_client.put_rule()
- イベントルールを作成
- 必須項目
- name = 作成するルール名
cloudwatchevents_client.put_rule({
  name: "rule-hello-world-cli",
  schedule_expression: "cron(10 22-13 * * ? *)",
  state: "ENABLED",
})
p cloudwatchevents_client.list_rules()

# 実行結果
# <struct Aws::CloudWatchEvents::Types::ListRulesResponse rules=[#<struct Aws::CloudWatchEvents::Types::Rule name="rule-hello-world-cli", arn="arn:aws:events:ap-northeast-1:984305665891:rule/rule-hello-world-cli", event_pattern=nil, state="ENABLED", description=nil, schedule_expression="cron(10 22-13 * * ? *)", role_arn=nil, managed_by=nil, event_bus_name="default">, #<struct Aws::CloudWatchEvents::Types::Rule name="sample-rule", arn="arn:aws:events:ap-northeast-1:984305665891:rule/sample-rule", event_pattern=nil, state="ENABLED", description=nil, schedule_expression="cron(0/5 * * * ? *)", role_arn=nil, managed_by=nil, event_bus_name="default">], next_token=nil>
3. cloudwatchevent_client.put_targets()
- 特定のルールにターゲットを追加
- 必須項目
- rule = 対象ルール名
- targets = ぶら下げるターゲットの設定
resp_task_difinition = ecs_client.list_task_definitions({family_prefix: 'hello-world-cli'})
# 今回は必要ないですが、下記prefixなので取得後に完全一致でfilterをかけてます。
# ex. rule-hello-world-cli-1, rule-hello-world-cli-2 とかの場合複数引っかかるので。さらに完全一致で絞る。
resp_rule = cloudwatchevents_client.list_rules({name_prefix: 'rule-hello-world-cli'})
rules = resp_rule.rules.filter{|rule| rule.name == 'rule-hello-world-cli'}

if rules.size == 1
  # リビジョンがlatestの情報を取得
  task_definition_arn = resp_task_difinition.task_definition_arns.last
  rule = rules.first

  # 必要な情報
  target_id = 'target-hello-world-cli'
  cluster_arn = 'arn:aws:ecs:ap-northeast-1:984305665891:cluster/cluster-hello-world'
  subnets = ["subnet-04fdc3640612bbe3b"]
  security_groups = ["sg-0bedd9c00543d8298"]

  cloudwatchevents_client.put_targets({
    rule: rule.name,
    targets: [
      {
        id: target_id,
        arn: cluster_arn,
        role_arn: "arn:aws:iam::984305665891:role/ecsTaskExecutionRole",
        ecs_parameters: {
          task_definition_arn: task_definition_arn,
          task_count: 1,
          launch_type: "FARGATE",
          network_configuration: {
            awsvpc_configuration: {
              subnets: subnets,
              security_groups: security_groups,
              assign_public_ip: "ENABLED",
            },
          },
          platform_version: "LATEST",
        },
      },
    ],
  })
  p cloudwatchevents_client.list_targets_by_rule({rule: rule.name})
end

# 実行結果
# <struct Aws::CloudWatchEvents::Types::ListTargetsByRuleResponse targets=[#<struct Aws::CloudWatchEvents::Types::Target id="target-hello-world-cli", arn="arn:aws:ecs:ap-northeast-1:984305665891:cluster/cluster-hello-world", role_arn="arn:aws:iam::984305665891:role/ecsTaskExecutionRole", input=nil, input_path=nil, input_transformer=nil, kinesis_parameters=nil, run_command_parameters=nil, ecs_parameters=#<struct Aws::CloudWatchEvents::Types::EcsParameters task_definition_arn="arn:aws:ecs:ap-northeast-1:984305665891:task-definition/hello-world-cli:2", task_count=1, launch_type="FARGATE", network_configuration=#<struct Aws::CloudWatchEvents::Types::NetworkConfiguration awsvpc_configuration=#<struct Aws::CloudWatchEvents::Types::AwsVpcConfiguration subnets=["subnet-04fdc3640612bbe3b"], security_groups=["sg-0bedd9c00543d8298"], assign_public_ip="ENABLED">>, platform_version="LATEST", group=nil>, batch_parameters=nil, sqs_parameters=nil>], next_token=nil>
2-3-4. 削除形処理
1. cloudwatchevent_client.remove_targets()
- 特定ルールにぶら下がっている特定ターゲットを削除
- 必須項目
- rule = 対象ルール名
- ids = 対象ターゲットID
2. cloudwatchevent_client.delete_rule()
- 対象ルールを削除
- 必須項目
- name = 対象ルール名
3. ecs_client.deregister_task_definition()
- 対象タスク定義を削除
- 必須項目
- task_definition = [名前:リビジョン] or ARN での指定
2-4. ユーザーイベントと連動させてみる
上記で一連のsdkの使い方は分かったと思うので、あとは使いたい処理を何かしらのユーザーイベントと組み合わせてもらえれば、作成〜削除まで実行できるかと思います。
自分の場合は管理画面上でボタンとかのUI作ってあげて、それらのイベントを契機に各種処理を走らせる運用をしています。
■結び
今回は、自分の備忘録も兼ねて書いてみました。誰かの役になったら幸いです。
ちなみに削除形処理の部分はめんどくさくなったので省略しました。雰囲気でわかるかと思います。
長々とありがとうございました。