
以下、真っ白なUbuntu22.04 LTSに
2026/09/05で競合や依存性不良を発生させず
機械学習用のフレームワーク一式をインストールする手順です。
本手順により以下が有効になります
- NVIDIAドライバ (595-open)
- CUDA12.6 ToolKit (依存関係により13.3は断念)
- cuDNN9.24.1
- Docker + NVIDIA Container Toolkit
- NGC CLI
- GPUを利用可能なPython仮想環境
- TensorFlow + ONNX
- TensorRT + ONNX
- PyTorch + ONNX
- NVIDIA TAO / Samples
- DeepStream
以上です。
Ubuntu22.04のインストール
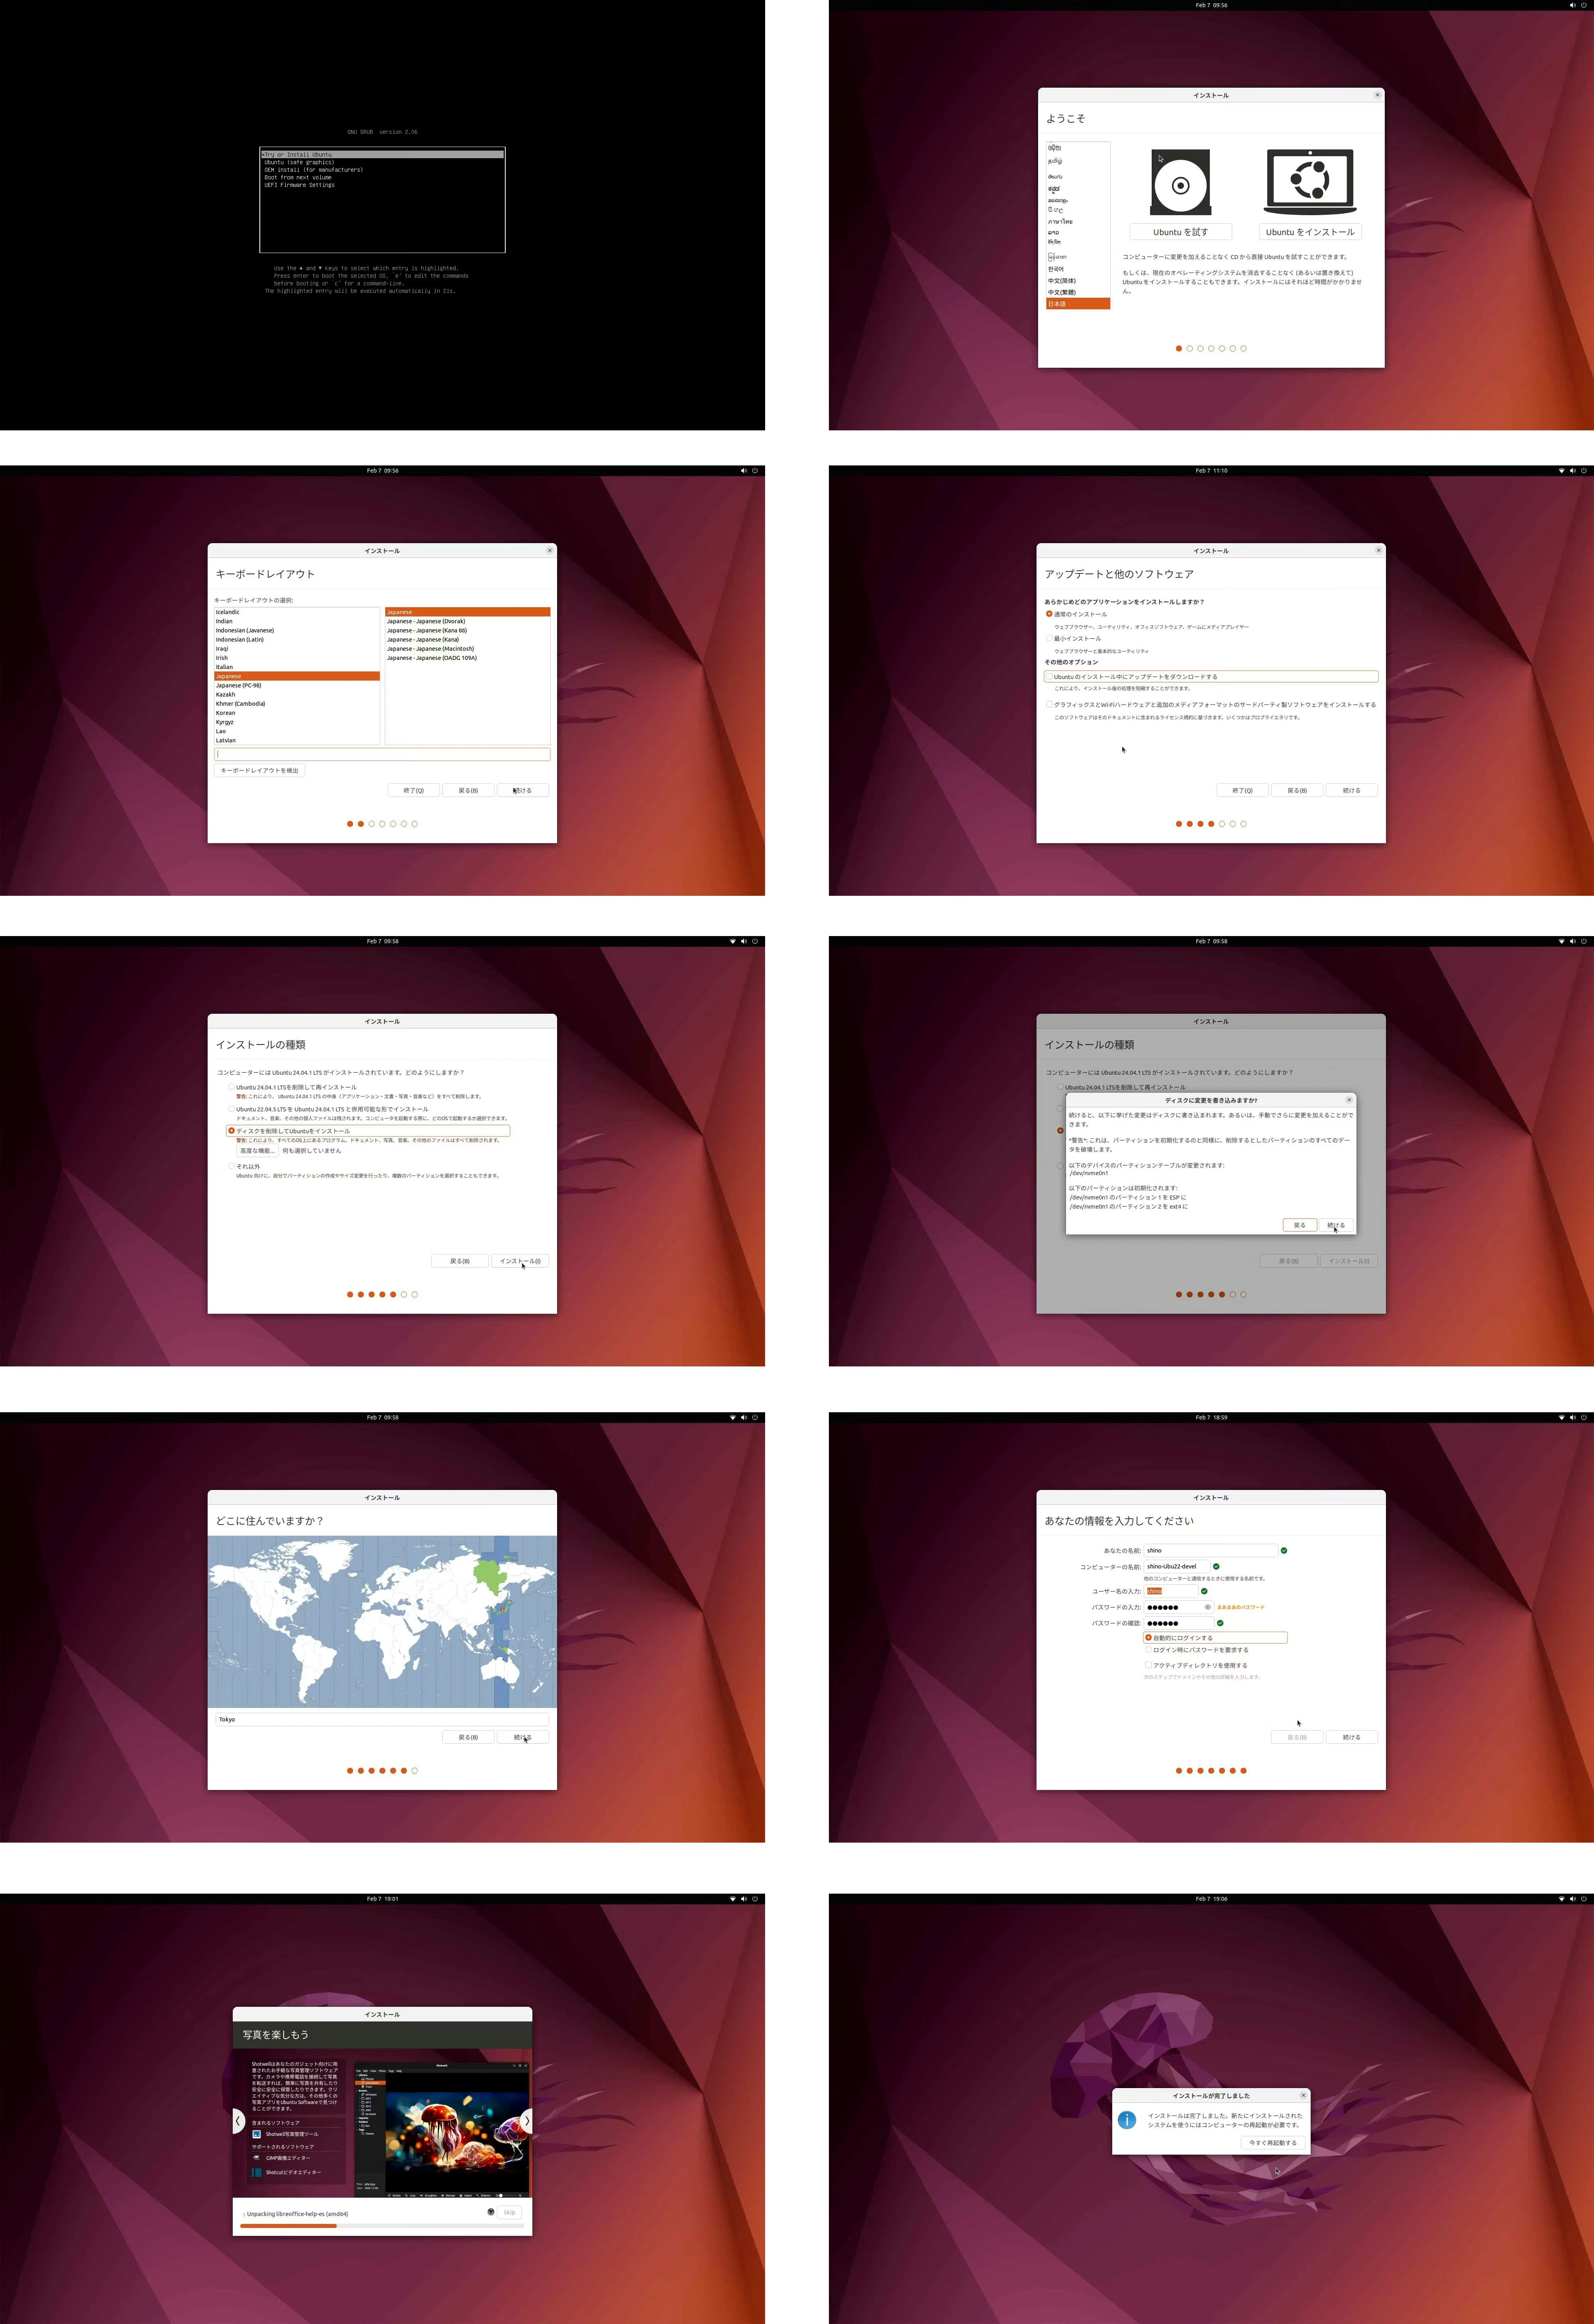
機械学習用のフレームワーク一式をインストールする
リモート接続環境とエディタをインストールする
### ホームディレクトリへ移動
$ cd ~

### ホームディレクトリ名から日本語を除外する
$ LANG=C xdg-user-dirs-gtk-update

### ユーザーからsudoをパスワード無しで実行できるようにする
$ sudo vi /etc/sudoers
# -->> 以下の行を追加する(ユーザー名がshinoの場合)
# shino   ALL=(ALL:ALL) NOPASSWD:ALL

### 再起動する
$ sudo reboot

# リポジトリにアクセス
$ sudo apt update

# 更新可能なパッケージをすべてアップグレード
$ sudo apt upgrade

# 再起動
$ sudo reboot

### sshサーバをインストールします
$ sudo apt install openssh-server

### Ubuntu24.04からsshdでなくsshになっています
# ... 起動時にサービスが開始されるように設定します
$ sudo systemctl start ssh
$ sudo systemctl enable ssh

### vimエディタをインストールします。
$ sudo apt install vim

### 鍵の登録
$ mkdir -p /home/shino/.ssh
$ touch /home/shino/.ssh/authorized_keys
$ sudo chmod 700 /home/shino/.ssh
$ sudo chmod 640 /home/shino/.ssh/authorized_keys

### 公開鍵を登録する
$ vi /home/shino/.ssh/authorized_keys
# -->> Windows上の "id_rsa.pub" の内容を書き込む

### 再起動する
$ sudo reboot
グラフィックドライバをインストールする
# Linuxカーネルのヘッダをインストールする
$ sudo apt update
$ sudo apt install linux-headers-$(uname -r)

### インストール可能なGPUドライバのリストを表示する
$ ubuntu-drivers devices
#== /sys/devices/pci0000:00/0000:00:1c.4/0000:05:00.0 ==
#modalias : pci:v000010DEd00002489sv0000103Csd000088D4bc03sc00i00
#vendor   : NVIDIA Corporation
#model    : GA104 [GeForce RTX 3060 Ti Lite Hash Rate]
#driver   : nvidia-driver-610-open - distro non-free
#driver   : nvidia-driver-580-open - distro non-free
#driver   : nvidia-driver-610 - distro non-free
#driver   : nvidia-driver-580 - distro non-free
#driver   : nvidia-driver-595-open - distro non-free recommended
#driver   : nvidia-driver-580-server - distro non-free
#driver   : nvidia-driver-545-open - distro non-free
#driver   : nvidia-driver-580-server-open - distro non-free
#driver   : nvidia-driver-545 - distro non-free
#driver   : nvidia-driver-470-server - distro non-free
#driver   : nvidia-driver-595-server - distro non-free
#driver   : nvidia-driver-595-server-open - distro non-free
#driver   : nvidia-driver-595 - distro non-free
#driver   : xserver-xorg-video-nouveau - distro free builtin

### recommendedをインストールする
$ sudo apt install nvidia-driver-595-open
$ sudo update-initramfs -u
$ sudo reboot

### NVIDIAドライバが適用されていて、すべてのGPUが見えるか確認
$ nvidia-smi
#+-----------------------------------------------------------------------------------------+
#| NVIDIA-SMI 595.84                 Driver Version: 595.84         CUDA Version: 13.2     |
#+-----------------------------------------+------------------------+----------------------+
#| GPU  Name                 Persistence-M | Bus-Id          Disp.A | Volatile Uncorr. ECC |
#| Fan  Temp   Perf          Pwr:Usage/Cap |           Memory-Usage | GPU-Util  Compute M. |
#|                                         |                        |               MIG M. |
#|=========================================+========================+======================|
#|   0  NVIDIA GeForce RTX 3060 Ti     Off |   00000000:01:00.0  On |                  N/A |
#| 31%   40C    P8              8W /  200W |     223MiB /   8192MiB |      2%      Default |
#|                                         |                        |                  N/A |
#+-----------------------------------------+------------------------+----------------------+
#|   1  NVIDIA GeForce RTX 3060 Ti     Off |   00000000:05:00.0 Off |                  N/A |
#|  0%   48C    P8              8W /  200W |      15MiB /   8192MiB |      0%      Default |
#|                                         |                        |                  N/A |
#+-----------------------------------------+------------------------+----------------------+
#
#+-----------------------------------------------------------------------------------------+
#| Processes:                                                                              |
#|  GPU   GI   CI              PID   Type   Process name                        GPU Memory |
#|        ID   ID                                                               Usage      |
#|=========================================================================================|
#|    0   N/A  N/A            1476      G   /usr/lib/xorg/Xorg                      106MiB |
#|    0   N/A  N/A            1767      G   /usr/bin/gnome-shell                     80MiB |
#|    1   N/A  N/A            1476      G   /usr/lib/xorg/Xorg                        4MiB |
#+-----------------------------------------------------------------------------------------+
CUDA12.6とcuDNNをインストールする
### CUDA 12.6 をインストールする
# TensorFlowが13.xを完全サポートしていないため
# DeepStreamがCUDA12.8をサポートしていないため
# https://developer.nvidia.com/cuda-12-6-3-download-archive?target_os=Linux&target_arch=x86_64&Distribution=Ubuntu&target_version=22.04&target_type=deb_network

$ wget https://developer.download.nvidia.com/compute/cuda/repos/ubuntu2204/x86_64/cuda-keyring_1.1-1_all.deb
$ sudo dpkg -i cuda-keyring_1.1-1_all.deb
$ sudo apt-get update
$ sudo apt-get -y install cuda-toolkit-12-6
$ sudo apt-mark hold cuda-toolkit-12-6
###
# 注意:Driver Installerの手順は実行しない
# 595-openから変わってしまうため
###

# 最後の行に下記の4行を追加
$ vi ~/.bashrc
export PATH="/usr/local/cuda/bin:$PATH"
export PATH="~/.local/bin:$PATH"
export LD_LIBRARY_PATH="/usr/local/cuda/lib64:$LD_LIBRARY_PATH"
export CUDA_PATH="/usr/local/cuda-12.6"

# 設定した環境変数を反映
$ source ~/.bashrc

# Tool-Kitのコマンドにパスが通っているか確認
$ nvcc -V
#nvcc: NVIDIA (R) Cuda compiler driver
#Copyright (c) 2005-2024 NVIDIA Corporation
#Built on Tue_Oct_29_23:50:19_PDT_2024
#Cuda compilation tools, release 12.6, V12.6.85
#Build cuda_12.6.r12.6/compiler.35059454_0

### cuDNN 9.24.1 をインストールする
# 2026/09/04最新
# https://developer.nvidia.com/cudnn-downloads?target_os=Linux&target_arch=x86_64&Distribution=Ubuntu&target_version=22.04&target_type=deb_network&Configuration=Full
## $ wget https://developer.download.nvidia.com/compute/cuda/repos/ubuntu2204/x86_64/cuda-keyring_1.1-1_all.deb
## $ sudo dpkg -i cuda-keyring_1.1-1_all.deb
$ sudo apt-get update

# CUDA12.x決め打ちでインストールする
$ sudo apt-get -y install cudnn9-cuda-12
$ sudo apt-mark hold cudnn9-cuda-12

# このあたりで一旦再起動
$ sudo reboot
Dockerをインストールする
### Dockerをインストールする
# https://docs.docker.com/engine/install/ubuntu/

# まず削除
$ sudo apt remove $(dpkg --get-selections docker.io docker-compose docker-compose-v2 docker-doc docker-buildx podman-docker containerd runc | cut -f1)

# インストールの準備
$ sudo apt update
$ sudo apt install ca-certificates curl
$ sudo install -m 0755 -d /etc/apt/keyrings
$ sudo curl -fsSL https://download.docker.com/linux/ubuntu/gpg -o /etc/apt/keyrings/docker.asc
$ sudo chmod a+r /etc/apt/keyrings/docker.asc

# Add the repository to Apt sources:
$ sudo tee /etc/apt/sources.list.d/docker.sources <<EOF
Types: deb
URIs: https://download.docker.com/linux/ubuntu
Suites: $(. /etc/os-release && echo "${UBUNTU_CODENAME:-$VERSION_CODENAME}")
Components: stable
Architectures: $(dpkg --print-architecture)
Signed-By: /etc/apt/keyrings/docker.asc
EOF

$ sudo apt update

# 最新版をインストール
$ sudo apt install docker-ce docker-ce-cli containerd.io docker-buildx-plugin docker-compose-plugin

# 非rootユーザーもDockerを操作できるようにする
$ sudo groupadd docker
$ sudo usermod -aG docker $USER
$ newgrp docker

# 再起動
$ sudo reboot

# Dockerのテスト
$ docker run --rm hello-world


### NVIDIA Container Toolkitをインストールする
# Dockerのコンテナ内からGPUにアクセスする
# https://docs.nvidia.com/datacenter/cloud-native/container-toolkit/latest/install-guide.html
$ sudo apt update && sudo apt install -y --no-install-recommends \
   ca-certificates \
   curl \
   gnupg2

$ curl -fsSL https://nvidia.github.io/libnvidia-container/gpgkey | sudo gpg --dearmor -o /usr/share/keyrings/nvidia-container-toolkit-keyring.gpg \
  && curl -s -L https://nvidia.github.io/libnvidia-container/stable/deb/nvidia-container-toolkit.list | \
    sed 's#deb https://#deb [signed-by=/usr/share/keyrings/nvidia-container-toolkit-keyring.gpg] https://#g' | \
    sudo tee /etc/apt/sources.list.d/nvidia-container-toolkit.list

# インストール
$ sudo apt update
$ export NVIDIA_CONTAINER_TOOLKIT_VERSION=1.20.0-1
  sudo apt install -y \
      nvidia-container-toolkit=${NVIDIA_CONTAINER_TOOLKIT_VERSION} \
      nvidia-container-toolkit-base=${NVIDIA_CONTAINER_TOOLKIT_VERSION} \
      libnvidia-container-tools=${NVIDIA_CONTAINER_TOOLKIT_VERSION} \
      libnvidia-container1=${NVIDIA_CONTAINER_TOOLKIT_VERSION}

# コンテナのランタイムがDockerであることを登録する
$ sudo nvidia-ctk runtime configure --runtime=docker
# INFO[0000] Config file does not exist; using empty config
# INFO[0000] Wrote updated config to /etc/docker/daemon.json
# INFO[0000] It is recommended that docker daemon be restarted.

# Dockerサービスを再起動する
$ sudo systemctl restart docker

# GPUが見えなくなる問題の対策
# -->> https://qiita.com/tttamaki/items/4f369633b7f53f5131a1
$ sudo vi /etc/docker/daemon.json
{
    "runtimes": {
        "nvidia": {
            "args": [],
            "path": "nvidia-container-runtime"
        }
    },
    "exec-opts": ["native.cgroupdriver=cgroupfs"]
}

# Dockerサービスを再起動する
$ sudo systemctl restart docker

# Dockerにプロセス管理機能cgroup設定が結びつけられていることを確認する
$ docker info | grep Cgroup
# Cgroup Driver: cgroupfs
# Cgroup Version: 2

# Dockerコンテナを取得して、コンテナにすべてのGPUを接続する
$ docker run --rm -it --gpus all pytorch/pytorch:2.6.0-cuda12.6-cudnn9-devel

(on Conatiner) $ /usr/local/cuda/bin/nvcc --version
#nvcc: NVIDIA (R) Cuda compiler driver
#Copyright (c) 2005-2024 NVIDIA Corporation
#Built on Tue_Oct_29_23:50:19_PDT_2024
#Cuda compilation tools, release 12.6, V12.6.85
#Build cuda_12.6.r12.6/compiler.35059454_0

(on Conatiner) $ nvidia-smi
#Fri Sep  4 13:54:48 2026
#+-----------------------------------------------------------------------------------------+
#| NVIDIA-SMI 595.84                 Driver Version: 595.84         CUDA Version: 13.2     |
#+-----------------------------------------+------------------------+----------------------+
#| GPU  Name                 Persistence-M | Bus-Id          Disp.A | Volatile Uncorr. ECC |
#| Fan  Temp   Perf          Pwr:Usage/Cap |           Memory-Usage | GPU-Util  Compute M. |
#|                                         |                        |               MIG M. |
#|=========================================+========================+======================|
#|   0  NVIDIA GeForce RTX 3060 Ti     Off |   00000000:01:00.0  On |                  N/A |
#| 31%   32C    P8              8W /  200W |     222MiB /   8192MiB |      0%      Default |
#|                                         |                        |                  N/A |
#+-----------------------------------------+------------------------+----------------------+
#|   1  NVIDIA GeForce RTX 3060 Ti     Off |   00000000:05:00.0 Off |                  N/A |
#|  0%   35C    P8              7W /  200W |      15MiB /   8192MiB |      0%      Default |
#|                                         |                        |                  N/A |
#+-----------------------------------------+------------------------+----------------------+
#
#+-----------------------------------------------------------------------------------------+
#| Processes:                                                                              |
#|  GPU   GI   CI              PID   Type   Process name                        GPU Memory |
#|        ID   ID                                                               Usage      |
#|=========================================================================================|
#|  No running processes found                                                             |
#+-----------------------------------------------------------------------------------------+

(on Conatiner) $ exit

# 確認完了
NVIDIAのリソースを取得するNGCをインストールする
### NGC CLIのセットアップ
# https://org.ngc.nvidia.com/setup/installers/cli
$ cd ~
# ツールのダウンロード
$ wget --content-disposition https://api.ngc.nvidia.com/v2/resources/nvidia/ngc-apps/ngc_cli/versions/3.59.0/files/ngccli_linux.zip -O ngccli_linux.zip && unzip ngccli_linux.zip
# 正常チェック
$ find ngc-cli/ -type f -exec md5sum {} + | LC_ALL=C sort | md5sum -c ngc-cli.md5
# NGC CLIに実行権限を付与してパスを通す
$ chmod u+x ngc-cli/ngc
$ echo "export PATH=\"\$PATH:$(pwd)/ngc-cli\"" >> ~/.bashrc && source ~/.bashrc

###
# https://org.ngc.nvidia.com/setup
###
$ ngc config set
#CLI_VERSION: Latest - 4.34.10 available (current: 3.59.0). Please update by using the command 'ngc version upgrade'
#
#Enter API key [no-apikey]. Choices: [<VALID_APIKEY>, 'no-apikey']: nvapi-【ここは自身のアカウントより取得する】
#Enter CLI output format type [ascii]. Choices: ['ascii', 'csv', 'json']:
#Enter org [no-org]. Choices: ['【ここは自身のアカウントが表示される】']: 【ここは自身のアカウントを指定する】
#Enter team [no-team]. Choices: ['no-team']:
#Enter ace [no-ace]. Choices: ['no-ace']:
#Validating configuration...
#Successfully validated configuration.
#Saving configuration...
#Successfully saved NGC configuration to /home/shino/.ngc/config

# Dockerコンテナをダウンロードする際に利用するNGC CLIの設定
$ docker login nvcr.io
#Username: $oauthtoken
#Password: nvapi-【ここは自身のアカウントより取得する】
#
#WARNING! Your credentials are stored unencrypted in '/home/shino/.docker/config.json'.
#Configure a credential helper to remove this warning. See
#https://docs.docker.com/go/credential-store/
#
#Login Succeeded
開発用のPython仮想環境を準備する
TensorRTをインストールする
## $ wget https://developer.nvidia.com/downloads/compute/machine-learning/tensorrt/10.6.0/local_repo/nv-tensorrt-local-repo-ubuntu2204-10.6.0-cuda-12.6_1.0-1_amd64.deb
## $ sudo dpkg -i nv-tensorrt-local-repo-ubuntu2204-10.6.0-cuda-12.6_1.0-1_amd64.deb
## $ sudo cp /var/nv-tensorrt-local-repo-ubuntu2204-10.6.0-cuda-12.6/*-keyring.gpg /usr/share/keyrings/
$ sudo apt update
$ trt_version="10.6.0.26-1+cuda12.6"
$ sudo apt-get install -y \
  libnvinfer10="${trt_version}" \
  libnvinfer-plugin10="${trt_version}" \
  libnvonnxparsers10="${trt_version}"

$ sudo bash -c 'cat > /etc/apt/preferences.d/cuda-12-6.pref <<EOF
Package: *
Pin: origin developer.download.nvidia.com
Pin-Priority: 1001
EOF'
$ sudo apt update
$ sudo apt install -y libnvinfer-vc-plugin10=${trt_version}
$ sudo apt-get install -y python3-libnvinfer="${trt_version}"

$ sudo apt-mark hold \
  libnvinfer10 \
  libnvinfer-plugin10 \
  libnvonnxparsers10 \
  libnvinfer-vc-plugin10 \
  python3-libnvinfer

# このへんで再起動
$ sudo reboot
Python仮想環境をインストールする
### Pythonの仮想環境モジュール"venv"をインストール
$ sudo apt update
$ sudo apt install python3.10-venv python3-pip
TensorRTの実行環境を準備する
$ mkdir ~/env
$ python3 -m venv ~/env/trt --system-site-packages
$ source ~/env/trt/bin/activate
(trt) $ pip install --upgrade pip setuptools wheel
(trt) $ pip install \
  pandas scipy matplotlib seaborn scikit-learn opencv-python \
  "numpy>=1.24,<2" \
  "cuda-python==12.6" \
  "onnx==1.16.1" \
  "onnxruntime-gpu>=1.21,<1.27"

### pythonからTensorRTを呼び出してみる
(trt) $ python --version
# Python 3.10.12

(trt) $ python -c "
import tensorrt as trt
print(trt.__version__)
assert trt.Builder(trt.Logger())
"
#10.6.0

(trt) $ python -c "
import onnxruntime as ort
print('ONNX Runtime version:', ort.__version__)
print('Available providers:', ort.get_available_providers())
"
#ONNX Runtime version: 1.23.2
#Available providers: ['TensorrtExecutionProvider', 'CUDAExecutionProvider', 'CPUExecutionProvider']
# -->> CUDAが見えていれば成功!

(trt) $ deactivate
$
TensorFlowの実行環境を準備する
######
### TensorFlow-gpuの仮想環境を作成する
######
$ python3 -m venv ~/env/tf_onnx
$ source ~/env/tf_onnx/bin/activate
$ pip install --upgrade pip setuptools wheel
$ pip install \
  "tensorflow[and-cuda]==2.15.1" \
  "tf2onnx==1.17.0" \
  "onnx==1.16.1" \
  "onnxruntime-gpu>=1.21,<1.27" \
  "numpy==1.26.4" \
  pandas scipy scikit-learn matplotlib seaborn opencv-python

(tf_onnx) $ python -c "
import tensorflow as tf
print('TensorFlow version:', tf.__version__)
print('Built with CUDA:', tf.test.is_built_with_cuda())
print('GPU devices:', tf.config.list_physical_devices('GPU'))
"
#2026-09-12 00:04:43.376493: I tensorflow/core/util/port.cc:113] oneDNN custom operations are on. You may see slightly different numerical results due to floating-point round-off errors from different computation orders. To turn them off, set the environment variable `TF_ENABLE_ONEDNN_OPTS=0`.
#2026-09-12 00:04:43.397286: E external/local_xla/xla/stream_executor/cuda/cuda_dnn.cc:9261] Unable to register cuDNN factory: Attempting to register factory for plugin cuDNN when one has already been registered
#2026-09-12 00:04:43.397311: E external/local_xla/xla/stream_executor/cuda/cuda_fft.cc:607] Unable to register cuFFT factory: Attempting to register factory for plugin cuFFT when one has already been registered
#2026-09-12 00:04:43.397843: E external/local_xla/xla/stream_executor/cuda/cuda_blas.cc:1515] Unable to register cuBLAS factory: Attempting to register factory for plugin cuBLAS when one has already been registered
#2026-09-12 00:04:43.401076: I tensorflow/core/platform/cpu_feature_guard.cc:182] This TensorFlow binary is optimized to use available CPU instructions in performance-critical operations.
#To enable the following instructions: AVX2 AVX_VNNI FMA, in other operations, rebuild TensorFlow with the appropriate compiler flags.
#2026-09-12 00:04:43.743121: W tensorflow/compiler/tf2tensorrt/utils/py_utils.cc:38] TF-TRT Warning: Could not find TensorRT
#TensorFlow version: 2.15.1
#Built with CUDA: True
#2026-09-12 00:04:44.329172: I external/local_xla/xla/stream_executor/cuda/cuda_executor.cc:901] successful NUMA node read from SysFS had negative value (-1), but there must be at least one NUMA node, so returning NUMA node zero. See more at https://github.com/torvalds/linux/blob/v6.0/Documentation/ABI/testing/sysfs-bus-pci#L344-L355
#2026-09-12 00:04:44.331557: I external/local_xla/xla/stream_executor/cuda/cuda_executor.cc:901] successful NUMA node read from SysFS had negative value (-1), but there must be at least one NUMA node, so returning NUMA node zero. See more at https://github.com/torvalds/linux/blob/v6.0/Documentation/ABI/testing/sysfs-bus-pci#L344-L355
#2026-09-12 00:04:44.452212: I external/local_xla/xla/stream_executor/cuda/cuda_executor.cc:901] successful NUMA node read from SysFS had negative value (-1), but there must be at least one NUMA node, so returning NUMA node zero. See more at https://github.com/torvalds/linux/blob/v6.0/Documentation/ABI/testing/sysfs-bus-pci#L344-L355
#2026-09-12 00:04:44.454311: I external/local_xla/xla/stream_executor/cuda/cuda_executor.cc:901] successful NUMA node read from SysFS had negative value (-1), but there must be at least one NUMA node, so returning NUMA node zero. See more at https://github.com/torvalds/linux/blob/v6.0/Documentation/ABI/testing/sysfs-bus-pci#L344-L355
#2026-09-12 00:04:44.456418: I external/local_xla/xla/stream_executor/cuda/cuda_executor.cc:901] successful NUMA node read from SysFS had negative value (-1), but there must be at least one NUMA node, so returning NUMA node zero. See more at https://github.com/torvalds/linux/blob/v6.0/Documentation/ABI/testing/sysfs-bus-pci#L344-L355
#2026-09-12 00:04:44.458419: I external/local_xla/xla/stream_executor/cuda/cuda_executor.cc:901] successful NUMA node read from SysFS had negative value (-1), but there must be at least one NUMA node, so returning NUMA node zero. See more at https://github.com/torvalds/linux/blob/v6.0/Documentation/ABI/testing/sysfs-bus-pci#L344-L355
#GPU devices: [PhysicalDevice(name='/physical_device:GPU:0', device_type='GPU'), PhysicalDevice(name='/physical_device:GPU:1', device_type='GPU')]
# -->> GPUリソースが見えていれば成功!

(tf_onnx) $ python -c "
import onnxruntime as ort
print('ONNX Runtime version:', ort.__version__)
print('Available providers:', ort.get_available_providers())
"
#ONNX Runtime version: 1.23.2
#Available providers: ['TensorrtExecutionProvider', 'CUDAExecutionProvider', 'CPUExecutionProvider']
# -->> CUDAが見えていれば成功!

(tf_onnx) $ deactivate
$
PyTorchの実行環境を準備する
######
### PyTorchの実行環境を構築してGPUが使えるか確認
######
$ python3 -m venv ~/env/torch
$ source ~/env/torch/bin/activate

(torch) $ python -m pip install --upgrade pip setuptools wheel

# PyTorch (CUDA 12.6)
(torch) $ pip install \
  "torch==2.11.0" \
  "torchvision==0.26.0" \
  "torchaudio==2.11.0" \
  --index-url https://download.pytorch.org/whl/cu126

# ONNX/ORT
(torch) $ pip install \
  "onnx==1.22.0" \
  "onnxscript==0.7.2" \
  "onnxruntime-gpu==1.23.2"

# Utility packages
(torch) $ pip install \
  "numpy==2.2.6" \
  pandas \
  scipy \
  scikit-learn \
  matplotlib \
  seaborn \
  opencv-python \
  six \
  torchinfo

(torch) $ pip check
#No broken requirements found.

# GPUが見えるか確認
(torch) $ python -c "
import torch
print('PyTorch version:', torch.__version__)
print('CUDA available:', torch.cuda.is_available())
print('CUDA version (PyTorch):', torch.version.cuda)
if torch.cuda.is_available():
    print('GPU name:', torch.cuda.get_device_name(0))
    print('GPU count:', torch.cuda.device_count())
    x = torch.rand(5, 3).cuda()
    print('Tensor on GPU:', x)
"
#CUDA available: True
#CUDA version (PyTorch): 12.6
#GPU name: NVIDIA GeForce RTX 3060 Ti
#GPU count: 2
#Tensor on GPU: tensor([[0.4332, 0.2673, 0.2932],
#        [0.7222, 0.8852, 0.0042],
#        [0.9091, 0.9655, 0.2439],
#        [0.4586, 0.4896, 0.3815],
#        [0.8671, 0.5108, 0.9195]], device='cuda:0')

(torch) $ python -c "
import onnxruntime as ort
print('ONNX Runtime version:', ort.__version__)
print('Available providers:', ort.get_available_providers())
"
#ONNX Runtime version: 1.23.2
#Available providers: ['TensorrtExecutionProvider', 'CUDAExecutionProvider', 'CPUExecutionProvider']
# -->> CUDAが見えていれば成功!
(torch) $ deactivate
$

# このへんで再起動
$ sudo reboot
PyTorchのモデルをTFLiteへ書き出すためのコンテナを準備する
### ONNX2TFの準備をする

$ docker pull pinto0309/onnx2tf:latest

#$ docker run --rm --user $(id -u):$(id -g) \
#  -v $(pwd):/work -w /work \
#  pinto0309/onnx2tf:latest \
#  onnx2tf -i model.onnx \
#          -o output_uint8 \
#          -oiqt \
#          -iqd int8 \
#          -oqd int8 \
#          -tb tf_converter \
#          -cind "x" "calib_data.npy" "[[[[0.0,0.0,0.0]]]]" "[[[[1.0,1.0,1.0]]]]"
NVIDIA TAOをインストールする
### TAO Launcher のインストール
$ mkdir -p ~/tao
$ cd ~/tao
$ python3 -m venv tao_env
$ source tao_env/bin/activate
(tao_env) $ pip install --upgrade pip setuptools wheel
(tao_env) $ pip install nvidia-tao
(tao_env) $ tao --help
#~/.tao_mounts.json wasn't found. Falling back to obtain mount points and docker configs from ~/.tao_mounts.json.
#Please note that this will be deprecated going forward.
#usage: tao [-h] {list,stop,info,dataset,deploy,model} ...
#
#Launcher for TAO Toolkit.
#
#options:
#  -h, --help            show this help message and exit
#
#task_groups:
#  {list,stop,info,dataset,deploy,model}

# notebookのインストール
(tao_env) $ pip install jupyter notebook jupyterlab ipykernel
(tao_env) $ python -m ipykernel install --user --name tao_env --display-name "tao_env"
#Installed kernelspec tao_env in /home/shino/.local/share/jupyter/kernels/tao_env

(tao_env) $ cd ~/tao
(tao_env) $ git clone https://github.com/NVIDIA/tao_tutorials.git
(tao_env) $ cd tao_tutorials
(tao_env) $ ls ./setup
#quickstart_launcher.sh  tao-docker-compose

(tao_env) $ bash setup/quickstart_launcher.sh --install
#...
#By installing the TAO Toolkit CLI, you accept the terms and conditions of this license: https://developer.nvidia.com/tao-toolkit-software-license-agreement
#Would you like to continue? (y/n): y
#...
#format_version: 3
#toolkit_version: 6.26.3
#published_date: 03/20/2026
(tao_env) $ cd ~/tao/tao_tutorials/
(tao_env) $ jupyter notebook --ip 0.0.0.0 --port 8888 --allow-root

# このへんで再起動
(tao_env) $ sudo reboot
DeepStreamをインストールする
# CUDA
$ nvcc --version
#nvcc: NVIDIA (R) Cuda compiler driver
#Copyright (c) 2005-2024 NVIDIA Corporation
#Built on Tue_Oct_29_23:50:19_PDT_2024
#Cuda compilation tools, release 12.6, V12.6.85
#Build cuda_12.6.r12.6/compiler.35059454_0

# TensorRT
$ dpkg -l | grep -E 'nvinfer|tensorrt'
#hi  libnvinfer-plugin10                        10.6.0.26-1+cuda12.6                             amd64        TensorRT plugin libraries
#hi  libnvinfer-vc-plugin10                     10.6.0.26-1+cuda12.6                             amd64        TensorRT vc-plugin library
#hi  libnvinfer10                               10.6.0.26-1+cuda12.6                             amd64        TensorRT runtime libraries
#hi  python3-libnvinfer                         10.6.0.26-1+cuda12.6                             amd64        Python 3 bindings for TensorRT standard runtime

# GPUドライバ
$ dpkg -l | grep -E 'nvidia-driver'
#ii  nvidia-driver-595-open                     595.91.07-0ubuntu0.22.04.1                       amd64        NVIDIA driver (open kernel) metapackage

####
#Ubuntu 22.04
#CUDA 12.6
#TensorRT 10.3.0.26 以降
#NVIDIA Driver 560以降
#を確認する
####

# 必要なパッケージをインストールする
$ sudo apt update
$ sudo apt install -y \
  libssl3 \
  libssl-dev \
  libgles2-mesa-dev \
  libgstreamer1.0-0 \
  gstreamer1.0-tools \
  gstreamer1.0-plugins-good \
  gstreamer1.0-plugins-bad \
  gstreamer1.0-plugins-ugly \
  gstreamer1.0-libav \
  libgstreamer-plugins-base1.0-dev \
  libgstrtspserver-1.0-0 \
  libjansson4 \
  libyaml-cpp-dev \
  libjsoncpp-dev \
  protobuf-compiler \
  gcc \
  make \
  git \
  python3

# Ububtu22.04のglibcを更新する
$ sudo apt install meson ninja-build
$ cd ~
$ git clone https://github.com/GNOME/glib.git
$ cd glib
$ git checkout 2.76.6
$ meson build --prefix=/usr
$ ninja -C build
$ sudo ninja -C build install
$ pkg-config --modversion glib-2.0
#2.76.6

# librdkafka のインストール
$ cd ~
$ git clone https://github.com/confluentinc/librdkafka.git
$ cd librdkafka
$ git checkout tags/v2.2.0
$ ./configure --enable-ssl
$ make
$ sudo make install

# DeepStream 7.1 のダウンロードとインストール
$ cd ~
$ wget --content-disposition https://api.ngc.nvidia.com/v2/resources/nvidia/deepstream/versions/7.1/files/deepstream-7.1_7.1.0-1_amd64.deb --output-document deepstream-7.1_7.1.0-1_amd64.deb
$ sudo apt-get install ./deepstream-7.1_7.1.0-1_amd64.deb

# GStreamer レジストリのクリア
$ rm -rf ~/.cache/gstreamer-1.0/

# CUDA シンボリックリンク
### sudo ln -snf /usr/local/cuda-12.6 /usr/local/cuda

# 環境変数(~/.bashrc に追記推奨)
$ vim ~/.bashrc
export PATH="/usr/local/cuda-12.6/bin${PATH:+:${PATH}}"
export LD_LIBRARY_PATH="/usr/local/cuda-12.6/lib64${LD_LIBRARY_PATH:+:${LD_LIBRARY_PATH}}"

$ source ~/.bashrc

# 動作確認
$ deepstream-app --version-all
#deepstream-app version 7.1.0
#DeepStreamSDK 7.1.0
#CUDA Driver Version: 13.2 # -->> NVIDIAドライバが対応している最大のCUDAバージョン
#CUDA Runtime Version: 12.6 # -->> 実際にアプリケーションがリンクして使っているCUDA Runtime
#TensorRT Version: 10.6
#cuDNN Version: 9.2
#libNVWarp360 Version: 2.0.1d3

$ cd /opt/nvidia/deepstream/deepstream-7.1/samples/configs/deepstream-app
$ deepstream-app -c source30_1080p_dec_infer-resnet_tiled_display_int8.txt
以上です!
お疲れさまでした!