ゼロからPyTorchとTensorflowの実行環境をつくる
はじめて機械学習まわりのプログラミングをするにあたって、PCを新調しました。構成はCore i5-14500、メモリ64GB、MotherboardにMSIのB760 GAMING PLUS WIFIを選択しました。手順としては下記の流れでセットアップするのですが、結論から言うとNVIDIAのGPUドライバがSecure Bootの影響でインストールされずドはまりしました。
- Ubuntu24.04LTSのインストール
- GeForceドライバをインストール
- CUDA Toolkitをインストール
- cuDNNをインストール
- python/venv/pipをインストール
- PyTorch/Tensorflowをインストール
今回参考にしたサイト
まずはじめに:Secure Bootを無効化
MotherboardのSecure Bootを無効にします。UEFIを起動して、Settings/Security/Secure BootのSecure BoodをDiasableにしました。Secure Bootを有効にしたままGeForceのドライバを入れる方法もあるようですが、難しいので今回はパス!

Mother BoardのBIOSを0x12B対応にする
第14世代のIntel CPUの多くは電力を過剰に消費する不具合があり、これを対策するために「0x12B」というパッチをMother Boardにあてる必要があります。今回利用したB760 GAMING PLUS WIFIは、パッチをあてる前に必要なIntel MEをWindows以外ではインストールできないため、一旦Windowsをインストールし、Intel MEをインストール、UEFI画面で0x12B対応のBIOSをインストールし、最後にすべてのパーティションを削除してUbuntuを入れる必要がありました。
Ubuntu24.04LTSのインストール
Ubuntu24.04LTSのイメージをダウンロードしてから、rufusでUSBメモリを書き込みます。今回は家に余っていた32GBのUSBメモリを使いました。準備ができたらUbuntuを入れるターゲットにUSBメモリを刺してインストールしてください。

GeForceドライバのインストール
OSの前準備
まず、Ubuntuのパッケージをすべて更新します
$ sudo apt update
$ sudo apt upgrade
$ sudo reboot
続いて、作業用にsshサーバをインストールして起動します
$ sudo apt install openssh-server
... sshサーバをインストールします
$ sudo systemctl start ssh
... Ubuntu24.04からsshdでなくsshになっています
$ sudo systemctl enable ssh
... 起動時にサービスが開始されるように設定します
GeForceドライバはグラフィックのドライバのひとつですが、関連する汎用グラフィックドライバ「nouveau」が勝手にロードされないよう無効化します。
$ sudo vi /etc/modprobe.d/blacklist-nouveau.conf
... 新しくファイルを作成する
... ファイルの中身は以下
blacklist nouveau
options nouveau modeset=0
... 保存したら次のコマンドを実行
$ sudo update-initramfs -u
$ sudo reboot
「update-initramfs」コマンドにより、カーネルが起動してからルートファイルシステムが開始する前に実行されるinitramfsの構成をアップデートします。
GPUの確認
NVIDIAのGPUが搭載されていることをlspciコマンドで確認します。
$ lspci | grep -i vga
01:00.0 VGA compatible controller: NVIDIA Corporation GA103 [GeForce RTX 3060 Ti] (rev a1)
古いドライバが入っていないか確認し、削除します。
$ dpkg -l | grep nvidia
$ dpkg -l | grep cuda
$ sudo apt-get --purge remove nvidia-*
$ sudo apt-get --purge remove cuda-*
インストールできるドライバのリストを表示します。ubuntu-driversで表示される推奨できるドライバはrecommendedと書かれているものですが、NVIDIAのドライバ配布サイトでもどのバージョンが推奨なのか調べることができます。
ここではnvidia-driver-550が良いようですね。
$ ubuntu-drivers devices
...
== /sys/devices/pci0000:00/0000:00:01.0/0000:01:00.0 ==
modalias : pci:v000010DEd00002414sv000010DEsd0000163Fbc03sc00i00
vendor   : NVIDIA Corporation
model    : GA103 [GeForce RTX 3060 Ti]
driver   : nvidia-driver-470 - distro non-free
driver   : nvidia-driver-550 - distro non-free recommended
driver   : nvidia-driver-535-server - distro non-free
driver   : nvidia-driver-550-open - distro non-free
driver   : nvidia-driver-535 - distro non-free
driver   : nvidia-driver-535-open - distro non-free
driver   : nvidia-driver-470-server - distro non-free
driver   : nvidia-driver-535-server-open - distro non-free
driver   : xserver-xorg-video-nouveau - distro free builtin

ドライバのインストール
GPUのドライバが含まれているリポジトリを登録し、リポジトリのパッケージ情報をapt updateで取得します。最後にドライバをインストール、システムを再起動します。
$ sudo add-apt-repository ppa:graphics-drivers/ppa
... グラフィックドライバが多く含まれるリポジトリをシステムに登録します
$ sudo apt update
... パッケージ情報を最新にします
$ sudo apt install nvidia-driver-550
... 推奨されている550ドライバをインストールします
$ sudo reboot
... システムを再起動します
インストール後の確認
nvidia-smiコマンドを実行し、GPUの情報が出力されればGeForceのドライバインストールは成功です。
$ nvidia-smi
Sat Nov  9 23:19:36 2024
+-----------------------------------------------------------------------------------------+
| NVIDIA-SMI 550.127.05             Driver Version: 550.127.05     CUDA Version: 12.4     |
|-----------------------------------------+------------------------+----------------------+
| GPU  Name                 Persistence-M | Bus-Id          Disp.A | Volatile Uncorr. ECC |
| Fan  Temp   Perf          Pwr:Usage/Cap |           Memory-Usage | GPU-Util  Compute M. |
|                                         |                        |               MIG M. |
|=========================================+========================+======================|
|   0  NVIDIA GeForce RTX 3060 Ti     Off |   00000000:01:00.0  On |                  N/A |
|  0%   30C    P8              5W /  200W |     206MiB /   8192MiB |      0%      Default |
|                                         |                        |                  N/A |
+-----------------------------------------+------------------------+----------------------+

+-----------------------------------------------------------------------------------------+
| Processes:                                                                              |
|  GPU   GI   CI        PID   Type   Process name                              GPU Memory |
|        ID   ID                                                               Usage      |
|=========================================================================================|
|    0   N/A  N/A      1760      G   /usr/lib/xorg/Xorg                             73MiB |
|    0   N/A  N/A      2038      G   /usr/bin/gnome-shell                          117MiB |
+-----------------------------------------------------------------------------------------+
CUDAのインストール
CUDAは以下のサイトにインストール方法が公開されています。
自身の構成にあわせて項目を選択すると、下部に実行すべきコマンドが表示されます。この通りに実行すれば問題ありません。

$ wget https://developer.download.nvidia.com/compute/cuda/repos/ubuntu2404/x86_64/cuda-ubuntu2404.pin
$ sudo mv cuda-ubuntu2404.pin /etc/apt/preferences.d/cuda-repository-pin-600
$ wget https://developer.download.nvidia.com/compute/cuda/12.6.2/local_installers/cuda-repo-ubuntu2404-12-6-local_12.6.2-560.35.03-1_amd64.deb
$ sudo dpkg -i cuda-repo-ubuntu2404-12-6-local_12.6.2-560.35.03-1_amd64.deb
$ sudo cp /var/cuda-repo-ubuntu2404-12-6-local/cuda-*-keyring.gpg /usr/share/keyrings/
$ sudo apt-get update
$ sudo apt-get -y install cuda-toolkit-12-6
最後にパスを通します。
$ vi ~/.bashrc
... 最後の行に下記の2行を追加する
export PATH="/usr/local/cuda/bin:$PATH"
export LD_LIBRARY_PATH="/usr/local/cuda/lib64:$LD_LIBRARY_PATH"
$ source ~/.bashrc
... 設定した環境変数を反映させます
nvccコマンドでCUDAの情報が出てくればOKです。
$ nvcc -V
nvcc: NVIDIA (R) Cuda compiler driver
Copyright (c) 2005-2024 NVIDIA Corporation
Built on Thu_Sep_12_02:18:05_PDT_2024
Cuda compilation tools, release 12.6, V12.6.77
Build cuda_12.6.r12.6/compiler.34841621_0
cuDNNのインストール
cuDNNのインストールには、NVIDIAのユーザー登録(無料)が必要です。登録した後はCUDA同様に構成を選択して、表示されたコマンドを実行しましょう。

$ wget https://developer.download.nvidia.com/compute/cudnn/9.5.1/local_installers/cudnn-local-repo-ubuntu2404-9.5.1_1.0-1_amd64.deb
$ sudo dpkg -i cudnn-local-repo-ubuntu2404-9.5.1_1.0-1_amd64.deb
$ sudo cp /var/cudnn-local-repo-ubuntu2404-9.5.1/cudnn-*-keyring.gpg /usr/share/keyrings/
$ sudo apt-get update
$ sudo apt-get -y install cudnn
$ sudo apt-get -y install cudnn-cuda-12
TensorRTのインストール
機械学習で利用されているTensorRTもNVIDIAのサイトからダウンロードしてインストールします。ダウンロードサイトへのログインが必要です。
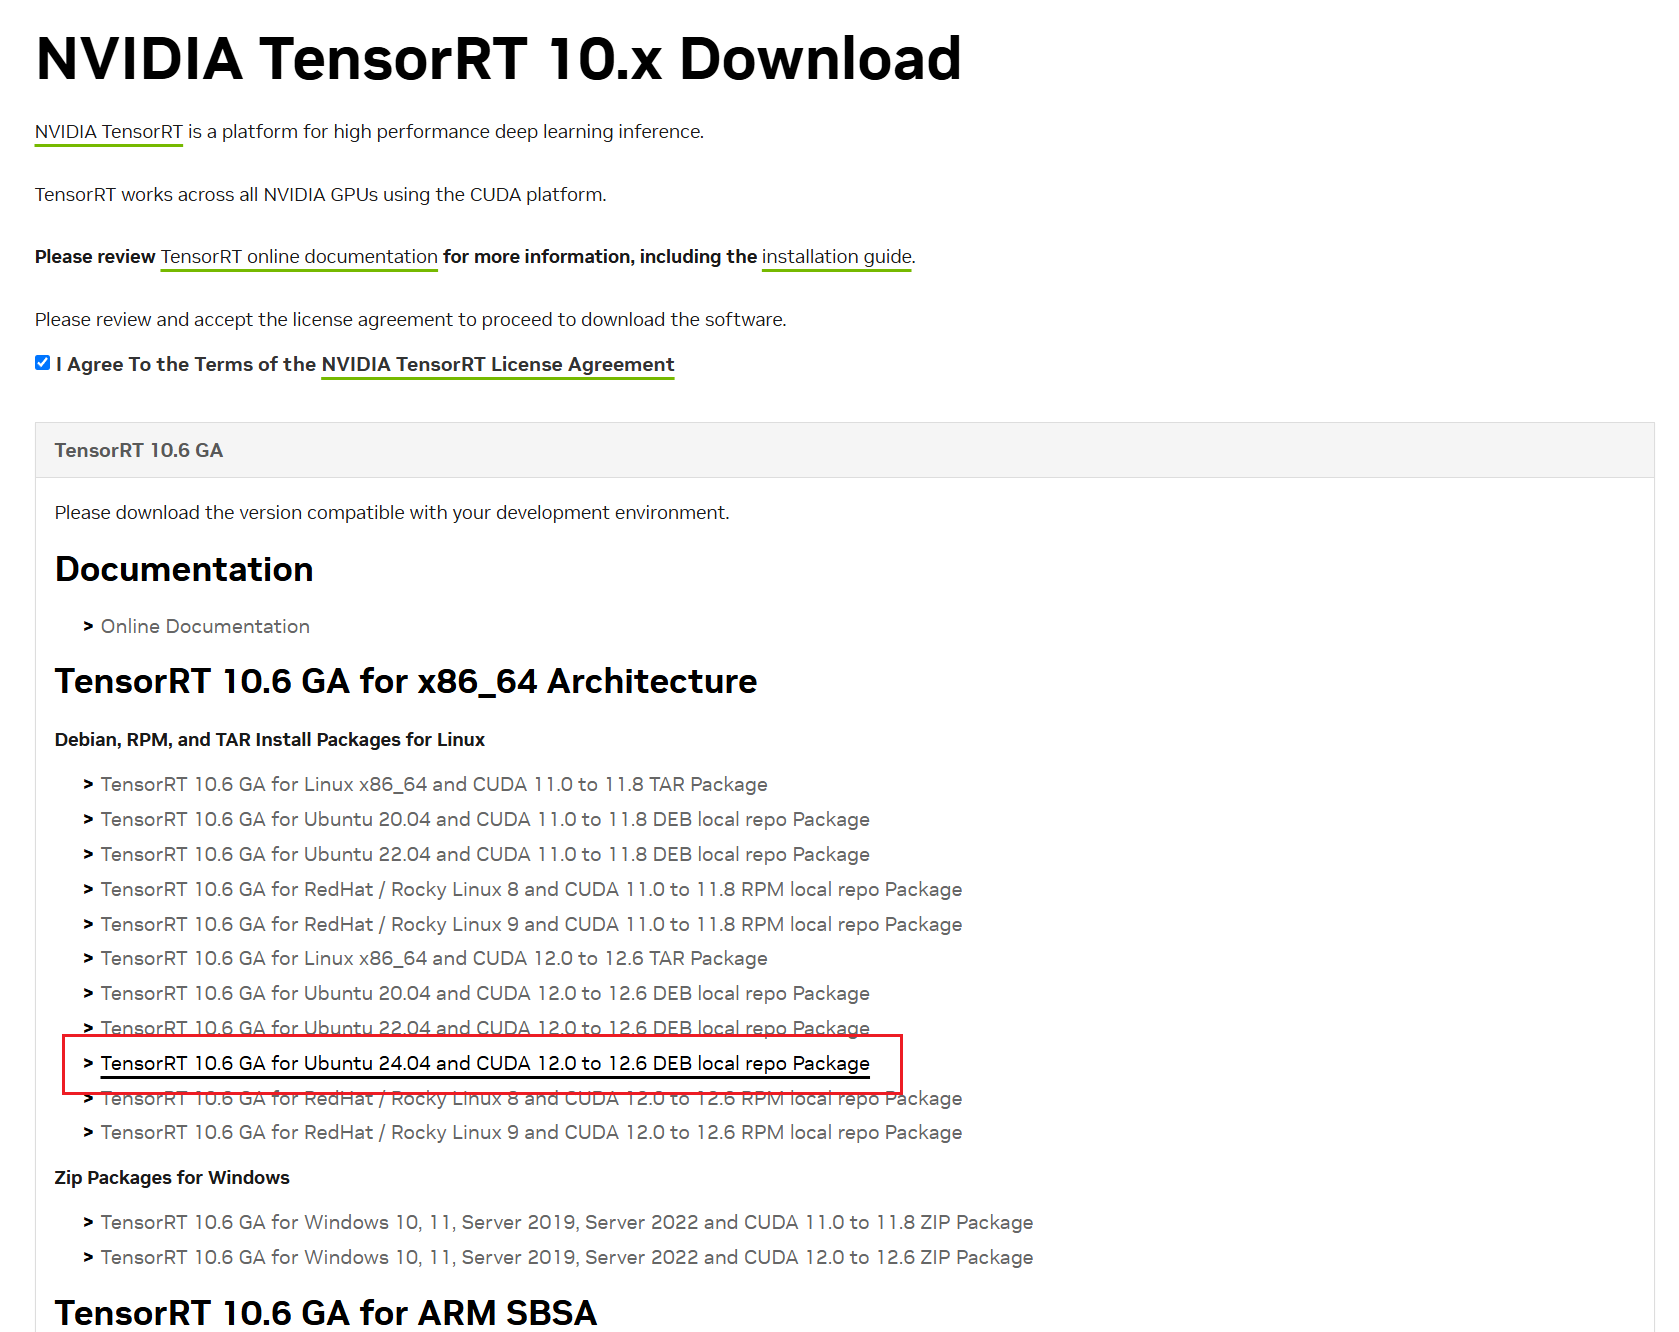
$ wget https://developer.nvidia.com/downloads/compute/machine-learning/tensorrt/10.6.0/local_repo/nv-tensorrt-local-repo-ubuntu2404-10.6.0-cuda-12.6_1.0-1_amd64.deb
$ sudo dpkg -i nv-tensorrt-local-repo-ubuntu2404-10.6.0-cuda-12.6_1.0-1_amd64.deb
$ sudo cp /var/nv-tensorrt-local-repo-ubuntu2404-10.6.0-cuda-12.6/nv-tensorrt-local-8DA3D6B4-keyring.gpg /usr/share/keyrings/
$ sudo apt-get update
$ sudo apt-get install tensorrt
以上でGeForceを使った開発環境のベースが準備できました。最後に、Pythonからこれらを利用してみましょう。
PythonからGPUリソースを利用する
Pythonの前準備
Pythonから利用するパッケージを管理する「pip」と仮想環境を管理する「venv」をインストールします。はじめてPythonを触られる方からすると、仮想環境ってなんだろう?と思われるかもしれません。仮想環境は、Pythonのコードを実行するための小さなコンピュータを作る機能です。Pythonのコードを実行するには、この小さなコンピュータを作成して、そのコンピュータに必要なパッケージを追加して、起動します。このように仮想環境をつくる理由は、個々のプログラムの利用するパッケージが競合することを防ぐためです。
$ sudo apt install python3-pip
$ sudo apt install python3-venv
venvの使い方はこちらの記事を参考にしました。
PyTorch用の仮想環境の作成と実行
PyTorchを試すために、ここではtorchboxという名前の仮想環境を作成しました(名前は自由です)。venvで仮想環境を作成した後、bin/activateを実行すると仮想環境に入ることができます。
$ python3 -m venv torchbox
$ . ./torchbox/bin/activate
(torchbox) $
pipコマンドを使ってPyTorchをインストールします。torchとtorchvisionをセットでインストールするのが一般的なようです。
(torchbox) $ pip install torch torchvision
... tourchと依存するパッケージのインストールが開始される
こちらが参考になりました。
それでは、PyTorchをインポートするプログラムを書いて実行してみましょう。torch.cuda.is_available()はPyTorchがGPUを利用可能かどうかを確認するメソッドです。torch.cuda.device_count()は利用可能なGPU数を確認するメソッドです。
(torchbox) $ vi firsttorch.py
import torch
print(torch.cuda.is_available())
print(torch.cuda.device_count())
(torchbox) $ python firsttorch.py
True
1
ただしく認識できましたね!なお仮想環境外でこのプログラムを実行すると、PyTorchがありませんので以下のようにエラーになります。
(torchbox) $ deactivate
$ python3 firsttorch.py
Traceback (most recent call last):
  File "/home/shino/firsttorch.py", line 1, in <module>
    import torch
ModuleNotFoundError: No module named 'torch'
Tensorflow用の仮想環境の作成と実行
Tensorflowは下記のサイトの手順を利用したところエラーなく実行できました。
$ python3 -m venv --system-site-packages ./tensorflow
$ . ./tensorflow/bin/activate
(tensorflow) $ pip3 install --upgrade tensorflow

(tensorflow) $ python3 -c "import tensorflow as tf;print(tf.reduce_sum(tf.random.normal([1000, 1000])))"
2024-11-10 12:51:46.991337: I tensorflow/core/util/port.cc:113] oneDNN custom operations are on. You may see slightly different numerical results due to floating-point round-off errors from different computation orders. To turn them off, set the environment variable `TF_ENABLE_ONEDNN_OPTS=0`.
2024-11-10 12:51:47.016845: I tensorflow/core/platform/cpu_feature_guard.cc:210] This TensorFlow binary is optimized to use available CPU instructions in performance-critical operations.
To enable the following instructions: AVX2 AVX_VNNI FMA, in other operations, rebuild TensorFlow with the appropriate compiler flags.
2024-11-10 12:51:47.405374: W tensorflow/compiler/tf2tensorrt/utils/py_utils.cc:38] TF-TRT Warning: Could not find TensorRT
2024-11-10 12:51:47.688795: I external/local_xla/xla/stream_executor/cuda/cuda_executor.cc:998] successful NUMA node read from SysFS had negative value (-1), but there must be at least one NUMA node, so returning NUMA node zero. See more at https://github.com/torvalds/linux/blob/v6.0/Documentation/ABI/testing/sysfs-bus-pci#L344-L355
2024-11-10 12:51:47.712473: I external/local_xla/xla/stream_executor/cuda/cuda_executor.cc:998] successful NUMA node read from SysFS had negative value (-1), but there must be at least one NUMA node, so returning NUMA node zero. See more at https://github.com/torvalds/linux/blob/v6.0/Documentation/ABI/testing/sysfs-bus-pci#L344-L355
2024-11-10 12:51:47.712587: I external/local_xla/xla/stream_executor/cuda/cuda_executor.cc:998] successful NUMA node read from SysFS had negative value (-1), but there must be at least one NUMA node, so returning NUMA node zero. See more at https://github.com/torvalds/linux/blob/v6.0/Documentation/ABI/testing/sysfs-bus-pci#L344-L355
2024-11-10 12:51:47.713814: I external/local_xla/xla/stream_executor/cuda/cuda_executor.cc:998] successful NUMA node read from SysFS had negative value (-1), but there must be at least one NUMA node, so returning NUMA node zero. See more at https://github.com/torvalds/linux/blob/v6.0/Documentation/ABI/testing/sysfs-bus-pci#L344-L355
2024-11-10 12:51:47.713898: I external/local_xla/xla/stream_executor/cuda/cuda_executor.cc:998] successful NUMA node read from SysFS had negative value (-1), but there must be at least one NUMA node, so returning NUMA node zero. See more at https://github.com/torvalds/linux/blob/v6.0/Documentation/ABI/testing/sysfs-bus-pci#L344-L355
2024-11-10 12:51:47.713949: I external/local_xla/xla/stream_executor/cuda/cuda_executor.cc:998] successful NUMA node read from SysFS had negative value (-1), but there must be at least one NUMA node, so returning NUMA node zero. See more at https://github.com/torvalds/linux/blob/v6.0/Documentation/ABI/testing/sysfs-bus-pci#L344-L355
2024-11-10 12:51:48.046780: I external/local_xla/xla/stream_executor/cuda/cuda_executor.cc:998] successful NUMA node read from SysFS had negative value (-1), but there must be at least one NUMA node, so returning NUMA node zero. See more at https://github.com/torvalds/linux/blob/v6.0/Documentation/ABI/testing/sysfs-bus-pci#L344-L355
2024-11-10 12:51:48.046890: I external/local_xla/xla/stream_executor/cuda/cuda_executor.cc:998] successful NUMA node read from SysFS had negative value (-1), but there must be at least one NUMA node, so returning NUMA node zero. See more at https://github.com/torvalds/linux/blob/v6.0/Documentation/ABI/testing/sysfs-bus-pci#L344-L355
2024-11-10 12:51:48.046945: I external/local_xla/xla/stream_executor/cuda/cuda_executor.cc:998] successful NUMA node read from SysFS had negative value (-1), but there must be at least one NUMA node, so returning NUMA node zero. See more at https://github.com/torvalds/linux/blob/v6.0/Documentation/ABI/testing/sysfs-bus-pci#L344-L355
2024-11-10 12:51:48.046995: I tensorflow/core/common_runtime/gpu/gpu_device.cc:1928] Created device /job:localhost/replica:0/task:0/device:GPU:0 with 6156 MB memory:  -> device: 0, name: NVIDIA GeForce RTX 3060 Ti, pci bus id: 0000:01:00.0, compute capability: 8.6
tf.Tensor(-755.08405, shape=(), dtype=float32)

(tensorflow) $ python3
>>> from tensorflow.python.client import device_lib
2024-11-10 12:52:05.929742: I tensorflow/core/util/port.cc:113] oneDNN custom operations are on. You may see slightly different numerical results due to floating-point round-off errors from different computation orders. To turn them off, set the environment variable `TF_ENABLE_ONEDNN_OPTS=0`.
2024-11-10 12:52:05.954770: I tensorflow/core/platform/cpu_feature_guard.cc:210] This TensorFlow binary is optimized to use available CPU instructions in performance-critical operations.
To enable the following instructions: AVX2 AVX_VNNI FMA, in other operations, rebuild TensorFlow with the appropriate compiler flags.
2024-11-10 12:52:06.344170: W tensorflow/compiler/tf2tensorrt/utils/py_utils.cc:38] TF-TRT Warning: Could not find TensorRT

>>> device_lib.list_local_devices()
2024-11-10 12:52:20.192059: I external/local_xla/xla/stream_executor/cuda/cuda_executor.cc:998] successful NUMA node read from SysFS had negative value (-1), but there must be at least one NUMA node, so returning NUMA node zero. See more at https://github.com/torvalds/linux/blob/v6.0/Documentation/ABI/testing/sysfs-bus-pci#L344-L355
2024-11-10 12:52:20.216299: I external/local_xla/xla/stream_executor/cuda/cuda_executor.cc:998] successful NUMA node read from SysFS had negative value (-1), but there must be at least one NUMA node, so returning NUMA node zero. See more at https://github.com/torvalds/linux/blob/v6.0/Documentation/ABI/testing/sysfs-bus-pci#L344-L355
2024-11-10 12:52:20.216417: I external/local_xla/xla/stream_executor/cuda/cuda_executor.cc:998] successful NUMA node read from SysFS had negative value (-1), but there must be at least one NUMA node, so returning NUMA node zero. See more at https://github.com/torvalds/linux/blob/v6.0/Documentation/ABI/testing/sysfs-bus-pci#L344-L355
2024-11-10 12:52:20.553724: I external/local_xla/xla/stream_executor/cuda/cuda_executor.cc:998] successful NUMA node read from SysFS had negative value (-1), but there must be at least one NUMA node, so returning NUMA node zero. See more at https://github.com/torvalds/linux/blob/v6.0/Documentation/ABI/testing/sysfs-bus-pci#L344-L355
2024-11-10 12:52:20.553814: I external/local_xla/xla/stream_executor/cuda/cuda_executor.cc:998] successful NUMA node read from SysFS had negative value (-1), but there must be at least one NUMA node, so returning NUMA node zero. See more at https://github.com/torvalds/linux/blob/v6.0/Documentation/ABI/testing/sysfs-bus-pci#L344-L355
2024-11-10 12:52:20.553873: I external/local_xla/xla/stream_executor/cuda/cuda_executor.cc:998] successful NUMA node read from SysFS had negative value (-1), but there must be at least one NUMA node, so returning NUMA node zero. See more at https://github.com/torvalds/linux/blob/v6.0/Documentation/ABI/testing/sysfs-bus-pci#L344-L355
2024-11-10 12:52:20.553924: I tensorflow/core/common_runtime/gpu/gpu_device.cc:1928] Created device /device:GPU:0 with 6158 MB memory:  -> device: 0, name: NVIDIA GeForce RTX 3060 Ti, pci bus id: 0000:01:00.0, compute capability: 8.6
[name: "/device:CPU:0"
device_type: "CPU"
memory_limit: 268435456
locality {
}
incarnation: 8649963976084563035
xla_global_id: -1
, name: "/device:GPU:0"
device_type: "GPU"
memory_limit: 6457196544
locality {
  bus_id: 1
  links {
  }
}
incarnation: 13181404559767175341
physical_device_desc: "device: 0, name: NVIDIA GeForce RTX 3060 Ti, pci bus id: 0000:01:00.0, compute capability: 8.6"
xla_global_id: 416903419
]
ただしく認識できましたね!
続いては実際にPyTorchを使って、機械学習のプログラムを書いてみたいと思います。