旧バージョンのUTMでは、仮想NICにブリッジ接続が使えなかったようで、外部からの接続にはポートフォワーディングの必要性があった。今回はあえてブリッジ接続無しでやってみる。
sshの設定
ssh.serviceの起動確認
systemctl status ssh

起動してないのでenable(自動実行)+start(起動)をまとめて設定して、再度確認。
sudo systemctl enable --now ssh
systemctl status ssh

ユーザー作成
ユーザー作成 + パスワード変更
(例: dev_userとして作成)
sudo useradd -s /bin/bash -d /home/dev_user -m dev_user
sudo passwd dev_user
作成後の確認
id dev_user

sudoグループに追加
sudo usermod -aG sudo dev_user
追加後の確認
id dev_user

RSAキーペアを作成
ユーザーをスイッチ
su - dev_user
キーペアの保存先 .ssh フォルダを作成
mkdir -p /home/dev_user/.ssh
キーペアを作成 + パスフレーズの設定
ssh-keygen -t rsa -b 4096

公開鍵をauthorized_keysに登録
cat /home/dev_user/.ssh/id_rsa.pub >> /home/dev_user/.ssh/authorized_keys
秘密鍵を共有フォルダにコピーしてmacOSから使えるようにする
cp -p /home/dev_user/.ssh/id_rsa /media/share/path/to/dir
パスワード認証の無効化
sudo vi /etc/ssh/sshd_config
#PasswordAuthentication yes
↓
PasswordAuthentication no
サービス再起動
sudo systemctl restart ssh
macOSから接続確認
ssh -i /path/to/id_rsa dev_user@target ip address
vncの設定
インストール
(dbus-x11の追加もお忘れなく)
apt install tigervnc-standalone-server dbus-x11
vncuser追加
sudo vi /etc/tigervnc/vncserver.users
:1 dev_userを追加

パスワードファイル作成
(view-only passwordは今回作成しない)
tigervncpasswd

~/.config/tigervnc/passwdが作成される。
systemdのユニットファイル作成
sudo vi /etc/systemd/system/tigervncserver@.service
以下の記述を追加
[Unit]
Description=Start TigerVNC server at display %i
After=network.target

[Service]
Type=forking
User=%u

Environment=LANG=ja_JP.UTF-8
Environment=DISPLAY=:1
Environment=XAUTHORITY=/home/dev_user/.Xauthority

ExecStart=/usr/bin/tigervncserver :%i -geometry 1920x1200 -depth 24 -SecurityTypes VncAuth -passwd /home/dev_user/.config/tigervnc/passwd -localhost no

ExecStop=/usr/bin/vncserver -kill :%i

[Install]
WantedBy=multi-user.target
systemdユニットの有効化と起動
sudo systemctl daemon-reload
sudo systemctl enable --now tightvncserver@1.service
起動確認
sudo systemctl status tightvncserver@1.service

Listen portの確認
ss -tlnp | grep 5901

macOSからvnc接続確認
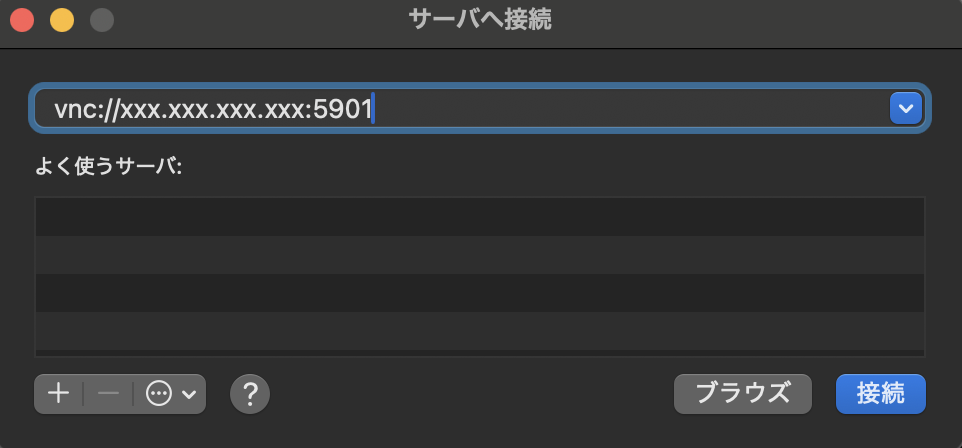
Finder - [サーバへ接続...] より、vnc:// kali linuxのIP:5901で接続する。
sshトンネルでmacOSからvnc接続
macOSでsshコマンドによるセッションを張る。
ssh -i /path/to/id_rsa -L 5901:localhost:5901 dev_user@kali linux IP
configファイルに保存しておくと ssh <hostname> でいける。
sudo vi ~/.ssh/config
Host <hostname>
  HostName <target ip>
  User <vncuser>
  Port 22
  IdentityFile /path/to/id_rsa
  LocalForward 5901 localhost:5901
Finder - [サーバへ接続...] より、vnc:// localhost:5901で接続する。
他の端末からvncに接続させる場合
0.0.0.0を5901の前に付与すればOK。
ssh -i path/to/id_rsa -L 0.0.0.0:5901:localhost:5901 dev_user@kali linux IP
ファイアウォールが有効であれば、5901を開ける。
これでトンネルを張った macOS(mac-Aとして)の 5901ポートが 同セグ内の他の端末からもアクセス可能になるので、 vnc://mac-AのIPアドレス:5901 でkali linuxのVNCに接続できる。