EBS のストレージ空き容量などは、デフォルトでは CloudWatch のメトリクスとして確認することができません。
collectd を使用することで、デフォルトで取得できていないメトリクスをカスタムメトリクスとして送信できるようになります。
以下、Amazon Linux2 への設定手順のメモとなります。
collectd のインストール
amazon-linux-extras を使用してインストール可能です。
デフォルト設定の状態で disk_used_percent と mem_used_percent が取得できるようになるので、このままでも良いでしょう。
他のメトリクスも取得したい場合は、ドキュメント参照してください。
collectd を使用してカスタムメトリクスを取得する
$ sudo amazon-linux-extras install -y collectd
$ sudo systemctl enable collectd.service
$ sudo systemctl start collectd.service
CloudWatch agent のインストール
CloudWatch agent をインストールした後、ウィザード起動して設定ファイルを作りましょう。
CloudWatch agent のインストール
$ sudo yum install -y amazon-cloudwatch-agent
ウィザードで設定ファイルを作成
$ sudo /opt/aws/amazon-cloudwatch-agent/bin/amazon-cloudwatch-agent-config-wizard
================================================================
= Welcome to the Amazon CloudWatch Agent Configuration Manager =
=                                                              =
= CloudWatch Agent allows you to collect metrics and logs from =
= your host and send them to CloudWatch. Additional CloudWatch =
= charges may apply.                                           =
================================================================
On which OS are you planning to use the agent?
1. linux
2. windows
3. darwin
default choice: [1]:
1
Trying to fetch the default region based on ec2 metadata...
Are you using EC2 or On-Premises hosts?
1. EC2
2. On-Premises
default choice: [1]:
1
Which user are you planning to run the agent?
1. root
2. cwagent
3. others
default choice: [1]:
1
Do you want to turn on StatsD daemon?
1. yes
2. no
default choice: [1]:
2
Do you want to monitor metrics from CollectD? WARNING: CollectD must be installed or the Agent will fail to start
1. yes
2. no
default choice: [1]:
1
Do you want to monitor any host metrics? e.g. CPU, memory, etc.
1. yes
2. no
default choice: [1]:
1
Do you want to monitor cpu metrics per core?
1. yes
2. no
default choice: [1]:
1
Do you want to add ec2 dimensions (ImageId, InstanceId, InstanceType, AutoScalingGroupName) into all of your metrics if the info is available?
1. yes
2. no
default choice: [1]:
1
Do you want to aggregate ec2 dimensions (InstanceId)?
1. yes
2. no
default choice: [1]:
1
Would you like to collect your metrics at high resolution (sub-minute resolution)? This enables sub-minute resolution for all metrics, but you can customize for specific metrics in the output json file.
1. 1s
2. 10s
3. 30s
4. 60s
default choice: [4]:
4
Which default metrics config do you want?
1. Basic
2. Standard
3. Advanced
4. None
default choice: [1]:
1
Current config as follows:
{
	"agent": {
		"metrics_collection_interval": 60,
		"run_as_user": "root"
	},
	"metrics": {
		"aggregation_dimensions": [
			[
				"InstanceId"
			]
		],
		"append_dimensions": {
			"AutoScalingGroupName": "${aws:AutoScalingGroupName}",
			"ImageId": "${aws:ImageId}",
			"InstanceId": "${aws:InstanceId}",
			"InstanceType": "${aws:InstanceType}"
		},
		"metrics_collected": {
			"collectd": {
				"metrics_aggregation_interval": 60
			},
			"disk": {
				"measurement": [
					"used_percent"
				],
				"metrics_collection_interval": 60,
				"resources": [
					"*"
				]
			},
			"mem": {
				"measurement": [
					"mem_used_percent"
				],
				"metrics_collection_interval": 60
			}
		}
	}
}
Are you satisfied with the above config? Note: it can be manually customized after the wizard completes to add additional items.
1. yes
2. no
default choice: [1]:
1
Do you have any existing CloudWatch Log Agent (http://docs.aws.amazon.com/AmazonCloudWatch/latest/logs/AgentReference.html) configuration file to import for migration?
1. yes
2. no
default choice: [2]:
2
Do you want to monitor any log files?
1. yes
2. no
default choice: [1]:
2
Saved config file to /opt/aws/amazon-cloudwatch-agent/bin/config.json successfully.
Current config as follows:
{
	"agent": {
		"metrics_collection_interval": 60,
		"run_as_user": "root"
	},
	"metrics": {
		"aggregation_dimensions": [
			[
				"InstanceId"
			]
		],
		"append_dimensions": {
			"AutoScalingGroupName": "${aws:AutoScalingGroupName}",
			"ImageId": "${aws:ImageId}",
			"InstanceId": "${aws:InstanceId}",
			"InstanceType": "${aws:InstanceType}"
		},
		"metrics_collected": {
			"collectd": {
				"metrics_aggregation_interval": 60
			},
			"disk": {
				"measurement": [
					"used_percent"
				],
				"metrics_collection_interval": 60,
				"resources": [
					"*"
				]
			},
			"mem": {
				"measurement": [
					"mem_used_percent"
				],
				"metrics_collection_interval": 60
			}
		}
	}
}
Please check the above content of the config.
The config file is also located at /opt/aws/amazon-cloudwatch-agent/bin/config.json.
Edit it manually if needed.
Do you want to store the config in the SSM parameter store?
1. yes
2. no
default choice: [1]:
2
Successfully put config to parameter store AmazonCloudWatch-linux.
Program exits now.
「Do you want to store the config in the SSM parameter store?」って設問で「1」を選択した場合、EC2 ロールを使って SSM parameter store に設定を保存してくれます。
SSM parameter store に保存する場合は EC2 Role に CloudWatchAgentAdminPolicy あたりをアタッチしておかないと権限不足で保存できないので注意してください。
複数の EC2 インスタンスに同じ設定をばら撒きたい場合、SSM parameter store を利用するのはとても便利ですが、今回はローカルに保存しましょう。
「2」を選択すれば、ウィザードで設定した内容が /opt/aws/amazon-cloudwatch-agent/bin/config.json に保存されます。
CloudWatch agent の開始
ウィザードで設定した内容を取り込んで諸々準備するには amazon-cloudwatch-agent-ctl コマンドを使います。
$ sudo /opt/aws/amazon-cloudwatch-agent/bin/amazon-cloudwatch-agent-ctl \
 -a fetch-config -m ec2  -s -c file:/opt/aws/amazon-cloudwatch-agent/bin/config.json
****** processing amazon-cloudwatch-agent ******
/opt/aws/amazon-cloudwatch-agent/bin/config-downloader --output-dir /opt/aws/amazon-cloudwatch-agent/etc/amazon-cloudwatch-agent.d --download-source file:/opt/aws/amazon-cloudwatch-agent/bin/config.json --mode ec2 --config /opt/aws/amazon-cloudwatch-agent/etc/common-config.toml --multi-config default
I! Trying to detect region from ec2
D! [EC2] Found active network interface
Successfully fetched the config and saved in /opt/aws/amazon-cloudwatch-agent/etc/amazon-cloudwatch-agent.d/file_config.json.tmp
Start configuration validation...
/opt/aws/amazon-cloudwatch-agent/bin/config-translator --input /opt/aws/amazon-cloudwatch-agent/etc/amazon-cloudwatch-agent.json --input-dir /opt/aws/amazon-cloudwatch-agent/etc/amazon-cloudwatch-agent.d --output /opt/aws/amazon-cloudwatch-agent/etc/amazon-cloudwatch-agent.toml --mode ec2 --config /opt/aws/amazon-cloudwatch-agent/etc/common-config.toml --multi-config default
2023/01/19 18:22:49 Reading json config file path: /opt/aws/amazon-cloudwatch-agent/etc/amazon-cloudwatch-agent.d/file_config.json.tmp ...
2023/01/19 18:22:49 I! Valid Json input schema.
I! Detecting run_as_user...
I! Trying to detect region from ec2
D! [EC2] Found active network interface
No csm configuration found.
No log configuration found.
Configuration validation first phase succeeded
/opt/aws/amazon-cloudwatch-agent/bin/amazon-cloudwatch-agent -schematest -config /opt/aws/amazon-cloudwatch-agent/etc/amazon-cloudwatch-agent.toml
Configuration validation second phase succeeded
Configuration validation succeeded
amazon-cloudwatch-agent has already been stopped
Created symlink from /etc/systemd/system/multi-user.target.wants/amazon-cloudwatch-agent.service to /etc/systemd/system/amazon-cloudwatch-agent.service.
Redirecting to /bin/systemctl restart amazon-cloudwatch-agent.service
今回、ウィザードで作成した config ファイル( config.json )は、/opt/aws/amazon-cloudwatch-agent/bin/config.json なので -c file:/opt/aws/amazon-cloudwatch-agent/bin/config.json としていますが、SSM parameter store に保存した場合は -c ssm:AmazonCloudWatch-linux のように指定します。
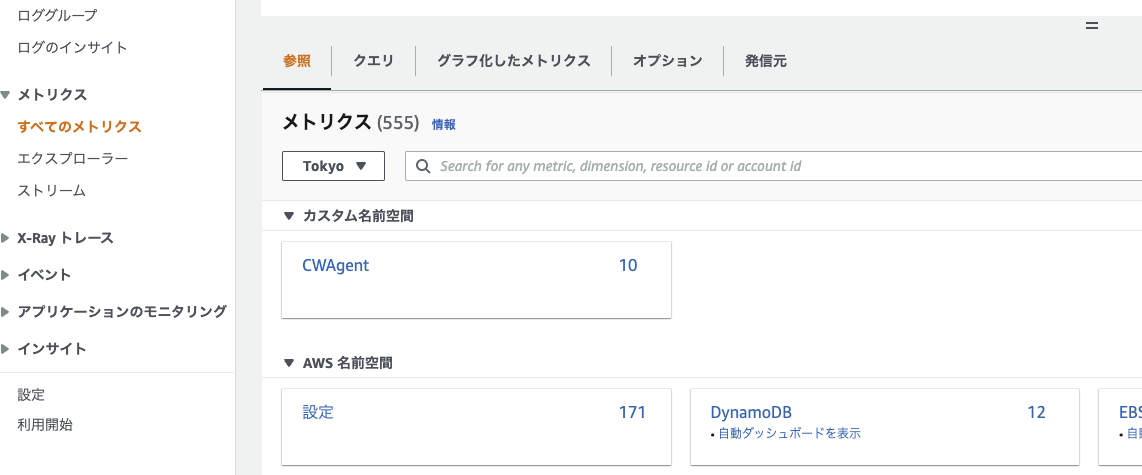
これで、しばらく待つと CloudWatch のカスタム名前空間に CWAgent って項目が追加されるはずです。
やったね、父ちゃん明日はホームランだ
