4GPiとは?
4GPi(フォージーパイ)は、メカトラックス社が開発したラズベリーパイ専用の4G(LTE)通信モジュールです。
以下サイトで4GPiの使用例を紹介しております。
・ メカトラックス社 公式サイト(受託開発・製造)
・ Stretch 版 4GPi のイメージから Buster へのアップグレード~4GPiを使うメリット~
必要な物
◎ NTTCom(NTTコミュニケーションズ)のリーダ「ACR1251CL-NTTCom」
◎ セルフパワー(電源アダプター付き)USBハブ
◎ ラズベリーパイ用4G(LTE)通信モジュール「4GPi」
◎ ACアダプタ(12V 2A)
◎ Raspberry Pi3 Model B+
◎ 標準SIM(私の場合は"NanoSIM" + "標準SIMへの変換アダプタ"で対応)
◎ パソコン
◎ MicroSDカード
◎ スマートカード(私の場合はSuica)
4GPiの取り付け手順・機器の画像・補足事項はStretch 版 4GPi のイメージから Buster へのアップグレード~必要な物~で紹介しておりますのでそちらを参照ください!
OSのダウンロード
4GPiインストール済のbuster版イメージをダウンロードします。
OSイメージをMicroSDカードへ書き込み
今回は有名な書き込みソフト「balenaEtcher」を使用しました。
書き込み手順はこちらのサイトを参照
パソコンからssh接続
ブラウザの表示をコピペしたいので、パソコンからssh接続します。
もちろんラズパイ直接入力でも問題ありません。
ssh接続のセットアップは過去の記事で記載したのでそちらを参照ください。
記事内の該当する章:下準備(Busterをラズパイにインストール)
ラズパイのパッケージを更新
sudo apt-get update
sudo apt-get upgrade
SIMカード情報を登録
| 項目 | Y!Moblieの場合 |
|---|---|
| APN | plus.acs.jp |
| ユーザー | ym |
| パスワード | ym |
Y!Moblieの場合は
sudo nmcli con add type gsm ifname "*" con-name ymobile apn plus.acs.jp user ym password ym
接続できているかifconfigコマンドで確認します。
ifconfig wwan0
inetにIPアドレスが表示されていれば正常に接続できています。
WiFiは以下のコマンドで接続を解除できます。
sudo ifconfig wlan0 down
ただし、この後の手順でダウンロードするファイルが複数あるので
全ての手順を終えてからWiFiを切断するのが望ましいです。
NTTコミュニケーションズのリーダ「ACR1251CL-NTTCom」のセットアップ
ACR1251CL-NTTComとは?
Amazon購入URL ➡ https://www.amazon.co.jp/gp/product/B01D0O90N0/ref=ppx_yo_dt_b_asin_image_o00_s00?ie=UTF8&psc=1
メーカ仕様URL ➡ https://www.ntt.com/business/services/application/authentication/jpki/download7.html
非接触型のICカードリーダライタです。
マイナンバーカード(個人番号カード)、MIFARE、FeliCa、運転免許証などを読み込むことができます。
ただし、決済機能はありません。
USBでラズパイと接続できるため、セットアップは大変簡単です。
消費電力は最大200mAです。(購入した本体箱に記載)
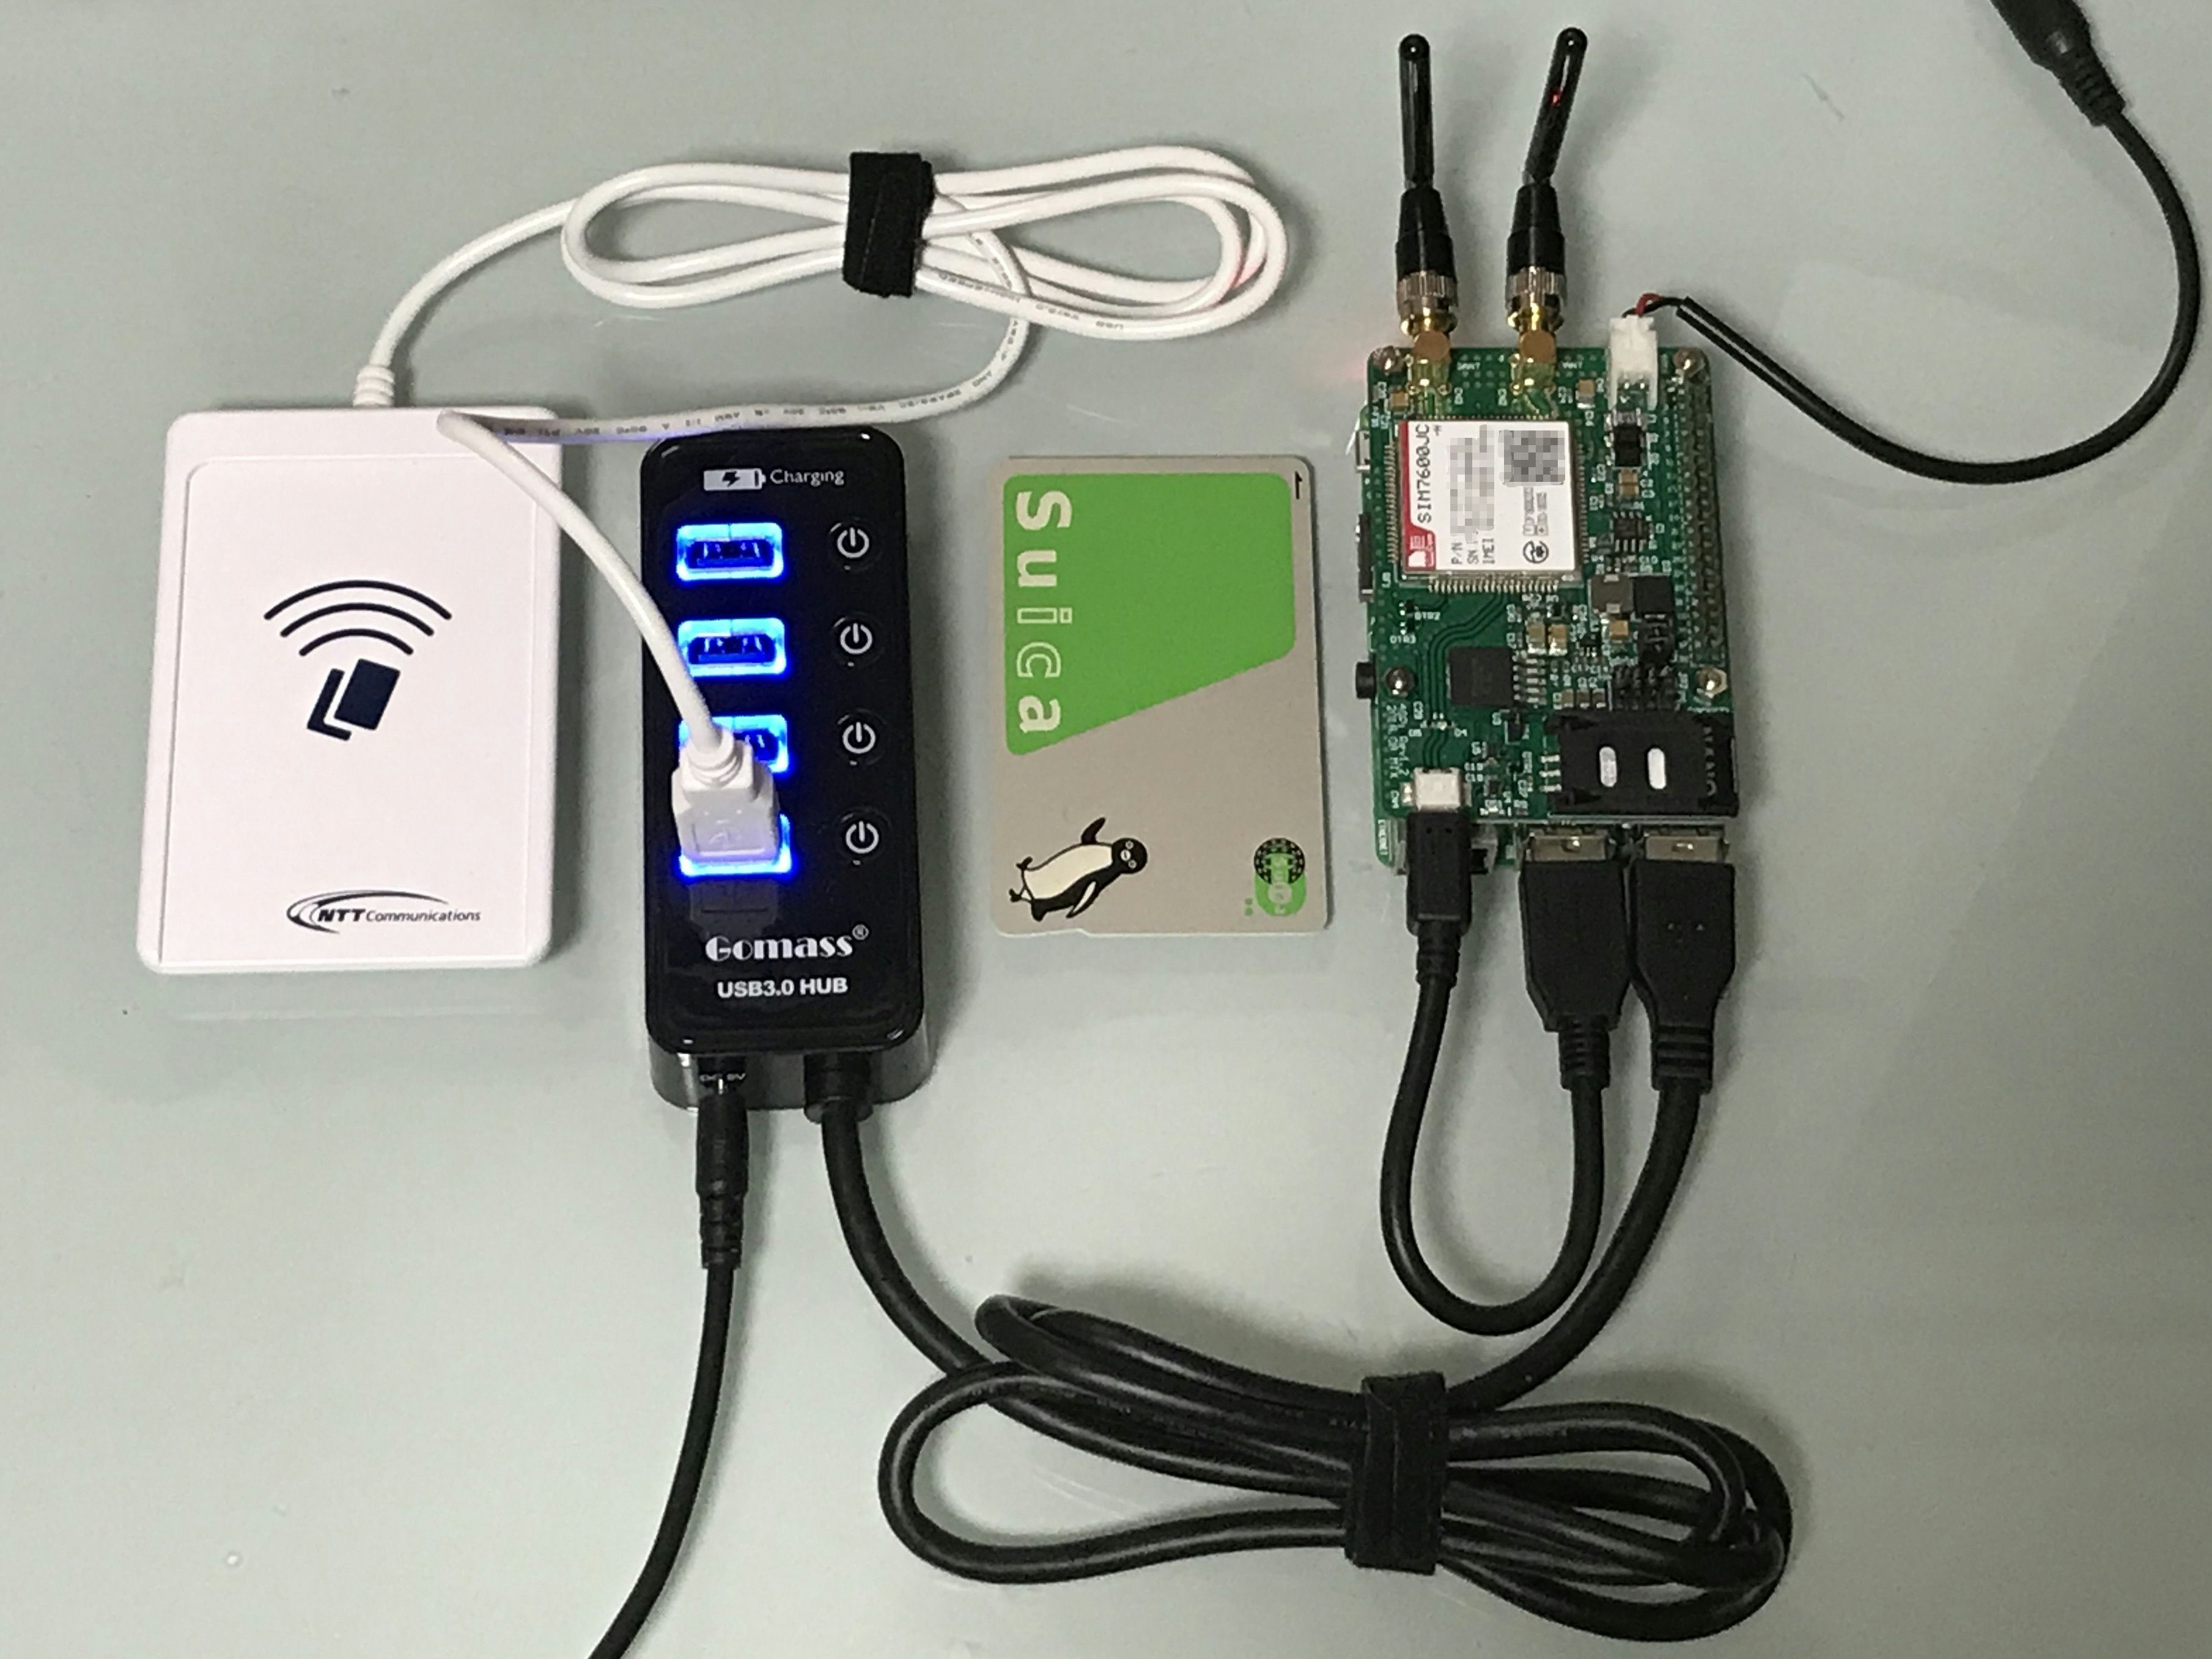
ACR1251CL-NTTComの取付
メーカの使用に記載されているようにセルフパワーのUSBハブを使用します。
セルフパワーは無くても動作確認できましたが、200mAの消費電力を考えると
セルフパワーはつけておいたほうが無難です。
取付後の写真を添付します。
スマートカードリーダのライブラリ(pyscard)のインストール
pyscardはPC/SCをpython用にラッパーしたライブラリです。
PC/SCは、WindowsでNFCなどのICカードを利用するためのインターフェース仕様です。
pythonは2系、3系どちらもサポートしていますが
後々の運用を考慮してpython3でプログラムを構築します。
※python2は2020年1月1日にサポート終了予定です。
pyscardおよび必要なライブラリをインストールします。
sudo apt install python3-pyscard pcscd libacsccid1
スマートカードの検知プログラムの作成
python3を使用してスマートカードの検知プログラムを作成します。
まずは好きな名前の空ファイルを作成します。
vi getSmartCardDataTest.py
pyscardのリファレンスを参考にプログラムを作成します。
# -*- coding: utf-8 -*-
# pyscardのライブラリのインポート
from smartcard.CardMonitoring import CardMonitor, CardObserver
from smartcard.util import toHexString

# sleepのインポート
from time import sleep

# スマートカードリーダの監視クラス
class PrintObserver(CardObserver):
    #スマートカードを検知すると呼び出される関数
    def update(self, observable, actions):
        (addedcards, removedcards) = actions
        for card in addedcards:
            print("+Inserted: ", toHexString(card.atr))
        for card in removedcards:
            print("-Removed: ", toHexString(card.atr))

if __name__ == '__main__':
    print("Please put smartcard on reader.")
    #「Ctrl + C」で強制終了した際にオブジェクトを削除
    try:
            #監視クラスの初期化
            cardmonitor = CardMonitor()
            cardobserver = PrintObserver()
            cardmonitor.addObserver(cardobserver)
            #プログラムを無限ループ
            while True:
                sleep(10)

    except KeyboardInterrupt:
         #オブジェクト削除
        cardmonitor.deleteObserver(cardobserver)
作成したプログラムを実行します。
python3 getSmartCardDataTest.py
スマートカードをリーダに近づけて以下のようなメッセージが出てくれば成功です。
+Inserted:  3B 8F 80 01 80 4F 0C A0 00 00 03 06 11 00 3B 00 00 00 00 42
-Removed:  3B 8F 80 01 80 4F 0C A0 00 00 03 06 11 00 3B 00 00 00 00 42
"3B 8F 80 01 80 4F 0C A0 00 00 03 06 11 00 3B 00 00 00 00 42"と
記載された文字列がカードのIDとなります。
終了する際は「Ctrl + C」でプログラムを強制終了します。
Azure Table Storageの操作
Azure Table Storageとは?
Azure Table Storageとは、NoSQLの構造化データをクラウド内に格納するマネージドサービスです。
大規模な半構造化データセットを使用して迅速な開発を行うための
NoSQLキーバリューストアサービスです。
AzureにはCOSMOS DBというデータストレージもありますが、
今回は比較的安価なAzure Table Storageを使用します。
Azureアカウントの作成
Azureの公式ページからアカウントを作成します。
初回は1年間の無料期間があります。
Azure CLIの使い方
Azure CLI(Azure コマンドライン インターフェイス)をインストールすると
ターミナルからAzure上のリソースの作成や管理ができます。
Azure CLIのインストール
Azure CLIの公式ページを参考にインストールを進めていきます。
まずはAzure CLIに必要なライブラリをインストールします。
sudo apt-get install libffi-dev python-dev libssl-dev
Azure CLIをインストールします。
sudo curl -L https://aka.ms/InstallAzureCli | bash
上記のコマンドの実行中に以下のように保存ディレクトリを入力を促すメッセージが出力されます。
保存ディレクトリがデフォルトでよい場合はそのままEnterを押します。("Y/n"は"Y"を選択)
In what directory would you like to place the install? (leave blank to use '/home/pi/lib/azure-cli'):
In what directory would you like to place the 'az' executable? (leave blank to use '/home/pi/bin'):
Modify profile to update your $PATH and enable shell/tab completion now? (Y/n):
Enter a path to an rc file to update (leave blank to use '/home/pi/.bashrc'):
インストールが正常に完了したらシェルを再起動します。
exec -l $SHELL
以上で、Azure CLIのインストールが完了です。
補足ですがAzure CLIインストールの際、以下メッセージのようなメッセージが出る場合があります。
/usr/bin/az: line 2: /opt/az/bin/python3: cannot execute binary file: Exec format error
SSL認証ができていない場合に生じる可能性があるエラーです。
以下の例のように現在時刻を合わせます。
sudo date -s "26 October 2019 20:53:00"
Azureのログイン
Azureにログインします。
az login
ターミナル上にメッセージが出力されます。
To sign in, use a web browser to open the page https://microsoft.com/devicelogin and enter the code [認証コード] to authenticate.
https://microsoft.com/deviceloginにアクセスし、[認証コード]を入力すると
ターミナル上にメッセージが出力されます。
[
  {
    "cloudName": "AzureCloud",
    "id": "[id名]",
    "isDefault": true,
    "name": "?????",
    "state": "Enabled",
    "tenantId": "[tenantId名]",
    "user": {
      "name": "[アカウント名]",
      "type": "user"
    }
  },
  {
    "cloudName": "AzureCloud",
    "id": "[id名]",
    "isDefault": false,
    "name": "Microsoft Azure Sponsorship",
    "state": "Enabled",
    "tenantId": "[tenantId名]",
    "user": {
      "name": "[アカウント名]",
      "type": "user"
    }
  }
]
以上でAzureのログインが完了です。
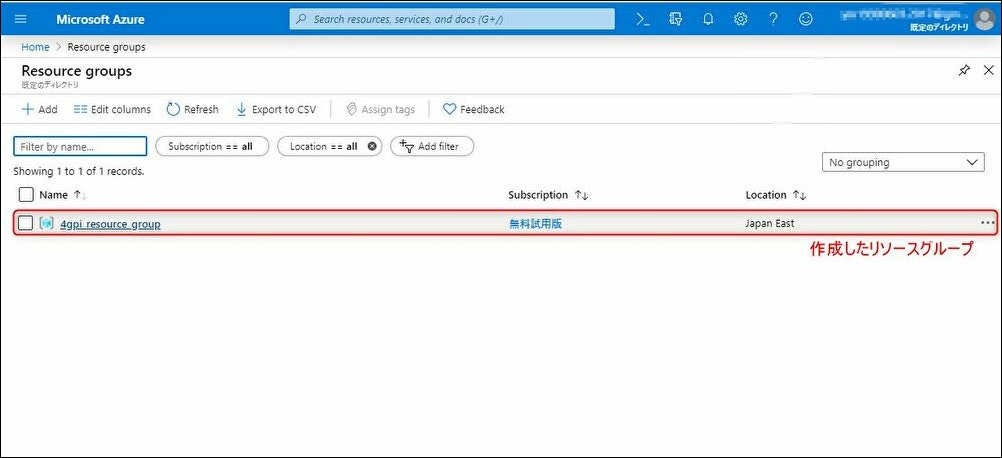
リソースグループの作成
Azure CLIのコマンドでリソースグループを作成します。
az group create -l japaneast -n 4gpi_resource_group
<オプションの説明>
-l = locationの略。住んでいる地域を入力します。("japaneast"もしくは"japanwest")
-n = nameの略。お好きなリソースグループ名を入力します。
成功するとAzure Portal上にResource Groupが追加されます。
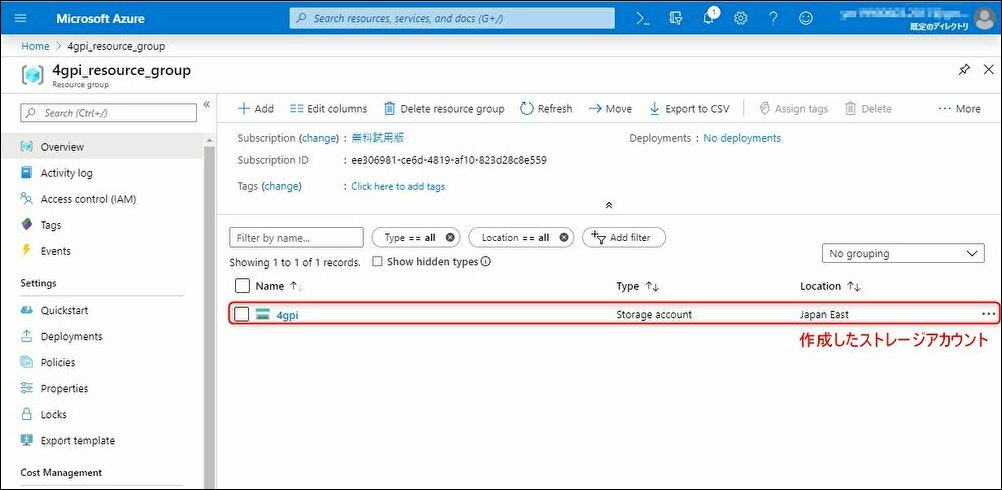
ストレージアカウントの作成
Azure CLIのコマンドでストレージアカウントを作成します。
az storage account create \
    -n 4gpi \
    -g 4gpi_resource_group \
    -l japaneast \
    --kind StorageV2 \
    --sku Standard_LRS
<オプションの説明>
-n = nameの略。お好きなストレージ名を入力します。
-g = "az group create"で作成したリソースグループ名を入力します。
-l = locationの略。住んでいる地域を入力します。("japaneast"もしくは"japanwest")
--kind = ストレージの種類を選択します。StorageV2にします。
--sku = レプリケーション方式。以下の項目から選択できます。今回は低コストのStandard_LRSを使用します。
Premium_LRS, Premium_ZRS, Standard_GRS, Standard_GZRS, Standard_LRS, Standard_RAGRS, Standard_RAGZRS, Standard_ZRS
レプリケーション方式別の料金 参考:https://azure.microsoft.com/ja-jp/pricing/calculator/
レプリケーション方式別の説明 参考:http://chuu-information.com/cloud/post-122/
成功すると先ほど作成したAzure Portal上のResource Group内にStorage Accountが追加されます。
ストレージアカウントのキーを確認
Azure Table Storageをプログラム上で使用する際にストレージアカウントとキーが必要になります。
Azure CLIのコマンドでキーを確認します。
az storage account keys list \
    -n 4gpi\
    -g 4gpi_resource_group\
    --output table
<オプションの説明>
-n = account nameの略。ストレージのアカウント名を入力します。
-g = "az group create"で作成したリソースグループ名を入力します。
--output table = 表形式でcmdに出力します。
キーは以下のように出力されます。
KeyName    Permissions    Value
---------  -------------  -----------------
key1       Full           [key1名]
key2       Full           [key2名]
本記事では[key1名]を使用します。(key2でも構いません。)
AzureTableStorageの使い方
Azureライブラリのインストール
pipをインストールします。
sudo apt-get install python3-pip
Azureのライブラリのインストールします。
pip3 install azure
pip3 install azure-cosmosdb-table
Table生成プログラムの作成
作業用ディレクトリ(任意のフォルダ)を作成します。
mkdir smartcard
cd smartcard/
好きな名前の空ファイルを作成します。
vi createtable.py
続いてTable APIのリファレンスを参考にプログラムを作成します。
# -*- coding: utf-8 -*-
# Azureのライブラリのインポート
from azure.cosmosdb.table.tableservice import TableService

# Tableの読み込み
ACCOUNT_KEY = "[key1名]"
table_service = TableService(account_name="4gpi", account_key=ACCOUNT_KEY)

# Tableの登録
table_service.create_table('accesslog')
table_service.create_table('idlist')

print("Make Tables Completed.")
[key1名]はストレージアカウントのキーを確認の[key1名]の値に書き替えます。
python3で実行します。
python3 createtable.py
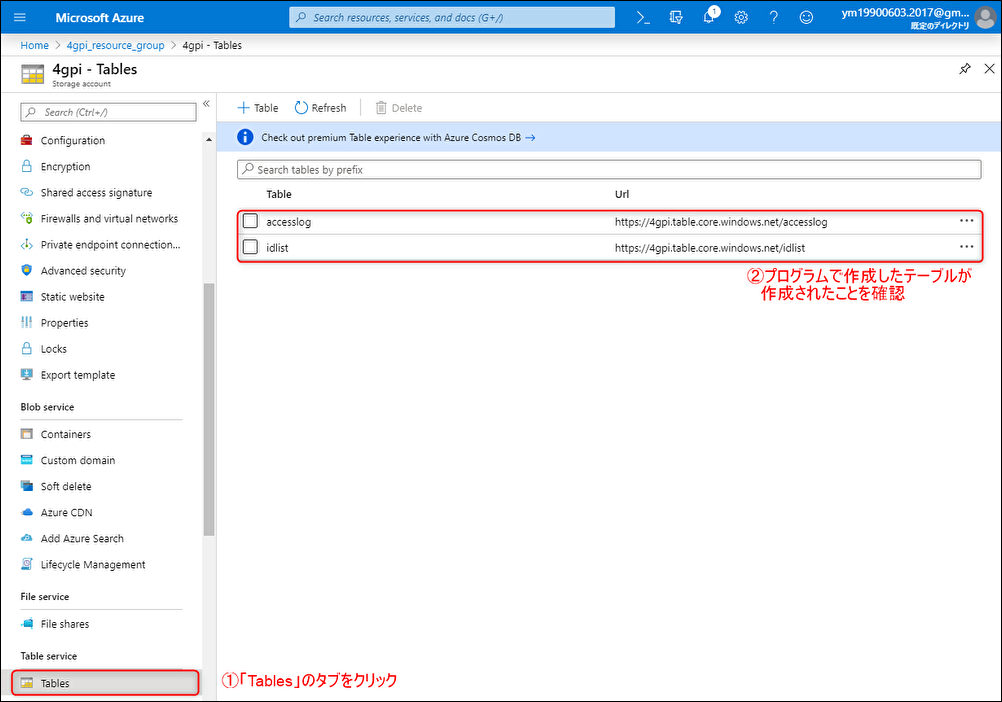
成功するとAzure Portal上にTableが追加されます。
Tableにデータ登録するプログラムの作成
スマートカードをこの後に連携を考えたプログラムのサンプルを作成します。
まずは好きな名前の空ファイルを作成します。
vi resistAccountTest.py
続いてTable APIのリファレンスを参考にプログラムを作成します。
# -*- coding: utf-8 -*-
# Azureのライブラリのインポート
from azure.cosmosdb.table.tableservice import TableService
from azure.cosmosdb.table.models import Entity
print("Search ids table from azure storage table.")

# Tableの読み込み
ACCOUNT_KEY= "[key1名]"
table_service = TableService(account_name="4gpi", account_key=ACCOUNT_KEY)

# 指定したTable(idlist)から指定したキー(PartitionKey,RowKey)を読み込み
id_table= table_service.query_entities('idlist', '', 'PartitionKey,RowKey') #query_entities('テーブル名','','レコード指定')

card_id  ="xyz"
is_update = True
new_id = 0

# カードIDがすでにアカウント登録されているかのチェック
if card_id in [ tbl.RowKey for tbl in id_table]:
    print("Exist Card ID")
    is_update = True if "Y" == input("Do you update?[Y or N]: ") else False

# 登録されていない、もしくはターミナルで"Y"以外を入力した場合のカードのアカウント登録
if is_update:
    lastname = input("Please Enter Last Name: ")
    firstname = input("Please Enter First Name: ")

    #登録したカードをPartitionKeyの降順に並び替え
    sorted_id_table = sorted(id_table, reverse=True, key=lambda tbl: tbl.PartitionKey)

    #PartitionKeyの最大値に1を加えたにPartitionKeyに新しくアカウント登録
    new_id = int(sorted_id_table[0].PartitionKey) + 1 if sorted_id_table else 1
    new_id_str = '{0:06d}'.format(new_id )

    #AzureにTable Data登録用にEntityを作成
    ent = Entity()

    #保存するキーを「.[key名]」で格納
    ent.PartitionKey = new_id_str
    ent.RowKey = card_id
    ent.LastName = lastname
    ent.FirstName = firstname

    #Entityを指定したTable(idlist)に保存
    table_service.insert_entity('idlist', ent )
print("Completed!")
python3で実行します。
python3 resistAccountTest.py
アカウント名をターミナル上で入力する仕様にしているので
任意の名称を入力してEnterを押してください。
Search ids table from azure storage table.
Please Enter Last Name: yamada
Please Enter First Name: taro
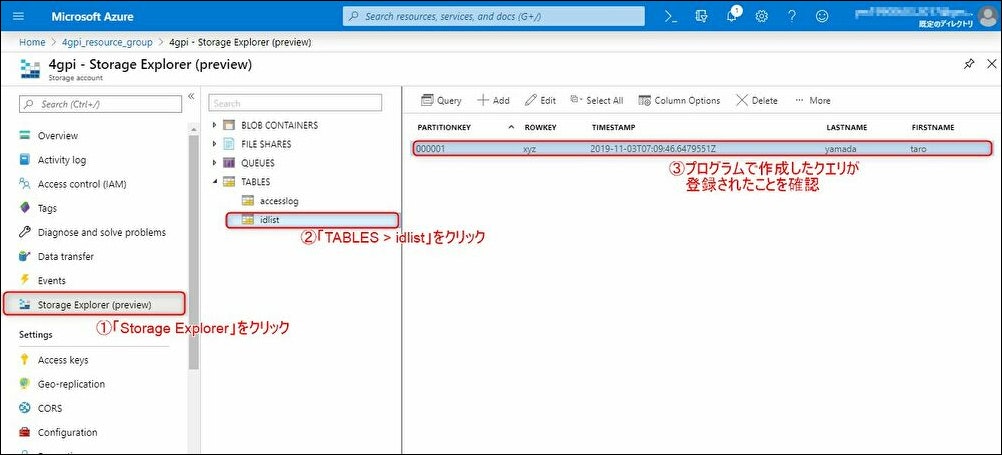
Completed!
AzurePortal上でデータを確認します。
アカウント登録プログラムの作成
スマートカードにひもづいたアカウント登録プログラムを作成します。
まずは好きな名前の空ファイルを作成します。
vi resistAccount.py
今までのプログラムを結合します。
# -*- coding: utf-8 -*-
# pyscardのライブラリのインポート
from smartcard.CardMonitoring import CardMonitor, CardObserver
from smartcard.util import toHexString

# sleepのインポート
from time import sleep

# Azureのライブラリのインポート
from azure.cosmosdb.table.tableservice import TableService
from azure.cosmosdb.table.models import Entity

# Tableの読み込み
ACCOUNT_KEY = "[key1名]"
table_service = TableService(account_name="4gpi", account_key=ACCOUNT_KEY)

# 指定したTable(idlist)から指定したキー(PartitionKey,RowKey)を読み込み
id_table= table_service.query_entities('idlist', '', 'PartitionKey,RowKey') #query_entities('テーブル名','','レコード指定')

# スマートカードリーダの監視クラス
class PrintObserver(CardObserver):
    #スマートカードを検知すると呼び出される関数
    def update(self, observable, actions):
        (addedcards, removedcards) = actions
        for card in addedcards:
            print("+Inserted: ", toHexString(card.atr))

            #カードIDを16進数に変換
            card_id = toHexString(card.atr)

            #指定したTable(idlist)から指定したキー(PartitionKey,RowKey)を読み込み
            id_table= table_service.query_entities('idlist', '', 'PartitionKey,RowKey') #query_entities('テーブル名','','レコード指定')
            is_update = True
            new_id = 0

            #カードIDがすでにアカウント登録されているかのチェック
            if card_id in [ tbl.RowKey for tbl in id_table]:
                print("Exist Card ID")
                is_update = True if "Y" == input("Do you update?[Y or N]: ") else False

            #登録されていない、もしくはターミナルで"Y"以外を入力した場合のカードのアカウント登録
            if is_update:
                lastname = input("Please Enter Last Name: ")
                firstname = input("Please Enter First Name: ")

                #登録したカードをPartitionKeyの降順に並び替え
                sorted_id_table = sorted(id_table, reverse=True, key=lambda tbl: tbl.PartitionKey)

                #PartitionKeyの最大値に1を加えたにPartitionKeyに新しくアカウント登録
                new_id = int(sorted_id_table[0].PartitionKey) + 1 if sorted_id_table else 1
                new_id_str = '{0:06d}'.format(new_id )

                #AzureにTable Data登録用にEntityを作成
                ent = Entity()

                #保存するキーを「.[key名]」で格納
                ent.PartitionKey = new_id_str
                ent.RowKey = card_id
                ent.LastName = lastname
                ent.FirstName = firstname

                #Entityを指定したTable(idlist)に保存
                table_service.insert_entity('idlist', ent )
            print("Completed!")

if __name__ == '__main__':
    print("Search ids table from azure storage table.")
    print("Please put smartcard on reader.")

    #「Ctrl + C」で強制終了した際にオブジェクトを削除
    try:
        #監視クラスの初期化
        cardmonitor = CardMonitor()
        cardobserver = PrintObserver()
        cardmonitor.addObserver(cardobserver)

        #プログラムを無限ループ
        while True:
            sleep(10)
    except KeyboardInterrupt:
        #オブジェクト削除
        cardmonitor.deleteObserver(cardobserver)
python3で実行します。
python3 resistAccount.py
Azureの読み込みとスマートカードリーダの準備できたらメッセージが出力されます。
Search ids table from azure storage table.
Please put smartcard on reader.
スマートカードをかざすとカード番号と名前を入力するメッセージが出力されます。
+Inserted: 3B 8F 80 01 80 4F 0C A0 00 00 03 06 11 00 3B 00 00 00 00 42
Please Enter Last Name: suzuki
Please Enter First Name: ichiro
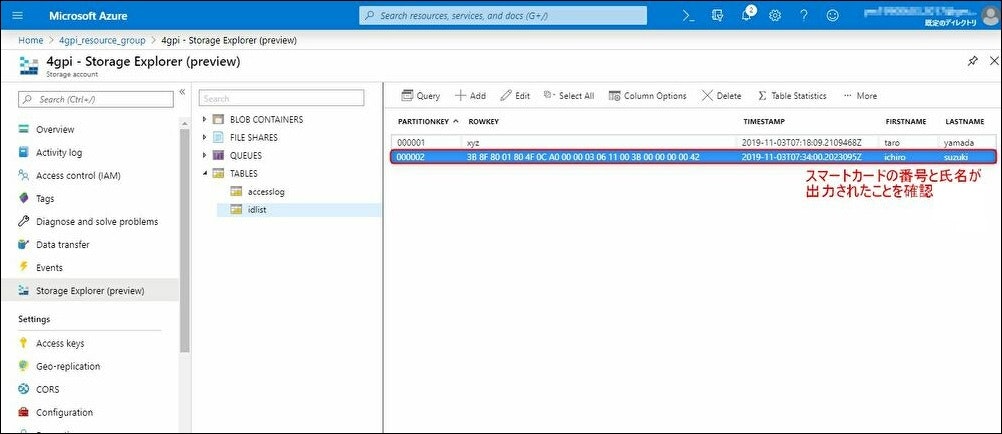
Completed!
「Ctrl + C」でプログラムを終了し、AzurePortal上でデータを確認します。
出退勤管理プログラムの作成
スマートカードで出退勤を管理するプログラムを作成します。
カードを一度かざすと出勤し、同じ日にもう一度かざすと退勤する仕様でプログラムを作成します。
まずは好きな名前の空ファイルを作成します。
以下のようにプログラムを作成します。
vi recordWorkTime.py
スマートカードを読み取るとAzure Table Storage上に
出退勤を記録するプログラムを記載します。
(同日内で1回目のリーダ読み取りを出勤、2回目のリーダ読み取りを退勤としています)
# -*- coding: utf-8 -*-
# pyscardのライブラリのインポート
from smartcard.CardMonitoring import CardMonitor, CardObserver
from smartcard.util import toHexString

# sleepのインポート
from time import sleep

# Azureのライブラリのインポート
from azure.cosmosdb.table.tableservice import TableService
from azure.cosmosdb.table.models import Entity

# 日付のライブラリのインポート
import datetime

# Tableの読み込み
ACCOUNT_KEY = "[key1名]"
table_service = TableService(account_name="4gpi", account_key=ACCOUNT_KEY )

# 指定したTable(accesslog)から指定したキー(PartitionKey,RowKey)を読み込み
id_table= table_service.query_entities("accesslog", ""''"", "PartitionKey,RowKey") #query_entities('テーブル名','','レコード指定')

# スマートカードリーダの監視クラス
class PrintObserver(CardObserver):
    #スマートカードを検知すると呼び出される関数
    def update(self, observable, actions):
        (addedcards, removedcards) = actions
        for card in addedcards:
            print("+Inserted: ", toHexString(card.atr))

            #カードIDを16進数に変換
            card_id = toHexString(card.atr)

            #指定したTable(idlist)から指定したキー(PartitionKey,RowKey)を読み込み
            todayDate = datetime.date.today().isoformat()

            #AzureにTable Data登録用にEntityを作成
            ent = Entity()

            #保存するキーを「.[key名]」で格納
            ent.PartitionKey = datetime.date.today().isoformat()
            ent.RowKey = card_id

            #指定したTable(accesslog)から指定したキー(PartitionKeyが今日の日付 かつ RowKeyが一致)を読み込み
            id_table_obj= table_service.query_entities("accesslog", filter="PartitionKey eq '"+todayDate+"' and RowKey eq '"+card_id+"'") #query_entities('テーブル名','','レコード指定',filter = キーのフィルタ)
            tbls = [tbl for tbl in id_table_obj]

            if tbls:
                #既に同一のカードが2回以上、リーダで読み込んでいた場合、処理しない
                if hasattr(tbls[0], "Finish"):
                    print("Already Finished!")
                #既に同一のカードが1回だけリーダで読み込んでいた場合、退勤処理
                else:
                    #現在時刻を退勤時刻として格納
                    ent.Finish = datetime.datetime.now(tz=datetime.timezone.utc)
                    ent.Begin = tbls[0].Begin

                    #勤怠時間の登録
                    t_delta = ent.Finish - ent.Begin
                    ent.WorkTime= int(t_delta.total_seconds()//60)

                    #Entityを指定したTable(accesslog)に保存
                    table_service.update_entity("accesslog", ent )
                    print("Finish Completed!")

            #クエリの登録がない場合、出勤処理
            else:
                #現在時刻を出勤時刻として格納
                ent.Begin = datetime.datetime.now(tz=datetime.timezone.utc)

                #Entityを指定したTable(accesslog)に保存
                table_service.insert_entity("accesslog", ent )
                print("Begin Completed!")
            print("Ready to read SmartCard...")

if __name__ == '__main__':
    print("Search ids table from azure storage table.")
    print("Ready to read SmartCard...")

    #「Ctrl + C」で強制終了した際にオブジェクトを削除
    try:
        #監視クラスの初期化
        cardmonitor = CardMonitor()
        cardobserver = PrintObserver()
        cardmonitor.addObserver(cardobserver)

        #プログラムを無限ループ
        while True:
            sleep(10)

    except KeyboardInterrupt:
        #オブジェクト削除
        cardmonitor.deleteObserver(cardobserver)
python3で実行します。
python3 recordWorkTime.py
Azureの読み込みとスマートカードリーダの準備完了したらメッセージが出力されます。
Search ids table from azure storage table.
Ready to read SmartCard...
スマートカードをかざすと「Begin Completed!」と出力され、
出勤時刻やIDをAzure Table Storageに登録します。
Search ids table from azure storage table.
Ready to read SmartCard...
+Inserted:  3B F5 91 00 FF 91 81 71 FE 40 00 42 00 01 91 A1 37
Begin Completed!
Ready to read SmartCard...
もう一度、スマートカードをかざすと「Finish Completed!」と出力され、
退勤時刻,ID,勤務時間をAzure Table Storageに登録します。
+Inserted: 3B F5 91 00 FF 91 81 71 FE 40 00 42 00 01 91 A1 37
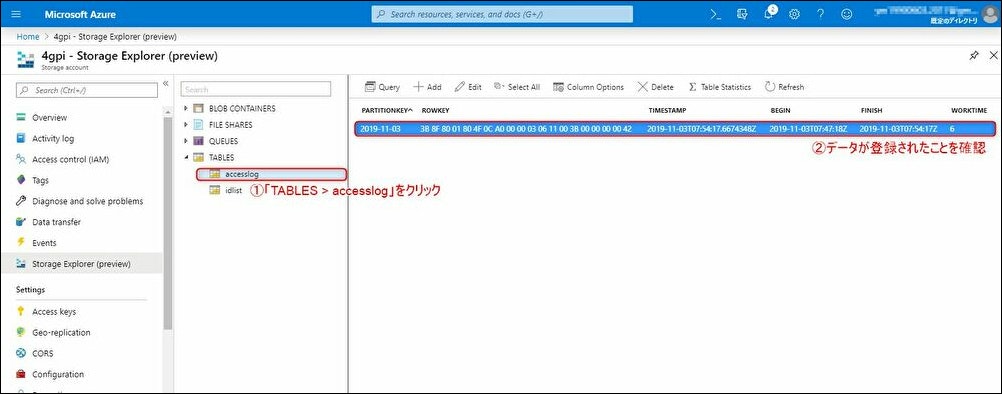
Finish Completed!
「Ctrl + C」でプログラムを終了し、AzurePortal上でデータを確認します。
以上でAzure Table Storageへのデータ保存は完了です。
まとめ
今回はAzure Table Storageとスマートカードリーダ(ACR1251CL-NTTCom)の基本的な使い方を紹介しました。
ACR1251CL-NTTComやAzure Table Storageはまだ実施したドキュメントが少ないのが現状です。
ACR1251CL-NTTComのドライバはダウンロード時にREADMEが添付されており、
Azure Table Storageは公式サイトのドキュメントがあるのでしっかりと読み込むとスムーズに進められると思います。
次回はAzure Table StorageとPower BIを連携しますので是非そちらもご覧ください!