この記事はUiPathブログ発信チャレンジ2025サマーの30日目の記事です。
「MCPって何?」――AIや自動化のトレンドを追う中で、そう感じている方も多いのではないでしょうか。
MCP(Model Context Protocol) とは、一言でいえば 「AI同士を連携させるための共通ルール」 です。これからのAIの進化、そしてUiPathが目指す 「エージェンティックオートメーション」 にとって、非常に重要なコンセプトです。
この新シリーズ「UiPathのMCP」では、AIと自動化の未来を語る上で欠かせないこのMCPについて、深く掘り下げていきます。本シリーズは以下の構成の予定です。
- 準備編 ① すべてのAIを繋ぐ「MCP」とは?(本記事)
- 準備編 ② MCPクライアントとLLMの通信解析
- 準備編 ③ MCPを使う利点と弱点の整理
- 活用編 ① UiPathのMCPへの取り組みと強み
- 活用編 ② 実際のユースケースから見るMCPの活用例
AI連携の共通基盤として注目されつつあるMCPの全体像を、このシリーズを通じてわかりやすく解説していきます。
ご注意
本シリーズの準備編の内容は、直接UiPath製品に関わるものではありません。
しかし、UiPathのMCP Serverを効果的に活用するためには、この準備編で取り上げる基礎知識が重要です。
MCP Serverの性能を最大限に引き出す方法や、その限界の理解、さらにセキュリティ上の注意点について理解を深めることで、より安全かつ効率的に活用できるようになります。
本記事の概要
実際に自分で作ってみることで理解が格段に深まるため、本記事では以下の図を中心に、MCP クライアントとMCP サーバー間のやり取りのログデータを分析し、MCPの詳細を深掘りしていきます。

MCPにおいて、MCPクライアント(Client)はMCPホスト(Host)の内部に存在するコンポーネントです。本記事では説明を簡略化するために、MCPクライアントとMCPホスト間の通信を省略し、MCPクライアントが外部(MCPサーバー、LLMサーバー、およびユーザー)との窓口となるものとします。
ログ分析のシナリオ
MCP公式サイトの実例を参考に、MCPサーバーとMCPクライアント間のデータのやり取りを分析します。
詳細な流れは以下の通りです。

この記事の通りに実装すれば、MCPの役割をよりよく理解できるようになります。 ご参考までに、本記事で使用したソースコードはこちらです。
使用するツール一覧
| ツール名 | 役割説明 |
|---|---|
| Visual Studio+Cline (MCP クライアント) | MCP ホストの内部に存在し、外部のMCP サーバーと通信するための「窓口」や「通訳」の役割を担います。MCP ホストからの指示を受け、MCPのルールに従ってMCP サーバーにリクエストを送り、結果をホストに返します。 |
| Python 環境 (MCP サーバー) | MCP クライアントからの要求に応じて、特定の機能やデータを提供するように、Model Context Protocolの仕様に準拠して作られたPythonプログラムのことです。 |
| OpenRouterでのDeepseek (LLM サーバー) | MCP ホストやMCP クライアントからプロンプト(指示文)を受け取り、Deepseek言語モデルがそれを解釈・処理し、生成したテキスト(応答)を返す役割を担います。 |
事前準備
Visual Studio と Clineのインストール
MCPサーバーの構築を始める前に、まずMCP ホストを構築する必要があります。現在、主なMCP ホストにはCursor、Cline、Claudeなどがあります。
ここでは、構築するMCP ホストとしてClineを選択します。
Clineは、VSCode専用に設計されたAIプログラミングアシスタントのプラグインです。VSCodeの拡張機能マーケットプレイスからインストールし、VSCode環境内で実行する必要があります。ClineはVSCodeのAPIを利用して、ファイル管理、ターミナル操作、コード編集といった機能を実現しています。
そのため、Clineクライアントを構築するには、まずVSCodeをインストールしなければなりません。
以下のサイトよりVS Code(Windows版)をダウンロードし、インストールします。
次は、インストールしたVS Codeを開いて、拡張機能画面より[Cline]をインストールします。

LLM サーバー利用のためOpenRouterの登録
ClineからLLM サーバーを利用するためには、LLM サーバーのAPIキーが必要です。
Clineでは、ChatGPT、Gemini、Deepseekなど、さまざまなLLM サーバーを利用することができます。どれでも問題ありませんが、今回は OpenRouter の APIキー を利用します。
OpenRouterを経由することで、さまざまなLLM サーバーを使用することができ、無料で使えるモデルもあるため、今回の動作確認には最適です。
以下のサイトからアカウントを登録してください。
次は、API Keyを発行します。
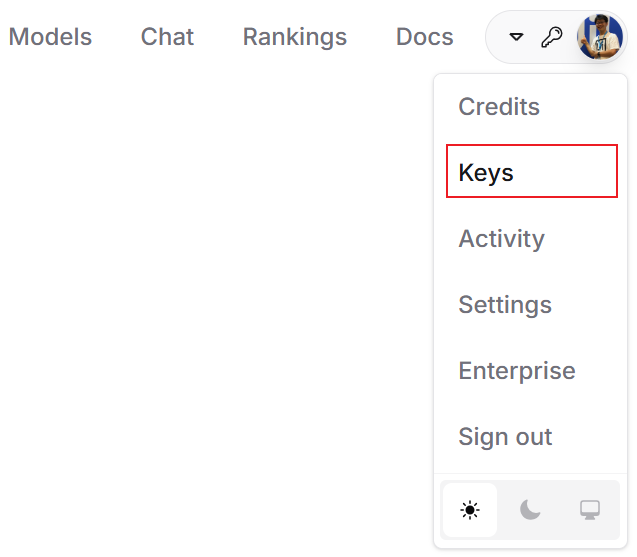
発行したAPI Keyをメモします。
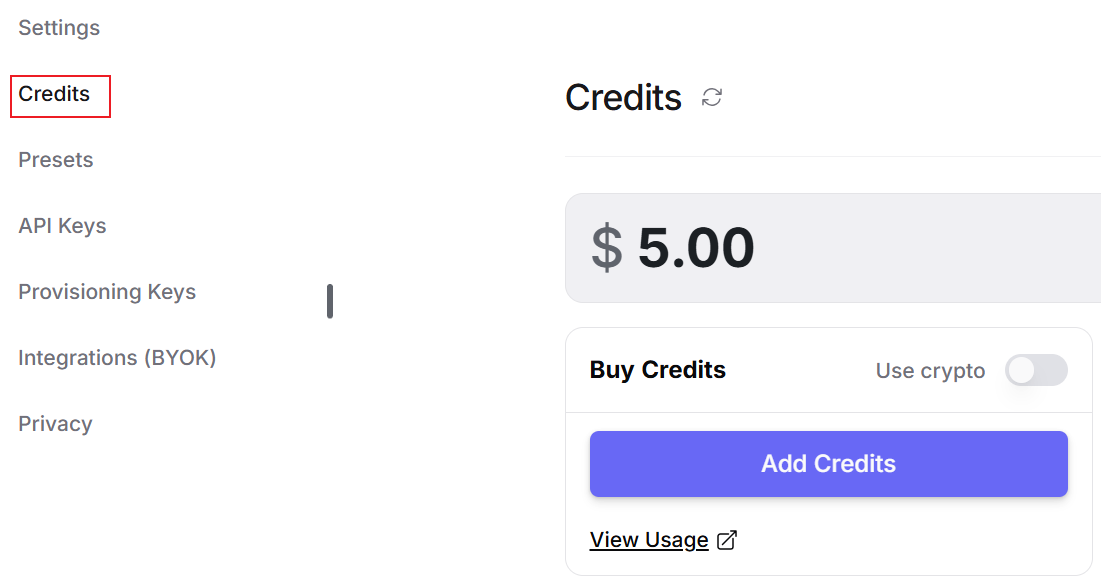
有料版のLLM サーバーを利用する場合は、Credits画面よりCreditsを注文してください。
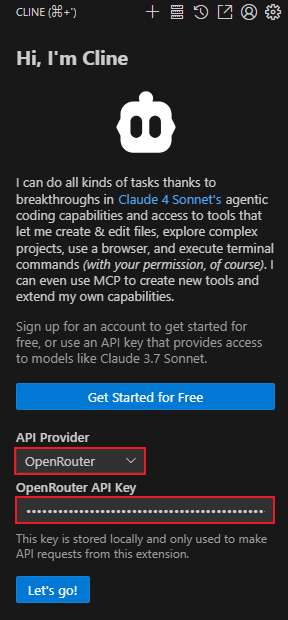
ClineにAPI Keyの設定
先ほどメモしたOpenRouterでのAPI Keyを以下の欄に貼り付けます。
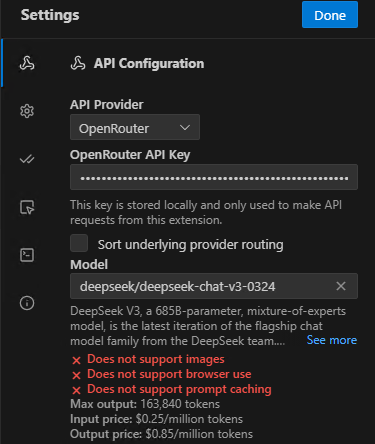
次に、利用するモデルを選択します。
Deepseek の方がコストが低いため、[deepseek-chat-v3-0324] を利用します。
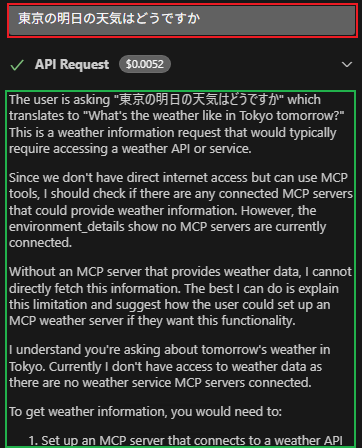
設定が完了したら、まずは挨拶してみます。[東京の明日の天気はどうですか]を質問すると、以下のようにClineから回答を得られたことで、LLMとの接続が完了しました。
Python 環境のインストール
Clineからの回答を確認したところ、以下のようなMCPに関する記述がありました(英語→日本語に翻訳)。
LLMだけでは現時点の天気情報を取得できないため、MCPサーバーの設定が必要だと案内されました。
...
現在、私は天気データにアクセスできません。
天気サービスMCPサーバーが接続されていないためです。

天気情報を取得するには、次の手順が必要です:
OpenWeatherMapなどの天気APIに接続するMCPサーバーを設定する
それをこのセッションに接続する
...
MCP サーバーは色々なプログラミング言語で作れますが、今回は Python を使います。
以下のサイトからダウンロードし、インストールしてください。
インストール後、コマンドプロンプトで Python のバージョンが確認できれば、インストールは成功です。
C:\Users\admin_1>python --version
Python 3.13.5
uvのパッケージ管理ツールのインストール
uv は、Python のパッケージ管理と依存関係解決において、「超高速な次世代ツール」 として設計されたツールです。pip や pip-tools の代替を目指し、Rust で書かれたことで生まれる速度と効率性が特徴です。
- 管理者権限で PowerShell を起動し、以下のコマンドを実行します。
powershell -ExecutionPolicy ByPass -c "irm https://docs.astral.sh/uv/install.ps1 | iex"
- 実行後、環境変数にも追加します。
$env:Path = "C:\Users\admin_1\.local\bin;$env:Path"
全てのコマンドは以下の通りです。最後に uv --version を実行して、バージョンが確認できれば、インストールは成功です。
全てのコマンドは以下の通りです。
PS C:\Users\admin_1> powershell -ExecutionPolicy ByPass -c "irm https://docs.astral.sh/uv/install.ps1 | iex"
Downloading uv 0.8.3 (x86_64-pc-windows-msvc)
Installing to C:\Users\admin_1\.local\bin
  uv.exe
  uvx.exe
  uvw.exe
everything's installed!

To add C:\Users\admin_1\.local\bin to your PATH, either restart your shell or run:

    set Path=C:\Users\admin_1\.local\bin;%Path%   (cmd)
    $env:Path = "C:\Users\admin_1\.local\bin;$env:Path"   (powershell)
PS C:\Users\admin_1> $env:Path = "C:\Users\admin_1\.local\bin;$env:Path"
PS C:\Users\admin_1> uv --version
uv 0.8.3 (7e78f54e7 2025-07-24)
PS C:\Users\admin_1>
uvに関するより詳細な紹介は以下のサイトをご参照ください。
MCP サーバーとは?
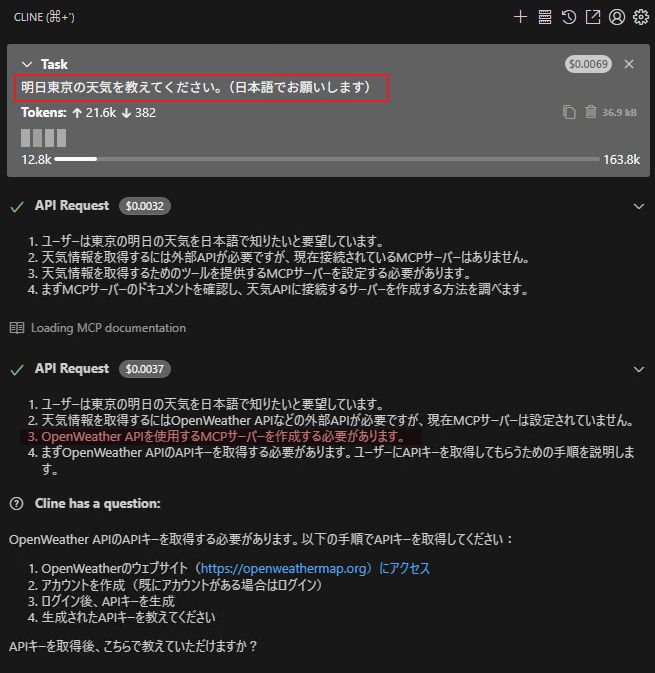
現在のClineでは、まだMCP サーバーの設定がされていない状態ですので、外部情報(たとえば「東京の明日の天気」など)を取得することができません。
再度「明日東京の天気を教えてください(日本語でお願いします)」と質問してみると、以下のように
「OpenWeather APIを使用するMCPサーバーを作成する必要があります」
という回答が返ってきました。
MCP サーバーとツール
次に、OpenWeather API を利用する MCP サーバーを作成します。これにより、リアルタイムの天気情報を取得できるようになります。
MCP サーバーは、実質的にはツールです。このツールは、Python や Java などのプログラミング言語で作られたアプリケーションであり、MCP(Model Context Protocol)に準拠している必要があります。
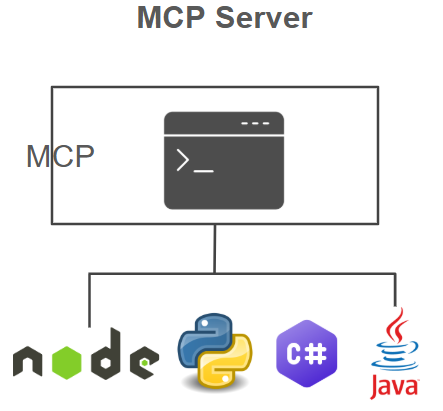
逆に言えば、作られたアプリケーションが MCP に準拠していれば、MCP サーバーとして利用することができます。
じゃ、MCPとは何ですか?
MCPってなんだ?
下記に公式の定義を引用します。
“MCP(Model Context Protocol)は、アプリケーションがLLM(大規模言語モデル)に文脈を提供する方法を標準化するオープンプロトコルです。MCPを、AIアプリケーションのための「USB-Cポート」のようなものと考えてみてください。USB-Cが、さまざまな周辺機器やアクセサリをデバイスと接続するための標準的な方法を提供するのと同じように、MCPはAIモデルをさまざまなデータソースやツールと接続するための標準的な方法を提供します。“
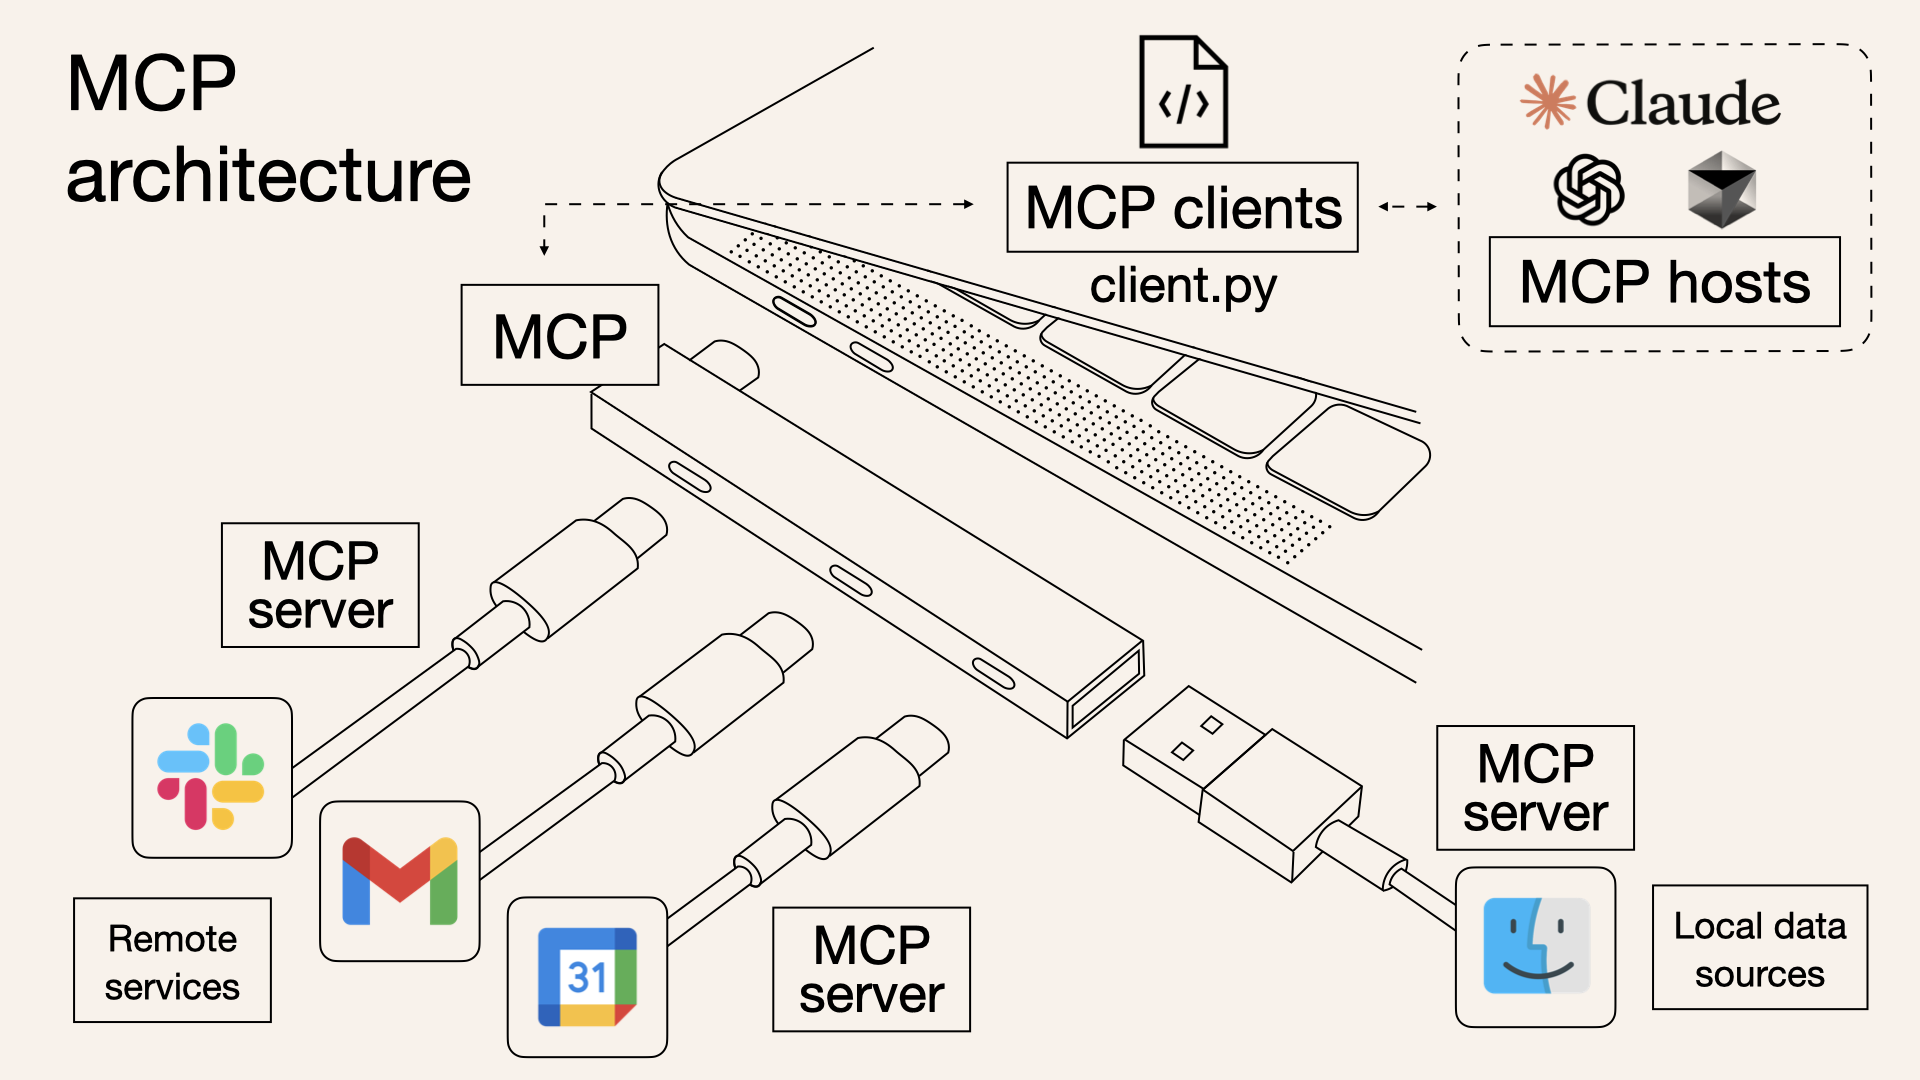
上記の図のように、MCP は MCP クライアントと MCP サーバーの間で通信を行うために、
お互いがどのようなリクエストやレスポンスをやり取りするのか、そのフォーマットを定めるプロトコルです。
以下の図のように、複数の MCP クライアントは MCP ホストによって管理されています。
解説を簡略化するために、MCP ホストとその配下のクライアントをまとめて「MCP クライアント」とみなし、MCP クライアントと MCP サーバー間のやり取りに焦点を当てます。

MCP 詳細の定義は以下のドキュメントよりご参照ください。
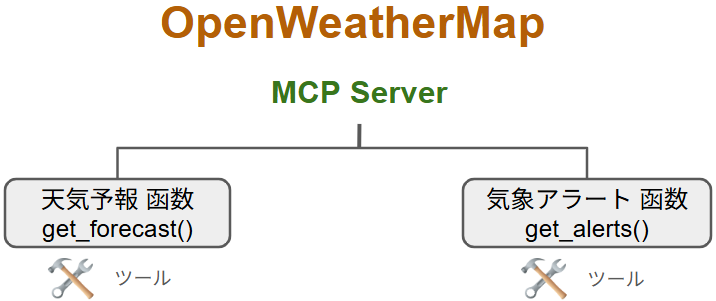
MCP サーバーの作成
これから、明日の東京の天気情報を取得できるように、天気予報を取得するための MCP サーバーを作成します。この MCP サーバーには、次の 2 つのツール(関数)を作ります。
pythonの仮想環境の準備
powershellを開いて、以下のコマンドを実施します。
-
cd C:\Users\admin_1\Documents\PythonProject:指定されたフォルダに移動 -
uv init weather:weather という名前のPythonプロジェクトの雛形を作成 -
cd weather:weatherプロジェクトに移動 -
uv venv:仮想環境(venv)を .venv というフォルダに作成 -
.venv\Scripts\activate: .venv 仮想環境をアクティベート
以下の(weather)…が表示されたら、仮想環境に正常に入れています。
(weather) PS C:\Users\admin_1\Documents\PythonProject\weather>
全てのコマンドは以下の通りです。
PS C:\Users\admin_1> cd C:\Users\admin_1\Documents\PythonProject
PS C:\Users\admin_1\Documents\PythonProject> uv init weather
Initialized project `weather` at `C:\Users\admin_1\Documents\PythonProject\weather`
PS C:\Users\admin_1\Documents\PythonProject> cd weather
PS C:\Users\admin_1\Documents\PythonProject\weather> uv venv
Using CPython 3.13.5 interpreter at: C:\Users\admin_1\AppData\Local\Programs\Python\Python313\python.exe
Creating virtual environment at: .venv
Activate with: .venv\Scripts\activate

PS C:\Users\admin_1\Documents\PythonProject\weather> .venv/Scripts/activate
(weather) PS C:\Users\admin_1\Documents\PythonProject\weather>
次は、mcpの開発が必要な依頼関係のパッケージをインストールしますので、uv add "mcp[cli]" httpxコマンドを実行します。
(weather) PS C:\Users\admin_1\Documents\PythonProject\weather> uv add "mcp[cli]" httpx
Resolved 35 packages in 487ms
Prepared 34 packages in 9.17s
Installed 34 packages in 792ms
...
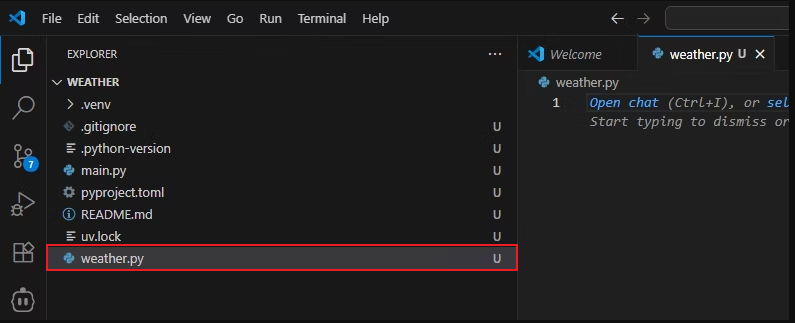
MCP サーバー Pythonプログラムの作成
次は、VS Codeを利用して、先ほど作ったプロジェクトフォルダの[weather]を開いて、[weather.py]を作成します。
上記のweather.pyには、以下のソースコードを貼り付けます。このコードは、FastMCP フレームワークを使って、米国気象局(NWS: National Weather Service)APIを利用し、天気アラートおよび天気予報を取得する非同期のMCPツールサーバーを実装しています。
以下のソースコードは公式サイトのサンプルコードを利用しています。
from typing import Any
import httpx
from mcp.server.fastmcp import FastMCP


# Initialize FastMCP server
mcp = FastMCP("weather", log_level="ERROR")


# Constants
NWS_API_BASE = "https://api.weather.gov"
USER_AGENT = "weather-app/1.0"


async def make_nws_request(url: str) -> dict[str, Any] | None:
    """Make a request to the NWS API with proper error handling."""
    headers = {
        "User-Agent": USER_AGENT,
        "Accept": "application/geo+json"
    }
    async with httpx.AsyncClient() as client:
        try:
            response = await client.get(url, headers=headers, timeout=30.0)
            response.raise_for_status()
            return response.json()
        except Exception:
            return None


def format_alert(feature: dict) -> str:
    """Format an alert feature into a readable string."""
    props = feature["properties"]
    return f"""
Event: {props.get('event', 'Unknown')}
Area: {props.get('areaDesc', 'Unknown')}
Severity: {props.get('severity', 'Unknown')}
Description: {props.get('description', 'No description available')}
Instructions: {props.get('instruction', 'No specific instructions provided')}
"""


@mcp.tool()
async def get_alerts(state: str) -> str:
    """Get weather alerts for a US state.

    Args:
        state: Two-letter US state code (e.g. CA, NY)
    """
    url = f"{NWS_API_BASE}/alerts/active/area/{state}"
    data = await make_nws_request(url)

    if not data or "features" not in data:
        return "Unable to fetch alerts or no alerts found."

    if not data["features"]:
        return "No active alerts for this state."

    alerts = [format_alert(feature) for feature in data["features"]]
    return "\n---\n".join(alerts)


@mcp.tool()
async def get_forecast(latitude: float, longitude: float) -> str:
    """Get weather forecast for a location.

    Args:
        latitude: Latitude of the location
        longitude: Longitude of the location
    """
    # First get the forecast grid endpoint
    points_url = f"{NWS_API_BASE}/points/{latitude},{longitude}"
    points_data = await make_nws_request(points_url)

    if not points_data:
        return "Unable to fetch forecast data for this location."

    # Get the forecast URL from the points response
    forecast_url = points_data["properties"]["forecast"]
    forecast_data = await make_nws_request(forecast_url)

    if not forecast_data:
        return "Unable to fetch detailed forecast."

    # Format the periods into a readable forecast
    periods = forecast_data["properties"]["periods"]
    forecasts = []
    for period in periods[:5]:  # Only show next 5 periods
        forecast = f"""
{period['name']}:
Temperature: {period['temperature']}°{period['temperatureUnit']}
Wind: {period['windSpeed']} {period['windDirection']}
Forecast: {period['detailedForecast']}
"""
        forecasts.append(forecast)

    return "\n---\n".join(forecasts)


if __name__ == "__main__":
    # Initialize and run the server
    mcp.run(transport='stdio')
上記の仮想環境で、Python製の天気予報用MCPサーバーを作成しました。次に、ClineでこのMCPサーバーを利用するための設定を行います。
MCP サーバーの設定
Clineから接続先のMCPサーバー情報を登録・設定するため、以下の [Configure MCP Servers] を開きます。

開いた cline_mcp_settings.json ファイルで、以下のJsonファイルを記入します。"C:\\Users\\admin_1\\Documents\\PythonProject\\weather"は、MCP サーバーであるweather.pyの所在フォルダです。
{
  "mcpServers": {
    "weather": {
      "disabled": false,
      "timeout": 60,
      "type": "stdio",
      "command": "uv",
      "args": [
        "--directory",
        "C:\\Users\\admin_1\\Documents\\PythonProject\\weather",
        "run",
        "weather.py"
      ]
    }
  }
}
以下のweather欄の右側にあるアイコンが緑色になっていれば、MCPサーバーの設定は正常に完了しています。

MCP サーバーの利用
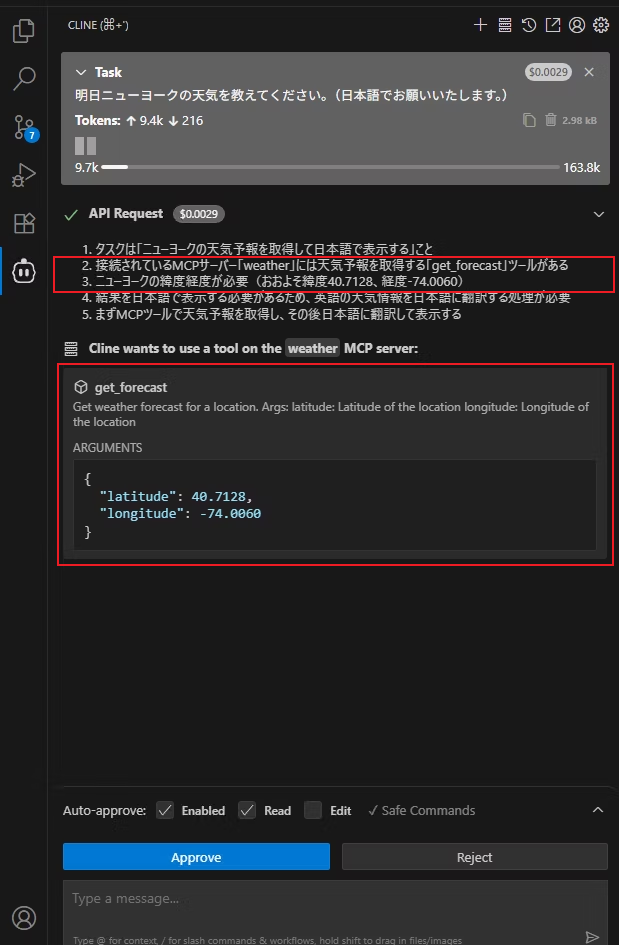
MCPサーバーの設定が完了したので、再度天気に関する質問をしてみます。
まず、LLM が MCPサーバー上のツール get_forecast を利用する必要があると判断し、さらにそのツールに必要なパラメータである latitude と longitude を提供しました。
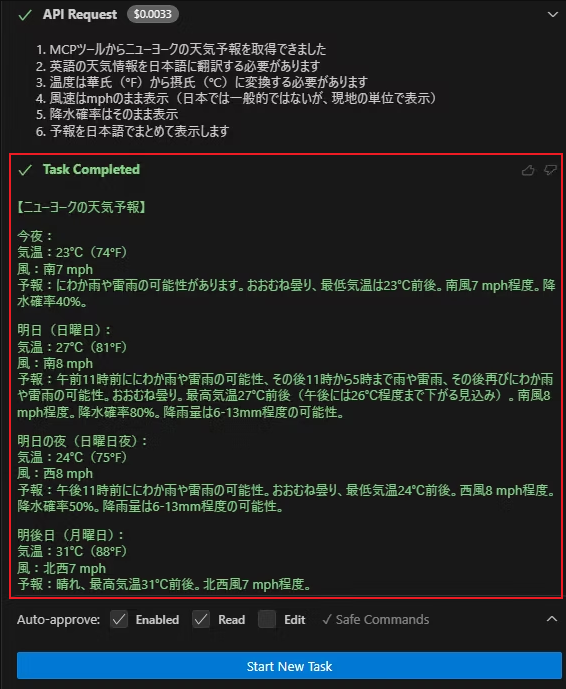
LLM は Cline から送信された天気予報情報を加工し、日本語に翻訳したうえで、Cline に返します。
MCP クライアントとMCP サーバー 間のやり取りの確認
ここまでの操作を通して、以下の点が理解できたかと思います。
- MCP サーバーがある場合とない場合の違い
- MCP サーバーは、本質的にはツールであるということ
ここからは、MCPホストとMCPサーバー間のやり取りをログに記録し、その内容を分析して、MCPをさらに深掘りしていきます。

ログ記録ラッパーmcp_logger.pyの作成
そのやり取りのログを取得するため、以下のログ記録用のラッパーを作ります。MCP クライアントとMCP サーバー間の入出力をリアルタイムで透過的に流しながら、やり取りの内容をログに記録します。
mcp_logger.pyソースコードは以下の通りです。
#!/usr/bin/env python3

import sys
import subprocess
import threading
import argparse
import os

# --- Configuration ---
LOG_FILE = os.path.join(os.path.dirname(os.path.realpath(__file__)), "mcp_io.log")
# --- End Configuration ---

# --- Argument Parsing ---
parser = argparse.ArgumentParser(
    description="Wrap a command, passing STDIN/STDOUT verbatim while logging them.",
    usage="%(prog)s <command> [args...]"
)
# Capture the command and all subsequent arguments
parser.add_argument('command', nargs=argparse.REMAINDER,
                    help='The command and its arguments to execute.')

open(LOG_FILE, 'w', encoding='utf-8')

if len(sys.argv) == 1:
    parser.print_help(sys.stderr)
    sys.exit(1)

args = parser.parse_args()

if not args.command:
    print("Error: No command provided.", file=sys.stderr)
    parser.print_help(sys.stderr)
    sys.exit(1)

target_command = args.command
# --- End Argument Parsing ---

# --- I/O Forwarding Functions ---
# These will run in separate threads

def forward_and_log_stdin(proxy_stdin, target_stdin, log_file):
    """Reads from proxy's stdin, logs it, writes to target's stdin."""
    try:
        while True:
            # Read line by line from the script's actual stdin
            line_bytes = proxy_stdin.readline()
            if not line_bytes:  # EOF reached
                break

            # Decode for logging (assuming UTF-8, adjust if needed)
            try:
                 line_str = line_bytes.decode('utf-8')
            except UnicodeDecodeError:
                 line_str = f"[Non-UTF8 data, {len(line_bytes)} bytes]\n" # Log representation

            # Log with prefix
            log_file.write(f"输入: {line_str}")
            log_file.flush() # Ensure log is written promptly

            # Write the original bytes to the target process's stdin
            target_stdin.write(line_bytes)
            target_stdin.flush() # Ensure target receives it promptly

    except Exception as e:
        # Log errors happening during forwarding
        try:
            log_file.write(f"!!! STDIN Forwarding Error: {e}\n")
            log_file.flush()
        except: pass # Avoid errors trying to log errors if log file is broken

    finally:
        # Important: Close the target's stdin when proxy's stdin closes
        # This signals EOF to the target process (like test.sh's read loop)
        try:
            target_stdin.close()
            log_file.write("--- STDIN stream closed to target ---\n")
            log_file.flush()
        except Exception as e:
             try:
                log_file.write(f"!!! Error closing target STDIN: {e}\n")
                log_file.flush()
             except: pass


def forward_and_log_stdout(target_stdout, proxy_stdout, log_file):
    """Reads from target's stdout, logs it, writes to proxy's stdout."""
    try:
        while True:
            # Read line by line from the target process's stdout
            line_bytes = target_stdout.readline()
            if not line_bytes: # EOF reached (process exited or closed stdout)
                break

            # Decode for logging
            try:
                 line_str = line_bytes.decode('utf-8')
            except UnicodeDecodeError:
                 line_str = f"[Non-UTF8 data, {len(line_bytes)} bytes]\n"

            # Log with prefix
            log_file.write(f"输出: {line_str}")
            log_file.flush()

            # Write the original bytes to the script's actual stdout
            proxy_stdout.write(line_bytes)
            proxy_stdout.flush() # Ensure output is seen promptly

    except Exception as e:
        try:
            log_file.write(f"!!! STDOUT Forwarding Error: {e}\n")
            log_file.flush()
        except: pass
    finally:
        try:
            log_file.flush()
        except: pass
        # Don't close proxy_stdout (sys.stdout) here

# --- Main Execution ---
process = None
log_f = None
exit_code = 1 # Default exit code in case of early failure

try:
    # Open log file in append mode ('a') for the threads
    log_f = open(LOG_FILE, 'a', encoding='utf-8')

    # Start the target process
    # We use pipes for stdin/stdout
    # We work with bytes (bufsize=0 for unbuffered binary, readline() still works)
    # stderr=subprocess.PIPE could be added to capture stderr too if needed.
    process = subprocess.Popen(
        target_command,
        stdin=subprocess.PIPE,
        stdout=subprocess.PIPE,
        stderr=subprocess.PIPE, # Capture stderr too, good practice
        bufsize=0 # Use 0 for unbuffered binary I/O
    )

    # Pass binary streams to threads
    stdin_thread = threading.Thread(
        target=forward_and_log_stdin,
        args=(sys.stdin.buffer, process.stdin, log_f),
        daemon=True # Allows main thread to exit even if this is stuck (e.g., waiting on stdin) - reconsider if explicit join is needed
    )

    stdout_thread = threading.Thread(
        target=forward_and_log_stdout,
        args=(process.stdout, sys.stdout.buffer, log_f),
        daemon=True
    )

    # Optional: Handle stderr similarly (log and pass through)
    stderr_thread = threading.Thread(
        target=forward_and_log_stdout, # Can reuse the function
        args=(process.stderr, sys.stderr.buffer, log_f), # Pass stderr streams
        # Add a different prefix in the function if needed, or modify function
        # For now, it will log with "STDOUT:" prefix - might want to change function
        # Let's modify the function slightly for this
        daemon=True
    )
    # A slightly modified version for stderr logging
    def forward_and_log_stderr(target_stderr, proxy_stderr, log_file):
        """Reads from target's stderr, logs it, writes to proxy's stderr."""
        try:
            while True:
                line_bytes = target_stderr.readline()
                if not line_bytes: break
                try: line_str = line_bytes.decode('utf-8')
                except UnicodeDecodeError: line_str = f"[Non-UTF8 data, {len(line_bytes)} bytes]\n"
                log_file.write(f"STDERR: {line_str}") # Use STDERR prefix
                log_file.flush()
                proxy_stderr.write(line_bytes)
                proxy_stderr.flush()
        except Exception as e:
            try:
                log_file.write(f"!!! STDERR Forwarding Error: {e}\n")
                log_file.flush()
            except: pass
        finally:
            try:
                log_file.flush()
            except: pass

    stderr_thread = threading.Thread(
        target=forward_and_log_stderr,
        args=(process.stderr, sys.stderr.buffer, log_f),
        daemon=True
    )


    # Start the forwarding threads
    stdin_thread.start()
    stdout_thread.start()
    stderr_thread.start() # Start stderr thread too

    # Wait for the target process to complete
    process.wait()
    exit_code = process.returncode

    # Wait briefly for I/O threads to finish flushing last messages
    # Since they are daemons, they might exit abruptly with the main thread.
    # Joining them ensures cleaner shutdown and logging.
    # We need to make sure the pipes are closed so the reads terminate.
    # process.wait() ensures target process is dead, pipes should close naturally.
    stdin_thread.join(timeout=1.0) # Add timeout in case thread hangs
    stdout_thread.join(timeout=1.0)
    stderr_thread.join(timeout=1.0)


except Exception as e:
    print(f"MCP Logger Error: {e}", file=sys.stderr)
    # Try to log the error too
    if log_f and not log_f.closed:
        try:
            log_f.write(f"!!! MCP Logger Main Error: {e}\n")
            log_f.flush()
        except: pass # Ignore errors during final logging attempt
    exit_code = 1 # Indicate logger failure

finally:
    # Ensure the process is terminated if it's still running (e.g., if logger crashed)
    if process and process.poll() is None:
        try:
            process.terminate()
            process.wait(timeout=1.0) # Give it a moment to terminate
        except: pass # Ignore errors during cleanup
        if process.poll() is None: # Still running?
             try: process.kill() # Force kill
             except: pass # Ignore kill errors

    # Final log message
    if log_f and not log_f.closed:
        try:
            log_f.close()
        except: pass # Ignore errors during final logging attempt

    # Exit with the target process's exit code
    sys.exit(exit_code)
MCP サーバーの再設定
ラッパーのmcp_logger.pyを経由しますので、MCP サーバーの設定も修正する必要があります。
Clineの [Configure MCP Servers] を開いて、開いた cline_mcp_settings.json ファイルで、以下のように変更をします。
{
  "mcpServers": {
    "weather": {
      "disabled": false,
      "timeout": 60,
      "type": "stdio",
      "command": "python",
      "args": [
        "C:\\Users\\admin_1\\Documents\\PythonProject\\weather\\mcp_logger.py",
        "uv",
        "--directory",
        "C:\\Users\\admin_1\\Documents\\PythonProject\\weather",
        "run",
        "weather.py"
      ]
    }
  }
}
変更したら、VS Studio再起動します。以下のようにweatherのMCP サーバーの接続が正常にできたかを確認します。

やり取り詳細確認
VS Studioを再起動したら、再度同じ質問を行い、その後で weather の仮想環境内にある [mcp_io.log] を確認します。
このログファイルには、以下の①と②のリクエストおよびレスポンスメッセージが記録されています。
これらのメッセージは、MCP(Model Context Protocol)に準拠したものです。
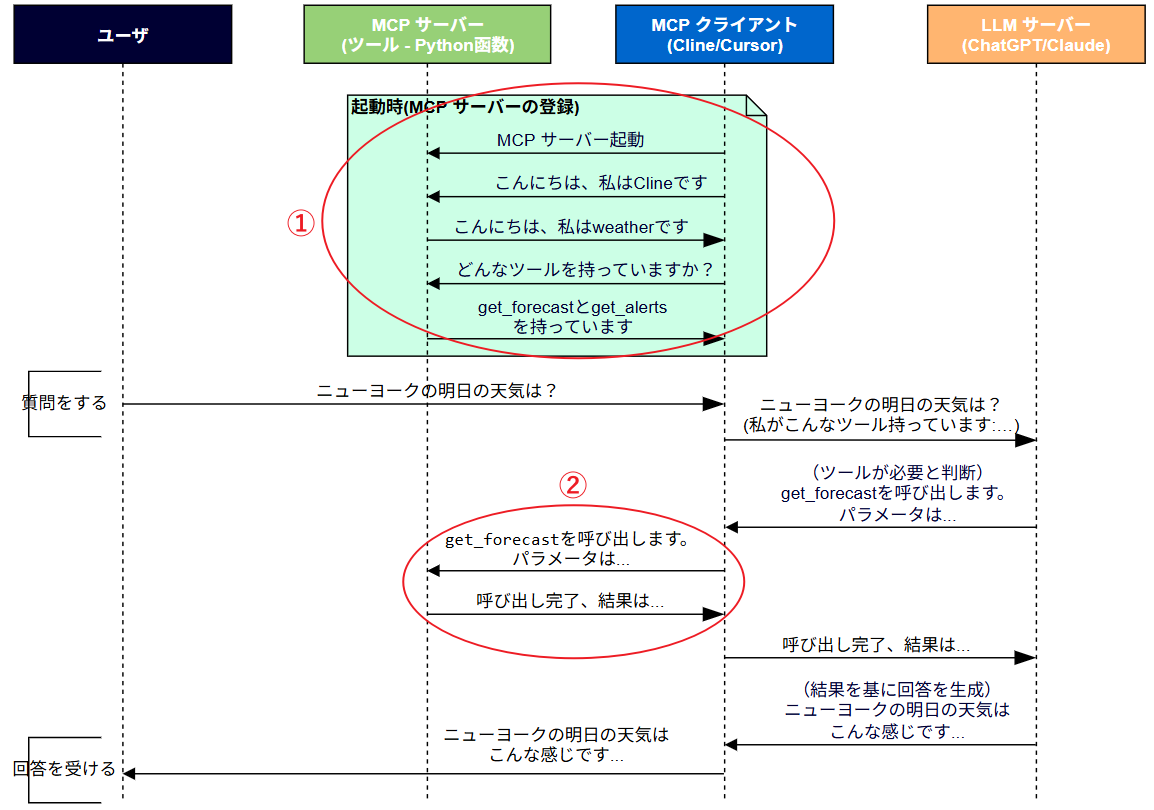
① 起動時の初期化処理(MCP サーバーの登録)
これは、MCP に基づく MCP クライアント(Cline)とMCP サーバー(weather)間の通信の一連の流れ を表したものです。
1. MCP クライアント(Cline)⇒ MCP サーバー(weather): こんにちは、私はClineです
これは Cline クライアントが最初にサーバーへ送る初期化リクエストです。
-
method :
initialize初期化要求 -
protocolVersion :
2025-03-26MCPのバージョン - clientInfo : 自分はClineというクライアントであるという自己紹介
{
  "method": "initialize",
  "params": {
    "protocolVersion": "2025-03-26",
    "capabilities": {},
    "clientInfo": {
      "name": "Cline",
      "version": "3.20.2"
    }
  },
  "jsonrpc": "2.0",
  "id": 0
}
2. MCP サーバー(weather)⇒ MCP クライアント(Cline) : こんにちは、私はweatherです
これは weather サーバーからの initialize に対する応答です。
- capabilities: MCP サーバーが対応している機能
- serverInfo: MCP サーバーの名前とバージョン
{
  "jsonrpc": "2.0",
  "id": 0,
  "result": {
    "protocolVersion": "2025-03-26",
    "capabilities": {
      "experimental": {},
      "prompts": {
        "listChanged": false
      },
      "resources": {
        "subscribe": false,
        "listChanged": false
      },
      "tools": {
        "listChanged": false
      }
    },
    "serverInfo": {
      "name": "weather",
      "version": "1.12.2"
    }
  }
}
3. MCP クライアント(Cline)⇒ MCP サーバー(weather): どんなツールを持っていますか?
これは、クライアントが「初期化が完了したので、ツール情報などを送ってください」と伝える通知です。
{
  "method": "notifications/initialized",
  "jsonrpc": "2.0"
}
4. MCP クライアント(Cline)⇒ MCP サーバー(weather): get_forecastとget_alertsを持っています
これは weather サーバーが保有するツール一覧(get_forecastとget_alerts)の応答です。各ツールは以下の情報を含んでいます:
- name:ツール名
- description:説明文
- inputSchema:入力の仕様(型・必須項目など)
- outputSchema:出力の仕様
これらの情報は、Python の weather.py ソースコードに記述されています。
{
  "jsonrpc": "2.0",
  "id": 1,
  "result": {
    "tools": [
      {
        "name": "get_alerts",
        "description": "Get weather alerts for a US state.\n\nArgs:\n    state: Two-letter US state code (e.g. CA, NY)\n",
        "inputSchema": {
          "properties": {
            "state": {
              "title": "State",
              "type": "string"
            }
          },
          "required": [
            "state"
          ],
          "title": "get_alertsArguments",
          "type": "object"
        },
        "outputSchema": {
          "properties": {
            "result": {
              "title": "Result",
              "type": "string"
            }
          },
          "required": [
            "result"
          ],
          "title": "get_alertsOutput",
          "type": "object"
        }
      },
      {
        "name": "get_forecast",
        "description": "Get weather forecast for a location.\n\nArgs:\n    latitude: Latitude of the location\n    longitude: Longitude of the location\n",
        "inputSchema": {
          "properties": {
            "latitude": {
              "title": "Latitude",
              "type": "number"
            },
            "longitude": {
              "title": "Longitude",
              "type": "number"
            }
          },
          "required": [
            "latitude",
            "longitude"
          ],
          "title": "get_forecastArguments",
          "type": "object"
        },
        "outputSchema": {
          "properties": {
            "result": {
              "title": "Result",
              "type": "string"
            }
          },
          "required": [
            "result"
          ],
          "title": "get_forecastOutput",
          "type": "object"
        }
      }
    ]
  }
}
② ツールの実行
これは「天気予報(get_forecast)」というツールを呼び出したときの、リクエストとレスポンスの例です
1. MCP クライアント(Cline)⇒ MCP サーバー(weather): get_forecastを呼び出します。パラメータは...
-
method:
tools/callツール呼び出しのコマンド -
name:
get_forecast呼び出したいツール名(天気予報) - arguments:緯度経度(ここではニューヨーク周辺)を指定
-
id:
4このリクエストのID(後でレスポンスと対応付け)
{
  "method": "tools/call",
  "params": {
    "name": "get_forecast",
    "arguments": {
      "latitude": 40.7128,
      "longitude": -74.006
    }
  },
  "jsonrpc": "2.0",
  "id": 4
}
2. MCP サーバー(weather)⇒ MCP クライアント(Cline): 呼び出し完了、結果は...
- result: 天気予報の内容が入っている
- structuredContent: 同じ情報(テキストを解析しやすくした形式)が含まれる
-
isError:
false正常に取得できたということ
{
  "jsonrpc": "2.0",
  "id": 4,
  "result": {
    "content": [
      {
        "type": "text",
        "text": "\nOvernight:\nTemperature: 74°F\nWind: 7 mph S\nForecast: A chance of showers and thunderstorms. Mostly cloudy, with a low around 74. South wind around 7 mph. Chance of precipitation is 40%.\n\n---\n\nSunday:\nTemperature: 81°F\nWind: 8 mph S\nForecast: A chance of showers and thunderstorms before 11am, then showers and thunderstorms between 11am and 5pm, then a chance of showers and thunderstorms. Mostly cloudy. High near 81, with temperatures falling to around 79 in the afternoon. South wind around 8 mph. Chance of precipitation is 80%. New rainfall amounts between a quarter and half of an inch possible.\n\n---\n\nSunday Night:\nTemperature: 75°F\nWind: 8 mph W\nForecast: A chance of showers and thunderstorms before 11pm. Mostly cloudy, with a low around 75. West wind around 8 mph. Chance of precipitation is 50%. New rainfall amounts between a quarter and half of an inch possible.\n\n---\n\nMonday:\nTemperature: 88°F\nWind: 7 mph NW\nForecast: Sunny, with a high near 88. Northwest wind around 7 mph.\n\n---\n\nMonday Night:\nTemperature: 78°F\nWind: 6 mph SW\nForecast: Mostly clear, with a low around 78. Southwest wind around 6 mph.\n"
      }
    ],
    "structuredContent": {
      "result": "\nOvernight:\nTemperature: 74°F\nWind: 7 mph S\nForecast: A chance of showers and thunderstorms. Mostly cloudy, with a low around 74. South wind around 7 mph. Chance of precipitation is 40%.\n\n---\n\nSunday:\nTemperature: 81°F\nWind: 8 mph S\nForecast: A chance of showers and thunderstorms before 11am, then showers and thunderstorms between 11am and 5pm, then a chance of showers and thunderstorms. Mostly cloudy. High near 81, with temperatures falling to around 79 in the afternoon. South wind around 8 mph. Chance of precipitation is 80%. New rainfall amounts between a quarter and half of an inch possible.\n\n---\n\nSunday Night:\nTemperature: 75°F\nWind: 8 mph W\nForecast: A chance of showers and thunderstorms before 11pm. Mostly cloudy, with a low around 75. West wind around 8 mph. Chance of precipitation is 50%. New rainfall amounts between a quarter and half of an inch possible.\n\n---\n\nMonday:\nTemperature: 88°F\nWind: 7 mph NW\nForecast: Sunny, with a high near 88. Northwest wind around 7 mph.\n\n---\n\nMonday Night:\nTemperature: 78°F\nWind: 6 mph SW\nForecast: Mostly clear, with a low around 78. Southwest wind around 6 mph.\n"
    },
    "isError": false
  }
}
LLM サーバーからの回答
これからは、MCP クライアント(Cline)がMCPサーバーから取得した天気情報をLLMサーバーに送信し、LLMサーバーから処理された日本語の天気情報を受け取るようになります。
以下が、LLMサーバーからの回答です:
ニューヨークの明日(日曜日)の天気予報:

- 天気:にわか雨と雷雨が予想されます(降水確率80%)
- 気温:最高27°C(午後には26°C程度まで下がる見込み)
- 降水量:6-12mm程度の雨が予想されます
- 風:南風 時速13km程度
- 天候の変化:午前11時以降に雨や雷雨が強まる見込みです

傘の準備をおすすめします。雷雨に備えて安全にもご注意ください。
最後に
ここまでで MCP の詳細について解説しました。しかし、MCP は LLM サーバーとのやり取りが見えませんでした。なぜでしょうか?
そう、MCP は LLM サーバーとは関係がないからです。
MCP はプロトコルであり、このプロトコルでは以下の 2 点が定められています:
- MCP サーバーで利用可能な関数のリスト
- 関数を呼び出すために守るべきルール(入力と出力のフォーマット)
では、MCP クライアントはどのように LLM サーバーと通信しているのでしょうか?
この両者のやり取りには特に決まったルールがなく、MCP クライアントごとに異なる方法が取られています。
次回の記事では、Cline をMCP クライアントの例にして、LLM サーバーとのやり取りを解説します。お楽しみください。

参照資料