前書き
会社でデスクトップアプリを作っているんですが、Webのほうが開発速度が速くてネットにも割と情報がたくさん落ちているので、どうにかWebでデスクトップアプリ作れないかなーということで探していたところ、Electronにたどり着きました。Tauriもいいなーと思ってんですが、Windows10向けのアプリが多いためできればWebView2に依存したくないなということで、今回はElectronやっていきます。UIは今もうほぼ一強のReact.js、バンドルはViteとかが流行りですが正直まだプロダクトに使うには厳しいかなということで安定のWebpackです。
この記事では、環境構築、IPC通信でコンソールに文字を表示、コマンドの実行、ファイルアクセス、通知、そしてexeの作成までやっていきたいと思います。
盛りだくさんなので長くなりますが、これを見ればとりあえず基本的なことはできるようにしていきます。
なお、前提としてTypeScriptとReactに関しての知識があることを前提として書きますのでそこはご了承ください...。
最終的なソースをGitHubにあげたので、コード読むだけで完全に理解できる方はぜひ。
electron-my-app
開発環境
主なライブラリやフレームワークのバージョン情報です。
- Node.js v18.12.1
- React.js v18.2.0
- Electron v20.0.2
環境構築
Node.jsのインストール
今回はNode.jsのv18.12.1を使っていきますが、別に最新のNode.jsでもそんなに変わらないとは思います。とりあえず今回は18.12.1のダウンロードページを置いておきます。
https://nodejs.org/download/release/v18.12.1/
こちらのページを開いてWindowsならmsi、Linuxならtarなどをダウンロードし、インストーラを実行しましょう。
最新の推奨版を入れたいという方はこちらから。
インストール後は以下のコマンドをコマンドプロンプトで実行して、ちゃんとインストールできたか確認しましょう。
node -v
VSCodeの設定
VSCodeはこちらからダウンロードできます。ダウンロードしてインストールしたら拡張機能のインストールや設定を行っていきましょう。
拡張機能
おすすめの拡張機能を書いておきます。割とReactを書くには必須のツールばかりなので、ぜひインストールしておいてください。
| 拡張機能名 | 説明 |
|---|---|
| Auto Close Tag | HTML/XMLの閉じタグを勝手に補完してくれるやつ |
| Auto Rename Tag | HTML/XMLの開始タグと閉じタグの変更を同期してくれるやつ |
| ES7+ React/Redux/React-Native snippets | Reactの自動補完とかをしてくれるやつ。必須です。 |
| indent-rainbow | インデントの空白部分に色を付けてくれるやつ |
| Japanese Language Pack for Visual Studio Code | VSCodeを日本語表記にするやつ |
| JavaScript (ES6) code snippets | JSの自動補完とかをしてくれるやつ。必須です。 |
| Prettier | コードのインデントなどをきれいにしてくれるやつ。必須です。 |
| vscode-icons | VSCodeのファイルやフォルダのアイコンを詳細なものに変えてくれるやつ |
| vscode-styled-components | styled-componentsのコードを自動補完とかしてくれるやつ |
とりあえず上に書いた拡張機能があればある程度効率的に作業できるかと思います。次に設定を見ていきます。
VSCodeの設定
VSCodeの設定画面は、画面左下の歯車マークから開けます。
設定画面を開いたら、検索欄にeditor formatと入力し、以下の設定を変更します。
- Editor: Default FormatterをPrettier - Code Formatterに変更する
- Editor: Format On Svaeにチェックを入れる
以上でVSCodeの設定が完了です。
PowerShellのスクリプト実行ポリシーを変更する
Windowsの場合、VSCodeからPowerShellを使ってモジュールをインストールしたりElectronのアプリをデバッグしたりしますが、デフォルトの設定ではPowerShellからnodeのコマンドなどを事項することができないため、設定を変更していきます。
詳しい説明はこちらにありますが、今回はRemoteSignedというポリシーに設定します。
PowerShellを管理者として実行し、以下のコマンドを実行します。
Set-ExecutionPolicy RemoteSigned
Yarnのインストール
Node.jsには、Node.js向けの拡張機能などを管理するパッケージマネージャとしてnpmというものが同梱されていますが、これが遅いわ依存関係をうまく解決してくれないわで結構詰まることが多いため、今回はyarnというパッケージマネージャを使っていきます。どのサイトも割とnpmよりyarnを使ってる印象なので、nodeのパッケージマネージャはもう何も考えずにyarnでもいいかもですね。
yarnのインストールはコマンドラインで行うので、コマンドプロンプトかPowerShellを開いて以下のコマンドを実行します。
npm i -D yarn
以下のコマンドを実行してちゃんとバージョンが表示されれば問題ありません。
yarn -v
プロジェクトの作成
環境構築が終わったところで、さっそくプロジェクトを作成していきましょう。まず、プロジェクトを作りたい場所に任意の名前でフォルダを作成します。今回は私はdev-spaceというフォルダを作りました。フォルダを作成したらそのフォルダをVSCodeで開きましょう。
VSCodeでコマンドを実行するためにターミナルを開きます。ターミナルはVSCodeを開いてctrl+@で開けます。ターミナルに以下のコマンドを入力してElectronのプロジェクトを作成します。ちなみにプロジェクト名は半角英数字の小文字とハイフンだけが基本です。今回はelectron-my-appという名前で作っていきます
yarn create electron-app electron-my-app --template=webpack-typescript
このコマンドだけでReact以外の設定はほぼ完結できます。electron-forgeありがたすぎますね。
Reactのインストール
では次にReactをインストールしていきます。同時にコードを書きやすいようにディレクトリ構成なども変えていきます。electronはOSの機能にアクセスできるメインプロセスと見た目を制御するレンダラープロセスに分けられ、レンダラープロセスから直接OSの機能にアクセスするのは望ましくありません。そういった部分も意識しながらディレクトリを作成します。
ではさっそくReactをインストールしていきます。必要なのはreactとreact-dom、TypeScriptなので@types/reactと@types/react-domも入れます。プロジェクトのディレクトリに移動してインストールコマンドを実行しましょう。
cd electron-my-app
yarn add react react-dom
yarn add --dev @types/react @types/react-dom
そしたら次はReactをプロジェクトに組み込んでいきます。まずsrcディレクトリ配下にrenderer、mainディレクトリを作成します。そして以下のファイルをrendererディレクトリに移動させます。
- index.css
- index.html
- renderer.ts
次に以下のファイルをmainディレクトリに移動します。
- index.ts
- preload.ts
ファイルを移動したら今度はファイル名を変えていきます。正直。メインプロセスのエントリーポイントがindex.tsという名前なのは解せません...。レンダラーのエントリーポイントがrenderer.tsという名前なのもちょっと違和感があります。以下のように変えましょう。
-
mainのindex.ts→main.ts -
rendererのrenderer.ts→index.tsx
ちゃっかりrenderer.tsはtsxファイルに変えます。これはReactを使うためです。
ファイル名の変更や移動を行ったので、webpackやelectron-forgeのエントリーポイントを変更していきます。
forge.config.tsを以下のように変更していきます。
import type { ForgeConfig } from "@electron-forge/shared-types";
import { MakerSquirrel } from "@electron-forge/maker-squirrel";
import { MakerZIP } from "@electron-forge/maker-zip";
import { MakerDeb } from "@electron-forge/maker-deb";
import { MakerRpm } from "@electron-forge/maker-rpm";
import { WebpackPlugin } from "@electron-forge/plugin-webpack";
import { mainConfig } from "./webpack.main.config";
import { rendererConfig } from "./webpack.renderer.config";

const config: ForgeConfig = {
  packagerConfig: {},
  rebuildConfig: {},
  makers: [
    new MakerSquirrel({}),
    new MakerZIP({}, ["darwin"]),
    new MakerRpm({}),
    new MakerDeb({}),
  ],
  plugins: [
    new WebpackPlugin({
      mainConfig,
      renderer: {
        config: rendererConfig,
        entryPoints: [
          {
            html: "./src/renderer/index.html",
            js: "./src/renderer/index.tsx",
            name: "main_window",
            preload: {
              js: "./src/renderer/preload.ts",
            },
          },
        ],
      },
    }),
  ],
};

export default config;
次にwebpack.main.config.tsを編集します。
import type { Configuration } from "webpack";

import { rules } from "./webpack.rules";

export const mainConfig: Configuration = {
  /**
   * This is the main entry point for your application, it's the first file
   * that runs in the main process.
   */
  entry: "./src/main/main.ts",
  // Put your normal webpack config below here
  module: {
    rules,
  },
  resolve: {
    extensions: [".js", ".ts", ".jsx", ".tsx", ".css", ".json"],
    modules: ["./src", "./node_modules"],
  },
};
webpack.renderer.config.tsも書き換えておきましょう。
import type { Configuration } from "webpack";
import { rules } from "./webpack.rules";
import { plugins } from "./webpack.plugins";

rules.push({
  test: /\.css$/,
  use: [{ loader: "style-loader" }, { loader: "css-loader" }],
});

export const rendererConfig: Configuration = {
  module: {
    rules,
  },
  plugins,
  resolve: {
    extensions: [".js", ".ts", ".jsx", ".tsx", ".css"],
    modules: ["./src", "./node_modules"],
  },
};
次はtsconfig.jsonの設定をします。これをしないとReactが書けません。jsxの記述を追加します。
{
  "compilerOptions": {
    "target": "ES6",
    "allowJs": true,
    "module": "commonjs",
    "skipLibCheck": true,
    "esModuleInterop": true,
    "noImplicitAny": true,
    "sourceMap": true,
    "baseUrl": "./src",
    "outDir": "dist",
    "moduleResolution": "node",
    "resolveJsonModule": true,
    "strict": true,
    "jsx": "react-jsx",
    "types": ["node"]
  },
  "include": ["src/**/*"]
}
次にsrc/renderer配下にApp.tsxを作り以下のコードを書きます。
const App = () => {
  return <div>App</div>;
};

export default App;
次にindex.tsxでReactでレンダリングする処理を書きます。index.tsxを以下のように変更します。
import React from "react";
import ReactDOM from "react-dom/client";
import App from "renderer/App";
import "renderer/index.css";

const root = ReactDOM.createRoot(
  document.getElementById("root") as HTMLElement
);

root.render(
  <React.StrictMode>
    <App />
  </React.StrictMode>
);
HTMLを書き換えてidがrootのdivを作ります。
<!DOCTYPE html>
<html lang="ja">
  <head>
    <meta charset="UTF-8" />
    <!-- <meta
      http-equiv="Content-Security-Policy"
      content="script-src 'self' 'unsafe-inline'"
    /> -->
    <meta name="viewport" content="width=device-width, initial-scale=1.0" />
    <title>Electron My App</title>
  </head>
  <body>
    <!-- React アプリのマウントポイント -->
    <div id="root"></div>
  </body>
</html>
これでアプリケーションが正しく動くようになったはずです。一度、以下のコマンドを実行し、画面にAppと表示されるのを確認しましょう。
yarn start
メインプロセスとメニューの整理
Reactを組み込めたので、次はメインプロセス関連のコードを書いていきます。ウィンドウの上部に表示されるメニューの項目の編集と、ウィンドウを描画する部分の処理を書き換えていきましょう。
まずはメニューを作っていきます。src/mainフォルダにmenu.tsというファイルを作ってい以下のように記述しましょう。
import {
  app,
  Menu,
  shell,
  BrowserWindow,
  MenuItemConstructorOptions,
} from "electron";

interface DarwinMenuItemConstructorOptions extends MenuItemConstructorOptions {
  selector?: string;
  submenu?: DarwinMenuItemConstructorOptions[] | Menu;
}

export default class MenuBuilder {
  mainWindow: BrowserWindow;

  constructor(mainWindow: BrowserWindow) {
    this.mainWindow = mainWindow;
  }

  buildMenu(): Menu {
    if (
      process.env.NODE_ENV === "development" ||
      process.env.DEBUG_PROD === "true"
    ) {
      this.setupDevelopmentEnvironment();
    }

    const template =
      process.platform === "darwin"
        ? this.buildDarwinTemplate()
        : this.buildDefaultTemplate();

    const menu = Menu.buildFromTemplate(template);
    Menu.setApplicationMenu(menu);

    return menu;
  }

  setupDevelopmentEnvironment(): void {
    this.mainWindow.webContents.on("context-menu", (_, props) => {
      const { x, y } = props;

      Menu.buildFromTemplate([
        {
          label: "Inspect element",
          click: () => {
            this.mainWindow.webContents.inspectElement(x, y);
          },
        },
      ]).popup({ window: this.mainWindow });
    });
  }

  buildDarwinTemplate(): MenuItemConstructorOptions[] {
    const subMenuAbout: DarwinMenuItemConstructorOptions = {
      label: "Electron",
      submenu: [
        {
          label: "About ElectronReact",
          selector: "orderFrontStandardAboutPanel:",
        },
        { type: "separator" },
        { label: "Services", submenu: [] },
        { type: "separator" },
        {
          label: "Hide ElectronReact",
          accelerator: "Command+H",
          selector: "hide:",
        },
        {
          label: "Hide Others",
          accelerator: "Command+Shift+H",
          selector: "hideOtherApplications:",
        },
        { label: "Show All", selector: "unhideAllApplications:" },
        { type: "separator" },
        {
          label: "Quit",
          accelerator: "Command+Q",
          click: () => {
            app.quit();
          },
        },
      ],
    };
    const subMenuEdit: DarwinMenuItemConstructorOptions = {
      label: "Edit",
      submenu: [
        { label: "Undo", accelerator: "Command+Z", selector: "undo:" },
        { label: "Redo", accelerator: "Shift+Command+Z", selector: "redo:" },
        { type: "separator" },
        { label: "Cut", accelerator: "Command+X", selector: "cut:" },
        { label: "Copy", accelerator: "Command+C", selector: "copy:" },
        { label: "Paste", accelerator: "Command+V", selector: "paste:" },
        {
          label: "Select All",
          accelerator: "Command+A",
          selector: "selectAll:",
        },
      ],
    };
    const subMenuViewDev: MenuItemConstructorOptions = {
      label: "View",
      submenu: [
        {
          label: "Reload",
          accelerator: "Command+R",
          click: () => {
            this.mainWindow.webContents.reload();
          },
        },
        {
          label: "Toggle Full Screen",
          accelerator: "Ctrl+Command+F",
          click: () => {
            this.mainWindow.setFullScreen(!this.mainWindow.isFullScreen());
          },
        },
        {
          label: "Toggle Developer Tools",
          accelerator: "Alt+Command+I",
          click: () => {
            this.mainWindow.webContents.toggleDevTools();
          },
        },
      ],
    };
    const subMenuViewProd: MenuItemConstructorOptions = {
      label: "View",
      submenu: [
        {
          label: "Toggle Full Screen",
          accelerator: "Ctrl+Command+F",
          click: () => {
            this.mainWindow.setFullScreen(!this.mainWindow.isFullScreen());
          },
        },
      ],
    };
    const subMenuWindow: DarwinMenuItemConstructorOptions = {
      label: "Window",
      submenu: [
        {
          label: "Minimize",
          accelerator: "Command+M",
          selector: "performMiniaturize:",
        },
        { label: "Close", accelerator: "Command+W", selector: "performClose:" },
        { type: "separator" },
        { label: "Bring All to Front", selector: "arrangeInFront:" },
      ],
    };
    const subMenuHelp: MenuItemConstructorOptions = {
      label: "Help",
      submenu: [
        {
          label: "Learn More",
          click() {
            shell.openExternal("https://electronjs.org");
          },
        },
        {
          label: "Documentation",
          click() {
            shell.openExternal(
              "https://github.com/electron/electron/tree/main/docs#readme"
            );
          },
        },
        {
          label: "Community Discussions",
          click() {
            shell.openExternal("https://www.electronjs.org/community");
          },
        },
        {
          label: "Search Issues",
          click() {
            shell.openExternal("https://github.com/electron/electron/issues");
          },
        },
      ],
    };

    const subMenuView =
      process.env.NODE_ENV === "development" ||
      process.env.DEBUG_PROD === "true"
        ? subMenuViewDev
        : subMenuViewProd;

    return [subMenuAbout, subMenuEdit, subMenuView, subMenuWindow, subMenuHelp];
  }

  buildDefaultTemplate() {
    const templateDefault = [
      {
        label: "&ファイル",
        submenu: [
          {
            label: "&開く",
            accelerator: "Ctrl+O",
          },
          {
            label: "&閉じる",
            accelerator: "Ctrl+W",
            click: () => {
              this.mainWindow.close();
            },
          },
        ],
      },
      {
        label: "&表示",
        submenu:
          process.env.NODE_ENV === "development" ||
          process.env.DEBUG_PROD === "true"
            ? [
                {
                  label: "&再読み込み",
                  accelerator: "Ctrl+R",
                  click: () => {
                    this.mainWindow.webContents.reload();
                  },
                },
                {
                  label: "&フルスクリーン",
                  accelerator: "F11",
                  click: () => {
                    this.mainWindow.setFullScreen(
                      !this.mainWindow.isFullScreen()
                    );
                  },
                },
                {
                  label: "&Developer Tools",
                  accelerator: "Alt+Ctrl+I",
                  click: () => {
                    this.mainWindow.webContents.toggleDevTools();
                  },
                },
              ]
            : [
                {
                  label: "&フルスクリーン",
                  accelerator: "F11",
                  click: () => {
                    this.mainWindow.setFullScreen(
                      !this.mainWindow.isFullScreen()
                    );
                  },
                },
              ],
      },
      {
        label: "ヘルプ",
        submenu: [
          {
            label: "Electron公式",
            click() {
              shell.openExternal("https://electronjs.org");
            },
          },
          {
            label: "Electron リポジトリ",
            click() {
              shell.openExternal(
                "https://github.com/electron/electron/tree/main/docs#readme"
              );
            },
          },
          {
            label: "Electron コミュニティ",
            click() {
              shell.openExternal("https://www.electronjs.org/community");
            },
          },
          {
            label: "Electron Issues",
            click() {
              shell.openExternal("https://github.com/electron/electron/issues");
            },
          },
        ],
      },
    ];

    return templateDefault;
  }
}
次にmain.tsの処理を書き換えてメニューを呼び出します。一緒にウィンドウの描画処理を少し変えます。
import { app, BrowserWindow } from "electron";
import fsFunctionListener from "./functions/fsFunction";
import shellFunctionListener from "./functions/shellFunction";
import testFunctionListener from "./functions/testFunction";
import MenuBuilder from "./menu";
// This allows TypeScript to pick up the magic constants that's auto-generated by Forge's Webpack
// plugin that tells the Electron app where to look for the Webpack-bundled app code (depending on
// whether you're running in development or production).
declare const MAIN_WINDOW_WEBPACK_ENTRY: string;
declare const MAIN_WINDOW_PRELOAD_WEBPACK_ENTRY: string;

let mainWindow: BrowserWindow | null = null;

// Handle creating/removing shortcuts on Windows when installing/uninstalling.
if (require("electron-squirrel-startup")) {
  app.quit();
}

const createWindow = async () => {
  mainWindow = new BrowserWindow({
    width: 1024,
    height: 728,
    webPreferences: {
      // webpack が出力したプリロードスクリプトを読み込み
      preload: MAIN_WINDOW_PRELOAD_WEBPACK_ENTRY,
      devTools: true,
    },
  });

  // レンダラープロセスをロード
  mainWindow.loadURL(MAIN_WINDOW_WEBPACK_ENTRY);

  mainWindow.on("ready-to-show", () => {
    if (!mainWindow) {
      throw new Error('"mainWindow" is not defined');
    }
    if (process.env.START_MINIMIZED) {
      mainWindow.minimize();
    } else {
      mainWindow.show();
    }
  });

  mainWindow.on("closed", () => {
    mainWindow = null;
  });

  const menuBuilder = new MenuBuilder(mainWindow);
  menuBuilder.buildMenu();
};

app.whenReady().then(() => {
  // アプリの起動イベント発火で BrowserWindow インスタンスを作成
  createWindow();
});

// Quit when all windows are closed, except on macOS. There, it's common
// for applications and their menu bar to stay active until the user quits
// explicitly with Cmd + Q.
app.on("window-all-closed", () => {
  if (process.platform !== "darwin") {
    app.quit();
  }
});

app.on("activate", () => {
  // On OS X it's common to re-create a window in the app when the
  // dock icon is clicked and there are no other windows open.
  if (BrowserWindow.getAllWindows().length === 0) {
    createWindow();
  }
});

// In this file you can include the rest of your app's specific main process
// code. You can also put them in separate files and import them here.
これで一度起動してみましょう。メニュー欄が変わって日本語表記になったかと思います。このあたりは正直筆者も理解していない部分が多く、解説ができなくて申し訳ない...。デバッグモード時とパッケージング時で表示するメニューを変えているような感じです。今回はメニュー関連は扱わず、とりあえずレンダラーとメインの通信の部分を解説したいので、飛ばしていきます。
レンダラーからメインのコンソールに文字を表示する
ではElectronで一番実現したい、メインとレンダラーの通信を書いていきます。基本的に以下のような構成で作っていきます。
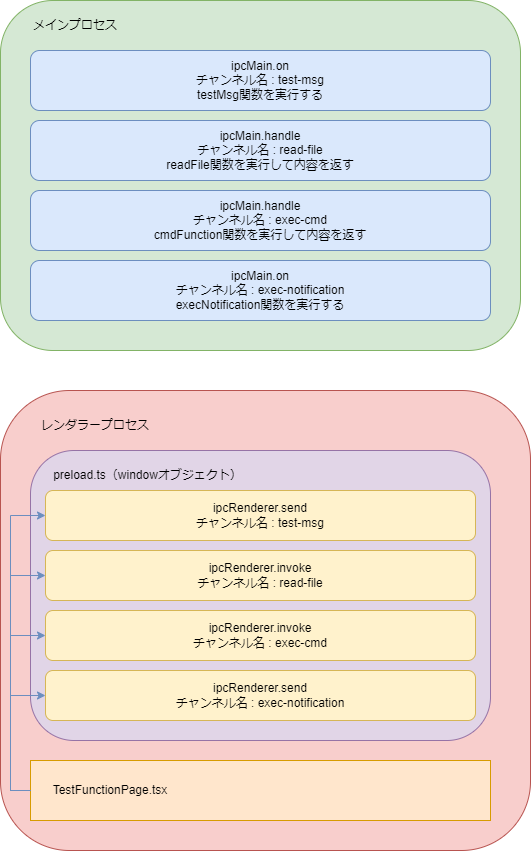
レンダラーとメインは直接つながっていません。これによってモジュールの結合を弱くし、強度を上げることができます。基本的にはメインプロセスでipcMain.onやipcMain.hendleでレンダラーからの処理のリクエストの窓口を作り、それぞれチャンネル名を設定しておきます。レンダラープロセスのpreload.tsではipcRenderer.sendやipcRenderer.invokeでメインプロセスのonやhandleで作った窓口にアクセスします。その時に、メインプロセスで設定したチャンネル名を指定することで目的の関数を呼び出すことができます。preload内の関数を呼び出すには、preload内の関数をwindowオブジェクトに組み込み、それをレンダラーのページから呼び出します。厳密には、windowオブジェクトを使ってelectronの関数を呼び出す部分はページには書かないほうがモジュールの結合度が下がりますが、今回はファイル数を増やしてややこしくしたくないので、ページから直接呼び出します。
メインプロセスに関数を作る
ではまずtestMsgという、コンソールに文字を表示するだけの関数をメインプロセス側に作りましょう。mainフォルダ内にfunctionsというフォルダを作成し、その中にtestFunction.tsというファイルを作成し、以下のように記述します。
import { ipcMain } from "electron";

/**
 * 引数で受け取った文字列をコンソールに出すだけの関数
 * @param msg 表示したい文字列
 */
const testMsg = (msg: string) => {
  console.log(msg);
};

/**
 * レンダラーから通知を受け取るリスナーを立てる処理
 */
const testFunctionListener = () => {
  // メインプロセスで"on"としておくと、レンダラーで"send"したときに
  // 通知を受け取り、対応するチャンネル名(今回はtest-msg)の処理が実行される
  // つまりこの関数を呼ぶときはレンダラーでipcRenderer.send("test-msg", [文字列])とすればいい
  ipcMain.on("test-msg", (event, [msg]: string[]) => testMsg(msg));
};

export default testFunctionListener;
testFunctionListenerという関数の中で、ipcMain.onという関数を実行しています。これをしておくことで、test-msgというチャンネル名でレンダラーからリクエストがあったときに、testMsgという関数を実行します。そしたら次はこれを実際に呼び出せるように、main.tsでimportして実行します。
import { app, BrowserWindow } from "electron";
import fsFunctionListener from "./functions/fsFunction";
import shellFunctionListener from "./functions/shellFunction";
import testFunctionListener from "./functions/testFunction";
import MenuBuilder from "./menu";
// This allows TypeScript to pick up the magic constants that's auto-generated by Forge's Webpack
// plugin that tells the Electron app where to look for the Webpack-bundled app code (depending on
// whether you're running in development or production).
declare const MAIN_WINDOW_WEBPACK_ENTRY: string;
declare const MAIN_WINDOW_PRELOAD_WEBPACK_ENTRY: string;

let mainWindow: BrowserWindow | null = null;

//#region eventListeners
// 各Functionをレンダラーから呼び出せるように
// 中でipcMain.onなどを行い、ここで実行
testFunctionListener();
//#endregion

// Handle creating/removing shortcuts on Windows when installing/uninstalling.
if (require("electron-squirrel-startup")) {
  app.quit();
}

const createWindow = async () => {
  mainWindow = new BrowserWindow({
    width: 1024,
    height: 728,
    webPreferences: {
      // webpack が出力したプリロードスクリプトを読み込み
      preload: MAIN_WINDOW_PRELOAD_WEBPACK_ENTRY,
      devTools: true,
    },
  });

  // レンダラープロセスをロード
  mainWindow.loadURL(MAIN_WINDOW_WEBPACK_ENTRY);

  mainWindow.on("ready-to-show", () => {
    if (!mainWindow) {
      throw new Error('"mainWindow" is not defined');
    }
    if (process.env.START_MINIMIZED) {
      mainWindow.minimize();
    } else {
      mainWindow.show();
    }
  });

  mainWindow.on("closed", () => {
    mainWindow = null;
  });

  const menuBuilder = new MenuBuilder(mainWindow);
  menuBuilder.buildMenu();
};

app.whenReady().then(() => {
  // アプリの起動イベント発火で BrowserWindow インスタンスを作成
  createWindow();
});

// Quit when all windows are closed, except on macOS. There, it's common
// for applications and their menu bar to stay active until the user quits
// explicitly with Cmd + Q.
app.on("window-all-closed", () => {
  if (process.platform !== "darwin") {
    app.quit();
  }
});

app.on("activate", () => {
  // On OS X it's common to re-create a window in the app when the
  // dock icon is clicked and there are no other windows open.
  if (BrowserWindow.getAllWindows().length === 0) {
    createWindow();
  }
});

// In this file you can include the rest of your app's specific main process
// code. You can also put them in separate files and import them here.
これでメインプロセス側のコーディングは終わりです。次にpreloadを記述していきます。
レンダラーからメインプロセスの関数を呼ぶ処理を記述する
preload.tsに以下のように記述します。
import {
  contextBridge,
  ipcRenderer,
} from "electron";

// レンダラープロセスとメインプロセスの通信はこちらで定義する
const electronHandler = {
  test: {
    sendTest: (testMsg: string) => {
      ipcRenderer.send("test-msg", [testMsg]);
    },
  },
};

contextBridge.exposeInMainWorld("electron", electronHandler);

export type ElectronHandler = typeof electronHandler;
electronHandlerの中身は任意のオブジェクト型です。ページから呼び出す際にこのオブジェクトの型に従って呼び出せます。ここではipcRenderer.sendとすることでメインプロセス側のipcMain.onに対してリクエストを飛ばすことができます。またその際に、チャンネル名もメインプロセスで定義したものにしてあげることで目的の関数を呼び出すことが可能になります。
次にpreload.tsで定義してエクスポートしたelectronHandlerの型をインポートし、winodowオブジェクトのインターフェースにelectron型として追加します。srcフォルダ配下にpreload.d.tsというファイルを作成し、以下のように記述します。
import { ElectronHandler } from "renderer/preload";

declare global {
  // windowからpreloadで定義したelectronHandlerを呼び出せるように型を追加
  interface Window {
    electron: ElectronHandler;
  }
}

export {};
これでページから呼び出す準備ができました。
ページを作成する
さっそくページを作成していきます。ページを遷移する処理が通常のReactとほんの少しだけ違うので、react-router-domを利用したルーティングも行っていきましょう。まずreact-router-domをインストールします。
yarn add react-router-dom
インストールできたら、src/renderer/pagesというフォルダを作成します。そのフォルダ内にIndexPage.tsxとFunctionTestPage.tsxというファイルを作成し、以下のように記述します。
import { useNavigate } from "react-router-dom";

const IndexPage = () => {
  const navigate = useNavigate();

  return (
    <div>
      <h1>IndexPage</h1>
      <button
        onClick={() => {
          navigate("function_test");
        }}
      >
        機能テストページへ
      </button>
    </div>
  );
};

export default IndexPage;
こちらのページでpreloadで定義した関数を呼び出しています。window.electron.hogehogeで呼び出せます。
import { useState } from "react";

const FunctionTestPage = () => {
  const sendTestMsg = () => {
    window.electron.test.sendTest("this is testMessage");
  };

  return (
    <div
      style={{
        display: "flex",
        flexDirection: "column",
        alignItems: "start",
        gap: "10px",
      }}
    >
      <h1>機能テストページ</h1>
      <button onClick={sendTestMsg}>testMsg呼び出し</button>
    </div>
  );
};

export default FunctionTestPage;
次にルーターを作成します。ElectronではBrowserRouterでなくMemoryRouterというコンポーネントで囲みます。
import { MemoryRouter, Outlet, Route, Routes } from "react-router-dom";
import FunctionTestPage from "./pages/FunctionTestPage";
import IndexPage from "./pages/IndexPage";

const Router = () => {
  return (
    <MemoryRouter>
      <Routes>
        <Route path="/" element={<Outlet />}>
          <Route index element={<IndexPage />} />
          <Route path="function_test" element={<FunctionTestPage />} />
        </Route>
      </Routes>
    </MemoryRouter>
  );
};

export default Router;
次にこのルーターをApp.tsxでimportします。
import Router from "renderer/Router";

const App = () => {
  return (
    <div>
      App
      <Router />
    </div>
  );
};

export default App;
これで再度実行してみましょう。こんな感じの表示になったかと思います。
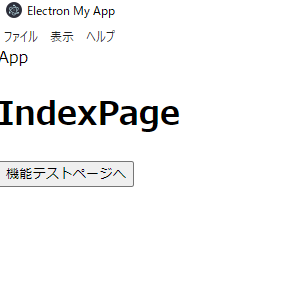
機能テストページへというボタンを押してみましょう。するとテストページが表示されるので、testMsg呼び出しというボタンをクリックしてみます。画面上には何も表示されませんが、yarn startしたコマンド画面上にthis is testMessageというメッセージが表示されると思います。

これでレンダラー側からメインプロセスの関数を呼び出すことに成功しました!
コンソールに文字を表示するだけじゃ面白くないので、いろいろな関数を作って呼び出してみましょう。
OSのコマンドを実行してみる
コマンドプロンプトで実行できるコマンドを実行できるようにしていきましょう。
メインプロセスに関数を作成する
メインプロセスでコマンドを実行するために、child_processというモジュールを使います。また、コマンドの実行時に返ってくる文字のコードがShiftJISなので、それをUnicodeに変換するために、encoding-japaneseもインストールします。
yarn add child_process encoding-japanese
インストールできたら、src/main/functionsフォルダ内にshellFunction.tsを作成します。
import {
  ipcMain,
  NotificationConstructorOptions,
  Notification,
} from "electron";
import { promisify } from "util";
const childProcess = require("child_process");
const Encoding = require("encoding-japanese");

/**
 * s-jisをUnicodeに変換する関数
 * @param bytes s-jisの文字列
 * @returns
 */
export const SJIStoUNICODE = (bytes: string) => {
  return Encoding.convert(bytes, {
    from: "SJIS",
    to: "UNICODE",
    type: "string",
  });
};

/**
 * コマンドを実行する関数
 * @param cmd 実行したいコマンド
 * @returns コマンドの実行結果
 */
const cmdFunction = async (cmd: string): Promise<string> => {
  const exec = promisify(childProcess.exec);
  try {
    const result = await exec(cmd, { encoding: "Shift_JIS" });
    if (result?.error) {
      const errorstr = SJIStoUNICODE(result.error);
      return errorstr;
    }

    const stdout = SJIStoUNICODE(result.stdout);

    return stdout;
  } catch (err) {
    console.error(err);
    return "コマンドが不正です";
  }
};

const shellFunctionListener = () => {
  // 戻り値のあるものは"handle"でリスナーを立てて、
  // レンダラー側はinvokeを使って
  ipcMain.handle(
    "exec-cmd",
    async (event, [cmd]: string[]) => await cmdFunction(cmd)
  );
};

export default shellFunctionListener;
今回はコマンドを実行した後にその結果をレンダラーに返したいので、onではなくhandleというものを使います。
次にこれをmain.tsでimportして実行します。
import { app, BrowserWindow } from "electron";
import fsFunctionListener from "./functions/fsFunction";
import shellFunctionListener from "./functions/shellFunction";
import testFunctionListener from "./functions/testFunction";
import MenuBuilder from "./menu";
// This allows TypeScript to pick up the magic constants that's auto-generated by Forge's Webpack
// plugin that tells the Electron app where to look for the Webpack-bundled app code (depending on
// whether you're running in development or production).
declare const MAIN_WINDOW_WEBPACK_ENTRY: string;
declare const MAIN_WINDOW_PRELOAD_WEBPACK_ENTRY: string;

let mainWindow: BrowserWindow | null = null;

//#region eventListeners
// 各Functionをレンダラーから呼び出せるように
// 中でipcMain.onなどを行い、ここで実行
testFunctionListener();
shellFunctionListener();
//#endregion

// Handle creating/removing shortcuts on Windows when installing/uninstalling.
if (require("electron-squirrel-startup")) {
  app.quit();
}

const createWindow = async () => {
  mainWindow = new BrowserWindow({
    width: 1024,
    height: 728,
    webPreferences: {
      // webpack が出力したプリロードスクリプトを読み込み
      preload: MAIN_WINDOW_PRELOAD_WEBPACK_ENTRY,
      devTools: true,
    },
  });

  // レンダラープロセスをロード
  mainWindow.loadURL(MAIN_WINDOW_WEBPACK_ENTRY);

  mainWindow.on("ready-to-show", () => {
    if (!mainWindow) {
      throw new Error('"mainWindow" is not defined');
    }
    if (process.env.START_MINIMIZED) {
      mainWindow.minimize();
    } else {
      mainWindow.show();
    }
  });

  mainWindow.on("closed", () => {
    mainWindow = null;
  });

  const menuBuilder = new MenuBuilder(mainWindow);
  menuBuilder.buildMenu();
};

app.whenReady().then(() => {
  // アプリの起動イベント発火で BrowserWindow インスタンスを作成
  createWindow();
});

// Quit when all windows are closed, except on macOS. There, it's common
// for applications and their menu bar to stay active until the user quits
// explicitly with Cmd + Q.
app.on("window-all-closed", () => {
  if (process.platform !== "darwin") {
    app.quit();
  }
});

app.on("activate", () => {
  // On OS X it's common to re-create a window in the app when the
  // dock icon is clicked and there are no other windows open.
  if (BrowserWindow.getAllWindows().length === 0) {
    createWindow();
  }
});

// In this file you can include the rest of your app's specific main process
// code. You can also put them in separate files and import them here.
メインプロセスにリクエストする処理を書く
preload.tsを以下のように書き換えてみましょう。
import {
  contextBridge,
  ipcRenderer,
} from "electron";

// レンダラープロセスとメインプロセスの通信はこちらで定義する
const electronHandler = {
  test: {
    sendTest: (testMsg: string) => {
      ipcRenderer.send("test-msg", [testMsg]);
    },
  },
  shell: {
    execCmd: async (cmd: string): Promise<string> => {
      return await ipcRenderer.invoke("exec-cmd", [cmd]);
    },
  },
  },
};

contextBridge.exposeInMainWorld("electron", electronHandler);

export type ElectronHandler = typeof electronHandler;
今回はsendではなくinvokeというものを使っています。戻り値を受け取りたい場合は、ipcMain.handleに対してipcRenderer.invokeでリクエストするというのを覚えておきましょう。
ではページからこれを使ってみましょう。
import { useState } from "react";

const FunctionTestPage = () => {
  // コマンドを入れておくState
  const [cmdState, setCmdState] = useState("");
  const [cmdResultState, setCmdResultState] = useState("");

  const sendTestMsg = () => {
    window.electron.test.sendTest("this is testMessage");
  };
  const execCmd = async () => {
    const cmdResult = await window.electron.shell.execCmd(cmdState);
    setCmdResultState(cmdResult);
  };

  return (
    <div
      style={{
        display: "flex",
        flexDirection: "column",
        alignItems: "start",
        gap: "10px",
      }}
    >
      <h1>機能テストページ</h1>
      <button onClick={sendTestMsg}>testMsg呼び出し</button>
      <div
        style={{
          display: "flex",
          flexDirection: "column",
          border: "1px solid",
          padding: "5px 10px 10px 10px",
        }}
      >
        <p>コマンドテスト</p>
        <div style={{ display: "flex", flexDirection: "row" }}>
          <input
            type="text"
            value={cmdState}
            onChange={(e) => {
              setCmdState(e.target.value);
            }}
            placeholder={"コマンド"}
          />
          <button onClick={execCmd}>実行</button>
        </div>
        <textarea value={cmdResultState} placeholder={"実行結果"} />
      </div>
    </div>
  );
};

export default FunctionTestPage;
ページ側は特に特殊なことはやってません。これで起動してコマンドを実行してみましょう。dirやipconfigなどがいいかと思います。
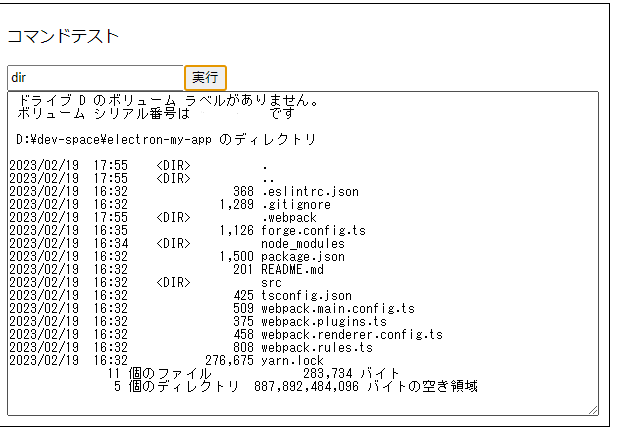
こんな感じでコマンド実行できれば成功です。
ファイルアクセス処理
次はファイルアクセスしてみましょう。読み込みが簡単なので読み込みをやっていきましょう。
メインプロセスの処理を書く
まずファイルアクセスする関数を作りましょう。src/main/functionsフォルダにfsFunction.tsというファイルを作成し以下のように記述します。
import { ipcMain } from "electron";
import { readFileSync } from "fs";

/**
 * ファイルを読み込んで中身を返す関数
 * @param filePath ファイルのパス
 * @returns ファイルの中身。ファイルが存在しない場合はその旨を返す。
 */
const readFile = (filePath: string) => {
  try {
    const fileData = readFileSync(filePath, { encoding: "utf-8" });
    return fileData;
  } catch (err) {
    return "ファイルが存在しません";
  }
};

const fsFunctionListener = () => {
  ipcMain.handle("read-file", async (event, [filePath]: string[]) =>
    readFile(filePath)
  );
};

export default fsFunctionListener;
ここの処理はあまり特殊なことはやっておらず、普通にfsを使ってファイルの中身を読み込んでいます。ただ、なぜか非同期処理でやろうとするとうまくいかないため、readFileSyncで同期処理を行います。
次にmain.tsでimportし実行します。
import { app, BrowserWindow } from "electron";
import fsFunctionListener from "./functions/fsFunction";
import shellFunctionListener from "./functions/shellFunction";
import testFunctionListener from "./functions/testFunction";
import MenuBuilder from "./menu";
// This allows TypeScript to pick up the magic constants that's auto-generated by Forge's Webpack
// plugin that tells the Electron app where to look for the Webpack-bundled app code (depending on
// whether you're running in development or production).
declare const MAIN_WINDOW_WEBPACK_ENTRY: string;
declare const MAIN_WINDOW_PRELOAD_WEBPACK_ENTRY: string;

let mainWindow: BrowserWindow | null = null;

//#region eventListeners
// 各Functionをレンダラーから呼び出せるように
// 中でipcMain.onなどを行い、ここで実行
testFunctionListener();
shellFunctionListener();
fsFunctionListener();
//#endregion

// Handle creating/removing shortcuts on Windows when installing/uninstalling.
if (require("electron-squirrel-startup")) {
  app.quit();
}

const createWindow = async () => {
  mainWindow = new BrowserWindow({
    width: 1024,
    height: 728,
    webPreferences: {
      // webpack が出力したプリロードスクリプトを読み込み
      preload: MAIN_WINDOW_PRELOAD_WEBPACK_ENTRY,
      devTools: true,
    },
  });

  // レンダラープロセスをロード
  mainWindow.loadURL(MAIN_WINDOW_WEBPACK_ENTRY);

  mainWindow.on("ready-to-show", () => {
    if (!mainWindow) {
      throw new Error('"mainWindow" is not defined');
    }
    if (process.env.START_MINIMIZED) {
      mainWindow.minimize();
    } else {
      mainWindow.show();
    }
  });

  mainWindow.on("closed", () => {
    mainWindow = null;
  });

  const menuBuilder = new MenuBuilder(mainWindow);
  menuBuilder.buildMenu();
};

app.whenReady().then(() => {
  // アプリの起動イベント発火で BrowserWindow インスタンスを作成
  createWindow();
});

// Quit when all windows are closed, except on macOS. There, it's common
// for applications and their menu bar to stay active until the user quits
// explicitly with Cmd + Q.
app.on("window-all-closed", () => {
  if (process.platform !== "darwin") {
    app.quit();
  }
});

app.on("activate", () => {
  // On OS X it's common to re-create a window in the app when the
  // dock icon is clicked and there are no other windows open.
  if (BrowserWindow.getAllWindows().length === 0) {
    createWindow();
  }
});

// In this file you can include the rest of your app's specific main process
// code. You can also put them in separate files and import them here.
レンダラーからリクエストする処理を書く
ここからはもう恒例行事です。処理を淡々と書いていきましょう。
import {
  contextBridge,
  ipcRenderer,
} from "electron";

// レンダラープロセスとメインプロセスの通信はこちらで定義する
const electronHandler = {
  test: {
    sendTest: (testMsg: string) => {
      ipcRenderer.send("test-msg", [testMsg]);
    },
  },
  shell: {
    execCmd: async (cmd: string): Promise<string> => {
      return await ipcRenderer.invoke("exec-cmd", [cmd]);
    },
  },
  fs: {
    readFile: async (filePath: string) => {
      const data = await ipcRenderer.invoke("read-file", [filePath]);
      return data;
    },
  },
};

contextBridge.exposeInMainWorld("electron", electronHandler);

export type ElectronHandler = typeof electronHandler;
ページに処理を追加する
ページからelectronの処理を呼び出しましょう。
import { useState } from "react";

const FunctionTestPage = () => {
  // コマンドを入れておくState
  const [cmdState, setCmdState] = useState("");
  const [cmdResultState, setCmdResultState] = useState("");

  const [fileNameState, setFileNameState] = useState("README.md");
  const [fileContentState, setFileContentState] = useState("");

  const sendTestMsg = () => {
    window.electron.test.sendTest("this is testMessage");
  };

  const execCmd = async () => {
    const cmdResult = await window.electron.shell.execCmd(cmdState);
    setCmdResultState(cmdResult);
  };

  const readFile = async () => {
    const fileContent = await window.electron.fs.readFile(fileNameState);
    setFileContentState(fileContent);
  };

  return (
    <div
      style={{
        display: "flex",
        flexDirection: "column",
        alignItems: "start",
        gap: "10px",
      }}
    >
      <h1>機能テストページ</h1>
      <button onClick={sendTestMsg}>testMsg呼び出し</button>
      <div
        style={{
          display: "flex",
          flexDirection: "column",
          border: "1px solid",
          padding: "5px 10px 10px 10px",
        }}
      >
        <p>コマンドテスト</p>
        <div style={{ display: "flex", flexDirection: "row" }}>
          <input
            type="text"
            value={cmdState}
            onChange={(e) => {
              setCmdState(e.target.value);
            }}
            placeholder={"コマンド"}
          />
          <button onClick={execCmd}>実行</button>
        </div>
        <textarea value={cmdResultState} placeholder={"実行結果"} />
      </div>
      <div
        style={{
          display: "flex",
          flexDirection: "column",
          border: "1px solid",
          padding: "5px 10px 10px 10px",
        }}
      >
        <p>ファイルアクセステスト</p>
        <div style={{ display: "flex", flexDirection: "row" }}>
          <input
            type="text"
            value={fileNameState}
            onChange={(e) => {
              setFileNameState(e.target.value);
            }}
            placeholder={"ファイル名"}
          />
          <button onClick={readFile}>実行</button>
        </div>
        <textarea value={fileContentState} placeholder={"ファイルの内容"} />
      </div>
    </div>
  );
};

export default FunctionTestPage;
これでファイルへのアクセスが可能になりました。とりあえずReadmeを表示するようにしてみました。
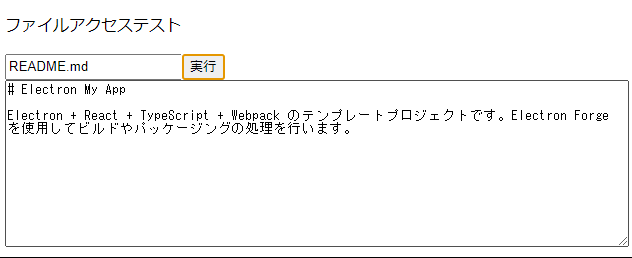
今回書いたコードではプロジェクトフォルダがルートディレクトリとなっているため、electron-my-appディレクトリ直下に置いたファイルにアクセスすることができます。
OSの通知機能を使う
最後にOS標準の通知機能を呼び出してみましょう。Windowsでは画面の右下から出てくるアレです。
メインプロセスの処理を書く
さてここからはもう伝統芸能みたいなもんです。基本的にNode.jsのサーバ側でできる処理は大体なんでもできます。ただ、今回のこの通知の機能はnode.jsの標準処理にないため、Electronの機能を使っていきます。
import {
  ipcMain,
  NotificationConstructorOptions,
  shell,
  Notification,
} from "electron";
import { promisify } from "util";
const childProcess = require("child_process");
const Encoding = require("encoding-japanese");

/**
 * s-jisをUnicodeに変換する関数
 * @param bytes s-jisの文字列
 * @returns
 */
export const SJIStoUNICODE = (bytes: string) => {
  return Encoding.convert(bytes, {
    from: "SJIS",
    to: "UNICODE",
    type: "string",
  });
};

/**
 * コマンドを実行する関数
 * @param cmd 実行したいコマンド
 * @returns コマンドの実行結果
 */
const cmdFunction = async (cmd: string): Promise<string> => {
  const exec = promisify(childProcess.exec);
  try {
    const result = await exec(cmd, { encoding: "Shift_JIS" });
    if (result?.error) {
      const errorstr = SJIStoUNICODE(result.error);
      return errorstr;
    }

    const stdout = SJIStoUNICODE(result.stdout);

    return stdout;
  } catch (err) {
    console.error(err);
    return "コマンドが不正です";
  }
};

/**
 * OSの通知を実行する関数
 * @param notificationOptions 通知のオプション
 */
const execNotification = (
  notificationOptions: NotificationConstructorOptions
) => {
  new Notification(notificationOptions).show();
};

const shellFunctionListener = () => {
  // 戻り値のあるものは"handle"でリスナーを立てて、
  // レンダラー側はinvokeを使って
  ipcMain.handle(
    "exec-cmd",
    async (event, [cmd]: string[]) => await cmdFunction(cmd)
  );
  ipcMain.on(
    "exec-notification",
    (event, [notificationOptions]: NotificationConstructorOptions[]) =>
      execNotification(notificationOptions)
  );
};

export default shellFunctionListener;
結構簡単に実装できますね。使いどころは少ないかもですが...。
レンダラーからリクエストする処理を書く
こちらもさっきまでと同じです。
import {
  contextBridge,
  ipcRenderer,
  NotificationConstructorOptions,
} from "electron";

// レンダラープロセスとメインプロセスの通信はこちらで定義する
const electronHandler = {
  test: {
    sendTest: (testMsg: string) => {
      ipcRenderer.send("test-msg", [testMsg]);
    },
  },
  shell: {
    execNotification: (notificationOption: NotificationConstructorOptions) => {
      ipcRenderer.send("exec-notification", [notificationOption]);
    },
    execCmd: async (cmd: string): Promise<string> => {
      return await ipcRenderer.invoke("exec-cmd", [cmd]);
    },
  },
  fs: {
    readFile: async (filePath: string) => {
      const data = await ipcRenderer.invoke("read-file", [filePath]);
      return data;
    },
  },
};

contextBridge.exposeInMainWorld("electron", electronHandler);

export type ElectronHandler = typeof electronHandler;
ここも特筆すべき点はありません。
ページから呼び出す処理を書く
これももう何も変わったことはやってません。とりあえず書いていきましょう。
import { NotificationConstructorOptions } from "electron";
import { useState } from "react";
const FunctionTestPage = () => {
// コマンドを入れておくState
const [cmdState, setCmdState] = useState("");
const [cmdResultState, setCmdResultState] = useState("");
const [fileNameState, setFileNameState] = useState("README.md");
const [fileContentState, setFileContentState] = useState("");
const sendTestMsg = () => {
window.electron.test.sendTest("this is testMessage");
};
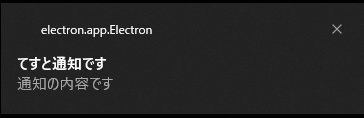
const execNotification = () => {
const notificationOptions: NotificationConstructorOptions = {
title: "てすと通知です",
body: "通知の内容です",
};
window.electron.shell.execNotification(notificationOptions);
};
const execCmd = async () => {
const cmdResult = await window.electron.shell.execCmd(cmdState);
setCmdResultState(cmdResult);
};
const readFile = async () => {
const fileContent = await window.electron.fs.readFile(fileNameState);
setFileContentState(fileContent);
};
return (
<div
style={{
display: "flex",
flexDirection: "column",
alignItems: "start",
gap: "10px",
}}
>
<h1>機能テストページ</h1>
<button onClick={sendTestMsg}>testMsg呼び出し</button>
<button onClick={execNotification}>通知呼び出し</button>
<div
style={{
display: "flex",
flexDirection: "column",
border: "1px solid",
padding: "5px 10px 10px 10px",
}}
>
<p>コマンドテスト</p>
<div style={{ display: "flex", flexDirection: "row" }}>
<input
type="text"
value={cmdState}
onChange={(e) => {
setCmdState(e.target.value);
}}
placeholder={"コマンド"}
/>
<button onClick={execCmd}>実行</button>
</div>
<textarea value={cmdResultState} placeholder={"実行結果"} />
</div>
<div
style={{
display: "flex",
flexDirection: "column",
border: "1px solid",
padding: "5px 10px 10px 10px",
}}
>
<p>ファイルアクセステスト</p>
<div style={{ display: "flex", flexDirection: "row" }}>
<input
type="text"
value={fileNameState}
onChange={(e) => {
setFileNameState(e.target.value);
}}
placeholder={"ファイル名"}
/>
<button onClick={readFile}>実行</button>
</div>
<textarea value={fileContentState} placeholder={"ファイルの内容"} />
</div>
</div>
);
};
export default FunctionTestPage;
これで実行してみましょう。すると以下のように画面の右下から通知が表示されたと思います。
exeファイルにする
これまでとりあえずデバッグモードで動かしてましたが、実際はリリースexeファイルにして配布したりなどすると思います。今回はwebpackの設定は完了しているので、以下のコマンドを実行することでexe化できます。
yarn package
コマンドを実行すると、out/electron-my-app-win32-x64というフォルダ(コンパイルするPCのOSの種類によって名前が変わります)にelectron-my-app.exeというファイルができたと思います。これを実行すると、デバッグ時と同じように動くと思います。仕組みとしては、out/electron-my-app-win32-x64フォルダ内のrendererというフォルダの中にあるソースを実行している感じです。rendererフォルダ内にはwebpackでバンドルされたjsファイルが入っています。なので、アプリを配布する際はexeだけでなくフォルダごと配布することになります。これもexe単体で配れるようにできないかなーっていうのがあるので、気が向いたら検証してみようかと思います。
最後に
正直自分もまだ理解が深まってない部分が多々あるので間違っているところもあるかと思いますが、とりあえず動くものは作れるかと思います。セキュリティ的な部分などは考慮していないので、そのあたりはまた気が向いたら書いていきたいと思います。まずはElectronでアプリを作ってとりあえずexeにするところまでできることが目標なので、初心者の方が詰まらずにElectronのアプリを作る助けになればと思います。
不明な点などがあれば、Twitterやコメント欄で気軽にお願いします。